Models
You can create a model in a Model Manager database by, for example, saving the model opened in the COMSOL Desktop or by importing a model directly from the file system.
Every time you save a model, a new model version is created. This does not mean that a full copy of the model is saved anew in the database — Model Manager is able to reuse any data it finds unmodified between versions. This includes the model tree itself, any binary data used for geometries, meshes, solutions, and results, as well as any other data that the model may use. Once saved, a model version cannot be modified (except for clearing generated data that can be recreated from the model, that is, Built, Computed, and Plotted Data). You can be confident that what you save to the database will always be returned when opening the model version again, given that you open it in the same COMSOL Multiphysics version as the model version was originally saved in.
There is a subtle distinction between a model and all the versions of the model in a database. You set Access Control on the models themselves, while you open, save, search, and organize versions of the models. The same remark applies to any of the Items in a Model Manager database.
Item Version Types
Versions of models come in three different item version types:
Model (), which is the standard type obtained, for example, when creating a new model from the Model Builder.
Application (), which is a model that also has an application UI as defined in the Application Builder.
Physics (), which is the type obtained when saving from the Physics Builder.
You may notice that a model can start out as the first type for its first couple of versions, but then transition into the second type once you save a version in which you have added an application UI. The opposite transition will occur if you save a version in which you have removed the application UI.
Item Save Types
Models can be created in the database as two different item save types:
Regular (represented by one of the icons for Item Version Types)
Unlike Item Version Types, the item save type of a model is fixed for all its versions.
Regular Models
A regular model is one that has been created in the database by saving a new model via the Save window or by importing a model directly from the file system. You can think of a regular model as the main result of your modeling work. Each version represents a clear transition in which you made enough progress that it is worth keeping the version around for future reference. Perhaps you want to go back to one of the older model versions and from that create a completely new model (with its own set of model versions), or perhaps the model version that you save corresponds to a step in which your modeling work is completed, and it is time for your coworker to take over.
Drafts
A draft model is one that has been created by going to the File menu and selecting Save Draft (), or by pressing Ctrl+S, when a regular model is opened in the COMSOL Desktop.
A draft model is version controlled in the same way as a regular model: The first time you select Save Draft, a new draft model is created in the database. Selecting Save Draft after that will save new versions of that same draft model. You may think of a draft as an ancillary model used for saving intermediate changes, without muddying the version history of the main regular model.
The draft is automatically set with a Private permission template when you create a new draft in a server database accessed via a Model Manager server — see Predefined Permission Templates. Only you, as its owner, will be able to open or save the draft unless you change its permissions, although other users may still see it in search results.
The database stores a reference between the draft and the version of the regular model the draft originated from. This is analogous to how regular models created from existing models via Save as New in the Save window remembers their origin — see Splitting a Model Version History in Two. The stored reference enables Model Manager, for example, to automatically discover if a newer version has been saved of the regular model after the draft was created — see Save Conflicts.
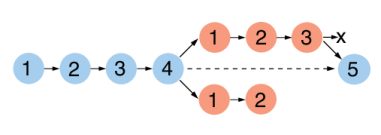
A schematic of a possible history of a regular model and a draft model created from the former. Starting from the left, four model versions of a regular model have been saved. A draft was then created from the fourth version, after which three versions of the draft have been saved.
Once you are finished with your draft, you can open the Save window and save the current draft as a version of the original model. The draft will be automatically deleted in the process, although this deletion is not permanent — you can, for example, find the deleted draft via the The Commit Details Dialog Box for the corresponding commit or when Searching All Versions in the Database.
You can create multiple drafts from the same regular model, each draft having its own identity and version history, by repeatedly opening a version of a regular model and pressing Ctrl+S. You and your coworker may, for example, both start working on your own drafts of the same regular model, perhaps with the intention of combining your work once you are finished using the Comparison Result window.
A schematic of a possible history of a regular model and two drafts models saved in a database. The middle row starting from the left represents four model versions of a regular model. From the fourth model version, two drafts (bottom and top rows) have been independently created. Two versions of the bottom row draft, and three versions of the top row draft, have been saved. The top row draft’s latest version has then been saved back to the original regular model as a fifth version, automatically deleting the top row draft in the process (represented by the x-mark). The bottom draft may have been discarded, awaiting, for example, its owner to manually delete it.
Model Settings
The Settings window for a model shows settings for a specific version of the model. Update any of the settings and click the Save button () to save a new version of the model. You can write an optional save comment. Click OK to save.
The Version Section
This section displays the following fields:
Location. The commit location in the database in which the model version is saved. See Locations.
Saved. The time when the model version was saved.
Saved by. The display name of the user that saved the model version.
Saved in. The COMSOL Multiphysics version that the model version was saved in.
Title. The title of the model in the saved version.
The title is the same as shown in the Title field in the Presentation section in the root node’s Settings window for a model opened in the COMSOL Desktop.
Filename. The filename used by the model version if exporting it to the file system.
Update from. An optional field in which the path to a file on the file system can be specified to save a new version of the model from that file.
a
Click the Browse button.
b
c
Click the Save button ().
You can update from any model file that can be opened in COMSOL Multiphysics. The saved model version will first be converted to the current COMSOL Multiphysics version.
Description. The description of the model in the saved version.
The description is the same as shown in the Description field in the Presentation section in the root node’s Settings window for a model opened in the COMSOL Desktop.
The Contents Section
This section displays the model tree as it looked when the model version was saved to the database. Use the Collapse button () and Expand button () to collapse and expand nodes in the tree.
Select a node in the tree and click Details () in the toolbar below the tree to open the Details dialog box. The dialog box contains node field values and setting field values for the selected model tree node. The Node table in the dialog box shows the values for the properties of a node. The available properties will differ between node types. The Settings table shows settings for the node.
Select a node and click Open Node () to open the model in the COMSOL Desktop with the model tree node automatically selected in the user interface.
Some node types support being inserted into the model currently opened in the COMSOL Desktop. Select, for example, a component or a geometry part node in the model tree and click Insert into Model (). You will be asked to select a target parent node for the insertion if there is more than one target available in the opened model. See Inserting Contents from Models for further details.
The Tags Section
This section displays the Tags assigned to the model as a collection of tag pills.