Merge Edges
The operation merges opposite edges by collapsing the face between the edges. The edges selected to be removed are merged with the edges to be kept, and the faces adjacent to the removed edges are reconnected to the resulting merged edges. This is shown in Figure 7-32 and Figure 7-33.
Figure 7-32: The edge highlighted in yellow is selected to be kept when merging the vertical edges for the rectangular face in the middle of the image. This means that the two vertical edges to the left (highlighted in magenta) will be merged with the yellow vertical edge. The arrow in the left image indicate the direction of the merge. The image on the right shows the resulting geometry.
Figure 7-33: The edges highlighted in yellow are selected to be kept when merging the vertical edges for the rectangular face in the middle of the image. This means that the single vertical edge on the right hand side of the rectangular face (highlighted in magenta) will be moved to the left (direction indicated by the arrow in the left image). The edge, which is connected to the vertex at the top of the edge that is removed, is also moved together with the vertex. After the merge, this edge will connect to the vertex at the top of the edge that is kept. This is indicated by the arrow at the top of the image on the left. The image on the right shows the result.
Sliver and small faces can require a very fine meshes size, which can create meshes with many mesh elements. The Merge Edges, Collapse Faces, Form Composite Faces, and Ignore Edges operations provide a manual way to remove sliver and small faces, while the Remove Details operation is a fully automated way to prepare a geometry for meshing.
To use the operation, in the Geometry toolbar, from the Virtual Operations menu (), select Merge Edges (). Then enter the properties of the operation using the following sections:
Edges to Keep
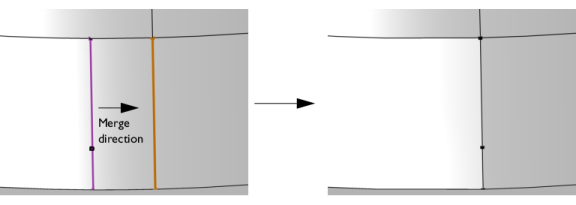
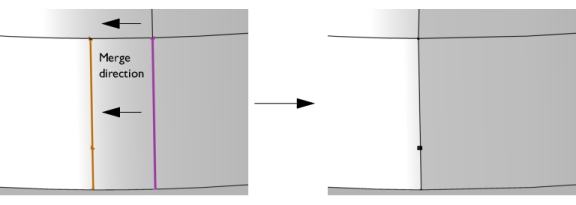
Select the edges that you want to keep in the Graphics window. They then appear in the Edges to keep list.
Click the Active button to toggle between turning ON and OFF the Edges to keep selections.
Edges to Remove
Select the edges that you want to remove in the Graphics window. They then appear in the Edges to remove list. Click the Active button to toggle between turning ON and OFF the Edges to remove selections.