The Individual Form Settings Windows
The figure below shows the application tree node and Settings window for a form.
Each form has its own Settings window with settings for:
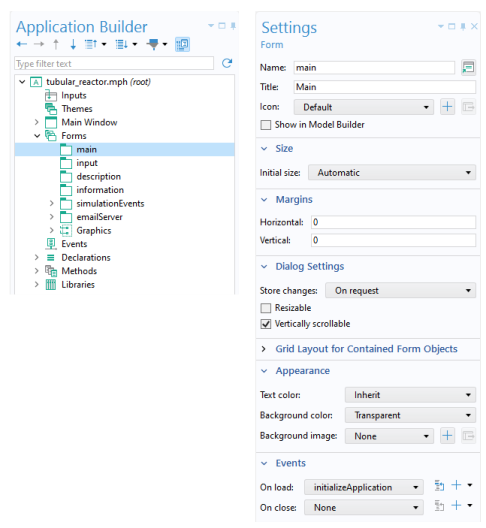
Name used to reference the form in other form objects and methods.
Form Title that is used in applications with several forms.
Icon shown in the upper-left corner of a dialog.
Initial size of the form when used as a dialog or when the Main Window is set to have its size determined by the form.
Margins with respect to the upper-left corner (Horizontal and Vertical).
Choices of whether the form should be Resizable or not and Vertically scrollable or not when used as a dialog.
Appearance with settings for Text color, Background color, and Background image.
Events that are triggered when a form is loaded or closed. (On load and On close.)
Double-click a form node to open its window in the Form Editor. Alternatively, you can right-click a form node and select Edit. Right-click a form window tab to see its context menu with options for closing, floating, and tiling form windows.
Sketch and Grid Layout Modes
When adding a form using the Blank or Single form layout templates, the Application Builder defaults to sketch layout mode, which lets you use fixed object positions and size. The other layout templates use the grid layout mode. Sketch layout mode is useful when you want control over the absolute positioning of form objects, such as when creating dialogs. Many, but not all, of the instructions in the The Form Editor assume that the Form Editor is in sketch layout mode unless otherwise specified. For information on grid layout mode, see Sketch and Grid Layout.
If you use the Single form template and follow the same steps as for the earlier example using the Basic template, then the Form Editor will result in an form as shown in the figure below, after dragging to reorganize the buttons.
In this case, no ribbon is created and you can freely position form objects, such as buttons and edit fields, by dragging them. This is beneficial in some cases, however, the size of the graphics object will be fixed when using the Single form layout template. This is because for this template the sketch layout mode is used and automatic resizing of an app is only supported with the grid layout mode. To learn how to create resizable graphics objects, see Automatic Resizing of Graphics Objects.
Note that any type of application that you create using templates can also be built using manual steps by starting from a Blank form or Single form template, however, using templates accelerates this process.
Initial Size of a Form
There are two options for the initial size of a form:
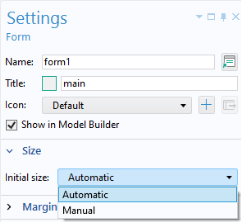
Manual lets you enter the pixel size for the width and height.
Automatic determines the size based on the form objects that the form contains. If you are using grid layout mode and there are columns or rows set to Grow, then the size is not defined by the form objects. In this case, the size is estimated using the Form Editor grid size as a base point. (It will typically be slightly larger.) You can change the grid size by dragging the right or bottom border of the grid. For more information on grid layout mode, see Grid Layout.