Working with Commits
At this point, you may be satisfied with the new low alloy steel material for the wrench. But what if you realize that you wanted to perform further changes to your draft before those changes were saved back to the regular model? You could create a new draft and continue your work, but in the meantime the regular model would contain changes that you are perhaps not yet prepared to share with your coworkers. You could restore the previous version of the regular model using Restore Version () from the Versions window, but then you would have to redo the work you did in the first draft.
Model Manager solves this issue via the concept of commits. Every time you perform changes that involve items in a Model Manager database, all those changes are saved as a collective whole in a commit. Each commit identifies what was changed, when those changes were performed, and the user that performed the changes. Saving a new version of an item is a special case of such a change. Other examples include deleting items and assigning tags to items.
A useful property of commits is that they can be reverted. Reverting a commit means to save a new commit in which the opposite changes to those in the reverted commit are performed.
1
Right-click the Stresses and Strains in a Wrench regular model () in the Model Manager window and select Commits ().
The Commits window is opened in the Model Manager workspace. The window shows all commits in which the selected model was changed. The commits are sorted in chronological order with the latest commit at the top.
2
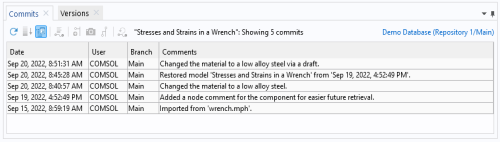
Select the top table row and click the Commit Details button () in the toolbar. You can also double-click the table row.
The Commit Details dialog box is opened showing details for the commit in which the draft model was saved back to the regular model. As seen in the Changes table, two item changes were performed in this commit: a new version of the regular model () was saved and the draft model () was deleted.
3
Click OK to close the Commit Details dialog box.
You will revert the changes made in the latest commit. This will restore the regular model to its previous version and recover the deleted draft.
1
Select the top table row and click the Revert button () in the toolbar.
The Revert window is opened in the Model Manager workspace. The table contains the changes that reverts the selected commit.
2
Click the Apply Revert button () in the toolbar.
The Apply Revert dialog box is opened with a suggested commit comment.
3
Change to Reverted updates to model made from draft in the Comments field. Click OK.
The reverting commit is saved to the database and the Revert window is automatically closed.
4
Click the Refresh button () in the Model Manager window. Both the Stresses and Strains in a Wrench regular model () and the Stresses and Strains in a Wrench draft model () are shown in the search result.
5
Right-click the regular model and select Versions (). You can see that the Versions window now contains a later version of the regular model than the bold-highlighted one opened in the COMSOL Desktop. Select the draft model and verify that there are two versions of the draft — these two versions are identical in content.
At this point, you could open the Stresses and Strains in a Wrench draft model () and continue your draft work. For the conclusion of this part of the tutorial, instead delete the draft again.
1
Right-click the Stresses and Strains in a Wrench draft model () in the Model Manager window and select Delete ().
The Delete Draft dialog box is opened. The Item table contains the draft model, the sole item that will be deleted.
2
Click OK to delete the draft.
You should view the list of commits in the Commits window as a history of changes made in the database. To see the complete list of all changes going back to when the database was created:
1
Click the Tree button () in the Model Manager window to switch to the Tree View.
2
Right-click the Main root node () in the tree and select Commits ().
The Commits window shows the 100 most recent commits saved in the demo database. You can double-click some of the table rows to see which items were involved in each commit from the Commit Details dialog box.
3
Click the Show More button () a few times to append older commits to the bottom of the table — there are about 4 000 commits in total.
4
Click the Table button () in the Model Manager window to switch back to the Table View.
Browsing and Searching With Respect to Commits
Commits serve a secondary purpose in a Model Manager database beyond grouping a collection of changes: a commit can be used to browse and search the particular state of your database at the time when the commit was saved.
1
Right-click the Stresses and Strains in a Wrench regular model () and select Commits ().
2
In the Commits window, right-click the last table row at the bottom and select Search in Commit ().
The Model Manager window is updated to show the latest item versions at the time the wrench model was first imported in the database. Click the Reset button (). You will notice that the database had about one thousand less item at that time than when the original import completed.
3
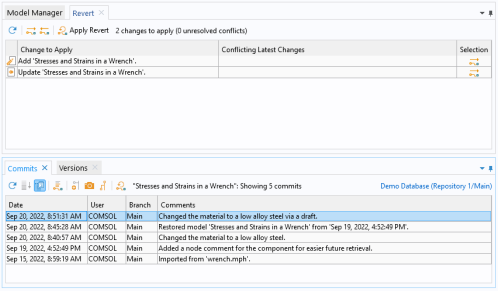
Right-click the table row with the comment Changed the material to a low alloy steel in the Commits window and select Search in Commit ().
The Model Manager window is updated to show the latest item versions at the time when you replaced the material in the wrench model for the first time in this tutorial.
The most useful commit to search in the Model Manager window is the latest one, which is also the default behavior. To switch back to searching with respect to this commit:
1
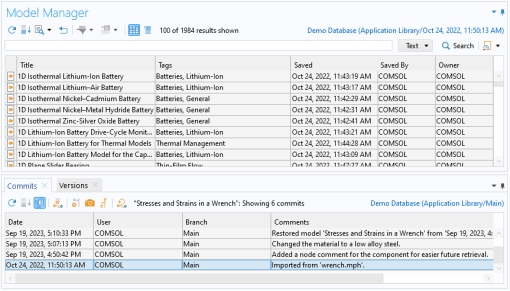
Click the link button in the upper-right corner in the Model Manager window — you will find it above the Search button ().
The Select Location dialog box is opened enabling you to select the commit location to search with respect to.
2
Select the Main branch node () in the tree. The branch serves as an implicit stand-in for the latest commit saved in the database.
You will return to the concept of branches later in this tutorial.
3
You can record a snapshot that references a particular commit in case the state of the database holds a special meaning at the point in time when the commit was saved. One such commit for the demo database is the last one in which a file was imported from the COMSOL Application Libraries.
1
2
Under Snapshots (), select the single leaf snapshot node () named after the version number of the COMSOL Multiphysics software used to import the COMSOL Application Libraries.
3
The Model Manager window shows the model and data file versions that were the latest versions in the database when the demo database was initially prepared.
Restore the search in the Model Manager window by clicking the link button in the upper-right corner in the Model Manager window and selecting the Main branch node () in the Select Location dialog box. You can also restore the search by selecting the demo database via the database selector expand button in the Database section of the Home toolbar.