PDF

Petzval Lens STOP Analysis
Introduction
Many optical systems are required to be operated in extreme environments, where temperature changes are significant. This will invariably induce deformations in the optical geometry. In order to simulate the effects of structural and thermal deformation on the optical performance of a lens a structural-thermal-optical performance (STOP) analysis should be performed. In this tutorial an integrated STOP analysis is demonstrated.
The Petzval Lens tutorial is used as the basis for this model, together with a simple barrel geometry (see Figure 1). The assembly is subjected to uniform temperature of 25°C and the effect on the displacement fields and image quality is shown..
Figure 1: An overview of the Petzval Lens STOP analysis geometry. The lenses are shown in blue, the lens supports are colored red, and the detector assembly is dark gray. A simple barrel assembly connects these elements.
Model Definition
Details of the lens simulated in this tutorial can be found in the Petzval Lens tutorial (see Ref. 1, p. 191). For this model, a simple barrel geometry and detector assembly has been added. The instructions for creating the geometry can be found in Appendix — Geometry Instructions.
Following insertion into the model, the geometry sequence should look like Figure 2. The mesh also needs to be refined slightly in order to improve the discretization and to account for the overall change in size of the geometry. The resulting mesh is shown in Figure 3.
Figure 2: The Petzval Lens Stop Analysis geometry sequence.
Figure 3: The Petzval Lens Stop Analysis mesh.
The refractive indices of the glasses are computed using the Sellmeier optical dispersion model which defines the refractive index as a function of the wavelength of light. The Sellmeier coefficients for each material are found in the Optical material library. For most of the optical glasses in the Optical material library, additional material properties including density, Young’s modulus, Poisson’s ratio, and coefficient of thermal expansion are also available.
The entire barrel detector assembly is assumed to made entirely from aluminum. This material is available in another built-in material library.
Each of the lenses is assumed to be held in place by a ring of room temperature vulcanized silicone (RTV). The properties of the RTV silicone are all nominal (that is, an average of various common RTV silicones). The temperature dependent properties of RTV silicone are also ignored (for example, Ref. 4 and Ref. 5). The thickness of the elastomer supports is computed using the nominal athermal equation given in Ref. 6, p. 203.
In this example the RTV is treated using a simple linear elastic material model. In an extremely high-fidelity simulation it might be preferable to use a hyperelastic material model for the RTV. For a model involving a nonlinear material model, see Petzval Lens STOP Analysis with Hyperelasticity.
The nominal temperature, wavelength, and field angles used in this simulation are given in Table 1.
T0
-25°C
λvac
475 nm, 550 nm, 625 nm
θx,i
0°, 0°, 0°
Nominal x field angle, field i = 1,2,3
θy,i
0°, 3.5°, 7.0°
Nominal y field angle, field i = 1,2,3
Nring
15
Pnom
41.5 mm
Pfac1
-1.142
Pfac2
-0.080
Several of the parameters defined in Table 1 are used to derive additional parameters such as the ray direction vector components, the stop and image plane z-coordinates, and the entrance pupil location. Table 2 gives the expressions used to derive these parameters. Note that the pupil shift factor is an empirical approximation to ensure that the chief ray passes through the center of the stop at all field angles.
 
vx,i
tan θx,i
Ray direction vector, x-component, field i.
vy,i
tan θy,i
Ray direction vector, y-component, field i.
vz
zstop
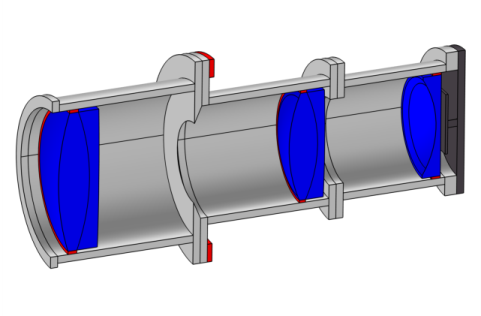
Stop z-coordinate, where Tc,n is the central thickness of element n and Tn is the separation between elements n and n+1. Note that the stop is the 3rd element in the Petzval lens.
zimage
Image plane z-coordinate, where Tc,n is the central thickness of element n and Tn is the separation between elements n and n+1. Including the stop, the Petzval lens has 6 elements.
Pfac,i
Pfac1 + Pfac2 sin θi
Δxi
z + Pfac,i zstop)tan θx,i
Pupil shift, x-coordinate, field i.
Δyi
z + Pfac,i zstop)tan θy,i
Pupil shift, y-coordinate, field i.
ts,i
Athermal thickness of support i, where d is the lens diameter, αe, α1, and α2, are the CTE’s of the elastomer, the mount, and the lens respectively, and νe is Poissions ratio.
Results and Discussion
Following a Stationary study which computes the displacement field due to thermal expansion, a Ray Tracing study is made over three field angles and three wavelengths (see Table 1). The resulting temperature and displacement fields can be seen together with a ray trace in Figure 4 and Figure 5. Both figures also show the von Mises stress within the lenses (and barrel). The large stress within the second lens group is due to the significant difference between the coefficients of thermal expansion (CTE) of each element.
Figure 6 shows a spot diagram on the nominal image surface. That is, this is the detector surface after being subject to thermal and structural deformation at 25°C. The Spot Diagram plot can be used to determine the location of the best focus plane, defined as the plane for which the root mean square spot size is minimized. This is shown in Figure 7. Note that the plane of best focus is located 72 μm behind the nominal image surface.
Figure 4: A ray trace shown together with a 3/4 section view of the Petzval lens assembly. The von Mises stress field is on the cross-sections.
Figure 5: In this ray trace, the displacement field is shown together with the von Mises stress.
Figure 6: The image quality on the nominal image surface. This is the detector surface after being subject to thermal expansion.
Figure 7: Image quality on the best focus plane. That is, this is the surface that gives the minimum RMS spot size on-axis. It is about 72 microns displaced from the nominal plane.
Related models
This tutorial model, in which STOP analysis is performed at a single uniform temperature, is extended in the following examples:
Petzval Lens STOP Analysis Isothermal Sweep — A parametric sweep over a range of uniform temperatures is performed. The position of the best focus image plane is determined as a function of temperature.
Petzval Lens STOP Analysis with Hyperelasticity — In this model the RTV lens supports are modeled as a hyperelastic material using the Nonlinear Structural Materials Module.
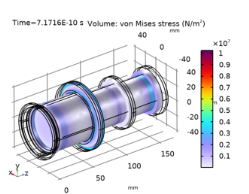
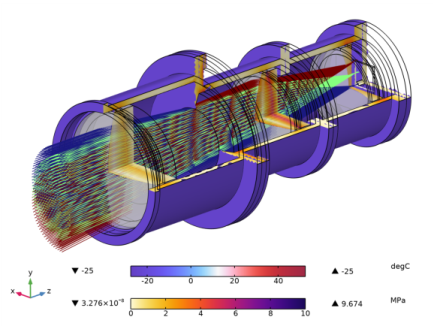
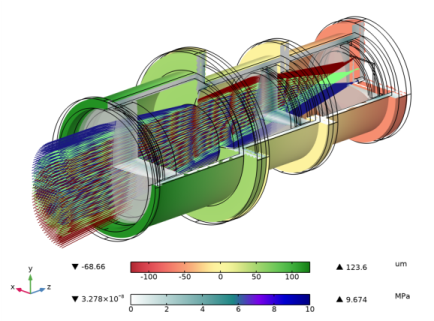
Petzval Lens STOP Analysis with Surface-to-Surface Radiation — For this model, the lens assembly is placed inside a thermo-vacuum enclosure where the exterior temperature is significantly different from the interior. The lens assembly is exposed to this exterior through a pair of windows via surface-to-surface radiation. The resulting thermal gradient and displacement field within the optical system are shown together with the effect on image quality.
References
1. M.J. Kidger, Fundamental Optical Design, Bellingham WA, USA: SPIE Press, 2001.
2. https://www.us.schott.com/english/index.html.
3. http://www.oharacorp.com/catalog.html.
4. M.A. Salama, W.M. Rowe, and R.K. Yasui, “Thermoelatic Analysis of Solar Cell Arrays and their Material Properties.” Technical Memorandum 33-626, NASA, 1973.
5. T.M. Mower, “Thermomechanical behavior of aerospace-grade RTV (silicone adhesive).” International Journal of Adhesions and Adhesives 87 (2018): 64-72.
6. P.R. Yoder, Jr., Opto-Mechanical Systems Design, Bellingham WA, USA: SPIE Press, 2006.
Application Library path: Ray_Optics_Module/Structural_Thermal_Optical_Performance_Analysis/petzval_lens_stop_analysis
Modeling Instructions
From the File menu, choose New.
New
In the New window, click  Model Wizard.
Model Wizard
1
In the Model Wizard window, click  3D.
2
In the Select Physics tree, select Optics>Ray Optics>Geometrical Optics (gop).
3
Click Add.
4
In the Select Physics tree, select Structural Mechanics>Solid Mechanics (solid).
5
Click Add.
6
Click  Study.
7
In the Select Study tree, select Empty Study. The studies will be added below.
8
Petzval Lens Stop Analysis Geometry Sequence
Insert the prepared geometry sequence from file. You can read the instructions for creating the geometry in Appendix — Geometry Instructions. Following insertion, the original Petzval Lens optical prescription will be available in the Parameters node.
1
In the Model Builder window, under Component 1 (comp1) click Geometry 1.
2
In the Settings window for Geometry, type Petzval Lens Stop Analysis Geometry Sequence in the Label text field.
3
In the Geometry toolbar, click Insert Sequence and choose Insert Sequence.
4
5
In the Insert Sequence dialog box, click OK.
6
In the Geometry toolbar, click  Build All.
7
Click the  Orthographic Projection button in the Graphics toolbar.
8
Click the  Click and Hide button in the Graphics toolbar.
9
In the Graphics window toolbar, clicknext to  Select Objects, then choose Select Boundaries.
10
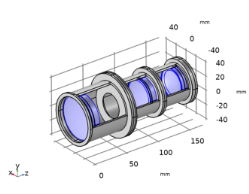
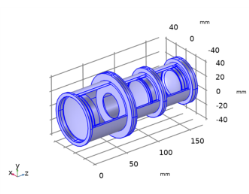
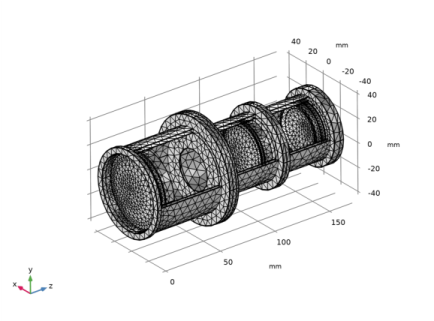
On the object fin, select Boundary 19 only. Continue to select boundaries that allow the inside of the lens assembly to be seen. Orient the view to match Figure 2.
Global Definitions
Lens Prescription
1
In the Model Builder window, under Global Definitions click Parameters 1.
2
In the Settings window for Parameters, type Lens Prescription in the Label text field. The lens prescription was added when the geometry sequence was inserted above. Next, create parameter nodes for material and general properties.
Material Properties
1
In the Home toolbar, click  Parameters and choose Add>Parameters.
2
In the Settings window for Parameters, type Material Properties in the Label text field. These material properties contain other parameters than will be used in extensions of this study.
3
Locate the Parameters section. Click  Load from File.
4
General Properties
1
In the Home toolbar, click  Parameters and choose Add>Parameters.
2
In the Settings window for Parameters, type General Properties in the Label text field.
3
Locate the Parameters section. Click  Load from File.
4
Lens Prescription
1
In the Model Builder window, click Lens Prescription.
2
In the Settings window for Parameters, locate the Parameters section.
3
Definitions
Create a selection defining the lens barrels and detector assemblies. In this simulation it will be assumed they are made of the same material.
Lens Barrels and Detector
1
In the Definitions toolbar, click  Union.
2
In the Settings window for Union, type Lens Barrels and Detector in the Label text field.
3
Locate the Input Entities section. Under Selections to add, click  Add.
4
In the Add dialog box, in the Selections to add list, choose All (Barrel 1), All (Barrel 2), All (Barrel 3), and Detector Assembly.
5
Lenses and Supports
Also, create a selection including only the lenses and supports.
1
In the Definitions toolbar, click  Union.
2
In the Settings window for Union, type Lenses and Supports in the Label text field.
3
Locate the Input Entities section. Under Selections to add, click  Add.
4
In the Add dialog box, in the Selections to add list, choose Supports and All Lenses.
5
Next, create operators to make the deformed image plane coordinates available to postprocessing features. Select three of the four image surface corners.
Average 1 (aveop1)
1
In the Definitions toolbar, click  Nonlocal Couplings and choose Average.
2
In the Settings window for Average, locate the Source Selection section.
3
From the Geometric entity level list, choose Point.
4
Average 2 (aveop2)
1
Right-click Average 1 (aveop1) and choose Duplicate.
2
In the Settings window for Average, locate the Source Selection section.
3
Click  Clear Selection.
4
Average 3 (aveop3)
1
Right-click Average 2 (aveop2) and choose Duplicate.
2
In the Settings window for Average, locate the Source Selection section.
3
Click  Clear Selection.
4
Mesh 1
Free Triangular 1
1
In the Mesh toolbar, click  Boundary and choose Free Triangular.
2
In the Settings window for Free Triangular, locate the Boundary Selection section.
3
From the Selection list, choose Clear Apertures.
Size 1
1
Right-click Free Triangular 1 and choose Size.
2
In the Settings window for Size, locate the Element Size section.
3
From the Predefined list, choose Extremely fine. Refine the mesh of the lens surfaces.
Free Tetrahedral 1
In the Mesh toolbar, click  Free Tetrahedral.
Size 1
1
Right-click Free Tetrahedral 1 and choose Size.
2
In the Settings window for Size, locate the Geometric Entity Selection section.
3
From the Geometric entity level list, choose Domain.
4
5
Locate the Element Size section. From the Predefined list, choose Finer. This is part of the detector assembly.
Size 2
1
In the Model Builder window, right-click Free Tetrahedral 1 and choose Size.
2
In the Settings window for Size, locate the Geometric Entity Selection section.
3
From the Geometric entity level list, choose Domain.
4
From the Selection list, choose Supports.
5
Locate the Element Size section. Click the Custom button.
6
Locate the Element Size Parameters section. Select the Minimum element size check box.
7
Size
1
In the Model Builder window, under Component 1 (comp1)>Mesh 1 click Size.
2
In the Settings window for Size, locate the Element Size section.
3
From the Predefined list, choose Coarse.
4
Click  Build All. The mesh should look like Figure 3.
Component 1 (comp1)
1
In the Model Builder window, click Component 1 (comp1).
2
In the Settings window for Component, locate the Curved Mesh Elements section.
3
From the Geometry shape function list, choose Cubic Lagrange. The ray tracing algorithm used by the Geometrical Optics interface computes the refracted ray direction based on a discretized geometry via the underlying finite element mesh. A cubic geometry shape order usually introduces less discretization error compared to the default, which uses linear and quadratic polynomials.
Geometrical Optics (gop)
1
In the Model Builder window, under Component 1 (comp1) click Geometrical Optics (gop).
2
In the Settings window for Geometrical Optics, locate the Domain Selection section.
3
From the Selection list, choose All Lenses.
4
Locate the Ray Release and Propagation section. From the Wavelength distribution of released rays list, choose Polychromatic, specify vacuum wavelength. The list of polychromatic wavelengths will be entered below.
5
In the Maximum number of secondary rays text field, type 0. In this simulation stray light is not being traced, so reflected rays will not be produced at the lens surfaces. Note that because rays will be traced through a deformed geometry, it is not possible to use geometry normals for ray-boundary interactions. This check box should remained cleared.
6
Locate the Material Properties of Exterior and Unmeshed Domains section. From the Optical dispersion model list, choose Air, Edlen (1953).
7
In the Text text field, type T0. The refractive index of the air surrounding the camera lens will be a function of temperature.
Medium Properties 1
1
In the Model Builder window, under Component 1 (comp1)>Geometrical Optics (gop) click Medium Properties 1.
2
In the Settings window for Medium Properties, locate the Medium Properties section.
3
From the Refractive index of domains list, choose Get dispersion model from material.
4
Click to expand the Model Inputs section. From the T list, choose Common model input.
Global Definitions
Default Model Inputs
1
In the Model Builder window, under Global Definitions click Default Model Inputs.
2
In the Settings window for Default Model Inputs, locate the Browse Model Inputs section.
3
In the tree, select General>Temperature (K) - minput.T.
4
Find the Expression for remaining selection subsection. In the Temperature text field, type T0. This temperature is defined in the parameters node.
Geometrical Optics (gop)
Material Discontinuity 1
1
In the Model Builder window, under Component 1 (comp1)>Geometrical Optics (gop) click Material Discontinuity 1.
2
In the Settings window for Material Discontinuity, locate the Rays to Release section.
3
From the Release reflected rays list, choose Never.
Obstructions
1
In the Physics toolbar, click  Boundaries and choose Wall.
2
In the Settings window for Wall, type Obstructions in the Label text field.
3
Locate the Boundary Selection section. From the Selection list, choose Obstructions.
4
Locate the Wall Condition section. From the Wall condition list, choose Disappear.
Stop
1
In the Physics toolbar, click  Boundaries and choose Wall.
2
In the Settings window for Wall, type Stop in the Label text field.
3
Locate the Boundary Selection section. From the Selection list, choose Aperture Stop.
4
Locate the Wall Condition section. From the Wall condition list, choose Disappear.
Image
1
In the Physics toolbar, click  Boundaries and choose Wall.
2
In the Settings window for Wall, type Image in the Label text field.
3
Locate the Boundary Selection section. From the Selection list, choose Image Plane. The default Wall condition is Freeze.
Release from Grid 1
1
In the Physics toolbar, click  Global and choose Release from Grid.
2
In the Settings window for Release from Grid, locate the Initial Coordinates section.
3
From the Grid type list, choose Hexapolar.
4
Specify the qc vector as
5
Specify the rc vector as
6
In the Rc text field, type 20.75[mm].
7
In the Nc text field, type 15.
8
Locate the Ray Direction Vector section. Specify the L0 vector as
9
Locate the Vacuum Wavelength section. From the Distribution function list, choose List of values.
10
In the Values text field, type 475[nm] 550[nm] 625[nm].
Release from Grid 2
1
Right-click Release from Grid 1 and choose Duplicate.
2
In the Settings window for Release from Grid, locate the Initial Coordinates section.
3
Specify the qc vector as
4
Locate the Ray Direction Vector section. Specify the L0 vector as
Release from Grid 3
1
Right-click Release from Grid 2 and choose Duplicate.
2
In the Settings window for Release from Grid, locate the Initial Coordinates section.
3
Specify the qc vector as
4
Locate the Ray Direction Vector section. Specify the L0 vector as
Solid Mechanics (solid)
5
In the Model Builder window, under Component 1 (comp1) click Solid Mechanics (solid).
6
In the Settings window for Solid Mechanics, click to expand the Discretization section.
7
From the Displacement field list, choose Cubic serendipity. As for the Geometrical Optics interface, a cubic shape order is chosen to reduce discretization error.
Linear Elastic Material 1
In the Model Builder window, under Component 1 (comp1)>Solid Mechanics (solid) click Linear Elastic Material 1.
Thermal Expansion 1
1
In the Physics toolbar, click  Attributes and choose Thermal Expansion.
The temperature model input value of Thermal Expansion is by default the common model input. In this way, the uniform temperature T0 is applied to the Solid Mechanics.
Fixed Constraint 1
1
In the Physics toolbar, click  Boundaries and choose Fixed Constraint.
2
In the Settings window for Fixed Constraint, locate the Boundary Selection section.
3
From the Selection list, choose All (Rigid Support). It is assumed that the lens assembly is attached to an external rigid structure via this annulus. The external structure does not otherwise participate in the physics.
Add Material
1
In the Home toolbar, click  Add Material to open the Add Material window.
2
Go to the Add Material window.
3
In the tree, select Optical>Schott Glass>Schott N-BK7 Glass.
4
Click Add to Component in the window toolbar.
5
In the tree, select Optical>Schott Glass>Schott N-KZFS5 Glass.
6
Click Add to Component in the window toolbar.
7
In the tree, select Optical>Schott Glass>Schott N-SK2 Glass.
8
Click Add to Component in the window toolbar.
9
In the tree, select Optical>Schott Glass>Schott N-SF5 Glass.
10
Click Add to Component in the window toolbar.
11
In the Home toolbar, click  Add Material to close the Add Material window.
Materials
Schott N-BK7 Glass (mat1)
1
In the Model Builder window, under Component 1 (comp1)>Materials click Schott N-BK7 Glass (mat1).
2
In the Settings window for Material, locate the Geometric Entity Selection section.
3
From the Selection list, choose Lens Material 1.
Schott N-KZFS5 Glass (mat2)
1
In the Model Builder window, click Schott N-KZFS5 Glass (mat2).
2
In the Settings window for Material, locate the Geometric Entity Selection section.
3
From the Selection list, choose Lens Material 2.
Schott N-SK2 Glass (mat3)
1
In the Model Builder window, click Schott N-SK2 Glass (mat3).
2
In the Settings window for Material, locate the Geometric Entity Selection section.
3
From the Selection list, choose Lens Material 3.
Schott N-SF5 Glass (mat4)
1
In the Model Builder window, click Schott N-SF5 Glass (mat4).
2
In the Settings window for Material, locate the Geometric Entity Selection section.
3
From the Selection list, choose Lens Material 4.
Add Material
1
In the Home toolbar, click  Add Material to open the Add Material window.
2
Go to the Add Material window.
3
In the tree, select Built-in>Aluminum 6063-T83.
4
Click Add to Component in the window toolbar.
5
In the Home toolbar, click  Add Material to close the Add Material window.
Materials
Aluminum 6063-T83 (mat5)
1
In the Settings window for Material, locate the Geometric Entity Selection section.
2
From the Selection list, choose Lens Barrels and Detector.
RTV
1
In the Model Builder window, right-click Materials and choose Blank Material.
2
In the Settings window for Material, locate the Geometric Entity Selection section.
3
From the Selection list, choose Supports.
4
In the Label text field, type RTV.
5
Locate the Material Contents section. In the table, enter the following settings:
Study 1
Add the studies necessary to perform a STOP analysis. First, add a stationary study to compute the geometry deformation at the nominal temperature. Next, add a Ray Tracing study to perform a ray trace through the deformed geometry.
Stationary
1
In the Study toolbar, click  Study Steps and choose Stationary>Stationary.
2
In the Settings window for Stationary, locate the Physics and Variables Selection section.
3
Ray Tracing
1
In the Study toolbar, click  Study Steps and choose Time Dependent>Ray Tracing.
2
In the Settings window for Ray Tracing, locate the Study Settings section.
3
From the Time-step specification list, choose Specify maximum path length.
4
From the Length unit list, choose mm.
5
In the Lengths text field, type 0 215. The maximum optical path length is sufficient to allow all rays to pass beyond the nominal location of the image plane.
6
Select the Include geometric nonlinearity check box. This ensures that the ray tracing is performed on the deformed geometry created in Step 1 of the Study.
7
Locate the Physics and Variables Selection section. In the table, enter the following settings:
Disable the Freeze condition on the image plane so that spot diagrams on both the nominal (deformed) image plane and the best focus image plane can be generated.
8
Select the Modify model configuration for study step check box.
9
In the tree, select Component 1 (Comp1)>Geometrical Optics (Gop)>Image.
10
11
In the Study toolbar, click  Compute.
Results
Ray Trajectories (gop)
The Ray Trajectories plot and the Stress plots (see below) are created by default with this combination of physics and study steps.
Stress (solid)
Study 1/Solution 1 (sol1)
In the Model Builder window, expand the Results>Datasets node, then click Study 1/Solution 1 (sol1).
Selection
1
In the Results toolbar, click  Attributes and choose Selection.
2
In the Settings window for Selection, locate the Geometric Entity Selection section.
3
From the Geometric entity level list, choose Domain.
4
From the Selection list, choose All Lenses. This selection is used to limit the domains in which some datasets will be processed.
Create an Intersection Point 3D dataset to show the image quality on the defomed image surface. Later, use the Spot Diagram postprocessing feature to generate a second Intersection Point 3D dataset that lies on plane which minimizes the RMS image quality on-axis.
Intersection Point 3D 1
1
In the Results toolbar, click  More Datasets and choose Intersection Point 3D.
2
In the Settings window for Intersection Point 3D, locate the Surface section.
3
From the Plane entry method list, choose Three points.
4
In row Point 1, set x to aveop1(x).
5
In row Point 1, set y to aveop1(y).
6
In row Point 1, set z to aveop1(z).
7
In row Point 2, set x to aveop2(x).
8
In row Point 2, set y to aveop2(y).
9
In row Point 2, set z to aveop2(z).
10
In row Point 3, set x to aveop3(x).
11
In row Point 3, set y to aveop3(y).
12
In row Point 3, set z to aveop3(z). These points are three of the four image surface corners.
Temperature
In the following steps, the Ray Trajectories plot is duplicated and extended to show the temperature field within the lens assembly together with the von Mises stress within the lenses.
Temperature
1
In the Model Builder window, right-click Ray Trajectories (gop) and choose Duplicate.
2
In the Settings window for 3D Plot Group, type Temperature in the Label text field.
3
Click to expand the Title section. From the Title type list, choose None.
4
Locate the Plot Settings section. From the View list, choose New view.
5
Locate the Color Legend section. Select the Show maximum and minimum values check box.
6
Select the Show units check box.
7
From the Position list, choose Bottom.
8
Click to expand the Number Format section. Select the Manual color legend settings check box.
9
In the Precision text field, type 4.
Ray Trajectories 1
1
In the Model Builder window, expand the Temperature node, then click Ray Trajectories 1.
2
In the Settings window for Ray Trajectories, locate the Extra Time Steps section.
3
From the Maximum number of extra time steps rendered list, choose All.
Color Expression 1
1
In the Model Builder window, expand the Ray Trajectories 1 node, then click Color Expression 1.
2
In the Settings window for Color Expression, locate the Expression section.
3
In the Expression text field, type gop.prf. This is the Ray release feature index; that is, the field number.
4
In the Unit field, type um.
5
Locate the Coloring and Style section. Clear the Color legend check box.
Filter 1
1
In the Model Builder window, click Filter 1.
2
In the Settings window for Filter, locate the Ray Selection section.
3
From the Rays to include list, choose Logical expression.
4
In the Logical expression for inclusion text field, type at(0,qx>0.1[mm]). Restrict the rays visible to one half of the view. Also, rays are not rendered just beyond the nominal, undeformed image plane z-coordinate.
Surface 1
1
In the Model Builder window, right-click Temperature and choose Surface.
2
In the Settings window for Surface, locate the Expression section.
3
In the Expression text field, type solid.T.
4
From the Unit list, choose degC.
5
Click to expand the Range section. Select the Manual color range check box.
6
In the Minimum text field, type -27.5.
7
In the Maximum text field, type 52.5.
8
Locate the Coloring and Style section. From the Color table list, choose WaveLight.
Selection 1
1
Right-click Surface 1 and choose Selection.
2
In the Settings window for Selection, locate the Selection section.
3
From the Selection list, choose Assembly Surfaces.
Filter 1
1
In the Model Builder window, right-click Surface 1 and choose Filter.
2
In the Settings window for Filter, locate the Element Selection section.
3
In the Logical expression for inclusion text field, type x>0.5[mm] || y<-0.5[mm].
Surface 2
1
Right-click Surface 1 and choose Duplicate.
2
In the Settings window for Surface, locate the Expression section.
3
In the Expression text field, type 1.
4
Locate the Coloring and Style section. From the Coloring list, choose Uniform.
5
From the Color list, choose Gray.
Transparency 1
Right-click Surface 2 and choose Transparency.
Selection 1
1
In the Settings window for Selection, locate the Selection section.
2
From the Selection list, choose Lens Exteriors.
Slice 1
1
In the Model Builder window, right-click Temperature and choose Slice.
2
In the Settings window for Slice, locate the Expression section.
3
In the Expression text field, type solid.mises.
4
From the Unit list, choose MPa.
5
Locate the Plane Data section. In the Planes text field, type 1.
6
Click to expand the Range section. Select the Manual color range check box.
7
In the Maximum text field, type 10.
8
Locate the Coloring and Style section. From the Color table list, choose HeatCamera.
9
From the Color table transformation list, choose Reverse.
Selection 1
1
Right-click Slice 1 and choose Selection.
2
In the Settings window for Selection, locate the Selection section.
3
From the Selection list, choose Lens Barrels and Detector.
Filter 1
1
In the Model Builder window, right-click Slice 1 and choose Filter.
2
In the Settings window for Filter, locate the Element Selection section.
3
In the Logical expression for inclusion text field, type y>0.
Slice 2
1
Right-click Slice 1 and choose Duplicate.
2
In the Settings window for Slice, locate the Plane Data section.
3
From the Plane list, choose zx-planes.
4
In the Planes text field, type 1.
5
Click to expand the Inherit Style section. From the Plot list, choose Slice 1.
Filter 1
1
In the Model Builder window, expand the Slice 2 node, then click Filter 1.
2
In the Settings window for Filter, locate the Element Selection section.
3
In the Logical expression for inclusion text field, type x<0.
Slice 3
In the Model Builder window, under Results>Temperature right-click Slice 1 and choose Duplicate.
Selection 1
1
In the Model Builder window, expand the Slice 3 node, then click Selection 1.
2
In the Settings window for Selection, locate the Selection section.
3
From the Selection list, choose Lenses and Supports.
Slice 3
1
In the Model Builder window, click Slice 3.
2
In the Settings window for Slice, locate the Inherit Style section.
3
From the Plot list, choose Slice 2.
Transparency 1
1
Right-click Slice 3 and choose Transparency.
2
In the Settings window for Transparency, locate the Transparency section.
3
In the Transparency text field, type 0.25.
Slice 4
In the Model Builder window, under Results>Temperature right-click Slice 2 and choose Duplicate.
Selection 1
1
In the Model Builder window, expand the Slice 4 node, then click Selection 1.
2
In the Settings window for Selection, locate the Selection section.
3
From the Selection list, choose Lenses and Supports.
Transparency 1
1
In the Model Builder window, right-click Slice 4 and choose Transparency.
2
In the Settings window for Transparency, locate the Transparency section.
3
In the Transparency text field, type 0.25.
4
In the Temperature toolbar, click  Plot.
5
Click the  Orthographic Projection button in the Graphics toolbar.
6
Click the  Show Grid button in the Graphics toolbar. Orient the resulting figure to match Figure 4.
Displacement
Copy and modify the temperature plot to illustrate the displacement field within the lens assembly.
Displacement
1
In the Model Builder window, right-click Temperature and choose Duplicate.
2
In the Settings window for 3D Plot Group, type Displacement in the Label text field.
Surface 1
1
In the Model Builder window, expand the Displacement node, then click Surface 1.
2
In the Settings window for Surface, locate the Expression section.
3
In the Expression text field, type w.
4
In the Unit field, type um.
5
Locate the Range section. In the Minimum text field, type -125.
6
In the Maximum text field, type 125.
7
Locate the Coloring and Style section. From the Color table list, choose TrafficLight.
8
From the Color table transformation list, choose Reverse.
Deformation 1
1
Right-click Surface 1 and choose Deformation. This is used to exaggerate the lens thermal deformation.
2
In the Settings window for Deformation, locate the Scale section.
3
Select the Scale factor check box.
4
Deformation 1
1
In the Model Builder window, right-click Surface 2 and choose Deformation.
2
In the Settings window for Deformation, locate the Scale section.
3
Select the Scale factor check box.
4
Slice 1
1
In the Model Builder window, under Results>Displacement click Slice 1.
2
In the Settings window for Slice, locate the Coloring and Style section.
3
From the Color table list, choose AuroraAustralis.
4
From the Color table transformation list, choose None.
Deformation 1
1
Right-click Slice 1 and choose Deformation.
2
In the Settings window for Deformation, locate the Scale section.
3
Select the Scale factor check box.
4
Deformation 1
In the Model Builder window, right-click Slice 2 and choose Deformation.
Deformation 1
In the Model Builder window, right-click Slice 3 and choose Deformation.
Deformation 1
1
In the Model Builder window, right-click Slice 4 and choose Deformation.
2
In the Displacement toolbar, click  Plot. Orient the result to match Figure 5.
Spot Diagrams
Finally, create two spot diagrams. The first will show the image quality on the nominal image plane. That is, the deformed image surface from the geometry. The second spot diagram will show the spots on the plane of best focus, using the on-axis rays.
Spot Diagram, Nominal
1
In the Home toolbar, click  Add Plot Group and choose 2D Plot Group.
2
In the Settings window for 2D Plot Group, type Spot Diagram, Nominal in the Label text field.
3
Locate the Data section. From the Dataset list, choose None.
4
Click to expand the Title section. From the Title type list, choose Manual.
5
In the Title text area, type Spot Diagram: Nominal Focal Plane.
6
Locate the Color Legend section. Select the Show maximum and minimum values check box.
7
Select the Show units check box.
Spot Diagram 1
1
In the Spot Diagram, Nominal toolbar, click  More Plots and choose Spot Diagram.
2
In the Settings window for Spot Diagram, locate the Data section.
3
From the Image surface list, choose Intersection Point 3D 1. This is the Intersection Point 3D dataset defined above using three corners of the deformed image surface.
4
Locate the Layout section. From the Layout list, choose Rectangular grid.
5
In the Number of columns text field, type 1.
6
From the Origin location list, choose Average over area.
7
In the Vertical padding factor text field, type 1.
8
Click to expand the Annotations section. Select the Show spot coordinates check box.
9
From the Coordinate system list, choose Global.
10
In the Display precision text field, type 6.
Color Expression 1
1
Right-click Spot Diagram 1 and choose Color Expression.
2
In the Settings window for Color Expression, locate the Expression section.
3
In the Expression text field, type gop.lambda0.
4
From the Unit list, choose nm.
5
Click to expand the Range section. Select the Manual color range check box.
6
In the Minimum text field, type 450.
7
In the Maximum text field, type 650.
8
In the Spot Diagram, Nominal toolbar, click  Plot. The first spot diagram should look like Figure 6.
Spot Diagram, Best Focus
1
In the Model Builder window, right-click Spot Diagram, Nominal and choose Duplicate.
2
In the Settings window for 2D Plot Group, type Spot Diagram, Best Focus in the Label text field.
3
Locate the Title section. In the Title text area, type Spot Diagram: Best Focus Plane.
4
Locate the Plot Settings section. From the View list, choose New view.
Spot Diagram 1
1
In the Model Builder window, expand the Spot Diagram, Best Focus node, then click Spot Diagram 1.
2
In the Settings window for Spot Diagram, locate the Data section.
3
From the Image surface list, choose Ray 1.
4
Locate the Filters section. Select the Filter by release feature index check box. The rays from the on-axis release will be used.
5
Click to expand the Focal Plane Orientation section. From the Normal to focal plane list, choose User defined. The default is that the image plane normal direction is the z-axis.
6
From the Transverse direction list, choose User defined.
7
Click Create Focal Plane Dataset.
8
Locate the Filters section. Clear the Filter by release feature index check box.
9
In the Spot Diagram, Best Focus toolbar, click  Plot.
10
Click the  Zoom Extents button in the Graphics toolbar. The second spot diagram should look like Figure 7.
 
Appendix — Geometry Instructions
From the File menu, choose New.
New
In the New window, click  Model Wizard.
Model Wizard
1
In the Model Wizard window, click  3D.
2
Petzval Lens STOP Analysis Geometry Sequence
Insert the prepared Petzval Lens geometry sequence from file. The instructions for creating the lens geometry can be found in the appendix of the Petzval Lens tutorial.
1
In the Model Builder window, under Component 1 (comp1) click Geometry 1.
2
In the Settings window for Geometry, locate the Units section.
3
From the Length unit list, choose mm.
4
In the Label text field, type Petzval Lens STOP Analysis Geometry Sequence.
5
In the Geometry toolbar, click Insert Sequence and choose Insert Sequence.
6
Browse to the model’s Application Libraries folder and double-click the file petzval_lens_stop_analysis_petzval_lens_geom_sequence.mph. Following insertion, the full lens prescription will be available in the Parameters node.
Add parameters to define the dimensions of the lens supports.
Global Definitions
Parameters 1
1
In the Model Builder window, under Global Definitions click Parameters 1.
2
In the Settings window for Parameters, locate the Parameters section.
3
Click  Load from File.
4
Browse to the model’s Application Libraries folder and double-click the file petzval_lens_stop_analysis_geom_sequence_parameters.txtNow, modify the clear aperture on the first surface of lens 1, the size of the aperture stop and the dimensions of the image plane.
5
Petzval Lens STOP Analysis Geometry Sequence
1
In the Geometry toolbar, click  Build All.
2
Click the  Orthographic Projection button in the Graphics toolbar.
3
In the Model Builder window, under Component 1 (comp1) click Petzval Lens STOP Analysis Geometry Sequence.
4
In the Settings window for Geometry, in the Graphics window toolbar, clicknext to  Go to Default View, then choose Go to ZY View.
5
Click the  Zoom Extents button in the Graphics toolbar. Orient the view to place the optical axis (z-axis) horizontal and the y-axis vertical.
Global Definitions
In the following steps a geometry part will be created. This part will be used to create barrels which will hold each of the three Petzval lens groups.
Barrel
1
In the Model Builder window, expand the Global Definitions>Geometry Parts node.
2
Right-click Global Definitions>Geometry Parts and choose 3D Part.
3
In the Settings window for Part, type Barrel in the Label text field.
4
Locate the Input Parameters section. In the table, enter the following settings:
Central Barrel Annulus
1
In the Geometry toolbar, click  Parts and choose Circular Planar Annulus.
2
In the Settings window for Part Instance, type Central Barrel Annulus in the Label text field.
3
Locate the Input Parameters section. In the table, enter the following settings:
4
Locate the Position and Orientation of Output section. Find the Displacement subsection. In the zw text field, type L1.
Central Barrel
1
In the Geometry toolbar, click  Extrude.
2
In the Settings window for Extrude, type Central Barrel in the Label text field.
3
On the object pi1, select Boundary 1 only.
4
Locate the Distances section. In the table, enter the following settings:
Front Ring Annulus
1
In the Geometry toolbar, click  Parts and choose Circular Planar Annulus.
2
In the Settings window for Part Instance, type Front Ring Annulus in the Label text field.
3
Locate the Input Parameters section. In the table, enter the following settings:
Front Ring
1
In the Geometry toolbar, click  Extrude.
2
In the Settings window for Extrude, type Front Ring in the Label text field.
3
On the object pi2, select Boundary 1 only.
4
Locate the Distances section. In the table, enter the following settings:
Rear Ring Annulus
1
In the Geometry toolbar, click  Parts and choose Circular Planar Annulus.
2
In the Settings window for Part Instance, type Rear Ring Annulus in the Label text field.
3
Locate the Input Parameters section. In the table, enter the following settings:
4
Locate the Position and Orientation of Output section. Find the Coordinate system to match subsection. From the Take work plane from list, choose Front Ring Annulus (pi2).
5
From the Work plane list, choose Surface (wp1).
6
Find the Displacement subsection. In the zw text field, type L.
Rear Ring
1
In the Geometry toolbar, click  Extrude.
2
In the Settings window for Extrude, type Rear Ring in the Label text field.
3
On the object pi3, select Boundary 1 only.
4
Locate the Distances section. In the table, enter the following settings:
5
Select the Reverse direction check box.
All
1
In the Geometry toolbar, click  Booleans and Partitions and choose Union.
2
In the Settings window for Union, type All in the Label text field.
3
Click in the Graphics window and then press Ctrl+A to select all objects.
4
Locate the Selections of Resulting Entities section. Select the Resulting objects selection check box.
Front Plane
1
In the Geometry toolbar, click  Work Plane.
2
In the Settings window for Work Plane, type Front Plane in the Label text field.
3
Locate the Plane Definition section. From the Plane type list, choose Transformed.
4
From the Take work plane from list, choose Front Ring Annulus (pi2).
5
From the Work plane to transform list, choose Surface (wp1).
Rear Plane
1
In the Geometry toolbar, click  Work Plane.
2
In the Settings window for Work Plane, type Rear Plane in the Label text field.
3
Locate the Plane Definition section. From the Plane type list, choose Transformed.
4
From the Take work plane from list, choose Rear Ring Annulus (pi3).
5
From the Work plane to transform list, choose Surface (wp1).
6
In the Geometry toolbar, click  Build All.
Next, modify the dimensions of the lens group apertures. These will be extruded to create the lens supports.
Petzval Lens STOP Analysis Geometry Sequence
Group 1 Aperture (pi8)
1
In the Model Builder window, under Component 1 (comp1)>Petzval Lens STOP Analysis Geometry Sequence click Group 1 Aperture (pi8).
2
In the Settings window for Part Instance, locate the Input Parameters section.
3
Group 2 Aperture (pi9)
1
In the Model Builder window, click Group 2 Aperture (pi9).
2
In the Settings window for Part Instance, locate the Input Parameters section.
3
Group 3 Aperture (pi10)
1
In the Model Builder window, click Group 3 Aperture (pi10).
2
In the Settings window for Part Instance, locate the Input Parameters section.
3
4
Locate the Position and Orientation of Output section. Find the Displacement subsection. In the zw text field, type 4.
Group 1 Support
1
In the Geometry toolbar, click  Extrude.
2
In the Settings window for Extrude, type Group 1 Support in the Label text field.
3
On the object pi8, select Boundary 1 only.
4
Locate the Distances section. From the Specify list, choose Vertices to extrude to.
5
On the object pi2, select Point 11 only.
6
Locate the Selections of Resulting Entities section. Find the Cumulative selection subsection. Click New.
7
In the New Cumulative Selection dialog box, type Supports in the Name text field.
8
Group 2 Support
1
In the Geometry toolbar, click  Extrude.
2
In the Settings window for Extrude, type Group 2 Support in the Label text field.
3
On the object pi9, select Boundary 1 only.
4
Locate the Distances section. From the Specify list, choose Vertices to extrude to.
5
On the object pi5, select Point 11 only.
6
Locate the Selections of Resulting Entities section. Find the Cumulative selection subsection. From the Contribute to list, choose Supports.
Group 3 Support
1
In the Geometry toolbar, click  Extrude.
2
In the Settings window for Extrude, type Group 3 Support in the Label text field.
3
On the object pi10, select Boundary 1 only.
4
Locate the Distances section. From the Specify list, choose Vertices to extrude to.
5
On the object pi6, select Point 12 only.
6
Locate the Selections of Resulting Entities section. Find the Cumulative selection subsection. From the Contribute to list, choose Supports.
7
In the Geometry toolbar, click  Build All.
Barrel 1 (pi11)
1
In the Geometry toolbar, click  Parts and choose Barrel.
2
In the Settings window for Part Instance, locate the Position and Orientation of Output section.
3
Find the Coordinate system in part subsection. From the Work plane in part list, choose Front Plane (wp1).
4
Find the Coordinate system to match subsection. From the Take work plane from list, choose Lens 1 (pi1).
5
From the Work plane list, choose Surface 1 vertex intersection (wp1).
6
Locate the Input Parameters section. In the table, enter the following settings:
7
Locate the Position and Orientation of Output section. Find the Displacement subsection. In the zw text field, type -3.0[mm].
8
Click to expand the Domain Selections section. In the table, select the Keep check box for All.
Cone 1 (cone1)
1
In the Geometry toolbar, click  Cone.
2
In the Settings window for Cone, locate the Coordinate System section.
3
From the Take work plane from list, choose Barrel 1 (pi11).
4
From the Work plane list, choose Rear Plane (wp2).
5
Locate the Size and Shape section. In the Height text field, type 3[mm].
6
In the Bottom radius text field, type d1_S/2.
7
In the Top radius text field, type dS_2/2.
8
Locate the Position section. In the zw text field, type -3[mm].
Difference 1 (dif1)
1
In the Geometry toolbar, click  Booleans and Partitions and choose Difference.
2
3
In the Settings window for Difference, locate the Difference section.
4
Find the Objects to subtract subsection. Click to select the  Activate Selection toggle button.
5
Barrel 2 (pi12)
1
In the Geometry toolbar, click  Parts and choose Barrel.
2
In the Settings window for Part Instance, locate the Position and Orientation of Output section.
3
Find the Coordinate system in part subsection. From the Work plane in part list, choose Front Plane (wp1).
4
Find the Coordinate system to match subsection. From the Take work plane from list, choose Barrel 1 (pi11).
5
From the Work plane list, choose Rear Plane (wp2).
6
Locate the Input Parameters section. In the table, enter the following settings:
7
Locate the Domain Selections section. In the table, select the Keep check box for All.
Barrel 3 (pi13)
1
In the Geometry toolbar, click  Parts and choose Barrel.
2
In the Settings window for Part Instance, locate the Position and Orientation of Output section.
3
Find the Coordinate system in part subsection. From the Work plane in part list, choose Front Plane (wp1).
4
Find the Coordinate system to match subsection. From the Take work plane from list, choose Barrel 2 (pi12).
5
From the Work plane list, choose Rear Plane (wp2).
6
Locate the Input Parameters section. In the table, enter the following settings:
7
Locate the Domain Selections section. In the table, select the Keep check box for All.
Finally, create a simplified detector mount.
Detector
1
In the Geometry toolbar, click  Extrude.
2
In the Settings window for Extrude, type Detector in the Label text field.
3
Locate the General section. From the Input faces list, choose Image Plane.
Detector Mount
1
In the Geometry toolbar, click  Cylinder.
2
In the Settings window for Cylinder, type Detector Mount in the Label text field.
3
Locate the Size and Shape section. In the Radius text field, type 1.5[mm].
4
In the Height text field, type 4.0[mm].
5
Locate the Coordinate System section. From the Take work plane from list, choose Barrel 3 (pi13).
6
From the Work plane list, choose Rear Plane (wp2).
7
Locate the Position section. In the zw text field, type -4.0[mm].
Detector Mount Rear
1
In the Geometry toolbar, click  Cylinder.
2
In the Settings window for Cylinder, type Detector Mount Rear in the Label text field.
3
Locate the Size and Shape section. In the Radius text field, type 30.0[mm].
4
In the Height text field, type 3.0[mm].
5
Locate the Coordinate System section. From the Take work plane from list, choose Barrel 3 (pi13).
6
From the Work plane list, choose Rear Plane (wp2).
Detector Assembly
1
In the Geometry toolbar, click  Booleans and Partitions and choose Union.
2
In the Settings window for Union, type Detector Assembly in the Label text field.
3
Select the objects cyl1, cyl2, and ext4 only.
4
Locate the Selections of Resulting Entities section. Select the Resulting objects selection check box.
Rigid Support
1
In the Geometry toolbar, click  Parts and choose Circular Planar Annulus.
2
In the Settings window for Part Instance, type Rigid Support in the Label text field.
3
Locate the Input Parameters section. In the table, enter the following settings:
4
Locate the Position and Orientation of Output section. Find the Coordinate system to match subsection. From the Take work plane from list, choose Barrel 2 (pi12).
5
From the Work plane list, choose Front Plane (wp1).
6
Find the Displacement subsection. In the zw text field, type 5.0[mm].
7
Click to expand the Boundary Selections section. In the table, select the Keep check box for All.
Rigid Support Ring
1
In the Geometry toolbar, click  Extrude.
2
In the Settings window for Extrude, type Rigid Support Ring in the Label text field.
3
On the object pi14, select Boundary 1 only.
4
Locate the Distances section. In the table, enter the following settings:
5
Select the Reverse direction check box.
6
Locate the Selections of Resulting Entities section. Find the Cumulative selection subsection. From the Contribute to list, choose Supports.
Assembly Surfaces
1
In the Geometry toolbar, click  Selections and choose Complement Selection.
2
In the Settings window for Complement Selection, type Assembly Surfaces in the Label text field.
3
Locate the Geometric Entity Level section. From the Level list, choose Boundary.
4
Locate the Input Entities section. Click  Add.
5
In the Add dialog box, select Lens Exteriors in the Selections to invert list.
6
7
In the Settings window for Complement Selection, click  Build All Objects.
8
Click the  Zoom Extents button in the Graphics toolbar. Compare the resulting geometry to Figure 2.