PDF

Homogenizing a Heterogeneous Electrode Model
Introduction
This example demonstrates how to calculate the effective transport properties of a heterogeneous 3D geometry of an nickel manganese cobalt (NMC) electrode. The effective flux parameter is then used to create a representative homogenized 1D model of the NMC electrode.
By homogenizing, memory requirements and computational times are reduced by orders of magnitude.
See also the Heterogeneous NMC Electrode tutorial for how to define the corresponding heterogeneous model.
Model Definition
Figure 1 shows the 3D geometry generated from tomography data (Ref. 1) using a Model Method. The geometry consists of one separator domain, one domain representing the porous conductive binder, and number of particle domains. How the geometry is created is documented in the Heterogeneous Electrode Geometry Generation tutorial.
Figure 1: Model geometry.
Model for calculating effective transport parameters
The homogenized model of the NMC electrode uses one single domain to define all transport processes occurring in the electrode and electrolyte phases. The homogenized equations make use of effective (volume-averaged) transport parameters, which are calculated by multiplying the diffusivity and conductivities of the porous conductive binder by an effective flux parameter feff. This parameter is also sometimes referred to as the McMullin number (Ref. 2).
The effective flux parameter will depend on both the volume fraction, , and the tortuosity, , of the porous conductive binder domain according to
(1)
For a homogeneous domain (i.e. with no particles present) with volume fraction and tortuosity both equal to unity, feff = 1.
To calculate the effective transport coefficient for the porous conductive domain, we will solve for the Laplace equation (i.e. a diffusion equation with the diffusion coefficient equal to unity) using the dependent variable u.
(2)
in the porous conductive binder domain together with the boundary conditions
(3)
at the boundary facing the separator and
(4)
at the boundary facing the NMC current collector.
By integrating the flux in the solved model at the NMC current collector boundary, our effective flux parameter felec can be calculated as
(5)
Homogenized battery model
Figure 2 shows the 1D homogenized model geometry.
Figure 2: 1D geometry used in the homogenized model.
The model is defined using the Lithium-Ion Battery interface similarly to the Heterogeneous NMC Electrode tutorial, with the following differences:
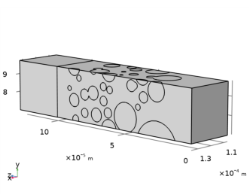
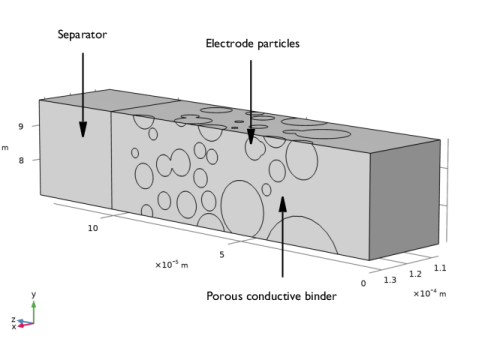
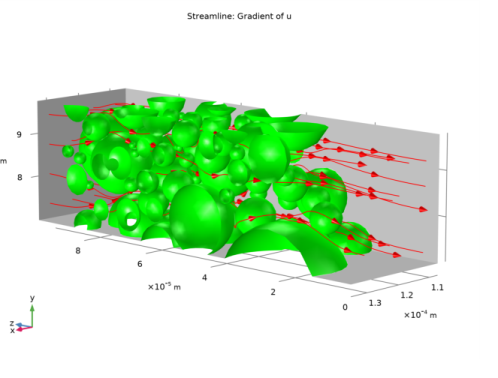
The Porous Electrode node is used to define the homogenized mixture of electrode particles, binder and electrolyte material of the electrode, considering the volume fractions of the electrode and electrolyte phases in the 3D geometry and the effective flux parameter feff .
A Porous Electrode Reaction child node to the Porous Electrode defines the equilibrium potential, and the electrode kinetics using a specific surface area parameter based on the 3D geometry.
The diffusion of solid lithium is solved for using an extra dimension defined by the Particle Intercalation child node to the Porous Electrode, using an average particle radius that was calculated by the model method when creating the 3D geometry. (In the Heterogeneous NMC Electrode tutorial a separate Transport of Diluted Species interface was used to model the intercalated lithium diffusion.)
For more details on this homogenized 1D approach to lithium battery cell modeling, see the 1D Isothermal Lithium-Ion Battery tutorial.
Similarly to the heterogeneous tutorial, two simulations are run: A 2C discharge from 100% state-of-charge (SOC), and an electrochemical impedance spectroscopy (EIS) simulation at 50% SOC.
Results and Discussion
Figure 3 shows the Laplacian flux through the porous conductive binder domain. Integrating the flux on the boundary and using Equation 5 results in the value feff=0.55.
Figure 3: Flux through the porous conductive binder domain when solving for the Laplace equation.
Figure 4 shows the 2C discharge curve of the battery, and compares the result to the heterogeneous model. The resulting discharge voltages of the two models match well during the discharge, apart from the final part of the discharge, where diffusion limitations of intercalated lithium in the largest particles of the heterogeneous model result in a faster drop of the discharge voltage. (Increasing the average radius parameter of the homogeneous model about 20% will make the two curves more or less overlap in this case.)
Figure 4: 2C discharge curves comparing the results from the homogenized model to the original heterogeneous model.
Figure 5 shows the Nyquist plot from the EIS simulation, compared to the heterogeneous model results. The two semi-circles, related to the charge transfer, more or less overlap, whereas the approx 45º tail, related to the intercalated lithium diffusion, show larger differences between the two models.
Figure 5: Nyquist plot from the EIS simulations at 50% lithiation of the NMC particles, comparing the results of the homogeneous model to the original heterogeneous model.
Reference
1. M.Ebner, F. Geldmacher , F. Marone , M. Stampanoni, and V. Wood, “X-Ray Tomography of Porous, Transition Metal Oxide Based Lithium Ion Battery Electrodes,” Adv. Energy Mater., vol. 3, pp. 845–850, 2013. See also supporting information at https://onlinelibrary.wiley.com/doi/abs/10.1002/aenm.201200932
2. A. Schmidt, E. Ramani, T. Carraro, J. Joos, A. Weber, M. Kamlah, and E. Ivers-Tiffée, “Understanding Deviations between Spatially Resolved and Homogenized Cathode Models of Lithium-Ion Batteries”, Energy Technol. 2021, 2000881
Application Library path: Battery_Design_Module/Batteries,_Heterogeneous/nmc_electrode_homogenization
Modeling Instructions
Application Libraries
1
From the File menu, choose Application Libraries.
2
In the Application Libraries window, select Battery Design Module>Batteries, Heterogeneous>nmc_electrode_geometry in the tree.
3
Geometry 1
1
In the Model Builder window, expand the Component 1 (comp1) node.
2
Right-click Component 1 (comp1)>Geometry 1 and choose Build All.
3
Click the  Wireframe Rendering button in the Graphics toolbar.
Add Physics
1
In the Home toolbar, click  Add Physics to open the Add Physics window.
2
Go to the Add Physics window.
3
In the tree, select Mathematics>Classical PDEs>Laplace Equation (lpeq).
4
Click Add to Component 1 in the window toolbar.
5
In the Home toolbar, click  Add Physics to close the Add Physics window.
Laplace Equation (lpeq)
1
In the Settings window for Laplace Equation, locate the Domain Selection section.
2
From the Selection list, choose Porous Conductive Binder.
Dirichlet Boundary Condition 1
1
Right-click Component 1 (comp1)>Laplace Equation (lpeq) and choose Dirichlet Boundary Condition.
2
Dirichlet Boundary Condition 2
1
In the Physics toolbar, click  Boundaries and choose Dirichlet Boundary Condition.
2
3
In the Settings window for Dirichlet Boundary Condition, locate the Dirichlet Boundary Condition section.
4
In the r text field, type 1.
Mesh 1
1
In the Model Builder window, under Component 1 (comp1) click Mesh 1.
2
In the Settings window for Mesh, locate the Sequence Type section.
3
From the list, choose User-controlled mesh.
Size
1
In the Model Builder window, under Component 1 (comp1)>Mesh 1 click Size.
2
In the Settings window for Size, click to expand the Element Size Parameters section.
3
In the Maximum element size text field, type hmax.
4
In the Minimum element size text field, type hmin.
5
Click  Build All.
Add Study
1
In the Home toolbar, click  Add Study to open the Add Study window.
2
Go to the Add Study window.
3
Find the Studies subsection. In the Select Study tree, select General Studies>Stationary.
4
Click Add Study in the window toolbar.
5
In the Home toolbar, click  Add Study to close the Add Study window.
Study 1
In the Home toolbar, click  Compute.
Results
Dependent Variable u
Inspect the default plot for the dependent variable u.
1
In the Settings window for 3D Plot Group, type Dependent Variable u in the Label text field.
2
In the Dependent Variable u toolbar, click  Plot.
Flux
Create a streamline plot of the flux (Figure 3) as follows:
1
In the Home toolbar, click  Add Plot Group and choose 3D Plot Group.
2
In the Settings window for 3D Plot Group, type Flux in the Label text field.
Streamline 1
1
Right-click Flux and choose Streamline.
2
3
In the Settings window for Streamline, locate the Coloring and Style section.
4
Find the Point style subsection. From the Type list, choose Arrow.
5
In the Flux toolbar, click  Plot.
Surface 1
1
In the Model Builder window, right-click Flux and choose Surface.
2
In the Settings window for Surface, locate the Expression section.
3
In the Expression text field, type 1.
4
Locate the Coloring and Style section. From the Coloring list, choose Uniform.
5
From the Color list, choose Green.
6
Click to expand the Title section. From the Title type list, choose None.
Selection 1
1
Right-click Surface 1 and choose Selection.
2
In the Settings window for Selection, locate the Selection section.
3
From the Selection list, choose Particle Surfaces.
4
In the Flux toolbar, click  Plot.
Surface 2
1
In the Model Builder window, right-click Flux and choose Surface.
2
In the Settings window for Surface, locate the Expression section.
3
In the Expression text field, type 1.
4
Locate the Coloring and Style section. From the Coloring list, choose Uniform.
5
From the Color list, choose Gray.
6
Locate the Title section. From the Title type list, choose None.
Selection 1
1
Right-click Surface 2 and choose Selection.
2
3
In the Flux toolbar, click  Plot.
Flux
1
In the Model Builder window, under Results click Flux.
2
In the Settings window for 3D Plot Group, locate the Plot Settings section.
3
Clear the Plot dataset edges check box.
4
In the Flux toolbar, click  Plot.
Surface Average - Effective Flux Factor
Calculate the effective flux factor through the porous conductive binder as follows:
1
In the Results toolbar, click  More Derived Values and choose Average>Surface Average.
2
In the Settings window for Surface Average, type Surface Average - Effective Flux Factor in the Label text field.
3
4
Click Replace Expression in the upper-right corner of the Expressions section. From the menu, choose Component 1 (comp1)>Laplace Equation>dflux.u - Boundary flux down direction - 1/m.
5
Locate the Expressions section. In the table, enter the following settings:
6
Click  Evaluate.
Make a note of the derived value in Table 2, and add the corresponding f_eff parameter to use in the homogenized model as follows:
Global Definitions
Geometry Parameters
1
In the Model Builder window, under Global Definitions click Geometry Parameters.
2
In the Settings window for Parameters, locate the Parameters section.
3
Electrode Parameters
Import some additional parameters for the homogenized model.
1
In the Home toolbar, click  Parameters and choose Add>Parameters.
2
In the Settings window for Parameters, type Electrode Parameters in the Label text field.
3
Locate the Parameters section. Click  Load from File.
4
Root
The homogenized 1D model is placed in a separate component.
Add Component
In the Model Builder window, right-click the root node and choose Add Component>1D.
Geometry 2
Interval 1 (i1)
1
In the Model Builder window, under Component 2 (comp2) right-click Geometry 2 and choose Interval.
2
In the Settings window for Interval, locate the Interval section.
3
From the Specify list, choose Interval lengths.
4
5
Click  Build Selected.
Add Physics
1
In the Home toolbar, click  Add Physics to open the Add Physics window.
2
Go to the Add Physics window.
3
In the tree, select Electrochemistry>Batteries>Lithium-Ion Battery (liion).
4
Click Add to Component 2 in the window toolbar.
5
In the Home toolbar, click  Add Physics to close the Add Physics window.
Add Material
1
In the Home toolbar, click  Add Material to open the Add Material window.
2
Go to the Add Material window.
3
In the tree, select Battery>Electrodes>NMC 111, LiNi0.33Mn0.33Co0.33O2 (Positive, Li-ion Battery).
4
Right-click and choose Add to Component 2 (comp2).
5
In the tree, select Battery>Electrodes>Lithium Metal, Li (Negative, Li-ion Battery).
6
Right-click and choose Add to Component 2 (comp2).
7
In the tree, select Battery>Electrolytes>LiPF6 in 3:7 EC:EMC (Liquid, Li-ion Battery).
8
Right-click and choose Add to Component 2 (comp2).
9
In the Home toolbar, click  Add Material to close the Add Material window.
Materials
Lithium Metal, Li (Negative, Li-ion Battery) (mat2)
1
In the Settings window for Material, locate the Geometric Entity Selection section.
2
From the Geometric entity level list, choose Boundary.
3
LiPF6 in 3:7 EC:EMC (Liquid, Li-ion Battery) (mat3)
1
In the Model Builder window, click LiPF6 in 3:7 EC:EMC (Liquid, Li-ion Battery) (mat3).
2
In the Settings window for Material, locate the Geometric Entity Selection section.
3
From the Selection list, choose All domains.
Lithium-Ion Battery (liion)
1
In the Model Builder window, under Component 2 (comp2) click Lithium-Ion Battery (liion).
2
In the Settings window for Lithium-Ion Battery, locate the Cross-Sectional Area section.
3
In the Ac text field, type A_cross.
Separator 1
1
In the Physics toolbar, click  Domains and choose Separator.
2
3
In the Settings window for Separator, locate the Porous Matrix Properties section.
4
In the εl text field, type epsl_sep.
Porous Electrode 1
1
In the Physics toolbar, click  Domains and choose Porous Electrode.
2
3
In the Settings window for Porous Electrode, locate the Electrode Properties section.
4
From the σs list, choose User defined. In the associated text field, type sigma_s.
5
Locate the Porous Matrix Properties section. In the εs text field, type eps_particles.
6
In the εl text field, type eps_l_b*eps_binder.
7
Locate the Effective Transport Parameter Correction section. From the Electrolyte conductivity list, choose User defined. In the fl text field, type f_eff*(eps_l_b^1.5).
8
From the Electrical conductivity list, choose User defined. In the fs text field, type f_eff.
9
From the Diffusion list, choose User defined. In the fDl text field, type f_eff*(eps_l_b^1.5).
Particle Intercalation 1
1
In the Model Builder window, click Particle Intercalation 1.
2
In the Settings window for Particle Intercalation, locate the Material section.
3
From the Particle material list, choose NMC 111, LiNi0.33Mn0.33Co0.33O2 (Positive, Li-ion Battery) (mat1).
4
Locate the Species Settings section. In the cs,init text field, type cs0.
5
Locate the Particle Transport Properties section. In the rp text field, type rp_avg_spheres.
Porous Electrode Reaction 1
1
In the Model Builder window, click Porous Electrode Reaction 1.
2
In the Settings window for Porous Electrode Reaction, locate the Material section.
3
From the Material list, choose NMC 111, LiNi0.33Mn0.33Co0.33O2 (Positive, Li-ion Battery) (mat1).
4
Locate the Electrode Kinetics section. In the i0,ref(T) text field, type i0_ref_NMC.
5
Locate the Active Specific Surface Area section. From the Active specific surface area list, choose User defined. In the av text field, type Av_particles.
Electrode Surface 1
1
In the Physics toolbar, click  Boundaries and choose Electrode Surface.
2
Electrode Reaction 1
1
In the Model Builder window, click Electrode Reaction 1.
2
In the Settings window for Electrode Reaction, locate the Electrode Kinetics section.
3
In the i0,ref(T) text field, type i0_ref_Li.
Electrode Current 1
1
In the Physics toolbar, click  Boundaries and choose Electrode Current.
2
3
In the Settings window for Electrode Current, locate the Electrode Current section.
4
In the Is,total text field, type -I_1C*C_rate.
Definitions (comp2)
Integration 1 (intop1)
1
In the Definitions toolbar, click  Nonlocal Couplings and choose Integration.
2
In the Settings window for Integration, locate the Source Selection section.
3
From the Geometric entity level list, choose Boundary.
4
5
In the Operator name text field, type intop_nmc_cc.
Add Study
1
In the Home toolbar, click  Add Study to open the Add Study window.
Solve the homogenized model in a new study. Disable the Laplace equation in this study.
2
Go to the Add Study window.
3
Find the Studies subsection. In the Select Study tree, select Preset Studies for Some Physics Interfaces>Time Dependent with Initialization.
4
5
In the Model Builder window, click the root node.
6
In the Home toolbar, click  Add Study to close the Add Study window.
Study 2
Step 1: Current Distribution Initialization
1
In the Settings window for Current Distribution Initialization, locate the Physics and Variables Selection section.
2
In the table, clear the Solve for check box for Laplace Equation (lpeq).
3
Click to expand the Mesh Selection section. Disabling the mesh in Geometry 1, which is not used by the homogenized model, memory can be saved.
4
Step 2: Time Dependent
1
In the Model Builder window, click Step 2: Time Dependent.
2
In the Settings window for Time Dependent, locate the Study Settings section.
3
From the Time unit list, choose h.
4
In the Output times text field, type range(0,0.1/C_rate,0.9/C_rate).
5
Locate the Physics and Variables Selection section. In the table, clear the Solve for check box for Laplace Equation (lpeq).
6
Click to expand the Mesh Selection section. In the table, enter the following settings:
Solution 2 (sol2)
1
In the Study toolbar, click  Show Default Solver.
2
In the Model Builder window, expand the Solution 2 (sol2) node, then click Time-Dependent Solver 1.
3
In the Settings window for Time-Dependent Solver, locate the General section.
4
From the Times to store list, choose Steps taken by solver.
5
Right-click Study 2>Solver Configurations>Solution 2 (sol2)>Time-Dependent Solver 1 and choose Stop Condition.
6
In the Settings window for Stop Condition, locate the Stop Expressions section.
7
8
9
Locate the Output at Stop section. Clear the Add warning check box.
10
In the Study toolbar, click  Compute.
Results
Boundary Electrode Potential with Respect to Ground (liion)
The discharge voltage is plotted by default.
1
In the Boundary Electrode Potential with Respect to Ground (liion) toolbar, click  Plot.
Lithium-Ion Battery (liion)
Now start setting up the EIS simulation.
Porous Electrode 1
In the Model Builder window, under Component 2 (comp2)>Lithium-Ion Battery (liion) click Porous Electrode 1.
Porous Matrix Double Layer Capacitance 1
1
In the Physics toolbar, click  Attributes and choose Porous Matrix Double Layer Capacitance.
2
In the Settings window for Porous Matrix Double Layer Capacitance, locate the Porous Matrix Double Layer Capacitance section.
3
In the Cdl text field, type C_dl_NMC.
4
From the Double layer area list, choose User defined. In the av,dl text field, type Av_particles.
Electrode Current - Harmonic Perturbation
1
In the Model Builder window, under Component 2 (comp2)>Lithium-Ion Battery (liion) right-click Electrode Current 1 and choose Duplicate.
2
In the Settings window for Electrode Current, type Electrode Current - Harmonic Perturbation in the Label text field.
3
Locate the Electrode Current section. In the Is,total text field, type 0.
Harmonic Perturbation 1
1
In the Physics toolbar, click  Attributes and choose Harmonic Perturbation.
2
In the Settings window for Harmonic Perturbation, locate the Harmonic Perturbation section.
3
In the ΔIs,total text field, type I_1C/20.
Global Definitions
Electrode Parameters
1
In the Model Builder window, under Global Definitions click Electrode Parameters.
2
In the Settings window for Parameters, locate the Parameters section.
3
Add Study
1
In the Home toolbar, click  Add Study to open the Add Study window.
2
Go to the Add Study window.
3
Find the Studies subsection. In the Select Study tree, select Preset Studies for Some Physics Interfaces>AC Impedance, Initial Values.
4
5
In the Model Builder window, click the root node.
6
In the Home toolbar, click  Add Study to close the Add Study window.
Study 3
Step 1: Frequency Domain Perturbation
1
In the Settings window for Frequency Domain Perturbation, locate the Study Settings section.
2
In the Frequencies text field, type 10^range(-2.6,0.2,5).
3
Locate the Physics and Variables Selection section. In the table, clear the Solve for check box for Laplace Equation (lpeq).
4
Click to expand the Mesh Selection section. In the table, enter the following settings:
Current Distribution Initialization
1
In the Study toolbar, click  Study Steps and choose Other>Current Distribution Initialization.
2
Right-click Study 3>Step 2: Current Distribution Initialization and choose Move Up.
3
In the Settings window for Current Distribution Initialization, locate the Physics and Variables Selection section.
4
In the table, clear the Solve for check box for Laplace Equation (lpeq).
5
Locate the Mesh Selection section. In the table, enter the following settings:
6
In the Study toolbar, click  Compute.
Results
Heterogeneous Discharge Data (Imported)
1
In the Results toolbar, click  Table.
2
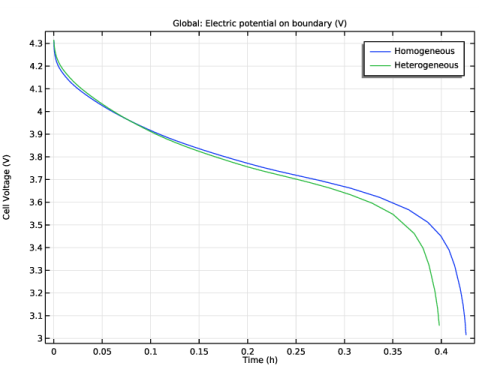
In the Settings window for Table, type Heterogeneous Discharge Data (Imported) in the Label text field.
3
Locate the Data section. Click Import.
4
Heterogeneous EIS Data (Imported)
1
In the Results toolbar, click  Table.
2
In the Settings window for Table, type Heterogeneous EIS Data (Imported) in the Label text field.
3
Locate the Data section. Click Import.
4
Discharge Voltage
1
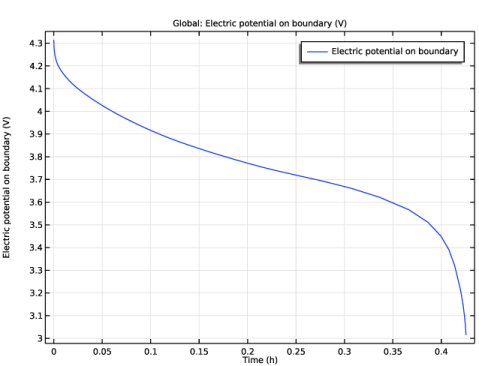
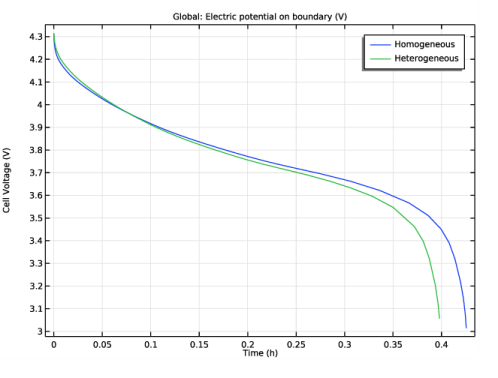
In the Model Builder window, under Results click Boundary Electrode Potential with Respect to Ground (liion).
2
In the Settings window for 1D Plot Group, type Discharge Voltage in the Label text field.
3
Locate the Plot Settings section. Select the y-axis label check box.
4
Table Graph 1
1
Right-click Discharge Voltage and choose Table Graph.
2
In the Settings window for Table Graph, locate the Data section.
3
From the Table list, choose Heterogeneous Discharge Data (Imported).
4
Click to expand the Legends section. Select the Show legends check box.
5
From the Legends list, choose Manual.
6
Global 1
1
In the Model Builder window, click Global 1.
2
In the Settings window for Global, click to expand the Legends section.
3
From the Legends list, choose Manual.
4
5
In the Discharge Voltage toolbar, click  Plot.
Impedance with Respect to Ground, Nyquist (liion)
We can compare the Nyquist plots from both the heterogeneous and the homogeneous approach (Figure 5).
1
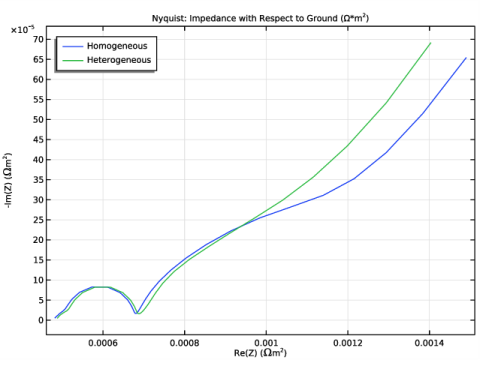
In the Model Builder window, expand the Results>Impedance with Respect to Ground, Nyquist (liion) node, then click Impedance with Respect to Ground, Nyquist (liion).
2
In the Settings window for 1D Plot Group, locate the Plot Settings section.
3
Select the x-axis label check box.
4
In the associated text field, type Re(Z) (\Omega m<sup>2</sup>).
5
Select the y-axis label check box.
6
In the associated text field, type -Im(Z) (\Omega m<sup>2</sup>).
7
Locate the Legend section. From the Position list, choose Upper left.
Table Graph 1
1
Right-click Impedance with Respect to Ground, Nyquist (liion) and choose Table Graph.
2
In the Settings window for Table Graph, locate the Data section.
3
From the Table list, choose Heterogeneous EIS Data (Imported).
4
From the x-axis data list, choose Imaginary Part of Z (Ω*m^2)                       Real Part of Z (Ω*m^2).
5
From the Plot columns list, choose Manual.
6
In the Columns list, select Column 2.
7
Locate the Legends section. Select the Show legends check box.
8
From the Legends list, choose Manual.
9
10
In the Impedance with Respect to Ground, Nyquist (liion) toolbar, click  Plot.
Nyquist 1
1
In the Model Builder window, click Nyquist 1.
2
In the Settings window for Nyquist, click to expand the Legends section.
3
From the Legends list, choose Manual.
4
5
In the Impedance with Respect to Ground, Nyquist (liion) toolbar, click  Plot.