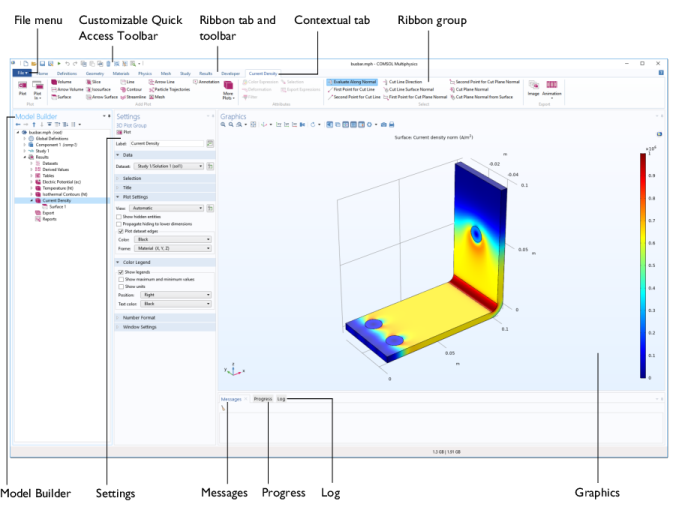
This section is an overview of the major components in the COMSOL Multiphysics environment. These components are integrated into the
COMSOL Desktop, which you can personalize to your own modeling needs and preferences. Primarily consisting of the
Model Builder nodes,
Settings windows, and
Graphics windows, other dockable windows can be opened, closed, and organized according to the modeling settings you need to access and the GUI configuration you want to work in. You can save these configurations, and the last opened configuration is always displayed when you open COMSOL again.
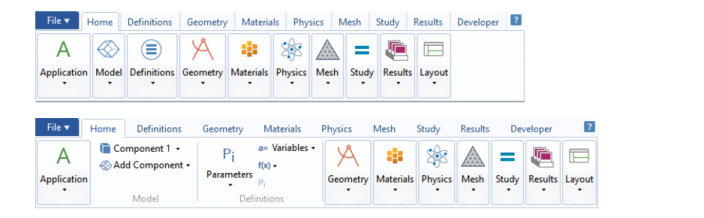
When the complete COMSOL Desktop is resized, the toolbar collapses and the buttons are grouped into menus. In Figure 2-2, all the groups in the
Home toolbar are collapsed into menus. As the window is widened, the ribbon groups expand again to include the options as buttons or other submenus.
When you are on the COMSOL Desktop you can toggle between the Application Builder and COMSOL Multiphysics. In the Home toolbar click
Application Builder 
to open the Application Editor and modify the user interface of the application and to create and edit code for the application. You can also press Ctrl+Shift+A.
Conversely, when you are in the Application Builder, you can click Model Builder 
in the
Home toolbar to return to COMSOL Multiphysics. You can also press Ctrl+Shift+M.
After this introductory overview, The Application Libraries Window section explains how to work with the application libraries included with the COMSOL Multiphysics products.
The Physics Interfaces section lists the interfaces available with a basic COMSOL Multiphysics license. This prepares you to start creating a new model.
The next section, Creating a New Model, shows you how to use the Model Wizard to begin building a new model by choosing a physics interface and study combination.
The last section, Toolbars and Keyboard Shortcuts, is a quick reference to all the features found on the toolbars. It includes links to the information contained throughout this reference manual.