
|
|
|
|
•
|
|
•
|
Positive porous electrode: NCA (LiNi0.08Co0.15Al0.05O2) active material, electronic conductor, and filler.
|
|
•
|
Electrolyte: 1.2 M LiPF6 in EC:EMC (3:7 by weight)
|
|
1 Am-2
|
||

|
2.6 Am-2
|
|
|
1
|
|
2
|
|
3
|
Click Add.
|
|
4
|
Click
|
|
5
|
In the Select Study tree, select Preset Studies for Selected Physics Interfaces > AC Impedance, Initial Values.
|
|
6
|
Click
|
|
1
|
|
2
|
|
3
|
Click
|
|
4
|
Browse to the model’s Application Libraries folder and double-click the file li_battery_impedance_parameters.txt.
|
|
1
|
In the Model Builder window, under Component 1 (comp1) right-click Definitions and choose Variables.
|
|
2
|
|
3
|
Click
|
|
4
|
Browse to the model’s Application Libraries folder and double-click the file li_battery_impedance_variables.txt.
|
|
1
|
|
2
|
|
3
|
Locate the Interval section. In the table, enter the following settings:
|
|
4
|
Locate the Selections of Resulting Entities section. Select the Resulting objects selection checkbox.
|
|
1
|
|
2
|
|
3
|
|
4
|
|
6
|
Locate the Selections of Resulting Entities section. Select the Resulting objects selection checkbox.
|
|
1
|
|
2
|
|
3
|
|
4
|
|
6
|
Locate the Selections of Resulting Entities section. Select the Resulting objects selection checkbox.
|
|
1
|
|
2
|
|
3
|
|
4
|
Locate the Selections of Resulting Entities section. Select the Resulting objects selection checkbox.
|
|
5
|
Click
|
|
6
|
|
1
|
|
2
|
Go to the Add Material window.
|
|
3
|
|
4
|
Click the Add to Component button in the window toolbar.
|
|
5
|
|
6
|
Click the Add to Component button in the window toolbar.
|
|
7
|
|
8
|
Click the Add to Component button in the window toolbar.
|
|
9
|
|
1
|
|
2
|
|
1
|
|
2
|
|
3
|
|
1
|
|
2
|
|
3
|
|
1
|
In the Model Builder window, under Component 1 (comp1) > Lithium-Ion Battery (liion) click Separator 1.
|
|
2
|
|
3
|
|
4
|
Locate the Effective Transport Parameter Correction section. From the Electrolyte conductivity list, choose User defined. In the fl text field, type epsl_sep^brugl_sep.
|
|
5
|
|
1
|
|
2
|
|
3
|
|
4
|
Locate the Electrolyte Properties section. From the Electrolyte material list, choose LiPF6 in 3:7 EC:EMC (Liquid, Li-ion Battery) (mat1).
|
|
5
|
|
6
|
Click to expand the Film Resistance section. From the Film resistance list, choose Surface resistance.
|
|
7
|
|
8
|
|
9
|
|
10
|
Locate the Effective Transport Parameter Correction section. From the Electrolyte conductivity list, choose User defined. In the fl text field, type epsl_neg^brugl_neg.
|
|
11
|
|
1
|
|
2
|
|
3
|
|
4
|
|
5
|
|
1
|
|
2
|
|
3
|
|
4
|
|
1
|
|
2
|
In the Settings window for Porous Matrix Double Layer Capacitance, locate the Porous Matrix Double Layer Capacitance section.
|
|
3
|
|
1
|
|
2
|
|
3
|
|
4
|
Locate the Electrolyte Properties section. From the Electrolyte material list, choose LiPF6 in 3:7 EC:EMC (Liquid, Li-ion Battery) (mat1).
|
|
5
|
|
6
|
|
7
|
|
8
|
|
9
|
|
10
|
Locate the Effective Transport Parameter Correction section. From the Electrolyte conductivity list, choose User defined. In the fl text field, type epsl_pos^brugl_pos.
|
|
11
|
|
1
|
|
2
|
|
3
|
From the Particle material list, choose NCA, LiNi0.8Co0.15Al0.05O2 (Positive, Li-ion Battery) (mat3).
|
|
4
|
|
5
|
|
1
|
|
2
|
|
3
|
|
4
|
Locate the Electrode Kinetics section. From the Kinetics expression type list, choose Butler-Volmer.
|
|
5
|
|
6
|
Locate the Active Specific Surface Area section. From the Active specific surface area list, choose User defined. In the av text field, type as_pos.
|
|
1
|
|
2
|
In the Settings window for Porous Matrix Double Layer Capacitance, locate the Porous Matrix Double Layer Capacitance section.
|
|
3
|
|
4
|
|
1
|
In the Model Builder window, under Component 1 (comp1) > Lithium-Ion Battery (liion) click Initial Values 1.
|
|
2
|
|
3
|
|
4
|
|
1
|
|
2
|
|
3
|
|
4
|
|
5
|
|
6
|
|
1
|
|
1
|
|
3
|
|
4
|
|
5
|
|
6
|
|
1
|
|
2
|
|
3
|
|
1
|
|
2
|
In the Settings window for Additional Porous Electrode Material, locate the Domain Selection section.
|
|
3
|
|
4
|
|
1
|
|
2
|
In the Settings window for Porous Matrix Double Layer Capacitance, locate the Porous Matrix Double Layer Capacitance section.
|
|
3
|
|
4
|
From the Double-layer area list, choose User defined. In the av,dl text field, type cdlvol_cs_pos/1[F/m^2].
|
|
1
|
|
2
|
|
3
|
|
1
|
|
2
|
|
3
|
From the list, choose User-controlled mesh.
|
|
1
|
|
2
|
|
3
|
Click the Custom button.
|
|
4
|
|
1
|
|
3
|
|
4
|
Click the Custom button.
|
|
5
|
Locate the Element Size Parameters section.
|
|
6
|
|
1
|
|
3
|
|
4
|
Click the Custom button.
|
|
5
|
Locate the Element Size Parameters section.
|
|
6
|
|
1
|
|
2
|
|
3
|
|
4
|
|
1
|
|
2
|
|
1
|
In the Model Builder window, under Study 1 > Solver Configurations click Solution 1 - Copy 1 (sol2).
|
|
2
|
|
1
|
|
2
|
|
3
|
|
4
|
Browse to the model’s Application Libraries folder and double-click the file li_battery_impedance_Zexp.csv.
|
|
1
|
|
2
|
|
3
|
Click to expand the Title section. Locate the Data section. From the Dataset list, choose Study 1/Not Optimized (sol2).
|
|
4
|
|
5
|
|
1
|
|
2
|
|
3
|
|
4
|
|
5
|
Clear the Solution checkbox.
|
|
1
|
|
3
|
|
4
|
|
5
|
|
6
|
|
7
|
|
8
|
|
9
|
Clear the Point checkbox.
|
|
10
|
Clear the Solution checkbox.
|
|
1
|
|
2
|
|
3
|
|
4
|
|
1
|
|
2
|
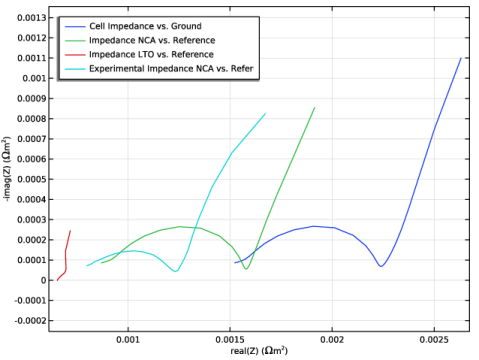
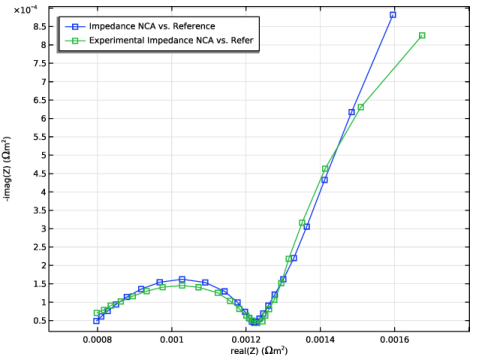
In the Settings window for Table Graph, type Experimental Impedance NCA vs. Reference in the Label text field.
|
|
3
|
|
4
|
|
5
|
|
6
|
|
7
|
|
8
|
|
9
|
Clear the Headers checkbox.
|
|
1
|
|
2
|
|
3
|
|
4
|
|
5
|
|
6
|
|
1
|
In the Model Builder window, under Results, Ctrl-click to select Impedance with Respect to Ground, Real Part (liion) and Impedance with Respect to Ground, Imaginary Part (liion).
|
|
2
|
Right-click and choose Delete.
|
|
1
|
|
2
|
|
3
|
Click
|
|
4
|
Browse to the model’s Application Libraries folder and double-click the file li_battery_impedance_parametric_sweep.txt.
|
|
5
|
|
6
|
|
7
|
Clear the Generate default plots checkbox.
|
|
8
|
Clear the Generate convergence plots checkbox.
|
|
9
|
|
1
|
In the Model Builder window, under Study 1 > Solver Configurations click Parametric Solutions 1 (sol3).
|
|
2
|
|
1
|
|
2
|
In the Settings window for 1D Plot Group, type Nyquist Plots, Parametric Sweep in the Label text field.
|
|
1
|
|
2
|
|
1
|
In the Model Builder window, under Results > Nyquist Plots, Parametric Sweep click Impedance NCA vs. Reference.
|
|
2
|
|
3
|
|
4
|
|
Rfilm_pos=1\<sup\>.\</sup\>10\<sup\>-5\</sup\> Ωm\<sup\>2\</sup\>
|
|
1
|
|
2
|
|
3
|
|
1
|
|
2
|
Go to the Add Study window.
|
|
3
|
Find the Studies subsection. In the Select Study tree, select Preset Studies for Selected Physics Interfaces > AC Impedance, Initial Values.
|
|
4
|
Click the Add Study button in the window toolbar.
|
|
5
|
|
1
|
|
2
|
Clear the Generate default plots checkbox.
|
|
3
|
Clear the Generate convergence plots checkbox.
|
|
1
|
|
2
|
|
3
|
|
4
|
Locate the Data Column Settings section. In the table, click to select the cell at row number 1 and column number 2.
|
|
5
|
From the drop-down list, choose Frequency.
|
|
7
|
|
8
|
|
9
|
|
10
|
|
12
|
|
13
|
|
14
|
|
15
|
|
16
|
|
18
|
|
19
|
Find the Solver settings subsection. From the Least-squares time/parameter list method list, choose Use only least-squares data points.
|
|
20
|
|
21
|
|
1
|
|
2
|
|
3
|
|
4
|
|
5
|
|
1
|
|
2
|
|
3
|
|
1
|
In the Model Builder window, expand the Nyquist Plots, Optimization node, then click Impedance NCA vs. Reference.
|
|
2
|
|
3
|
|
4
|
Click to expand the Coloring and Style section. Find the Line markers subsection. From the Marker list, choose Square.
|
|
5
|
|
6
|
|
7
|
|
1
|
|
2
|
|
3
|
|
4
|
|
5
|
|
1
|
|
2
|
|
3
|
|
4
|
|
1
|
|
2
|
|
1
|
|
2
|
|
3
|