Use the Cleanup Wizard (

), shown in
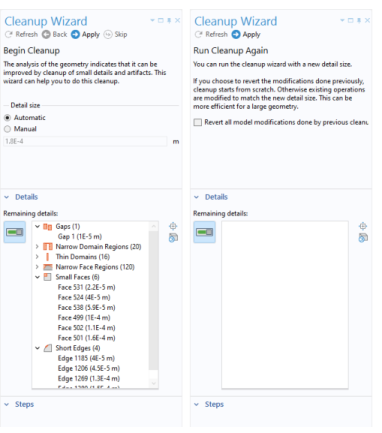
Figure 7-17, to manually step through each step in the cleanup process. It is possible to modify the detail size used by the process, to skip steps in the process, and to go back and forth between steps to see if the action made wanted changes to the geometry. It is also possible to mesh the geometry before and after a step in the process to check how the element quality is influenced.

To open up the Cleanup Wizard, click the
Open Wizard button when prompted how to clean up small details, click the
Cleanup Wizard (

) button on
The Geometry Toolbar, or click the
Cleanup Wizard (

) button in the
Settings window of
The Cleanup Log node (

).
To modify the detail size, select the Manual radio button and edit the value for
Detail size. If you make changes to the geometry or if you change the
Detail size setting, click the
Refresh (

) button to update the list or detected details. Click
Back (

) to revert a step in the process and click
Apply (

) to accept the suggested modification. Click
Skip (

) to jump to the next suggested action without applying this one.
If the Cleanup Wizard has been restarted, as shown in the right image in Figure 7-17, you can select to click
Apply (

) to continue cleaning the geometry with a new detail size. Select the
Revert all model modifications done by previous cleanup to revert the previous cleanup modifications before restarting the process.
The Remaining details list contains the details detected using the current detail size. The details detected by the geometry cleanup are gaps, narrow domain regions, thin domains, narrow face regions, sliver faces, small faces, and short edges.
Close the window by clicking Done (

) on the last page of the
Cleanup Wizard. It then adds a Cleanup Log node (

) and opens up its
Settings window.

