|


|
1
|
|
2
|
|
3
|
Click Add.
|
|
4
|
Click
|
|
5
|
In the Select Study tree, select Preset Studies for Selected Physics Interfaces>Boundary Mode Analysis.
|
|
6
|
Click
|
|
1
|
|
2
|
In the Part Libraries window, select Wave Optics Module>Slab Waveguides>slab_waveguide_straight_to_ring_coupler in the tree.
|
|
3
|
|
1
|
In the Model Builder window, under Component 1 (comp1)>Geometry 1 click Slab Waveguide Straight-to-Ring Coupler 1 (pi1).
|
|
2
|
|
1
|
|
2
|
|
3
|
|
4
|
Browse to the model’s Application Libraries folder and double-click the file optical_ring_resonator_parameters.txt.
|
|
1
|
In the Model Builder window, under Component 1 (comp1)>Geometry 1 click Slab Waveguide Straight-to-Ring Coupler 1 (pi1).
|
|
2
|
|
4
|
Locate the Position and Orientation of Output section. In the y-displacement text field, type -r0-w_clad/2.
|
|
5
|
|
6
|
|
7
|
|
8
|
|
1
|
In the Model Builder window, under Component 1 (comp1) right-click Definitions and choose Variables.
|
|
2
|
|
3
|
|
4
|
|
5
|
Locate the Variables section. In the table, enter the following settings:
|
|
1
|
|
2
|
|
3
|
|
4
|
|
5
|
Locate the Variables section. In the table, enter the following settings:
|
|
1
|
|
2
|
|
3
|
|
4
|
|
5
|
Locate the Variables section. In the table, enter the following settings:
|
|
1
|
In the Model Builder window, under Component 1 (comp1) right-click Materials and choose Blank Material.
|
|
2
|
|
3
|
Locate the Geometric Entity Selection section. From the Selection list, choose Cladding (Slab Waveguide Straight-to-Ring Coupler 1).
 |
|
4
|
|
1
|
|
2
|
|
3
|
Locate the Geometric Entity Selection section. From the Selection list, choose Core (Slab Waveguide Straight-to-Ring Coupler 1).
 |
|
4
|
|
1
|
In the Model Builder window, under Component 1 (comp1) click Electromagnetic Waves, Beam Envelopes (ewbe).
|
|
2
|
|
3
|
|
4
|
|
5
|
|
6
|
|
1
|
|
2
|
|
3
|
|
4
|
|
1
|
|
2
|
|
3
|
|
4
|
|
1
|
|
2
|
|
3
|
|
4
|
|
5
|
In the Show More Options dialog box, in the tree, select the check box for the node Physics>Advanced Physics Options.
|
|
6
|
Click OK.
|
|
1
|
|
2
|
|
3
|
|
1
|
|
2
|
|
3
|
|
1
|
|
2
|
|
3
|
|
1
|
|
2
|
|
3
|
Click the Custom button.
|
|
4
|
|
5
|
|
1
|
|
2
|
|
3
|
|
4
|
|
1
|
|
2
|
|
3
|
|
1
|
|
2
|
|
3
|
|
4
|
|
1
|
|
2
|
|
3
|
Click
|
|
4
|
|
5
|
Click
|
|
6
|
|
7
|
|
8
|
|
9
|
|
10
|
Click Replace.
|
|
11
|
|
13
|
|
1
|
|
2
|
|
3
|
|
1
|
|
2
|
|
3
|
|
4
|
|
1
|
In the Model Builder window, under Results click Reflectance, Transmittance, and Absorptance (ewbe).
|
|
2
|
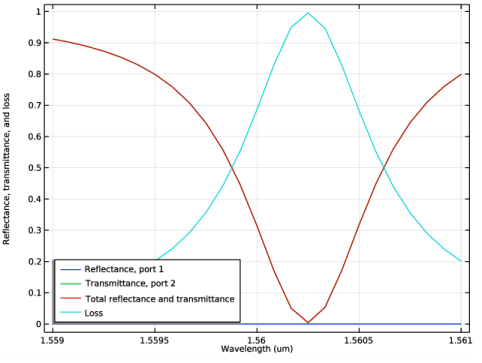
In the Settings window for 1D Plot Group, type Reflectance, Transmittance, and Loss (ewbe) in the Label text field.
|
|
3
|
Locate the Plot Settings section. In the y-axis label text field, type Reflectance, transmittance, and loss.
|
|
4
|
|
1
|
In the Model Builder window, expand the Reflectance, Transmittance, and Loss (ewbe) node, then click Global 1.
|
|
2
|
|
4
|
|
1
|
|
2
|
|
3
|
|
4
|
|
1
|
|
2
|
|
3
|
|
4
|