PDF

Capacitive Pressure Sensor
Introduction
Capacitive pressure sensors are gaining market share over their piezoresistive counterparts since they consume less power, are usually less temperature sensitive and have a lower fundamental noise floor. This model performs an analysis of a hypothetical sensor design discussed in Ref. 1, using the electromechanics interface. The effect of a rather poor choice of packaging solution on the performance of the sensor is also considered. The results emphasize the importance of considering packaging in the MEMS design process.
Model Definition
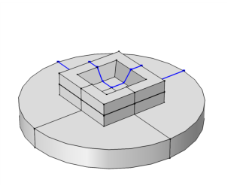
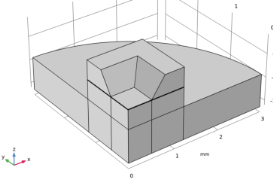
The model geometry is shown in Figure 1. The pressure sensor is part of a silicon die that has been bonded to a metal plate at 70 °C. Since the geometry is symmetric, only a single quadrant of the geometry needs to be included in the model, and it is possible to use symmetry boundary condition.
Figure 1: The model geometry. Left: The symmetric device geometry, with one quadrant highlighted in blue, showing the symmetry planes. Right: In COMSOL only the highlighted quadrant is modeled, and the symmetry boundary condition is used on the cross section walls.
A detailed 2D section through the functional part of the device is shown in Figure 2. A thin membrane is held at a fixed potential of 1 V. The membrane is separated from a ground plane chamber sealed under high vacuum. The sides of the chamber are insulating to prevent a connection between the membrane and the ground plane (for simplicity the insulating layer is not modeled explicitly in the COMSOL model; this approximation has little effect on the results of the study.).
Figure 2: Cross section through the device showing the capacitor. The vertical axis has been expanded to emphasize the gap.
When the pressure outside of the sealed chamber changes, the pressure difference causes the membrane to deflect. The thickness of the sealed chamber now varies across the membrane and its capacitance to ground therefore changes. This capacitance is then monitored by an interfacing circuit, such as the switched capacitor amplifier circuit discussed in Ref. 1.
Thermal stresses are introduced into the structure as a result of the thermal conductivity mismatch between the silicon die and the metal plate, and the elevated temperature used for the bonding process. These stresses change the deformation of the diaphragm in response to applied pressures and alter the response of the sensor. In addition, because the stresses are temperature dependent, they introduce an undesired temperature dependence to the device output.
Initially the sensor is analyzed in the case where there are no packaging stresses. Then the effect of the packaging stress is considered. First, the device response at fixed temperature is evaluated with the additional packaging stress. Finally the temperature dependence of the device response at a fixed applied pressure is assessed.
Results and Discussion
Figure 3 shows the deformation of the membrane when a pressure of 25 kPa is applied to it, in the absence of packaging stresses. Figure 4 shows the potential on a plane located between the plates. The deformation of the membrane is of the form expected, and results in a nonuniform potential between the plates.
Figure 3: Quadrant deflection when the pressure difference across the membrane is 25 kPa. As expected the deflection is greatest in the center of the membrane.
Figure 4: Electric potential in the sealed chamber, plotted on a slice between the two plates of the capacitor. The potential has become nonuniform as a result of the pressure-induced deformation of the diaphragm.
Figure 5: Maximum and mean displacement of the membrane as a function of the applied pressure.
Figure 6: Capacitance of the membrane as a function of applied pressure, both with and without the packaging stresses. The linearized zero pressure capacitance variation, taken from Ref. 1, is also shown for comparison.
Figure 5 shows the mean and maximum displacements of the membrane as a function of applied pressure. At an applied pressure of 10 kPa the diaphragm displacement in the center is 0.89 μm. The average displacement of the diaphragm is 0.27 μm. These values are in good agreement with the approximate model given in Ref. 1 (maximum displacement 0.93 μm, average displacement 0.27 μm).
Figure 6 shows that the capacitance of the device increases nonlinearly with applied pressure. The gradient of the curve plotted is a measure of the sensitivity of the sensor. At zero applied pressure the sensitivity of the model (1/4 of the whole sensor) is 7.3·106 pF/Pa (compare to the value of 6.5·106 pF/Pa given in Ref. 1). The device sensitivity is therefore 29·106 pF/Pa (compare to 26·106 pF/Pa. calculated in Ref. 1). Assuming the interfacing electronics use the switched capacitor amplifier circuit presented in Ref. 1 this corresponds to a sensor transfer function of 29 μV/Pa (compared to 26 μV/Pa from Ref. 1). Using a smaller pressure step to produce the plot improves the agreement leading to a response at the origin of 6.7·106 pF/Pa (27·106 pF/Pa for the device, corresponding to 27 μV/Pa). The response is nonlinear, so that at 20 kPa the model output is 14.3·106 pF/Pa (device output 57 pF/Pa or 57 μV/Pa)). This nonlinear response adds to the complexity of designing the interfacing circuitry. Note that, for comparison with these figures, the circuitry proposed in Ref. 1, has a noise floor corresponding to a capacitance of 17·106 pF, or 0.6 Pa at zero applied pressure (assuming an average of 100 consecutive measurements). This resolution is approximately four times the fundamental sensitivity of the device imposed by mechanical noise from thermal fluctuations.
Next the response of the device is considered when packaging stresses are present in the model. For this part of the discussion it is assumed that the device is operated at 20°C and that the system was stress and displacement free at the bonding temperature (70°C). Figure 7 shows the displacement of the structure at the room temperature operating point, with an applied pressure of 25 kPa. The membrane displacement at its center is shown in Figure 5. The complex interaction between the thermal stresses and the stresses introduced as a result of the applied pressure has resulted in both an initial offset displacement and an increased dependence of the displacement on the pressure.
Figure 7: The displacement of the structure due to an applied pressure of 25 kPa when packaging stresses are also included in the model. Displacements are shown at the operating temperature of 20 °C, and are assumed to be zero at the die bonding temperature of 70 °C.
Figure 8: Temperature dependence of the capacitance of the packaged device. The capacitance varies with temperature as a result of temperature induced changes in the packaging stress within the diaphragm.
The response of the device with the additional packaging stresses is shown in Figure 6. At zero applied pressure the sensitivity of the COMSOL model has increased from 6.5·106 pF/Pa to 10·106 pF/Pa (40·106 pF/Pa for the entire device). The effect is even more pronounced at a pressure of 20 kPa, where the model that includes thermal stresses shows a pressure sensitivity of 25·106 pF/Pa (100 pF/Pa for the entire device) compared to the unstressed value of 14.3·106 pF/Pa. The sensitivity of the device to pressure has almost doubled. While this effect might seem desirable, an unwanted dependence on temperature has been introduced into the device response. Since the thermal stresses are temperature dependent, the response of the device is also now temperature dependent. The final study in the model assesses this issue.
Figure 8 shows the capacitance of the device, with an applied pressure of 20 kPa, as the temperature is varied. The temperature sensitivity of the model response is given by the gradient of this curve, approximately 3.5·103 pF/K (14·103 pF/K for the whole device). With a pressure sensitivity of 25·106 pF/Pa at 20 kPa (for a single quadrant of the device) this corresponds to an equivalent pressure of 140 Pa/K in the sensor output. Compared to the unstressed performance of the sensor (0.6 Pa with the circuit proposed in Ref. 1) this number is very large. The model shows the importance of carefully considering the packaging in the MEMS design process.
Reference
1. V. Kaajakari, Practical MEMS, Small Gear Publishing, Las Vegas, 2009.
Application Library path: MEMS_Module/Sensors/capacitive_pressure_sensor
Modeling Instructions
From the File menu, choose New.
New
In the New window, click  Model Wizard.
Model Wizard
1
In the Model Wizard window, click  3D.
2
In the Select Physics tree, select Structural Mechanics>Electromagnetics-Structure Interaction>Electromechanics>Electromechanics.
3
Click Add.
4
Click  Study.
5
In the Select Study tree, select General Studies>Stationary.
6
Geometry 1
For convenience, the device geometry is inserted from an existing file. You can read the instructions for creating the geometry in the Appendix — Geometry Instructions.
1
In the Geometry toolbar, click Insert Sequence and choose Insert Sequence.
2
3
In the Geometry toolbar, click  Build All.
Add parameters to the model. These will be used subsequently to perform parametric studies.
Global Definitions
Parameters 1
1
In the Model Builder window, under Global Definitions click Parameters 1.
2
In the Settings window for Parameters, locate the Parameters section.
3
SI units or their multiples, such as Pa and kPa, as well as non-SI units, such as degrees Celsius can be entered in the COMSOL Desktop enclosed by square brackets.
Next, add a nonlocal coupling to compute a derived global quantity from the model. These couplings can be convenient for processing results and COMSOL’s solvers can also use them during the solution process, for example to include integral quantities in the equation system. Here, a nonlocal average coupling is added so that the average displacement of the diaphragm can be computed and a point integration is used to make available the displacement of the center point of the diaphragm.
Definitions
Average 1 (aveop1)
1
In the Definitions toolbar, click  Nonlocal Couplings and choose Average.
2
In the Settings window for Average, locate the Source Selection section.
3
From the Geometric entity level list, choose Boundary.
4
Integration 1 (intop1)
1
In the Definitions toolbar, click  Nonlocal Couplings and choose Integration.
2
In the Settings window for Integration, locate the Source Selection section.
3
From the Geometric entity level list, choose Point.
4
Next, define selections to simplify the setup of materials and physics.
Steel Base
1
In the Definitions toolbar, click  Box.
2
In the Settings window for Box, locate the Box Limits section.
3
In the z maximum text field, type -100[um].
4
Locate the Output Entities section. From the Include entity if list, choose Entity inside box.
5
Right-click Box 1 and choose Rename.
6
In the Rename Box dialog box, type Steel Base in the New label text field.
7
Cavity
1
In the Definitions toolbar, click  Explicit.
2
3
Right-click Explicit 1 and choose Rename.
4
In the Rename Explicit dialog box, type Cavity in the New label text field.
5
All domains
1
In the Definitions toolbar, click  Explicit.
2
In the Settings window for Explicit, locate the Input Entities section.
3
Select the All domains check box.
4
Right-click Explicit 2 and choose Rename.
5
In the Rename Explicit dialog box, type All domains in the New label text field.
6
Solid
1
In the Definitions toolbar, click  Difference.
2
In the Settings window for Difference, locate the Input Entities section.
3
Under Selections to add, click  Add.
4
In the Add dialog box, select All domains in the Selections to add list.
5
6
In the Settings window for Difference, locate the Input Entities section.
7
Under Selections to subtract, click  Add.
8
In the Add dialog box, select Cavity in the Selections to subtract list.
9
10
Right-click Difference 1 and choose Rename.
11
In the Rename Difference dialog box, type Solid in the New label text field.
12
Electrostatics
1
In the Definitions toolbar, click  Explicit.
2
3
In the Settings window for Explicit, type Electrostatics in the Label text field.
Solid Mechanics (solid)
1
In the Model Builder window, under Component 1 (comp1) click Solid Mechanics (solid).
2
In the Settings window for Solid Mechanics, locate the Domain Selection section.
3
From the Selection list, choose Solid.
Apply the structural symmetry boundary condition on the symmetry boundaries.
Symmetry 1
1
In the Physics toolbar, click  Boundaries and choose Symmetry.
2
In the Settings window for Symmetry, locate the Boundary Selection section.
3
From the Selection list, choose XZ Symmetry Plane.
Symmetry 2
1
In the Physics toolbar, click  Boundaries and choose Symmetry.
2
In the Settings window for Symmetry, locate the Boundary Selection section.
3
From the Selection list, choose YZ Symmetry Plane.
Note that the electrical symmetry boundary condition (the Zero Charge feature) is applied by default.
The motion of the structure is constrained in most directions by the structural symmetry boundary conditions. However, the whole device can still slide up and down the z-axis. Apply a point constraint to prevent this.
Prescribed Displacement 1
1
In the Physics toolbar, click  Points and choose Prescribed Displacement.
2
3
In the Settings window for Prescribed Displacement, locate the Prescribed Displacement section.
4
Select the Prescribed in z direction check box.
Apply a Boundary Load to represent the pressure acting on the surface of the diaphragm.
Boundary Load 1
1
In the Physics toolbar, click  Boundaries and choose Boundary Load.
2
3
In the Settings window for Boundary Load, locate the Force section.
4
From the Load type list, choose Pressure.
5
In the p text field, type p0.
Moving Mesh
Deforming Domain 1
1
In the Model Builder window, under Component 1 (comp1)>Moving Mesh click Deforming Domain 1.
2
In the Settings window for Deforming Domain, locate the Domain Selection section.
3
From the Selection list, choose Cavity.
Symmetry/Roller 1
1
In the Model Builder window, click Symmetry/Roller 1.
2
Doing this allows the mesh to move in the z direction.
Add Terminal and Ground features to the model to apply boundary conditions for the electrostatics parts of the problem.
The default Charge Conservationfeature was set to use solid material type. Add one more feature to represent the nonsolid (void) domain.
Electrostatics (es)
1
In the Model Builder window, under Component 1 (comp1) click Electrostatics (es).
2
In the Settings window for Electrostatics, locate the Domain Selection section.
3
From the Selection list, choose Electrostatics.
Charge Conservation 2
1
In the Physics toolbar, click  Domains and choose Charge Conservation.
2
In the Settings window for Charge Conservation, locate the Domain Selection section.
3
From the Selection list, choose Cavity.
With the assumption that the silicon membrane is a good conductor, use the Domain Terminal feature to set a bias voltage on the domain. Note: The Domain Terminal feature will be very handy for a conducting domain with a complex shape and many exterior boundaries - instead of selecting all the boundaries to set up the Ground, Terminal, or Electric Potential boundary condition, we only need to select the domain to specify the Domain Terminal with the same effect. In addition, the computation load is reduced, because the electrostatic degrees of freedom within the Domain Terminal do not need to be solved for.
Terminal 1
1
In the Physics toolbar, click  Domains and choose Terminal.
2
3
In the Settings window for Terminal, locate the Terminal section.
4
From the Terminal type list, choose Voltage.
The default value of 1 V is fine in this instance.
Ground 1
1
In the Physics toolbar, click  Boundaries and choose Ground.
2
The pressure sensor consists of a silicon die with an enclosed cavity held at a low pressure. The pressure sensor is bonded onto a cylindrical steel plate during the packaging process. COMSOL includes a Material Library with many predefined material properties. This model uses a predefined material for the steel plate, but sets up the silicon as a user-defined material with isotropic material parameters to allow comparison with Ref. 1. The cavity also needs ‘material’ properties (to define the relative permittivity) and a user defined material is used to set the relative permittivity to 1 in this region.
Materials
Silicon
1
In the Model Builder window, under Component 1 (comp1) right-click Materials and choose Blank Material.
2
In the Settings window for Material, locate the Material Contents section.
3
4
Right-click Material 1 (mat1) and choose Rename.
5
In the Rename Material dialog box, type Silicon in the New label text field.
6
By default, the silicon is in all domains. Some of these selections will be overridden as other materials are added.
Vacuum
1
In the Model Builder window, right-click Materials and choose Blank Material.
2
In the Settings window for Material, locate the Geometric Entity Selection section.
3
From the Selection list, choose Cavity.
4
Locate the Material Contents section. In the table, enter the following settings:
5
Click to expand the Material Properties section. From the Material type list, choose Nonsolid.
6
Right-click Material 2 (mat2) and choose Rename.
7
In the Rename Material dialog box, type Vacuum in the New label text field.
8
Add Material
1
In the Home toolbar, click  Add Material to open the Add Material window.
2
Go to the Add Material window.
3
In the tree, select Built-in>Steel AISI 4340.
4
Click Add to Component in the window toolbar.
5
In the Home toolbar, click  Add Material to close the Add Material window.
Materials
Steel AISI 4340 (mat3)
1
In the Settings window for Material, locate the Geometric Entity Selection section.
2
From the Selection list, choose Steel Base.
Next set up a structured mesh to solve the problem on.
Mesh 1
Mapped 1
1
In the Mesh toolbar, click  Boundary and choose Mapped.
2
Size 1
1
Right-click Mapped 1 and choose Size.
2
In the Settings window for Size, locate the Geometric Entity Selection section.
3
4
Click  Remove from Selection.
5
6
7
Click  Remove from Selection.
8
9
Locate the Element Size section. Click the Custom button.
10
Locate the Element Size Parameters section. Select the Maximum element size check box.
11
12
Click  Build All.
Swept 1
1
In the Mesh toolbar, click  Swept.
2
In the Settings window for Swept, click  Build All.
Set up a study that sweeps over a range of applied pressures, so that the response of the sensor can be assessed.
Study 1
Step 1: Stationary
1
In the Model Builder window, under Study 1 click Step 1: Stationary.
2
In the Settings window for Stationary, click to expand the Study Extensions section.
3
Select the Auxiliary sweep check box.
4
The continuation parameter p0 (Pressure) is added by default. This is the correct parameter to sweep over.
5
Click  Range.
6
In the Range dialog box, type 0 in the Start text field.
7
In the Step text field, type 5000.
8
In the Stop text field, type 25000.
9
Click Add.
10
In the Home toolbar, click  Compute.
Results
Displacement (solid)
Much of the structure is not displaced in this initial study. To facilitate results analysis, add a selection to the solution. This will ensure that only the domains of interest are displayed in the plots.
Study 1/Solution 1 (sol1)
In the Model Builder window, expand the Results>Datasets node, then click Study 1/Solution 1 (sol1).
Selection
1
In the Results toolbar, click  Attributes and choose Selection.
2
In the Settings window for Selection, locate the Geometric Entity Selection section.
3
From the Geometric entity level list, choose Domain.
4
From the Selection list, choose Electrostatics.
Displacement (solid)
1
Click the  Zoom Extents button in the Graphics toolbar.
The plot now shows the displacement of the diaphragm only, which, as expected, is maximum in the center of the sensor.
Next, plot the electric potential in an xy-orientated plane between the sensor diaphragm and the ground plane.
Streamline Multislice 1
1
In the Model Builder window, expand the Results>Electric Potential (es) node.
2
Right-click Results>Electric Potential (es)>Streamline Multislice 1 and choose Delete.
Multislice 1
1
In the Model Builder window, under Results>Electric Potential (es) click Multislice 1.
2
In the Settings window for Multislice, locate the Multiplane Data section.
3
Find the x-planes subsection. From the Entry method list, choose Number of planes.
4
In the Planes text field, type 0.
5
Find the y-planes subsection. From the Entry method list, choose Number of planes.
6
In the Planes text field, type 0.
7
Find the z-planes subsection. In the Coordinates text field, type -0.0023[mm].
8
Click to expand the Range section. Select the Manual color range check box.
Selection 1
1
Right-click Multislice 1 and choose Selection.
2
In the Settings window for Selection, locate the Selection section.
3
From the Selection list, choose Cavity.
4
In the Electric Potential (es) toolbar, click  Plot.
Due to the deformation of the diaphragm the potential is nonuniformly distributed in the plane.
Next, plot the deformation of the diaphragm as a function of the pressure differential across it. Include both average and maximum displacements.
1D Plot Group 5
In the Home toolbar, click  Add Plot Group and choose 1D Plot Group.
Global 1
1
Right-click 1D Plot Group 5 and choose Global.
Use the point integration and surface average couplings defined earlier to evaluate the displacement at the midpoint of the membrane and the average displacement.
2
In the Settings window for Global, locate the y-Axis Data section.
3
Diaphragm Displacement vs. Pressure
1
In the Model Builder window, click 1D Plot Group 5.
2
In the Settings window for 1D Plot Group, click to expand the Title section.
3
From the Title type list, choose Manual.
4
In the Title text area, type Diaphragm displacement.
5
Locate the Plot Settings section. Select the x-axis label check box.
6
7
Select the y-axis label check box.
8
9
Locate the Legend section. From the Position list, choose Lower left.
10
Right-click 1D Plot Group 5 and choose Rename.
11
In the Rename 1D Plot Group dialog box, type Diaphragm Displacement vs. Pressure in the New label text field.
12
13
In the Diaphragm Displacement vs. Pressure toolbar, click  Plot.
At an applied pressure of 10 kPa the diaphragm displacement in the center is 0.89 um. The average displacement of the diaphragm is 0.27 υm. These values are in good agreement with the approximate model given in Ref. 1 (maximum displacement 0.93 υm, average displacement 0.27 υm).
Now plot the sensor capacitance as a function of the applied pressure. If the switched capacitor amplifier described in Ref. 1 is used to produce the output, the sensor output or transfer function is directly proportional to the change in capacitance.
1D Plot Group 6
In the Home toolbar, click  Add Plot Group and choose 1D Plot Group.
Global 1
1
Right-click 1D Plot Group 6 and choose Global.
Since the Terminal boundary condition was used for the underside of the diaphragm, COMSOL automatically computes its capacitance with respect to ground. The value of the capacitance is available as a variable in results analysis.
2
In the Settings window for Global, click Replace Expression in the upper-right corner of the y-Axis Data section. From the menu, choose Component 1 (comp1)>Electrostatics>Terminals>es.C11 - Maxwell capacitance - F.
Next, compare the computed capacitance with the small-displacement, linearized analytic expression derived in Ref. 1.
3
Locate the y-Axis Data section. In the table, enter the following settings:
Model Capacitance vs. Pressure
1
In the Model Builder window, click 1D Plot Group 6.
2
In the Settings window for 1D Plot Group, locate the Title section.
3
From the Title type list, choose Manual.
4
In the Title text area, type Model Capacitance vs. Pressure.
5
Locate the Plot Settings section. Select the x-axis label check box.
6
7
Select the y-axis label check box.
8
9
Locate the Legend section. From the Position list, choose Upper left.
10
Right-click 1D Plot Group 6 and choose Rename.
The capacitance of the sensor increases with applied pressure. The gradient of the curve plotted gives a useful measure of the response of the device. At the origin, the response of the model (1/4 of the whole sensor) is 7e-6 pF/Pa, compared to the analytical response of 6.5e-6 pf/Pa. The response for the whole sensor is 29e-6 pF/Pa compared to the analytic value of 26e-6 pF/Pa. With the measurement circuit proposed in Ref. 1 this corresponds to a sensor transfer function of 29 υV/Pa for the COMSOL model and 26 υV/Pa for the simple analytic model. The response is nonlinear, so that at 20 kPa the model output is 14e-6 pf/Pa (device output 57 pF/Pa).
11
In the Rename 1D Plot Group dialog box, type Model Capacitance vs. Pressure in the New label text field.
12
13
In the Model Capacitance vs. Pressure toolbar, click  Plot.
Next, add thermal expansion to the model to assess the effects of packaging stresses on the device performance.
Solid Mechanics (solid)
Linear Elastic Material 1
In the Model Builder window, under Component 1 (comp1)>Solid Mechanics (solid) click Linear Elastic Material 1.
Thermal Expansion 1
1
In the Physics toolbar, click  Attributes and choose Thermal Expansion.
The model temperature should be set to the previously defined room temperature parameter, T0.
2
In the Settings window for Thermal Expansion, locate the Model Input section.
3
From the T list, choose User defined. In the associated text field, type T0.
The reference temperature indicates the temperature at which the structure had no thermal strains. In this case, set it to the previously defined parameter, Tref, which represents the temperature at which the silicon die was bonded to the metal carrier plate.
4
Click  Go to Source for Volume reference temperature.
Global Definitions
Default Model Inputs
1
In the Model Builder window, under Global Definitions click Default Model Inputs.
2
In the Settings window for Default Model Inputs, locate the Browse Model Inputs section.
3
Find the Expression for remaining selection subsection. In the Volume reference temperature text field, type Tref.
Materials
Silicon (mat1)
COMSOL shows a warning in the material properties settings to indicate a missing property.
1
In the Model Builder window, under Component 1 (comp1)>Materials click Silicon (mat1).
2
Add a new study to compute the system response including thermal expansivity effects.
Add Study
1
In the Home toolbar, click  Add Study to open the Add Study window.
2
Go to the Add Study window.
3
Find the Studies subsection. In the Select Study tree, select General Studies>Stationary.
4
Click Add Study in the window toolbar.
5
In the Home toolbar, click  Add Study to close the Add Study window.
Study 2
1
In the Model Builder window, click Study 2.
2
In the Settings window for Study, locate the Study Settings section.
3
Clear the Generate default plots check box.
Step 1: Stationary
1
In the Model Builder window, under Study 2 click Step 1: Stationary.
2
In the Settings window for Stationary, locate the Study Extensions section.
3
Select the Auxiliary sweep check box.
4
The continuation parameter p0 (Differential Pressure) is added by default. This is the correct parameter to sweep over.
5
Click  Range.
6
In the Range dialog box, type 0 in the Start text field.
7
In the Step text field, type 5000.
8
In the Stop text field, type 25000.
9
Click Add.
10
In the Home toolbar, click  Compute.
Create a mirrored dataset to visualize a cross section of the device.
Results
Mirror 3D 1
1
In the Results toolbar, click  More Datasets and choose Mirror 3D.
2
In the Settings window for Mirror 3D, locate the Data section.
3
From the Dataset list, choose Study 2/Solution 2 (sol2).
Displacement (solid) 1
1
In the Model Builder window, right-click Displacement (solid) and choose Duplicate.
2
In the Settings window for 3D Plot Group, locate the Data section.
3
From the Dataset list, choose Mirror 3D 1.
4
In the Displacement (solid) 1 toolbar, click  Plot.
Notice that the entire structure is now displaced at room temperature as a result of thermal expansion.
Now look at the effect of the thermal stress on the response of the sensor.
Add an additional Global node to the previously defined plot. This separate node can point to a different dataset, enabling a plot of the displacement of the thermally stressed device alongside the unstressed plot.
Global 2
1
In the Model Builder window, under Results>Diaphragm Displacement vs. Pressure right-click Global 1 and choose Duplicate.
2
In the Settings window for Global, locate the Data section.
3
From the Dataset list, choose Study 2/Solution 2 (sol2).
Note that the aveop1(w) expression has been removed from the table.
4
In the Diaphragm Displacement vs. Pressure toolbar, click  Plot.
The maximum displacement of the membrane is now nonzero at zero applied pressure, as a result of the packaging stress. The gradient of the displacement-pressure line has also changed.
Model Capacitance vs. Pressure
Now add the thermally stressed results to the Capacitance versus Pressure plot.
Global 2
1
In the Model Builder window, right-click Model Capacitance vs. Pressure and choose Global.
2
In the Settings window for Global, locate the Data section.
3
From the Dataset list, choose Study 2/Solution 2 (sol2).
4
Click Replace Expression in the upper-right corner of the y-Axis Data section. From the menu, choose Component 1 (comp1)>Electrostatics>Terminals>es.C11 - Maxwell capacitance - F.
5
Locate the y-Axis Data section. In the table, enter the following settings:
6
In the Model Capacitance vs. Pressure toolbar, click  Plot.
The packaging stress causes a significant change in the response of the device. At zero applied pressure the sensitivity of the COMSOL model has increased to 10e-6 pF/Pa (40e-6 pF/Pa for the entire device). Compare to the unstressed value of 6.5e-6 pf/Pa (29e-6 pF/Pa for the entire device). The effect is even more pronounced at a pressure of 20 kPa, where the model that includes thermal stresses shows a pressure sensitivity of 25e-6 pf/Pa (100 pF/Pa for the entire device), compared to the unstressed pressure sensitivity of 14.3e-6 pf/Pa (sensor output 57 pF/Pa).
It may be possible to calibrate the device to remove the effect of the packaging strains. However, the addition of the thermal stresses to the system has created an additional issue, since the response of the sensor has now become temperature dependent - due to the temperature sensitivity of the thermal strains. This effect is assessed in the final study.
Add Study
1
In the Home toolbar, click  Add Study to open the Add Study window.
2
Go to the Add Study window.
3
Find the Studies subsection. In the Select Study tree, select General Studies>Stationary.
4
Click Add Study in the window toolbar.
5
In the Home toolbar, click  Add Study to close the Add Study window.
Study 3
Step 1: Stationary
1
In the Settings window for Stationary, locate the Study Extensions section.
2
Select the Auxiliary sweep check box.
Sweep over operating temperature at constant applied pressure, to assess the temperature sensitivity of the device.
3
4
From the list in the Parameter name column, choose T0 (Operating temperature).
5
Click  Range.
6
In the Range dialog box, type 290 in the Start text field.
7
In the Step text field, type 5.
8
In the Stop text field, type 300.
9
Click Add.
For this study disable the default plots, as these will be very similar to those already generated by Study 2.
10
In the Model Builder window, click Study 3.
11
In the Settings window for Study, locate the Study Settings section.
12
Clear the Generate default plots check box.
13
In the Home toolbar, click  Compute.
Add a plot to show how the sensor response varies with temperature. The response is computed at an applied pressure set by the value of the parameter p0, defined as 20 kPa.
Results
1D Plot Group 8
1
In the Home toolbar, click  Add Plot Group and choose 1D Plot Group.
2
In the Settings window for 1D Plot Group, locate the Data section.
3
From the Dataset list, choose Study 3/Solution 3 (sol3).
Global 1
1
Right-click 1D Plot Group 8 and choose Global.
2
In the Settings window for Global, click Replace Expression in the upper-right corner of the y-Axis Data section. From the menu, choose Component 1 (comp1)>Electrostatics>Terminals>es.C11 - Maxwell capacitance - F.
3
Locate the y-Axis Data section. In the table, enter the following settings:
Capacitance vs. Operating Temperature
1
In the Model Builder window, click 1D Plot Group 8.
2
In the Settings window for 1D Plot Group, locate the Title section.
3
From the Title type list, choose Manual.
4
In the Title text area, type Model Capacitance vs. Operating Temperature.
5
Locate the Plot Settings section. Select the x-axis label check box.
6
In the associated text field, type Operating Temperature (K).
7
Right-click 1D Plot Group 8 and choose Rename.
8
In the Rename 1D Plot Group dialog box, type Capacitance vs. Operating Temperature in the New label text field.
9
10
In the Capacitance vs. Operating Temperature toolbar, click  Plot.
At a pressure of 20 kPa the temperature sensitivity of the model is given by the gradient of this curve, approximately 3.5e-3 pF/K (14e-4 pF/K for the whole device). Given the pressure sensitivity of 25e-6 pF/Pa at 20 kPa this corresponds to equivalent pressure of 140 Pa/K in the sensor output. Compared to the noise floor of the measuring circuit proposed in Ref. 1 (0.6Pa) this number is very large. This model shows that a naive choice of packaging can have a highly detrimental effect on sensor performance.
 
Appendix — Geometry Instructions
From the File menu, choose New.
New
In the New window, click  Blank Model.
Add Component
In the Home toolbar, click  Add Component and choose 3D.
Geometry 1
1
In the Settings window for Geometry, locate the Units section.
2
From the Length unit list, choose mm.
Block 1 (blk1)
1
In the Geometry toolbar, click  Block.
2
In the Settings window for Block, locate the Size and Shape section.
3
In the Width text field, type 1.2.
4
In the Depth text field, type 1.2.
5
In the Height text field, type 1.51.
6
Locate the Position section. In the z text field, type -1.1.
7
Click to expand the Layers section. In the table, enter the following settings:
Block 2 (blk2)
1
In the Geometry toolbar, click  Block.
2
In the Settings window for Block, locate the Size and Shape section.
3
In the Width text field, type 0.5.
4
In the Depth text field, type 0.5.
5
In the Height text field, type 1.51.
6
Locate the Position section. In the z text field, type -1.1.
Partition Domains 1 (pard1)
1
In the Geometry toolbar, click  Booleans and Partitions and choose Partition Domains.
2
On the object blk1, select Domains 1–4 only.
3
In the Settings window for Partition Domains, locate the Partition Domains section.
4
From the Partition with list, choose Objects.
5
Hexahedron 1 (hex1)
1
In the Geometry toolbar, click  More Primitives and choose Hexahedron.
2
In the Settings window for Hexahedron, locate the Vertices section.
3
In row 2, set x to 0.5.
4
In row 3, set x to 0.5.
5
In row 4, set x to 0.
6
In row 6, set x to 0.78322.
7
In row 7, set x to 0.78322.
8
In row 8, set x to 0.
9
In row 2, set y to 0.
10
In row 3, set y to 0.5.
11
In row 4, set y to 0.5.
12
In row 6, set y to 0.
13
In row 7, set y to 0.78322.
14
In row 8, set y to 0.78322.
15
In row 1, set z to 0.01.
16
In row 2, set z to 0.01.
17
In row 3, set z to 0.01.
18
In row 4, set z to 0.01.
19
In row 5, set z to 0.41.
20
In row 6, set z to 0.41.
21
In row 7, set z to 0.41.
22
In row 8, set z to 0.41.
Difference 1 (dif1)
1
In the Geometry toolbar, click  Booleans and Partitions and choose Difference.
2
3
In the Settings window for Difference, locate the Difference section.
4
Find the Objects to subtract subsection. Click to select the  Activate Selection toggle button.
5
Cylinder 1 (cyl1)
1
In the Geometry toolbar, click  Cylinder.
2
In the Settings window for Cylinder, locate the Size and Shape section.
3
In the Radius text field, type 3.
4
In the Height text field, type 0.7.
5
Locate the Position section. In the z text field, type -1.1.
Partition Domains 2 (pard2)
1
In the Geometry toolbar, click  Booleans and Partitions and choose Partition Domains.
2
On the object cyl1, select Domain 1 only.
3
In the Settings window for Partition Domains, locate the Partition Domains section.
4
From the Partition with list, choose Extended faces.
5
On the object dif1, select Boundaries 17 and 38 only.
6
7
Click  Build Selected.
Delete Entities 1 (del1)
1
In the Geometry toolbar, click  Delete.
2
In the Settings window for Delete Entities, locate the Entities or Objects to Delete section.
3
From the Geometric entity level list, choose Domain.
4
On the object blk2, select Domain 1 only.
5
On the object pard2, select Domains 1–3 only.
Form Union (fin)
1
In the Model Builder window, click Form Union (fin).
2
In the Settings window for Form Union/Assembly, click  Build Selected.
YZ Symmetry Plane
1
In the Geometry toolbar, click  Selections and choose Explicit Selection.
2
In the Settings window for Explicit Selection, type YZ Symmetry Plane in the Label text field.
3
Locate the Entities to Select section. From the Geometric entity level list, choose Boundary.
4
Select the Group by continuous tangent check box.
5
On the object fin, select Boundaries 1, 4, 7, 10, 14, 17, 20, 23, 26, and 30 only.
XZ Symmetry Plane
1
In the Geometry toolbar, click  Selections and choose Explicit Selection.
2
In the Settings window for Explicit Selection, type XZ Symmetry Plane in the Label text field.
3
Locate the Entities to Select section. From the Geometric entity level list, choose Boundary.
4
Select the Group by continuous tangent check box.
5
On the object fin, select Boundaries 2, 5, 8, 11, 40, 42, 44, 46, 48, and 50 only.
Steel Base
1
In the Geometry toolbar, click  Selections and choose Box Selection.
2
In the Settings window for Box Selection, type Steel Base in the Label text field.
3
Locate the Box Limits section. In the z maximum text field, type -0.1.
4
Locate the Output Entities section. From the Include entity if list, choose Entity inside box.
Cavity
1
In the Geometry toolbar, click  Selections and choose Explicit Selection.
2
In the Settings window for Explicit Selection, type Cavity in the Label text field.
3
On the object fin, select Domain 3 only.
Geometry
1
In the Geometry toolbar, click  Selections and choose Explicit Selection.
2
In the Settings window for Explicit Selection, type Geometry in the Label text field.
3
Locate the Entities to Select section. From the Geometric entity level list, choose Object.
4
Linear Elastic
1
In the Geometry toolbar, click  Selections and choose Difference Selection.
2
In the Settings window for Difference Selection, type Linear Elastic in the Label text field.
3
Locate the Input Entities section. Click  Add.
4
In the Add dialog box, select Geometry in the Selections to add list.
5
6
In the Settings window for Difference Selection, locate the Input Entities section.
7
8
In the Add dialog box, select Cavity in the Selections to subtract list.
9