PDF

Microresistor Beam
Introduction
This example illustrates the ability to couple thermal, electrical, and structural analysis in one model. This particular application moves a beam by passing a current through it; the current generates heat, and the temperature increase leads to displacement through thermal expansion. The model estimates how much current and increase in temperature are necessary to displace the beam.
Although the model involves a rather simple 3D geometry and straightforward physics, it provides a good example of multiphysics modeling.
Model Definition
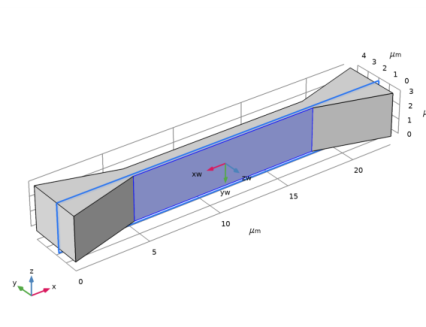
Figure 1: Microbeam geometry.
A copper microbeam has a length of 13 μm with a height and width of 1 μm. Feet at both ends bond it rigidly to a substrate. An electric potential of 0.2 V applied between the feet induces an electric current. Due to the material’s resistivity, the current heats up the structure. Because the beam operates in the open, the generated heat dissipates into the air. The thermally induced stress loads the material and deforms the beam.
As a first approximation, you can assume that the electrical conductivity is constant. However, a conductor’s resistivity increases with temperature. In the case of copper, the relationship between resistivity and temperature is approximately linear over a wide range of temperatures:
(1)
α is the temperature coefficient. You obtain the conductor’s temperature dependency from the relationship that defines electric resistivity; conductivity is simply its reciprocal (σ = 1).
For the heat transfer equations, set the base boundaries facing the substrate to a constant temperature of 323 K. You model the convective air cooling in other boundaries using a heat flux boundary condition with a heat transfer coefficient, h, of 5 W/(m2·K) and an external temperature, Tinf, of 298 K. Standard constraints handle the bases’ rigid connection to the substrate.
Results and Discussion
Figure 2 shows the temperature field on the microbeam surface when solving the model using a temperature-dependent resistivity as in Equation 1. Based on the color scale, the maximum temperature is about 710 K.
Figure 3 shows the microbeam’s deformation. The displacement for the temperature-dependent case is 48 nm compared to the maximum displacement for constant electrical conductivity, which is 88 nm (the plot scales the deformation by a factor of around 20).
Figure 2: Surface temperature with temperature-dependent electrical conductivity.
Figure 3: Microbeam deformation with temperature-dependent electrical conductivity.
Notes About the COMSOL Implementation
In this example you create the 3D geometry by starting with two 2D work planes. The first one views the geometry from above, and the second does so from the side. You create cross sections on the work planes, which you then extrude into 3D. As the final step you create the resistor beam geometry as the intersection of the extruded objects. You can also skip the step-by-step instructions for the geometry creation and import the ready-made geometry directly from the Application Libraries.
By using the Joule Heating and Thermal Expansion predefined multiphysics interface you automatically add the equations for three physics including the necessary multiphysics couplings. In this case the physics equations describe the current and heat conduction and structural mechanics problems. The interface also provides suitable defaults for the solver.
Application Library path: MEMS_Module/Actuators/microresistor_beam
Modeling Instructions
From the File menu, choose New.
New
In the New window, click  Model Wizard.
Model Wizard
1
In the Model Wizard window, click  3D.
2
In the Select Physics tree, select Structural Mechanics>Thermal-Structure Interaction>Joule Heating and Thermal Expansion.
3
Click Add.
4
Click  Study.
5
In the Select Study tree, select General Studies>Stationary.
6
Global Definitions
Parameters 1
1
In the Model Builder window, under Global Definitions click Parameters 1.
2
In the Settings window for Parameters, locate the Parameters section.
3
Geometry 1
1
In the Model Builder window, under Component 1 (comp1) click Geometry 1.
2
In the Settings window for Geometry, locate the Units section.
3
From the Length unit list, choose µm.
Work Plane 1 (wp1)
1
In the Geometry toolbar, click  Work Plane.
2
In the Settings window for Work Plane, click  Show Work Plane.
Work Plane 1 (wp1)>Plane Geometry
In the Model Builder window, click Plane Geometry.
Work Plane 1 (wp1)>Polygon 1 (pol1)
1
In the Work Plane toolbar, click  Polygon.
2
In the Settings window for Polygon, locate the Coordinates section.
3
From the Data source list, choose Vectors.
4
In the xw text field, type 0 5 5 18 18 23 23 23 23 18 18 5 5 0 0 0.
5
In the yw text field, type 0 1.5 1.5 1.5 1.5 0 0 4 4 2.5 2.5 2.5 2.5 4 4 0.
Extrude 1 (ext1)
1
In the Model Builder window, under Component 1 (comp1)>Geometry 1 right-click Work Plane 1 (wp1) and choose Extrude.
2
In the Settings window for Extrude, locate the Distances section.
3
4
Click  Build All Objects.
5
Click the  Zoom Extents button in the Graphics toolbar.
Work Plane 2 (wp2)
1
In the Geometry toolbar, click  Work Plane.
2
In the Settings window for Work Plane, locate the Plane Definition section.
3
From the Plane type list, choose Face parallel.
4
On the object ext1, select Boundary 6 only.
It might be easier to select the correct boundary by using the Selection List window. To open this window, in the Home toolbar click Windows and choose Selection List. (If you are running the cross-platform desktop, you find Windows in the main menu.)
5
In the Offset in normal direction text field, type -1.5.
6
Select the Reverse normal direction check box.
7
Click  Show Work Plane.
Work Plane 2 (wp2)>Plane Geometry
1
In the Settings window for Plane Geometry, locate the Visualization section.
2
Find the In-plane visualization of 3D geometry subsection. Clear the Intersection (green) check box.
3
Clear the Coincident entities (blue) check box.
Work Plane 2 (wp2)>Polygon 1 (pol1)
1
In the Work Plane toolbar, click  Polygon.
2
In the Settings window for Polygon, locate the Coordinates section.
3
From the Data source list, choose Vectors.
4
In the xw text field, type -11.5 -6.3 -6.3 -6.3 -6.3 6.3 6.3 6.3 6.3 11.5 11.5 6.5 6.5 -6.5 -6.5 -11.5.
5
In the yw text field, type -1.5 -1.5 -1.5 0.5 0.5 0.5 0.5 -1.5 -1.5 -1.5 -1.5 1.5 1.5 1.5 1.5 -1.5.
6
Click the  Zoom Extents button in the Graphics toolbar.
Work Plane 2 (wp2)>Fillet 1 (fil1)
1
In the Work Plane toolbar, click  Fillet.
2
On the object pol1, select Points 4 and 6 only.
3
In the Settings window for Fillet, locate the Radius section.
4
In the Radius text field, type 0.3.
5
In the Work Plane toolbar, click  Build All.
Extrude 2 (ext2)
1
In the Model Builder window, under Component 1 (comp1)>Geometry 1 right-click Work Plane 2 (wp2) and choose Extrude.
2
In the Settings window for Extrude, locate the Distances section.
3
4
Click  Build All Objects.
Intersection 1 (int1)
1
In the Geometry toolbar, click  Booleans and Partitions and choose Intersection.
2
Click in the Graphics window and then press Ctrl+A to select both objects.
3
In the Settings window for Intersection, click  Build All Objects.
Form Union (fin)
1
In the Model Builder window, click Form Union (fin).
2
In the Settings window for Form Union/Assembly, click  Build Selected.
The model geometry is now complete.
Definitions
Add a set of selections that you can use later when applying boundary conditions.
connector1
1
In the Definitions toolbar, click  Explicit.
2
Right-click Explicit 1 and choose Rename.
3
In the Rename Explicit dialog box, type connector1 in the New label text field.
4
5
In the Settings window for Explicit, locate the Input Entities section.
6
From the Geometric entity level list, choose Boundary.
7
connector2
1
In the Definitions toolbar, click  Explicit.
2
In the Model Builder window, right-click Explicit 2 and choose Rename.
3
In the Rename Explicit dialog box, type connector2 in the New label text field.
4
5
In the Settings window for Explicit, locate the Input Entities section.
6
From the Geometric entity level list, choose Boundary.
7
connectors
1
In the Definitions toolbar, click  Explicit.
2
Right-click Explicit 3 and choose Rename.
3
In the Rename Explicit dialog box, type connectors in the New label text field.
4
5
In the Settings window for Explicit, locate the Input Entities section.
6
From the Geometric entity level list, choose Boundary.
7
Add Material
1
In the Home toolbar, click  Add Material to open the Add Material window.
2
Go to the Add Material window.
3
In the tree, select MEMS>Metals>Cu - Copper.
4
Click Add to Component in the window toolbar.
5
In the Home toolbar, click  Add Material to close the Add Material window.
Materials
Cu - Copper (mat1)
1
In the Settings window for Material, locate the Material Contents section.
2
3
Click to expand the Material Properties section. In the Material properties tree, select Electromagnetic Models>Linearized resistivity>Reference resistivity (rho0).
4
Click  Add to Material.
5
Locate the Material Contents section. In the table, enter the following settings:
Ω·m
Electric Currents (ec)
Current Conservation 1
1
In the Model Builder window, under Component 1 (comp1)>Electric Currents (ec) click Current Conservation 1.
2
In the Settings window for Current Conservation, locate the Constitutive Relation Jc-E section.
3
From the Conduction model list, choose Linearized resistivity.
Before solving the two-way coupled model with a temperature-dependent resistivity, use a constant resistivity for later comparison:
4
From the α list, choose User defined. Keep the default zero value for α.
Ground 1
1
In the Physics toolbar, click  Boundaries and choose Ground.
2
In the Settings window for Ground, locate the Boundary Selection section.
3
From the Selection list, choose connector2.
Electric Potential 1
1
In the Physics toolbar, click  Boundaries and choose Electric Potential.
2
In the Settings window for Electric Potential, locate the Electric Potential section.
3
In the V0 text field, type V0.
4
Locate the Boundary Selection section. From the Selection list, choose connector1.
Multiphysics
Thermal Expansion 1 (te1)
1
In the Model Builder window, under Component 1 (comp1)>Multiphysics click Thermal Expansion 1 (te1).
2
In the Settings window for Thermal Expansion, locate the Model Input section.
3
Click  Go to Source.
Global Definitions
Default Model Inputs
1
In the Model Builder window, under Global Definitions click Default Model Inputs.
2
In the Settings window for Default Model Inputs, locate the Browse Model Inputs section.
3
Find the Expression for remaining selection subsection. In the Volume reference temperature text field, type Text.
Heat Transfer in Solids (ht)
Initial Values 1
1
In the Model Builder window, under Component 1 (comp1)>Heat Transfer in Solids (ht) click Initial Values 1.
2
In the Settings window for Initial Values, locate the Initial Values section.
3
In the T text field, type T0.
Heat Flux 1
1
In the Physics toolbar, click  Boundaries and choose Heat Flux.
2
In the Settings window for Heat Flux, locate the Boundary Selection section.
3
From the Selection list, choose All boundaries.
Select all boundaries for simplicity; next you will add a node that overrides this boundary condition for the connectors.
4
Locate the Heat Flux section. Click the Convective heat flux button.
5
In the h text field, type k.
6
In the Text text field, type Text.
Temperature 1
1
In the Physics toolbar, click  Boundaries and choose Temperature.
2
In the Settings window for Temperature, locate the Temperature section.
3
In the T0 text field, type T0.
4
Locate the Boundary Selection section. From the Selection list, choose connectors.
Solid Mechanics (solid)
In the Model Builder window, under Component 1 (comp1) click Solid Mechanics (solid).
Fixed Constraint 1
1
In the Physics toolbar, click  Boundaries and choose Fixed Constraint.
2
In the Settings window for Fixed Constraint, locate the Boundary Selection section.
3
From the Selection list, choose connectors.
Mesh 1
Free Tetrahedral 1
In the Mesh toolbar, click  Free Tetrahedral.
Size
1
In the Model Builder window, click Size.
2
In the Settings window for Size, locate the Element Size section.
3
From the Predefined list, choose Finer.
4
In the Model Builder window, right-click Mesh 1 and choose Build All.
Study 1
You can use the default solver settings for this model.
1
In the Home toolbar, click  Compute.
Results
Displacement - Study 1
The first default plot presents a surface plot of the von Mises stress. Modify it to show the displacement magnitude.
1
Right-click Results>Stress (solid) and choose Rename.
2
In the Rename 3D Plot Group dialog box, type Displacement - Study 1 in the New label text field.
3
Surface 1
1
In the Model Builder window, expand the Displacement - Study 1 node, then click Surface 1.
2
In the Settings window for Surface, click Replace Expression in the upper-right corner of the Expression section. From the menu, choose Component 1 (comp1)>Solid Mechanics>Displacement>solid.disp - Displacement magnitude - m.
3
Locate the Expression section. From the Unit list, choose nm.
4
In the Displacement - Study 1 toolbar, click  Plot.
As the color legend shows, the maximum displacement is roughly 88 nm with a constant resistivity.
Temperature (ht)
The second default surface plot shows the temperature field. Note the maximum temperature of roughly 1048 K.
Now restore the temperature-dependence of the resistivity that you temporarily disabled and then add a new study and solve the model again.
Electric Currents (ec)
Current Conservation 1
1
In the Model Builder window, under Component 1 (comp1)>Electric Currents (ec) click Current Conservation 1.
2
In the Settings window for Current Conservation, locate the Constitutive Relation Jc-E section.
3
From the α list, choose From material.
Add Study
1
In the Home toolbar, click  Add Study to open the Add Study window.
2
Go to the Add Study window.
3
Find the Studies subsection. In the Select Study tree, select General Studies>Stationary.
4
Click Add Study in the window toolbar.
5
In the Home toolbar, click  Add Study to close the Add Study window.
Study 2
In the Home toolbar, click  Compute.
Results
Temperature (ht) 1
As you can see from the plot, using the more realistic material model with a temperature-dependent resistivity has a significant effect on the solution. The maximum temperature is now almost 340 K lower.
Displacement - Study 2
1
In the Model Builder window, right-click Stress (solid) and choose Rename.
2
In the Rename 3D Plot Group dialog box, type Displacement - Study 2 in the New label text field.
3
Surface 1
1
In the Model Builder window, expand the Displacement - Study 2 node, then click Surface 1.
2
In the Settings window for Surface, click Replace Expression in the upper-right corner of the Expression section. From the menu, choose Component 1 (comp1)>Solid Mechanics>Displacement>solid.disp - Displacement magnitude - m.
3
Locate the Expression section. From the Unit list, choose nm.
4
In the Displacement - Study 2 toolbar, click  Plot.
Similarly, the maximum displacement has been reduced from 88 nm to around 50 nm.