|
|
|

|
•
|
H+
|
|
•
|
|
•
|
|
•
|
|
•
|


|
•
|
H+
|
|
•
|
|
•
|
|
•
|
|
•
|


|
•
|
H+
|
|
•
|
|
•
|
|
•
|
|
•
|
|
•
|
|
•
|


|
1
|
|
2
|
In the Select Physics tree, select Electrochemistry>Tertiary Current Distribution, Nernst-Planck>Tertiary, Electroneutrality (tcd).
|
|
3
|
Click Add.
|
|
4
|
|
5
|
In the Concentrations table, enter the following settings:
|
|
6
|
|
7
|
|
8
|
In the Select Physics tree, select Electrochemistry>Tertiary Current Distribution, Nernst-Planck>Tertiary, Electroneutrality (tcd).
|
|
9
|
Click Add.
|
|
10
|
|
11
|
In the Concentrations table, enter the following settings:
|
|
12
|
|
13
|
|
14
|
In the Select Physics tree, select Electrochemistry>Tertiary Current Distribution, Nernst-Planck>Tertiary, Electroneutrality (tcd).
|
|
15
|
Click Add.
|
|
16
|
|
17
|
In the Concentrations table, enter the following settings:
|
|
18
|
|
19
|
|
20
|
Click
|
|
21
|
In the Select Study tree, select Preset Studies for Selected Physics Interfaces>Stationary with Initialization.
|
|
22
|
Click
|
|
1
|
|
2
|
|
3
|
|
4
|
Browse to the model’s Application Libraries folder and double-click the file v_flow_battery_parameters.txt.
|
|
1
|
|
2
|
|
3
|
|
4
|
|
5
|
Locate the Selections of Resulting Entities section. Select the Resulting objects selection check box.
|
|
6
|
|
7
|
|
8
|
Click OK.
|
|
1
|
|
2
|
|
3
|
|
4
|
|
5
|
|
6
|
Locate the Selections of Resulting Entities section. Select the Resulting objects selection check box.
|
|
7
|
|
8
|
|
9
|
Click OK.
|
|
1
|
|
2
|
|
3
|
|
4
|
|
5
|
|
6
|
Locate the Selections of Resulting Entities section. Select the Resulting objects selection check box.
|
|
7
|
|
8
|
|
9
|
Click OK.
|
|
10
|
|
11
|
|
1
|
|
2
|
|
3
|
|
4
|
|
5
|
|
6
|
Browse to the model’s Application Libraries folder and double-click the file v_flow_battery_negative_variables.txt.
|
|
7
|
|
8
|
|
9
|
Click OK.
|
|
1
|
|
2
|
|
3
|
|
4
|
|
5
|
|
6
|
Browse to the model’s Application Libraries folder and double-click the file v_flow_battery_membrane_variables.txt.
|
|
7
|
|
8
|
|
9
|
Click OK.
|
|
1
|
|
2
|
|
3
|
|
4
|
|
5
|
|
6
|
Browse to the model’s Application Libraries folder and double-click the file v_flow_battery_positive_variables.txt.
|
|
7
|
|
8
|
|
9
|
Click OK.
|
|
1
|
In the Settings window for Tertiary Current Distribution, Nernst-Planck, type Tertiary Current Distribution, Nernst-Planck (Negative) in the Label text field.
|
|
2
|
|
3
|
|
1
|
Right-click Component 1 (comp1)>Tertiary Current Distribution, Nernst-Planck (Negative) and choose Porous Electrode.
|
|
2
|
|
3
|
|
4
|
|
5
|
Locate the Electrode Current Conduction section. From the σs list, choose User defined. In the associated text field, type sigma_e.
|
|
6
|
|
7
|
|
8
|
|
9
|
|
10
|
|
11
|
|
12
|
|
13
|
|
14
|
|
15
|
|
16
|
|
17
|
Locate the Effective Transport Parameter Correction section. From the Electrical conductivity list, choose No correction.
|
|
1
|
In the Model Builder window, expand the Porous Electrode 1 node, then click Porous Electrode Reaction 1.
|
|
2
|
In the Settings window for Porous Electrode Reaction, locate the Stoichiometric Coefficients section.
|
|
3
|
|
4
|
|
5
|
|
6
|
|
7
|
|
8
|
|
1
|
|
2
|
|
3
|
|
4
|
|
5
|
|
6
|
|
1
|
|
1
|
|
3
|
|
4
|
|
5
|
|
6
|
|
7
|
|
8
|
|
1
|
|
1
|
|
3
|
In the Settings window for Ion Exchange Membrane Boundary, locate the Ion Exchange Membrane Boundary section.
|
|
4
|
|
5
|
|
6
|
|
7
|
|
8
|
|
9
|
|
10
|
|
11
|
|
12
|
|
13
|
|
14
|
|
1
|
|
3
|
|
4
|
|
1
|
|
2
|
|
3
|
|
4
|
|
5
|
|
6
|
|
1
|
In the Model Builder window, under Component 1 (comp1) click Tertiary Current Distribution, Nernst-Planck 2 (tcd2).
|
|
2
|
In the Settings window for Tertiary Current Distribution, Nernst-Planck, type Tertiary Current Distribution, Nernst-Planck (Ion Exchange Membrane) in the Label text field.
|
|
3
|
|
4
|
|
1
|
|
2
|
|
3
|
|
4
|
|
5
|
|
6
|
|
7
|
|
8
|
|
9
|
|
10
|
|
11
|
|
12
|
|
13
|
|
14
|
|
15
|
|
16
|
|
17
|
|
18
|
|
19
|
|
1
|
|
2
|
|
3
|
|
4
|
|
5
|
|
6
|
|
1
|
|
1
|
|
2
|
|
3
|
|
4
|
|
5
|
|
6
|
Locate the Equilibrium Potential section. From the Eeq list, choose User defined. Locate the Electrode Kinetics section. From the Kinetics expression type list, choose Fast irreversible electrode reaction.
|
|
7
|
|
1
|
|
2
|
|
3
|
|
4
|
|
5
|
|
6
|
Locate the Equilibrium Potential section. From the Eeq list, choose User defined. Locate the Electrode Kinetics section. From the Kinetics expression type list, choose Fast irreversible electrode reaction.
|
|
7
|
|
1
|
|
1
|
|
2
|
|
3
|
From the Eeq list, choose User defined. Locate the Electrode Kinetics section. From the Kinetics expression type list, choose Fast irreversible electrode reaction.
|
|
4
|
|
5
|
|
6
|
|
7
|
|
1
|
|
2
|
|
3
|
From the Eeq list, choose User defined. Locate the Electrode Kinetics section. From the Kinetics expression type list, choose Fast irreversible electrode reaction.
|
|
4
|
|
5
|
|
6
|
|
1
|
|
2
|
|
3
|
|
4
|
|
5
|
|
6
|
|
7
|
|
8
|
|
9
|
|
1
|
In the Model Builder window, under Component 1 (comp1) click Tertiary Current Distribution, Nernst-Planck 3 (tcd3).
|
|
2
|
In the Settings window for Tertiary Current Distribution, Nernst-Planck, type Tertiary Current Distribution, Nernst-Planck (Positive) in the Label text field.
|
|
3
|
|
4
|
|
1
|
|
2
|
|
3
|
|
4
|
|
5
|
Locate the Electrode Current Conduction section. From the σs list, choose User defined. In the associated text field, type sigma_e.
|
|
6
|
|
7
|
|
8
|
|
9
|
|
10
|
|
11
|
|
12
|
|
13
|
|
14
|
|
15
|
|
16
|
|
17
|
Locate the Effective Transport Parameter Correction section. From the Electrical conductivity list, choose No correction.
|
|
1
|
In the Model Builder window, expand the Porous Electrode 1 node, then click Porous Electrode Reaction 1.
|
|
2
|
In the Settings window for Porous Electrode Reaction, locate the Stoichiometric Coefficients section.
|
|
3
|
|
4
|
|
5
|
|
6
|
|
7
|
|
8
|
|
9
|
|
1
|
|
2
|
|
3
|
|
4
|
|
5
|
|
6
|
|
1
|
|
2
|
|
3
|
|
5
|
|
1
|
|
3
|
|
4
|
|
5
|
|
6
|
|
7
|
|
8
|
|
1
|
|
1
|
|
3
|
In the Settings window for Ion Exchange Membrane Boundary, locate the Ion Exchange Membrane Boundary section.
|
|
4
|
|
5
|
|
6
|
|
7
|
|
8
|
|
9
|
|
10
|
|
11
|
|
12
|
|
13
|
|
14
|
|
1
|
|
3
|
|
4
|
|
1
|
|
2
|
|
3
|
|
4
|
|
5
|
|
6
|
|
1
|
|
2
|
|
3
|
|
4
|
|
1
|
|
3
|
|
4
|
|
5
|
|
6
|
|
7
|
|
1
|
|
3
|
|
4
|
|
5
|
|
6
|
|
1
|
|
2
|
|
3
|
|
5
|
|
1
|
|
3
|
|
4
|
|
5
|
|
6
|
|
1
|
|
3
|
|
1
|
|
2
|
|
3
|
|
1
|
|
2
|
|
3
|
|
4
|
Click
|
|
6
|
|
1
|
|
2
|
|
3
|
|
1
|
|
2
|
|
3
|
|
4
|
|
5
|
|
1
|
|
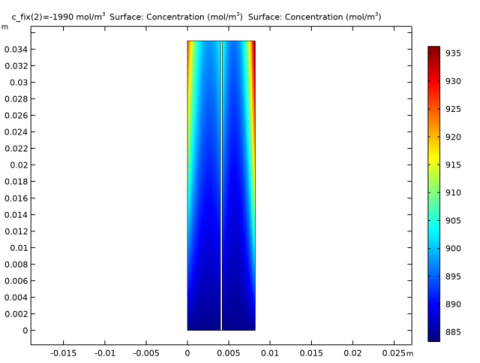
2
|
In the Rename 2D Plot Group dialog box, type V3/V4 Species Concentration in the New label text field.
|
|
3
|
Click OK.
|
|
1
|
|
1
|
|
2
|
|
3
|
|
1
|
|
2
|
|
3
|
|
1
|
|
2
|
|
3
|
|
4
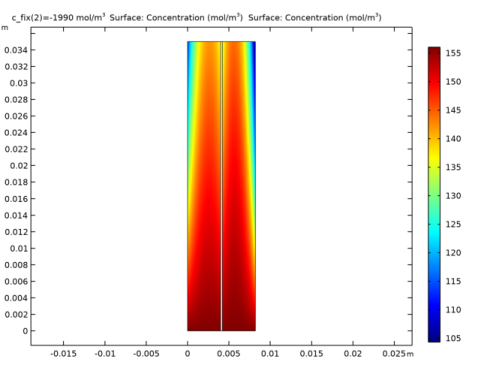
|
In the Rename 2D Plot Group dialog box, type V2/V5 Species Concentration in the New label text field.
|
|
5
|
Click OK.
|
|
1
|
|
2
|
|
1
|
|
2
|
|
3
|
Click OK.
|
|
1
|
|
2
|
|
3
|
|
4
|
|
1
|
|
2
|
|
3
|
|
4
|
|
1
|
|
2
|
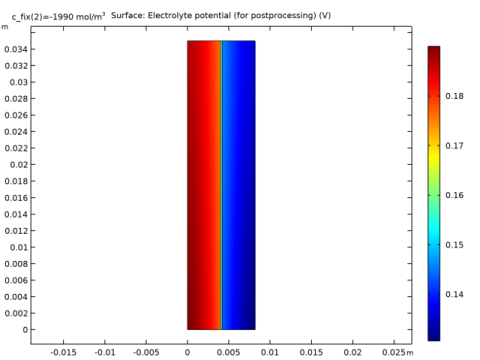
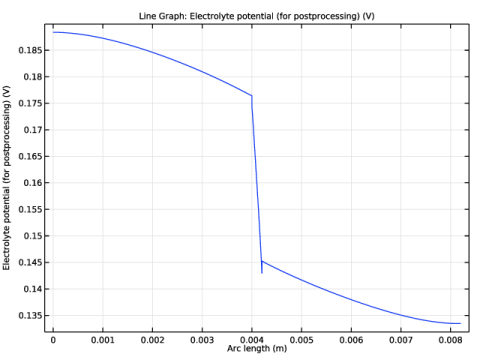
In the Settings window for Line Graph, click Replace Expression in the upper-right corner of the y-Axis Data section. From the menu, choose Component 1 (comp1)>Definitions>Variables>phil - Electrolyte potential (for postprocessing) - V.
|
|
3
|
|
1
|
|
2
|
|
3
|
Click OK.
|
|
1
|
|
2
|
|
3
|
|
4
|
|
5
|
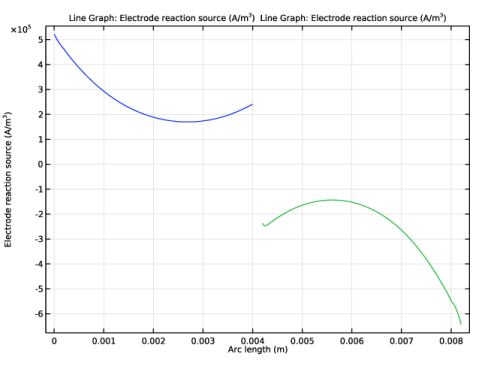
Click Replace Expression in the upper-right corner of the y-Axis Data section. From the menu, choose Component 1 (comp1)>Tertiary Current Distribution, Nernst-Planck (Negative)>Electrode kinetics>tcd.ivtot - Electrode reaction source - A/m³.
|
|
6
|
|
1
|
|
2
|
|
3
|
|
4
|
|
1
|
|
2
|
In the Rename 1D Plot Group dialog box, type Electrode reaction current densities in the New label text field.
|
|
3
|
Click OK.
|
|
1
|
|
2
|
|
3
|
|
4
|
|
1
|
|
2
|
|
3
|
Click OK.
|
|
1
|
|
2
|
|
3
|
|
4
|
|
1
|
|
2
|
|
3
|
|
4
|
|
5
|
|
1
|
|
2
|
|
3
|
|
4
|
Locate the Legends section. In the table, enter the following settings:
|
|
1
|
|
2
|
|
3
|
|
4
|
Locate the Legends section. In the table, enter the following settings:
|
|
1
|
|
2
|
|
3
|
|
4
|
|
5
|
Click OK.
|
|
1
|
|
2
|
|
3
|
|
4
|
|
1
|
|
2
|
|
3
|
|
4
|
|
5
|
|
1
|
|
2
|
|
3
|
|
4
|
Locate the Legends section. In the table, enter the following settings:
|
|
1
|
|
2
|
|
3
|
|
4
|
Locate the Legends section. In the table, enter the following settings:
|
|
1
|
|
2
|
|
3
|
|
4
|
Locate the Legends section. In the table, enter the following settings:
|
|
1
|
|
2
|
|
3
|
|
4
|
|
5
|
Click OK.
|
|
1
|
|
2
|
|
3
|
|
4
|
|
1
|
|
2
|
|
3
|
|
4
|
|
5
|
|
1
|
|
2
|
|
3
|
|
4
|
Locate the Legends section. In the table, enter the following settings:
|
|
1
|
|
2
|
|
3
|
|
4
|
Locate the Legends section. In the table, enter the following settings:
|
|
1
|
|
2
|
|
3
|
|
4
|
|
5
|
Click OK.
|