PDF

Loudspeaker Driver — Frequency-Domain Analysis
Introduction
This example shows how to model a loudspeaker driver of the dynamic cone type, common for low and medium frequencies. The analysis is carried out in the frequency domain and thus represents the linear behavior of the driver. The instructions walk you through modeling its electromagnetic, structural, and acoustic properties. The output from the model includes the total electric impedance and the sensitivity (the on-axis sound pressure level at a nominal driving voltage) as functions of the frequency. The spatial characteristics of the speaker are depicted in a directivity plot.
When performing the acoustic measurements in this model, the driver is set up in an infinite baffle — a wide reflective surface acting to shut out the sound produced on the backside of the cone. An extended 3D version of the model, Loudspeaker Driver in a Vented Enclosure, uses the lumped electromechanical properties modeled here and adds a vented enclosure (the driver is placed in a cabinet).
The model is set up with a combination of the Magnetic Fields interface from the AC/DC Module, the Acoustic-Structure Interaction multiphysics interface from the Acoustics Module. The Lorentz Coupling multiphysics feature is used for handling the electromagnetic forces and induced currents over the voice coil. A first, optional analysis solves only the electromagnetic part of the problem, with the driver in stand-still. From here, a driving force factor and the blocked voice coil impedance can be extracted and exported. The second analysis is of the full model, including the relevant multiphysics interactions all the way from the driving voltage to the computed sound pressure level.
A third optional analysis shows what is the effect of not considering the thermoviscous losses in the voice coil gap area. These losses are relevant around the frequencies where back cavity modes appear. The fourth and final analysis is an eigenfrequency analysis of the structure, showing the frequency and shape of the main structural modes of the speaker.
Note: This model requires the both the Acoustics Module and the AC/DC Module.
Model Definition
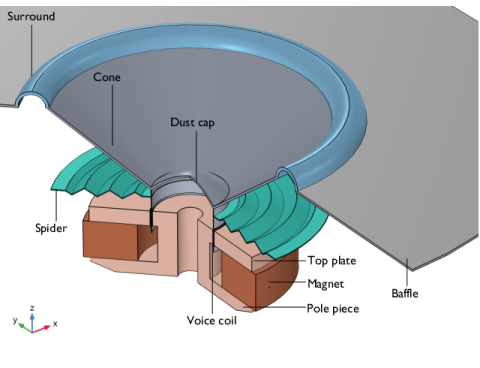
Figure 1 shows the geometry of the baffled driver with its functional parts. The field from the magnet is supported and focused by the iron pole piece and top plate to the thin gap where the voice coil is wound around a former extending from the apex of the cone. Although the voice coil consists of many turns of wire, it is for simplicity drawn and modeled as a homogenized domain. When a driving AC voltage is applied to the voice coil, the resulting force causes it to vibrate, and the cone to create sound.
The dust cap protects the magnetic motor. In this design, it is made of the same stiff and light composite material as the cone and also contributes to the sound. A centered hole in the pole piece counteracts pressure buildup beneath the dust cap. The suspension, consisting of the surround, made of a light foam material, and the spider, a flexible cloth, keep the cone in place and provide damping and spring forces.
The outer perimeters of the magnet and suspension are normally attached to a basket, a hollow supporting metal structure. The basket is not included in this model, but the magnet assembly and outer rims of the spider and surround are considered to be fixed. The omission of the basket means that the considered geometry is rotationally symmetric and can be modeled in the rz-plane.
Figure 1: Geometry of the modeled loudspeaker driver.
The loudspeaker is driven by a time-harmonic voltage, = V0exp(iωt), applied to the voice coil. The following theory section first describes the electromagnetic analysis of the current in the voice coil and the driving force that this current gives rise to. The relation between the driving voltage and the force on the voice coil as well as the so-called back EMF are easily set up in COMSOL using built-in functionality. This force is then applied in an acoustic-structure interaction analysis to compute the sound generation. More details are given in the section Electromagnetic Interactions.
The structural equation is solved in the moving parts of the driver, and a pressure acoustics equation in the surrounding air. The pressure acoustics equation is automatically excited by the structural vibrations, and feeds back the pressure load onto the structure, using the built-in Acoustic-Structure Boundary multiphysics coupling. In the narrow gap between the pole piece and the voice coil (the magnetic gap) damping occurs due to thermal and viscous boundary-layer losses. These losses are captured here using the Narrow Region Acoustics feature available in pressure acoustics. The gap is well approximated by a slit of constant cross section area. The effect of the damping is illustrated in the Results and Discussion section below.
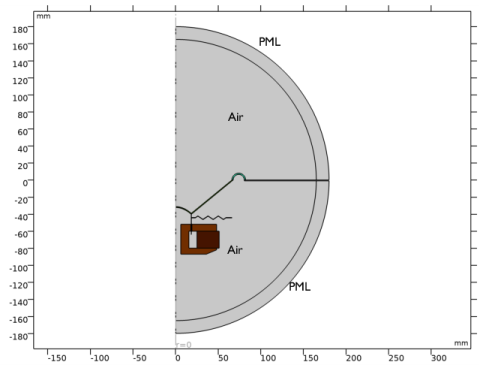
The air domains and the baffle should ideally extend to infinity. To avoid unphysical reflections where you truncate the geometry, you use a perfectly matched layer (PML), as seen in Figure 2. For more information about PMLs in acoustics, see the section Modeling with the Pressure Acoustics Branch (FEM-Based Interfaces) in the Acoustics Module User’s Guide.
Figure 2: Overview of the model geometry with the structures in pink.
Although the modeled air domain has a radius of only 165 mm, the local acoustic pressure and phase can be extracted anywhere outside the computational domain by using the exterior-field pressure computations. The sensitivity is calculated as the sound pressure level on the axis at a radius of 1 m, for the applied voltage V0 = 3.55 V. This functionality also allows postprocessing the directivity plot for the speaker, again evaluated at 1 m.
Electromagnetic Interactions
The Lorentz force on a wire of length L and with the current I in an externally generated magnetic flux density B perpendicular to the wire is given by F = LI × B. The voice coil consists of a single copper wire making N0 = 100 turns. The coil is homogenized so that
where is the azimuthally directed current density through a cross-section of the coil, and the integral is taken over its area in the rz-plane. The total driving force on the coil hence becomes
(1)
with Br being the r-component of the magnetic flux density, and the integral evaluated over the volume occupied by the coil domain. The Lorentz force is applied to the voice coil through the Lorentz Coupling multiphysics feature.
The current through the voice coil relates to the applied voltage as
(2)
where Zb is the blocked electric impedance (the electric impedance of the voice coil measured while the speaker’s moving parts are stationary) and Vbe denotes the back EMF (the voltage induced in the coil due to its motion through the permanent magnetic field in the gap). The back EMF is also automatically added to the voice coil using the Lorentz Coupling multiphysics feature.
Export of Lumped Electromagnetic Parameters
Lumped parameters that represent the driver can be derived and used for larger system simulations. The force factor BL and the blocked electric impedance of the coil are computed. They are used in the Loudspeaker Driver in a Vented Enclosure tutorial model to set up a lumped electromagnetic equivalent to drive the speaker.
If you write Equation 1 in terms of the coil current I rather than the cross-sectional current density, you get
(3)
as it is assumed that Jφ = I·N0/A and is constant in the coil cross-section of area A. The common factor in the expression for Fe and Vbe is the force factor BL, defined as
(4)
Note that if , the integral becomes equal to a magnetic flux density times the length of the coil; hence the name.
With knowledge of BL and the frequency-dependent Zb, Equation 2, Equation 3, and Equation 4 can be rearranged to form a relationship between the driving voltage V0 and the force acting on the voice coil
This is the expression used as the driving force in the Loudspeaker Driver in a Vented Enclosure model. Note the dependence on the velocity v of the moving coil, which is unknown prior to modeling the acoustic-structure interaction (ASI) problem.
Results and Discussion
The magnetic field in and around the magnetic motor is depicted in Figure 3. The maximum field in the air arises in the gap between the pole piece and the top plate (the magnetic gap where the voice coil is located). Performing the integral in Equation 4 over the voice coil domain gives a force factor BL = 10.48 N/A.
Figure 3: Magnetic field in and around the magnetic motor.
The iron in the pole piece and the top plate is modeled as a nonlinear magnetic material, with the relationship between the B and H fields described by interpolation from measured data. Figure 4 shows the local effective relative permeability μr = B/(μ0H). The plot shows that the iron is close to saturation in the center of the pole piece, but remains in the linear regime above and below the magnet. This indicates that if you want to use less material, you can likely decrease the radius of the pole piece and top plate with very little effect on the magnetic field in the gap.
Figure 4: The local relative permeability in the pole piece and top plate, when subjected to the field from the magnet.
In computing the blocked coil impedance, the AC equation is linearized around the local permeability resulting from the static solution. Figure 5 shows the induced currents at a frequency of 50 Hz and 900 Hz. With increasing frequency, it is evident that the so-called skin depth decreases as expected.
Figure 5: Induced currents in the pole piece and top plate at 50 Hz (top) and 900 Hz (bottom).
 
As seen at the higher frequency in Figure 5, the skin effect brings the currents closer to the surfaces. This causes the inductance as well as the resistive part of the impedance to change with the frequency. Figure 6 shows a plot of the blocked coil inductance versus frequency.
Figure 6: The inductance of the blocked coil as a function of frequency.
From the full electroacoustic-structure interaction analysis, Figure 7 shows the sound pressure level and displacement distribution at 8000 Hz. As the frequency of the excitation increases, it becomes possible to excite structural modes where different parts of the cone move at phases differing more than ±90 °. This effect, called cone break-up, reduces the acoustic efficiency of the speaker, as different parts of the cone will produce acoustic pressures of opposite sign. Using an eigenfrequency study pinpoints at which frequencies the different breakup modes appear. At lower frequencies, the sound pressure level is rather evenly distributed with peaks in the on-axis direction.
Figure 7: Sound pressure level (top) and displacement distribution (bottom) at 8000 Hz.
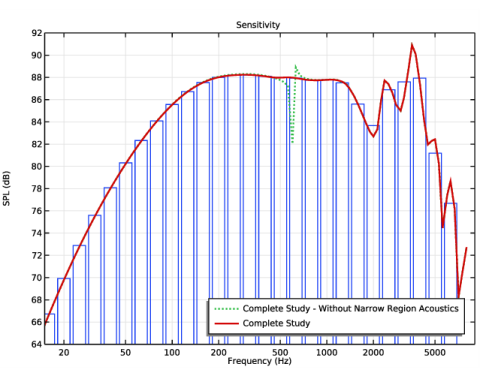
Figure 8 presents the loudspeaker’s sensitivity depicted both in 1/3 octave bands and as a continuous curve. The plot is realized using the specialized Octave Band plot available in the Acoustics Module. The preferred operating range is where the response is rather flat, that is, roughly in the range 100 Hz–1500 Hz. A vented enclosure can extend the range to lower frequencies, as shown in the tutorial model Loudspeaker Driver in a Vented Enclosure.
Figure 8: Loudspeaker sensitivity, measured as the on-axis sound pressure level (dB) at a distance of 1 m from the unit. The pressure is evaluated using an input signal of 3.55 V, or 2.51 V RMS, which corresponds to a power of 1 W at an 6.3 Ω. nominal impedance. Note the logarithmic frequency scale.
The plot in Figure 8 also shows the damping effect of the thermoviscous loses in the narrow gap between the voice coil and pole piece/top plate. In this setup one of the boundaries is moving (the voice coil) which is not fully compatible with the narrow region acoustics that assumes fixed boundaries. The error made is small. This can be seen by using the full thermoviscous acoustic physic interface in the narrow domain. The sensitivity is plotted both with (red curve) and without (green dotted) the losses included, captured using the Narrow Region Acoustics feature. If these are not considered, the back cavity mode around 600 Hz, will be shown in the sensitivity curve as steep resonances (green dotted curve). This mode can also be identified through the sudden shift of phase in the back cavity pressure as depicted in Figure 9.
Figure 9: Acoustic pressure below and above the back cavity mode for the lossless model.
The total electric impedance, defined as Z = V0/I, is depicted in Figure 10 (absolute, real, and imaginary parts are plotted). The features of this plot are very characteristic of loudspeaker drivers. The peak at approximately 50 Hz coincides with the mechanical resonance; at this frequency the reactive part of the impedance switches sign from inductive to capacitive. In most of the operational range the impedance is largely resistive. Between 100 Hz and 1 kHz it varies only between 6.3 Ω and 10.4 Ω. These are typical values for speakers with a nominal impedance of 6.3 Ω, as the nominal impedance is usually taken to represent a mean value over the usable frequency range, which for this driver extends between somewhat below 100 Hz and above 1 kHz. The DC resistance is the value as the frequency goes to 0 Hz, it has a value of 5.6 Ω. At frequencies higher than 1 kHz, the impedance continues to increase as the inductance of the voice coil starts playing a more important part.
Figure 10: Electric impedance (Ω) of the loudspeaker as a function of frequency (Hz).
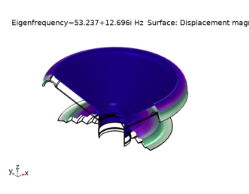
The deformation of the speaker depicted in Figure 7 indicates that one or more break-up modes are active at high frequency. The eigenfrequency analysis performed in the last study step shows the main mode affecting the structure. Due to the small influence of the acoustic pressure or the magnetic field in the frequency at which these modes appear, the analysis considers only the Solid Mechanics physic (the structure). The main modes, depicted in Figure 11, show that the first mode of the speaker appears slightly above 50 Hz, while the first break-up mode appears at around 2350 Hz. In the present case, only rotationally symmetric breakups can be modeled (the speaker is analyzed in 3D in the Loudspeaker Driver in a Vented Enclosure model).
 
Figure 11: Main structural modes of the loudspeaker driver.
Figure 12, finally, shows a directivity plot of the spatial speaker response. This is created using the dedicated Directivity plot available with the Acoustics Module. The plot shows a contour representation of the spatial response (measured on a half sphere in front of the speaker) versus the frequency. Directivity plots help analyze when side lobes occur and how they fall off. Several options, for example for the normalization and for switching the axes, are included. The plot in Figure 12 is normalized with respect to the level at 0o.
Figure 12: Directivity plot of the spatial speaker response.
Notes About the COMSOL Implementation
The step-by-step instructions take you through the following steps:
(Optional) Run the study to extract the force factor, BL, and the blocked coil impedance, Zb.
Pole piece and top plate material
The iron used in the pole piece and top plate is a nonlinear magnetic material, with interpolation data describing the relationship between the B and H fields. Among other output, the static solution provides the local permeability, as shown in Figure 4.
Perturbation Analysis
The studies in this model have a Stationary study step followed by a Frequency Domain, Perturbation step. This automatically makes the stationary solution the linearization point for the subsequent frequency domain solution. This means that the Magnetic Fields interface derives and uses a differential permeability inherited from the one computed by the stationary study. For the frequency domain assumption to be strictly valid, the applied AC voltage must be so small that the resulting current creates a magnetic field which does not significantly alter this permeability. Even though this is not quite the situation here, linearizing around a local biased permeability should still be a better approximation than assuming a constant permeability. The most accurate way to compute the impedance would be in a fully transient analysis, which is outside the scope of this model.
The coil is driven with a voltage set to linper(V0). The linper() operator ensures that the driving voltage V0 is applied only in the Frequency Domain, Perturbation study step.
Multiphysics
The Acoustic-Structure Interaction multiphysics interface sets up the pressure acoustics and the solid mechanics interfaces together with the Acoustic-Structure Boundary multiphysics coupling. The multiphysics coupling (under the Multiphysics node) automatically provides and assigns the boundary conditions for the two-way acoustic-structural coupling between the air and the structures. The acoustic-structure interaction is solved for only in the Frequency Domain, Perturbation step.
The Lorentz Coupling multiphysics feature automatically provides and assigns the domain loads for the two-way electromagnetic-structural coupling in the coil domain.
Structural Damping
In most loudspeaker specifications, the suspension is characterized by a mechanical compliance Cs and resistance Rs. In order to keep the resistance constant over a range of frequencies, the material needs to have a damping factor that increases linearly with the frequency or, equivalently, Rayleigh damping with αδM = 0 and a constant βdK = η00, where η0 is the loss factor measured at the angular frequency ω0. In this model, the frequency where the loss factor is measured is chosen to be near the lowest mechanical resonance of the driver.
Application Library path: Acoustics_Module/Electroacoustic_Transducers/loudspeaker_driver
Note: This application also requires the file Acoustics_Module/Electroacoustic_Transducers/loudspeaker_driver_materials as it contains the material definitions for Materials.
Modeling Instructions
From the File menu, choose New.
New
In the New window, click  Model Wizard.
Model Wizard
1
In the Model Wizard window, click  2D Axisymmetric.
2
In the Select Physics tree, select AC/DC>Electromagnetic Fields>Magnetic Fields (mf).
3
Click Add.
4
In the Select Physics tree, select Acoustics>Acoustic-Structure Interaction>Acoustic-Solid Interaction, Frequency Domain.
5
Click Add.
6
Click  Study.
The Model Wizard lets you select the first one of the study steps you plan to use in the model. Select a stationary study used for solving the static magnetic fields.
7
In the Select Study tree, select Preset Studies for Some Physics Interfaces>Stationary.
8
Geometry 1
When working with your own modeling project of an acoustic driver, you will typically either draw the geometry in COMSOL Multiphysics, or import a CAD file of the driver itself and add the surrounding air and PML domains. Here, the entire geometry is imported as a sequence from the geometry file. The instructions to the geometry can be found in the appendix at the end of this document.
1
In the Geometry toolbar, click  Insert Sequence.
2
3
In the Geometry toolbar, click  Build All.
4
Click the  Zoom Extents button in the Graphics toolbar.
Global Definitions
Parameters 1
Enter the model parameters or load them from the file loudspeaker_driver_parameters.txt. Here, as well as in all following sections, the Description field helps you keep track of what you are doing, but is completely optional.
1
In the Model Builder window, under Global Definitions click Parameters 1.
2
In the Settings window for Parameters, locate the Parameters section.
3
The loss factor frequency definition will be used when setting up the structural properties.
Create some selections, this will simplify setting up the physics.
Definitions
Soft Iron
1
In the Definitions toolbar, click  Explicit.
2
In the Settings window for Explicit, type Soft Iron in the Label text field.
3
4
Locate the Color section. From the Color list, choose Color 3.
Composite
1
In the Definitions toolbar, click  Explicit.
2
In the Settings window for Explicit, type Composite in the Label text field.
3
4
Locate the Color section. From the Color list, choose Color 9.
Cloth
1
In the Definitions toolbar, click  Explicit.
2
In the Settings window for Explicit, type Cloth in the Label text field.
3
4
Locate the Color section. From the Color list, choose Color 7.
Foam
1
In the Definitions toolbar, click  Explicit.
2
In the Settings window for Explicit, type Foam in the Label text field.
3
4
Locate the Color section. From the Color list, choose Color 10.
Coil
1
In the Definitions toolbar, click  Explicit.
2
In the Settings window for Explicit, type Coil in the Label text field.
3
4
Locate the Color section. From the Color list, choose Color 8.
Glass Fiber
1
In the Definitions toolbar, click  Explicit.
2
In the Settings window for Explicit, type Glass Fiber in the Label text field.
3
4
Locate the Color section. From the Color list, choose Color 10.
Generic Ferrite
1
In the Definitions toolbar, click  Explicit.
2
In the Settings window for Explicit, type Generic Ferrite in the Label text field.
3
4
Locate the Color section. From the Color list, choose Color 17.
PML
1
In the Definitions toolbar, click  Explicit.
2
In the Settings window for Explicit, type PML in the Label text field.
3
All Domains
1
In the Definitions toolbar, click  Box.
2
In the Settings window for Box, type All Domains in the Label text field.
Air
1
In the Definitions toolbar, click  Difference.
2
In the Settings window for Difference, type Air in the Label text field.
3
Locate the Input Entities section. Under Selections to add, click  Add.
4
In the Add dialog box, select All Domains in the Selections to add list.
5
6
In the Settings window for Difference, locate the Input Entities section.
7
Under Selections to subtract, click  Add.
8
In the Add dialog box, in the Selections to subtract list, choose Soft Iron, Composite, Cloth, Foam, Coil, Glass Fiber, and Generic Ferrite.
9
Structural Domains
1
In the Definitions toolbar, click  Union.
2
In the Settings window for Union, type Structural Domains in the Label text field.
3
Locate the Input Entities section. Under Selections to add, click  Add.
4
In the Add dialog box, in the Selections to add list, choose Composite, Cloth, Foam, Coil, and Glass Fiber.
5
Composite and Glass Fiber
1
In the Definitions toolbar, click  Union.
2
In the Settings window for Union, type Composite and Glass Fiber in the Label text field.
3
Locate the Input Entities section. Under Selections to add, click  Add.
4
In the Add dialog box, in the Selections to add list, choose Composite and Glass Fiber.
5
Magnetic Domains
1
In the Definitions toolbar, click  Box.
2
In the Settings window for Box, type Magnetic Domains in the Label text field.
3
Locate the Box Limits section. In the r minimum text field, type 0 [mm].
4
In the r maximum text field, type 50 [mm].
5
In the z minimum text field, type -90 [mm].
6
In the z maximum text field, type -42 [mm].
All Domains Without the PML
1
In the Definitions toolbar, click  Difference.
2
In the Settings window for Difference, type All Domains Without the PML in the Label text field.
3
Locate the Input Entities section. Under Selections to add, click  Add.
4
In the Add dialog box, select All Domains in the Selections to add list.
5
6
In the Settings window for Difference, locate the Input Entities section.
7
Under Selections to subtract, click  Add.
8
In the Add dialog box, select PML in the Selections to subtract list.
9
Perfectly Matched Layer 1 (pml1)
1
In the Definitions toolbar, click  Perfectly Matched Layer.
Use the Perfectly Matched Layers (PMLs) to model a nonreflecting condition-like behavior and avoid unphysical reflections (spurious reflections) where the sound leaves the model. This feature is also set up under Definitions. This makes them available for any physics interface that needs them.
2
In the Settings window for Perfectly Matched Layer, locate the Domain Selection section.
3
From the Selection list, choose PML.
4
Locate the Scaling section. From the Coordinate stretching type list, choose Rational.
5
In the PML scaling curvature parameter text field, type 5.
Integration 1 (intop1)
1
In the Definitions toolbar, click  Nonlocal Couplings and choose Integration.
Use this integral to compute the radiated power of the loudspeaker.
2
In the Settings window for Integration, locate the Source Selection section.
3
From the Geometric entity level list, choose Boundary.
4
Variables 1
1
In the Model Builder window, right-click Definitions and choose Variables.
Add two variables to compute the coil power and the acoustic efficiency of the loudspeaker.
2
In the Settings window for Variables, locate the Variables section.
3
Materials
While the material properties used in this model are partly made up, they resemble those used in a real driver. The coil former has properties representative of glass fiber materials. The spider, acting as a spring, is made of a phenolic cloth with a much lower stiffness. The material used in the coil is taken to be lighter than copper, as the wire is insulated and does not completely fill the coil domain. The surround, finally, is a light resistive foam.
Except for air and soft Iron, the materials you will use all come from a material library created especially for this model (to be loaded from the file loudspeaker_driver_materials.mph). You may notice that some of the materials will report missing properties. For example, the composite does not include any electromagnetic properties. This is fine, as you will not model the magnetic fields in the domains where the composite is used.
Add Material
1
In the Home toolbar, click  Add Material to open the Add Material window.
2
Go to the Add Material window.
3
4
Click Add to Component in the window toolbar.
5
In the tree, select AC/DC>Soft Iron (With Losses).
6
Click Add to Component in the window toolbar.
Materials
Air (mat1)
First, add air which will be present everywhere in your geometry. Next, switch to using nonlinear Iron in the pole piece and top plate.
Soft Iron (With Losses) (mat2)
1
In the Model Builder window, click Soft Iron (With Losses) (mat2).
2
In the Settings window for Material, locate the Geometric Entity Selection section.
3
From the Selection list, choose Soft Iron.
4
Right-click Soft Iron (With Losses) (mat2) and choose Browse Materials.
Material Browser
1
In the Material Browser window, In the ribbon make sure to select the Materials tab and then click the Browse Materials icon.
The Import Material Library functionality is activated by clicking the small icon at the lower-right, below the Material Browser tree.
2
click  Import Material Library.
3
4
Add Material
1
Go to the Add Material window.
2
In the tree, select loudspeaker driver materials>Composite.
3
Click Add to Component in the window toolbar.
4
In the tree, select loudspeaker driver materials>Cloth.
5
Click Add to Component in the window toolbar.
6
In the tree, select loudspeaker driver materials>Foam.
7
Click Add to Component in the window toolbar.
8
In the tree, select loudspeaker driver materials>Coil.
9
Click Add to Component in the window toolbar.
10
In the tree, select loudspeaker driver materials>Glass Fiber.
11
Click Add to Component in the window toolbar.
12
In the tree, select loudspeaker driver materials>Generic Ferrite.
13
Click Add to Component in the window toolbar.
14
In the Home toolbar, click  Add Material to close the Add Material window.
Materials
Composite (mat3)
1
In the Model Builder window, under Component 1 (comp1)>Materials click Composite (mat3).
2
In the Settings window for Material, locate the Geometric Entity Selection section.
3
From the Selection list, choose Composite.
Cloth (mat4)
1
In the Model Builder window, click Cloth (mat4).
2
In the Settings window for Material, locate the Geometric Entity Selection section.
3
From the Selection list, choose Cloth.
Foam (mat5)
1
In the Model Builder window, click Foam (mat5).
2
In the Settings window for Material, locate the Geometric Entity Selection section.
3
From the Selection list, choose Foam.
Coil (mat6)
1
In the Model Builder window, click Coil (mat6).
2
In the Settings window for Material, locate the Geometric Entity Selection section.
3
From the Selection list, choose Coil.
Glass Fiber (mat7)
1
In the Model Builder window, click Glass Fiber (mat7).
2
In the Settings window for Material, locate the Geometric Entity Selection section.
3
From the Selection list, choose Glass Fiber.
Generic Ferrite (mat8)
1
In the Model Builder window, click Generic Ferrite (mat8).
2
In the Settings window for Material, locate the Geometric Entity Selection section.
3
From the Selection list, choose Generic Ferrite.
Magnetic Fields (mf)
The Magnetic Fields equation needs to be solved in and around the magnetic motor. To reduce simulation time, make this physics interface active only where it is needed. You can remove all domains where you expect the magnetic field to be negligible.
1
In the Model Builder window, under Component 1 (comp1) click Magnetic Fields (mf).
2
In the Settings window for Magnetic Fields, locate the Domain Selection section.
3
From the Selection list, choose Magnetic Domains.
Ampère’s Law is per default solved in all domains where the physics interface is active. Add a second instance of it to apply to the permanent magnet, where you need a different constitutive relation.
Generic Ferrite
1
In the Physics toolbar, click  Domains and choose Ampère’s Law.
2
In the Settings window for Ampère’s Law, type Generic Ferrite in the Label text field.
3
Locate the Domain Selection section. From the Selection list, choose Generic Ferrite.
4
Locate the Constitutive Relation B-H section. From the Magnetization model list, choose Remanent flux density.
5
Specify the e vector as
This setting gives a static remanent flux density equal to 0.4 T in the z direction. This will create a static magnetic field distribution in the model, providing the linearization point for the frequency domain study.
Soft Iron
1
In the Physics toolbar, click  Domains and choose Ampère’s Law.
2
In the Settings window for Ampère’s Law, type Soft Iron in the Label text field.
3
Locate the Domain Selection section. From the Selection list, choose Soft Iron.
4
Locate the Constitutive Relation B-H section. From the Magnetization model list, choose B-H curve.
The B-H curve is provided by the soft iron material.
Coil 1
1
In the Physics toolbar, click  Domains and choose Coil.
2
In the Settings window for Coil, locate the Domain Selection section.
3
From the Selection list, choose Coil.
4
Locate the Coil section. From the Conductor model list, choose Homogenized multiturn.
5
Locate the Homogenized Multiturn Conductor section. In the N text field, type N0.
6
In the acoil text field, type 3.5e-8[m^2].
With N0 = 100 turns, the total cross-sectional area covered by the wires will be 3.5e-6 m2. The area of the coil domain is 6e-6 m2, making the fill factor approximately 60 %.
7
Locate the Coil section. From the Coil excitation list, choose Voltage.
8
In the Vcoil text field, type linper(V0).
This is the driving voltage. Because the linper() operator is used it will kick in only in the Frequency Domain, Perturbation study.
Pressure Acoustics, Frequency Domain (acpr)
Select the air domains above and under the speaker as well as the PML regions.
1
In the Model Builder window, under Component 1 (comp1) click Pressure Acoustics, Frequency Domain (acpr).
2
In the Settings window for Pressure Acoustics, Frequency Domain, locate the Domain Selection section.
3
From the Selection list, choose Air.
Exterior Field Calculation 1
1
In the Physics toolbar, click  Boundaries and choose Exterior Field Calculation.
The exterior-field calculation requires a source boundary encompassing all local sound sources, and with a symmetry plane to account for the infinite baffle. After computing the solution, you can evaluate the pressure in any point (r,z) outside the domain by entering pext(r,z).
2
3
In the Settings window for Exterior Field Calculation, locate the Exterior Field Calculation section.
4
From the Condition in the z = z^0 plane list, choose Symmetric/Infinite sound hard boundary.
The narrow air gaps around the voice coil have a significant effect on the damping of the back cavity modes.
Narrow Region Acoustics 1
1
In the Physics toolbar, click  Domains and choose Narrow Region Acoustics.
2
3
In the Settings window for Narrow Region Acoustics, locate the Duct Properties section.
4
From the Duct type list, choose Slit.
5
In the h text field, type 0.4[mm].
6
Narrow Region Acoustics 2
1
Right-click Narrow Region Acoustics 1 and choose Duplicate.
2
In the Settings window for Narrow Region Acoustics, locate the Domain Selection section.
3
Click  Clear Selection.
4
5
Locate the Duct Properties section. In the h text field, type 0.2[mm].
Solid Mechanics (solid)
1
In the Model Builder window, under Component 1 (comp1) click Solid Mechanics (solid).
2
In the Settings window for Solid Mechanics, locate the Domain Selection section.
3
From the Selection list, choose Structural Domains.
With the above selection, you leave out the magnet, pole piece, and top plate. You will consider these domains as perfectly rigid, by using the default sound hard wall condition on their surfaces.
Add damping to some of the solid material.
Linear Elastic Material 1
In the Model Builder window, under Component 1 (comp1)>Solid Mechanics (solid) click Linear Elastic Material 1.
Damping 1
1
In the Physics toolbar, click  Attributes and choose Damping.
2
In the Settings window for Damping, locate the Domain Selection section.
3
Click  Clear Selection.
4
From the Selection list, choose Composite and Glass Fiber.
5
Locate the Damping Settings section. From the Damping type list, choose Isotropic loss factor.
Linear Elastic Material 1
In the Model Builder window, click Linear Elastic Material 1.
Damping 2
1
In the Physics toolbar, click  Attributes and choose Damping.
2
In the Settings window for Damping, locate the Domain Selection section.
3
Click  Clear Selection.
4
From the Selection list, choose Cloth.
5
Locate the Damping Settings section. In the βdK text field, type 0.14/omega0.
Linear Elastic Material 1
In the Model Builder window, click Linear Elastic Material 1.
Damping 3
1
In the Physics toolbar, click  Attributes and choose Damping.
2
In the Settings window for Damping, locate the Domain Selection section.
3
Click  Clear Selection.
4
From the Selection list, choose Foam.
5
Locate the Damping Settings section. In the βdK text field, type 0.46/omega0.
The spider and the surround are attached to the case.
Fixed Constraint 1
1
In the Physics toolbar, click  Boundaries and choose Fixed Constraint.
2
Now is a good time to inspect Acoustic-Structure Boundary 1 multiphysics coupling under the Multiphysics node. When using a predefined multiphysics interface the coupling is automatically applied to all acoustic-solid boundaries.
Now, the Lorentz Coupling multiphysics feature is added to handle Lorentz force on the coil (it represents the product of the time-harmonic current and the static magnetic field in which it is traveling). For details, see Notes About the COMSOL Implementation.
Multiphysics
Lorentz Coupling 1 (ltzc1)
1
In the Physics toolbar, click  Multiphysics Couplings and choose Domain>Lorentz Coupling.
2
In the Settings window for Lorentz Coupling, locate the Domain Selection section.
3
From the Selection list, choose Coil.
Mesh 1
The mesh used in computing the impedance needs to resolve the induced eddy currents in the pole piece and the top plate. For the results to be accurate, the skin depth needs to be resolved by at least 1, preferably 2 quadratic elements.
With a conductivity of 1.12e7 S/m and a peak relative permeability of 1200, the skin depth in the iron at the maximum frequency of 8 kHz does not go below 0.05 mm. In practice, most of the induced currents will run in regions of the pole piece where the biased relative permeability is much less than 1200, which makes the skin depth greater. In this model, it is therefore sufficient to use a mesh size of 0.5 mm along the iron surfaces that are closest to the voice coil.
For the acoustic-structure interaction, the air domain and the thin moving structures also need to be well resolved. The PML is preferably meshed with mapped elements, use 8 elements for the default polynomial scaling.
Mapped 1
1
In the Mesh toolbar, click  Mapped.
2
In the Settings window for Mapped, locate the Domain Selection section.
3
From the Geometric entity level list, choose Domain.
4
Size
1
In the Model Builder window, click Size.
2
In the Settings window for Size, locate the Element Size section.
3
Click the Custom button.
4
Locate the Element Size Parameters section. In the Maximum element size text field, type lam0/5.
5
In the Minimum element size text field, type 0.5[mm].
6
In the Maximum element growth rate text field, type 1.15.
Size 1
1
In the Model Builder window, right-click Mapped 1 and choose Size.
2
3
In the Settings window for Size, locate the Element Size section.
4
Click the Custom button.
5
Locate the Element Size Parameters section. Select the Maximum element size check box.
6
Size 2
1
Right-click Mapped 1 and choose Size.
2
In the Settings window for Size, locate the Geometric Entity Selection section.
3
Click  Clear Selection.
4
5
Locate the Element Size section. Click the Custom button.
6
Locate the Element Size Parameters section. Select the Maximum element size check box.
7
Size 3
1
Right-click Mapped 1 and choose Size.
2
In the Settings window for Size, locate the Geometric Entity Selection section.
3
Click  Clear Selection.
4
5
Locate the Element Size section. Click the Custom button.
6
Locate the Element Size Parameters section. Select the Maximum element size check box.
7
Distribution 1
1
Right-click Mapped 1 and choose Distribution.
2
3
In the Settings window for Distribution, locate the Distribution section.
4
In the Number of elements text field, type 2.
Distribution 2
1
Right-click Mapped 1 and choose Distribution.
2
3
In the Settings window for Distribution, locate the Distribution section.
4
In the Number of elements text field, type 8.
5
Click  Build Selected.
Free Triangular 1
In the Mesh toolbar, click  Free Triangular.
Boundary Layers 1
1
In the Mesh toolbar, click  Boundary Layers.
2
In the Settings window for Boundary Layers, locate the Domain Selection section.
3
From the Geometric entity level list, choose Domain.
4
5
Click to expand the Transition section. Clear the Smooth transition to interior mesh check box.
Boundary Layer Properties
1
In the Model Builder window, click Boundary Layer Properties.
2
Boundary Layer Properties 1
1
In the Mesh toolbar, click  More Attributes and choose Boundary Layer Properties.
2
3
In the Settings window for Boundary Layer Properties, locate the Boundary Layer Properties section.
4
In the Number of boundary layers text field, type 1.
5
Click  Build All.
The image should look like this.
Magnetic Fields Study
1
In the Model Builder window, click Study 1.
2
In the Settings window for Study, type Magnetic Fields Study in the Label text field.
Your Study node already contains the Stationary study that you picked from the Model Wizard. Disable the Pressure Acoustics and Solid Mechanics interfaces.
Add a Frequency-Domain, Perturbation study.
3
Locate the Study Settings section. Clear the Generate default plots check box.
Step 1: Stationary
1
In the Model Builder window, under Magnetic Fields Study click Step 1: Stationary.
2
In the Settings window for Stationary, locate the Physics and Variables Selection section.
3
In the table, clear the Solve for check boxes for Pressure Acoustics, Frequency Domain (acpr) and Solid Mechanics (solid).
Frequency Domain Perturbation
1
In the Study toolbar, click  Study Steps and choose Frequency Domain>Frequency Domain Perturbation.
2
In the Settings window for Frequency Domain Perturbation, locate the Study Settings section.
3
In the Frequencies text field, type 1 2 3 4 5 6 7 8 9.
4
Click  Range.
5
In the Range dialog box, choose ISO preferred frequencies from the Entry method list.
6
In the Start frequency text field, type 10.
7
In the Stop frequency text field, type fmax.
8
From the Interval list, choose 1/12 octave.
9
Click Add.
This generates a few frequency points below 10 Hz and ISO preferred frequencies between 10 Hz and 8 kHz.
10
In the Settings window for Frequency Domain Perturbation, locate the Physics and Variables Selection section.
11
In the table, clear the Solve for check boxes for Pressure Acoustics, Frequency Domain (acpr) and Solid Mechanics (solid).
NOTE: The first solution of this model is only of the electromagnetic part of the problem, with the coil assumed to be fixed in order to extract the BL factor and the blocked coil impedance. If you would like to skip ahead to the solution of the full electroacoustic problem, you can do so by proceeding from here to the instructions starting at the section Component 1 (comp1), further below. Otherwise, continue by computing the solution.
12
In the Study toolbar, click  Compute.
Results
First, create a 2D plot to view the magnetic field distribution from the permanent magnet.
Static Magnetic Field
1
In the Home toolbar, click  Add Plot Group and choose 2D Plot Group.
2
In the Settings window for 2D Plot Group, type Static Magnetic Field in the Label text field.
3
Locate the Data section. From the Dataset list, choose Magnetic Fields Study/Solution Store 1 (sol2).
Each step in a study creates its own dataset. The numbering of the datasets begins from the last step. Hence in this model Solution 2 contains the stationary solution and Solution 1 the frequency domain perturbation.
Surface 1
1
Right-click Static Magnetic Field and choose Surface.
2
In the Settings window for Surface, click Replace Expression in the upper-right corner of the Expression section. From the menu, choose Component 1 (comp1)>Magnetic Fields>Magnetic>mf.normH - Magnetic field norm - A/m.
3
Locate the Coloring and Style section. From the Color table list, choose ThermalLight.
4
In the Static Magnetic Field toolbar, click  Plot.
You are now looking at the magnetic field norm created by the permanent magnet. Note that it has a distinct maximum in the gap where the voice coil is moving. If you zoom in a little, the plot should look like Figure 3.
Another interesting result is the permeability distribution in the iron. Begin by duplicating the existing plot.
Effective Permeability
1
In the Model Builder window, right-click Static Magnetic Field and choose Duplicate.
2
In the Settings window for 2D Plot Group, type Effective Permeability in the Label text field.
Surface 1
1
In the Model Builder window, expand the Effective Permeability node, then click Surface 1.
2
In the Settings window for Surface, locate the Expression section.
3
In the Expression text field, type mf.normB/(mu0_const*mf.normH).
4
Select the Description check box.
5
In the associated text field, type Effective relative permeability.
6
In the Effective Permeability toolbar, click  Plot.
This is the effective relative permeability at the linearization point, as given by the ratio of the flux density and the field multiplied by the permeability of vacuum. The plot should look like Figure 4.
Next, evaluate the BL force factor.
Surface Average 1
1
In the Results toolbar, click  More Derived Values and choose Average>Surface Average.
2
In the Settings window for Surface Average, locate the Data section.
3
From the Dataset list, choose Magnetic Fields Study/Solution Store 1 (sol2).
4
Locate the Selection section. From the Selection list, choose Coil.
5
Locate the Expressions section. In the table, enter the following settings:
6
Locate the Integration Settings section. Clear the Compute volume integral check box.
7
Click  Evaluate.
The BL factor evaluates to 10.5 N/A.
Next, study the induced current density at a few different frequencies.
Induced Current Density
1
In the Results toolbar, click  2D Plot Group.
2
In the Settings window for 2D Plot Group, type Induced Current Density in the Label text field.
Surface 1
1
Right-click Induced Current Density and choose Surface.
2
In the Settings window for Surface, click Replace Expression in the upper-right corner of the Expression section. From the menu, choose Component 1 (comp1)>Magnetic Fields>Currents and charge>Conduction current density (spatial frame) - A/m²>mf.Jiphi - Conduction current density, phi component.
The Compute differential check box, if turned on, wraps the expression in a lindev() operator. For more information, search for lindev in the COMSOL Multiphysics Documentation.
3
In the Induced Current Density toolbar, click  Plot.
At 3500 Hz, the induced currents are highly localized to the surfaces of the top plate and pole piece.
Induced Current Density
1
In the Model Builder window, click Induced Current Density.
2
In the Settings window for 2D Plot Group, locate the Data section.
3
From the Parameter value (freq (Hz)) list, choose 1.
4
In the Induced Current Density toolbar, click  Plot.
At 10 Hz, the induced currents distribute throughout the material. The distribution depends on the vicinity to the voice coil, but also very much on the local effective permeability from the static study. To reproduce Figure 5, try two frequencies in between.
Before proceeding to the full electroacoustic analysis, plot the blocked coil inductance as a function of the frequency.
Blocked Coil Inductance
1
In the Home toolbar, click  Add Plot Group and choose 1D Plot Group.
2
In the Settings window for 1D Plot Group, type Blocked Coil Inductance in the Label text field.
3
Click to expand the Title section. From the Title type list, choose Label.
Global 1
1
Right-click Blocked Coil Inductance and choose Global.
2
In the Settings window for Global, locate the y-Axis Data section.
3
4
Click the  x-Axis Log Scale button in the Graphics toolbar.
5
In the Blocked Coil Inductance toolbar, click  Plot.
The result should look like Figure 6.
Having extracted the force factor and the voice coil inductance, you now have most of the electromagnetic data required for a separate model of the acoustic parts of a boxed loudspeaker driver. See the Loudspeaker Driver in a Vented Enclosure model also in the Application Library. What remains is the real part of the blocked coil impedance. This is available as mf.RCoil_1, the Coil Resistance. If you would like to extract this too, you can set it up in a Global plot just like the inductance, and export the results as described in the following steps.
Plot 1
1
Right-click Global 1 and choose Add Plot Data to Export.
If you want to export the data, you can now enter a filename and click the Export button.
Component 1 (comp1)
It is now time to compute and evaluate the solution of the entire model, including the acoustic-structure interaction. In order to this, you will set up a new study. Although you could technically reuse the static magnetic fields solution from the first study, it can be handy to include this step in the new study too. This allows you to make changes anywhere in the model, including such that affect the static magnetic fields, and run only the new study again to get correctly updated results.
Add Study
1
In the Home toolbar, click  Add Study to open the Add Study window.
2
Go to the Add Study window.
Select an empty study so that you can copy and modify the study steps from your previous study.
3
Find the Studies subsection. In the Select Study tree, select Empty Study.
4
Click Add Study in the window toolbar.
5
In the Home toolbar, click  Add Study to close the Add Study window.
Magnetic Fields Study
Step 1: Stationary, Step 2: Frequency Domain Perturbation
1
In the Model Builder window, under Magnetic Fields Study, Ctrl-click to select Step 1: Stationary and Step 2: Frequency Domain Perturbation.
2
Study 2
Step 1: Stationary
1
In the Model Builder window, right-click Study 2 and choose Paste Multiple Items.
2
In the Settings window for Study, type Complete Study in the Label text field.
3
Locate the Study Settings section. Clear the Generate default plots check box.
Step 2: Frequency Domain Perturbation
Make the Frequency Domain, Perturbed study solve for the acoustics and the solid physics too.
1
In the Model Builder window, click Step 2: Frequency Domain Perturbation.
2
In the Settings window for Frequency Domain Perturbation, locate the Physics and Variables Selection section.
3
In the table, select the Solve for check boxes for Pressure Acoustics, Frequency Domain (acpr) and Solid Mechanics (solid).
4
In the Home toolbar, click  Compute.
Results
You will now have received two more datasets: Solution 4 containing the same static magnetic fields as Solution 2, and Solution 3 with the frequency domain electromagnetic and acoustic-structure interaction results. In order to get a good overview of the latter, begin by adding a selection of all domains except the PMLs. You will then create a Revolution dataset in order to enable a 3D view of the model.
Complete Study/Solution 3 (sol3)
In the Model Builder window, expand the Results>Datasets node, then click Complete Study/Solution 3 (sol3).
Selection
1
In the Results toolbar, click  Attributes and choose Selection.
2
In the Settings window for Selection, locate the Geometric Entity Selection section.
3
From the Geometric entity level list, choose Domain.
4
From the Selection list, choose All Domains Without the PML.
Revolution 2D 1
1
In the Results toolbar, click  More Datasets and choose Revolution 2D.
2
In the Settings window for Revolution 2D, locate the Data section.
3
From the Dataset list, choose Complete Study/Solution 3 (sol3).
4
Click to expand the Revolution Layers section. In the Start angle text field, type -80.
5
In the Revolution angle text field, type 250.
Create a 3D plot of the instantaneous pressure distribution at zero phase in and around the speaker.
Instantaneous Pressure
1
In the Results toolbar, click  3D Plot Group.
2
In the Settings window for 3D Plot Group, type Instantaneous Pressure in the Label text field.
Surface 1
1
Right-click Instantaneous Pressure and choose Surface.
2
In the Settings window for Surface, locate the Expression section.
3
In the Expression text field, type acpr.p_t.
4
Locate the Coloring and Style section. From the Color table list, choose WaveLight.
5
Select the Symmetrize color range check box.
Contour 1
1
In the Model Builder window, right-click Instantaneous Pressure and choose Contour.
2
In the Settings window for Contour, locate the Expression section.
3
In the Expression text field, type acpr.p_t.
4
Locate the Coloring and Style section. From the Coloring list, choose Uniform.
5
From the Color list, choose Gray.
6
Clear the Color legend check box.
Next, reproduce Figure 7 with a plot of the local sound pressure level.
Sound Pressure Level
1
In the Results toolbar, click  3D Plot Group.
2
In the Settings window for 3D Plot Group, type Sound Pressure Level in the Label text field.
Surface 1
1
Right-click Sound Pressure Level and choose Surface.
2
In the Settings window for Surface, locate the Expression section.
3
In the Expression text field, type acpr.Lp_t.
4
Click the  Show Grid button in the Graphics toolbar.
5
In the Sound Pressure Level toolbar, click  Plot.
The result should look like Figure 7.
Create a 1D plot of the sensitivity versus the frequency, as in Figure 8.
Sensitivity
1
In the Home toolbar, click  Add Plot Group and choose 1D Plot Group.
2
In the Settings window for 1D Plot Group, type Sensitivity in the Label text field.
3
Locate the Data section. From the Dataset list, choose Complete Study/Solution 3 (sol3).
4
Locate the Title section. From the Title type list, choose Label.
5
Locate the Plot Settings section. Select the x-axis label check box.
6
7
Select the y-axis label check box.
8
9
Locate the Legend section. From the Position list, choose Lower middle.
Octave Band 1
1
In the Sensitivity toolbar, click  More Plots and choose Octave Band.
2
In the Settings window for Octave Band, locate the Selection section.
3
From the Geometric entity level list, choose Global.
Use the Octave Band Plot to depict the sensitivity. Evaluate the pressure 1 m in front using pext() operator. The reference pressure is the default for an SPL evaluation. Plot the sensitivity both as a continuous curve and in 1/3 octave bands.
4
Locate the y-Axis Data section. In the Expression text field, type pext(0,1[m]).
5
In the Sensitivity toolbar, click  Plot.
6
Locate the Plot section. From the Style list, choose 1/3 octave bands.
7
Click to expand the Coloring and Style section. From the Type list, choose Outline.
Octave Band 2
1
Right-click Octave Band 1 and choose Duplicate.
2
In the Settings window for Octave Band, locate the Plot section.
3
From the Style list, choose Continuous.
4
In the Sensitivity toolbar, click  Plot.
5
Locate the Coloring and Style section. In the Width text field, type 2.
6
Click to expand the Legends section. Select the Show legends check box.
7
From the Legends list, choose Manual.
8
Sensitivity
1
In the Model Builder window, click Sensitivity.
2
In the Settings window for 1D Plot Group, locate the Axis section.
3
Select the Manual axis limits check box.
4
In the x minimum text field, type 15.
5
In the y minimum text field, type 64.
6
In the y maximum text field, type 92.
7
Locate the Legend section. From the Position list, choose Lower right.
8
In the Sensitivity toolbar, click  Plot.
Finally, plot the total electric impedance versus the frequency.
Total Electric Impedance
1
In the Home toolbar, click  Add Plot Group and choose 1D Plot Group.
2
In the Settings window for 1D Plot Group, type Total Electric Impedance in the Label text field.
3
Locate the Data section. From the Dataset list, choose Complete Study/Solution 3 (sol3).
4
Locate the Title section. From the Title type list, choose Label.
5
Locate the Plot Settings section. Select the x-axis label check box.
6
7
Select the y-axis label check box.
8
Global 1
1
Right-click Total Electric Impedance and choose Global.
The automatic computation of the coil impedance uses the entire applied voltage. Because this now includes a contribution from the motion of the coil, you need to define it manually as only the driving voltage V0 divided by the time-harmonic current through the coil. The results are depicted in Figure 10.
2
In the Settings window for Global, locate the y-Axis Data section.
3
4
In the Total Electric Impedance toolbar, click  Plot.
5
Click the  x-Axis Log Scale button in the Graphics toolbar.
Next create a plot of the deformation of the loudspeaker. This can in general be used to visualize breakups in the cone and surround.
Deformation
1
In the Home toolbar, click  Add Plot Group and choose 3D Plot Group.
2
In the Settings window for 3D Plot Group, type Deformation in the Label text field.
Surface 1
1
Right-click Deformation and choose Surface.
2
In the Settings window for Surface, locate the Expression section.
3
In the Expression text field, type solid.disp.
Deformation 1
1
Right-click Surface 1 and choose Deformation.
2
In the Deformation toolbar, click  Plot.
The plot should look like the one in Figure 10.
Finally, visualize the directivity of the loudspeaker using the built in Directivity plot. This is an important plot used to visualize and analyze the spatial response of the speaker as function of the frequency.
First, create a copy of the relevant dataset and switch to spatial coordinates. This dataset is automatically created when the Generate default plot is not deselected. It is necessary for the Directivity plot and other plots using the exterior-field feature.
Complete Study/Solution 3 (5) (sol3)
1
In the Model Builder window, under Results>Datasets right-click Complete Study/Solution 3 (sol3) and choose Duplicate.
2
In the Settings window for Solution, locate the Solution section.
3
From the Frame list, choose Spatial  (r, phi, z).
Directivity Plot
1
In the Home toolbar, click  Add Plot Group and choose 1D Plot Group.
2
In the Settings window for 1D Plot Group, type Directivity Plot in the Label text field.
Select the dataset you just created.
3
Locate the Data section. From the Dataset list, choose Complete Study/Solution 3 (5) (sol3).
4
Locate the Title section. From the Title type list, choose Label.
Directivity 1
1
In the Directivity Plot toolbar, click  More Plots and choose Directivity.
Per default the reference direction is along the z-axis. This defines what 0 deg corresponds to. Change the angles to correspond to everything in front of the speaker, that is, from -90 to 90 deg.
2
In the Settings window for Directivity, locate the Evaluation section.
3
Find the Angles subsection. From the Restriction list, choose Manual.
4
In the Number of angles text field, type 360.
5
In the φ start text field, type -90.
6
In the φ range text field, type 180.
7
Find the Evaluation distance subsection. In the Radius text field, type 1[m].
8
In the Directivity Plot toolbar, click  Plot.
The horizontal scale can be represented using a logaritmic scale.
9
Click the  x-Axis Log Scale button in the Graphics toolbar.
The image should look like the one in Figure 12. If you are more familiar with having the frequency on the y-axis, you can just change that under the Coloring and Style tab and change the Layout option.
Coil Power and Efficiency
1
In the Home toolbar, click  Add Plot Group and choose 1D Plot Group.
2
In the Settings window for 1D Plot Group, type Coil Power and Efficiency in the Label text field.
3
Locate the Title section. From the Title type list, choose Label.
4
Locate the Data section. From the Dataset list, choose Complete Study/Solution 3 (3) (sol3).
5
Locate the Plot Settings section. Select the Two y-axes check box.
6
Locate the Legend section. From the Position list, choose Middle left.
Global 1
1
Right-click Coil Power and Efficiency and choose Global.
2
In the Settings window for Global, locate the y-Axis Data section.
3
Global 2
1
In the Model Builder window, right-click Coil Power and Efficiency and choose Global.
2
In the Settings window for Global, locate the y-Axis section.
3
Select the Plot on secondary y-axis check box.
4
Locate the y-Axis Data section. In the table, enter the following settings:
5
Click the  x-Axis Log Scale button in the Graphics toolbar.
6
In the Coil Power and Efficiency toolbar, click  Plot.
The plot should look like this.
In the following steps, create a new study where the Narrow Region Acoustics features are disabled. This will highlight how the thermoviscous losses have a large influence around the back cavity modes but negligible influence on the global response of the loudspeaker for the rest of the frequencies.
Add Study
1
In the Home toolbar, click  Add Study to open the Add Study window.
2
Go to the Add Study window.
3
Find the Studies subsection. In the Select Study tree, select Empty Study.
4
Click Add Study in the window toolbar.
5
In the Home toolbar, click  Add Study to close the Add Study window.
Complete Study
Step 1: Stationary
In the Model Builder window, under Complete Study right-click Step 1: Stationary and choose Copy.
Study 3
In the Model Builder window, right-click Study 3 and choose Paste Stationary.
Complete Study
Step 2: Frequency Domain Perturbation
In the Model Builder window, under Complete Study right-click Step 2: Frequency Domain Perturbation and choose Copy.
Study 3
In the Model Builder window, right-click Study 3 and choose Paste Frequency Domain Perturbation.
Step 2: Frequency Domain Perturbation
1
In the Settings window for Frequency Domain Perturbation, locate the Physics and Variables Selection section.
2
Select the Modify model configuration for study step check box.
3
In the Physics and variables selection tree, select Component 1 (comp1)>Pressure Acoustics, Frequency Domain (acpr)>Narrow Region Acoustics 1.
4
Click  Disable.
5
In the Physics and variables selection tree, select Component 1 (comp1)>Pressure Acoustics, Frequency Domain (acpr)>Narrow Region Acoustics 2.
6
Click  Disable.
7
In the Model Builder window, click Study 3.
8
In the Settings window for Study, type Complete Study Without Narrow Region Acoustics in the Label text field.
9
Locate the Study Settings section. Clear the Generate default plots check box.
10
In the Home toolbar, click  Compute.
Results
Octave Band 2
1
In the Model Builder window, under Results>Sensitivity click Octave Band 2.
2
In the Settings window for Octave Band, locate the Data section.
3
From the Dataset list, choose Complete Study Without Narrow Region Acoustics/Solution 5 (sol5).
4
Locate the Legends section. In the table, enter the following settings:
5
Locate the Coloring and Style section. Find the Line style subsection. From the Line list, choose Dotted.
Octave Band 3
1
Right-click Results>Sensitivity>Octave Band 2 and choose Duplicate.
2
In the Settings window for Octave Band, locate the Data section.
3
From the Dataset list, choose From parent.
4
Locate the Legends section. In the table, enter the following settings:
5
Locate the Coloring and Style section. Find the Line style subsection. From the Line list, choose Solid.
6
In the Sensitivity toolbar, click  Plot.
The image should look like the one in Figure 8. As you can see, the two models only differ for the frequencies around 600 Hz and 1300 Hz, which indicate back cavity modes.
Instantaneous Pressure - Without Narrow Region Acoustics
1
In the Home toolbar, click  Add Plot Group and choose 2D Plot Group.
2
In the Settings window for 2D Plot Group, type Instantaneous Pressure - Without Narrow Region Acoustics in the Label text field.
3
Locate the Data section. From the Dataset list, choose Complete Study Without Narrow Region Acoustics/Solution 5 (sol5).
4
From the Parameter value (freq (Hz)) list, choose 630.
Surface 1
1
Right-click Instantaneous Pressure - Without Narrow Region Acoustics and choose Surface.
2
In the Settings window for Surface, locate the Expression section.
3
In the Expression text field, type acpr.p_t.
4
Locate the Coloring and Style section. Select the Symmetrize color range check box.
5
From the Color table list, choose Wave.
6
In the Instantaneous Pressure - Without Narrow Region Acoustics toolbar, click  Plot.
Surface 2
1
Right-click Surface 1 and choose Duplicate.
2
In the Settings window for Surface, locate the Data section.
3
From the Dataset list, choose Complete Study Without Narrow Region Acoustics/Solution 5 (sol5).
4
From the Parameter value (freq (Hz)) list, choose 600.
5
Click to expand the Title section. From the Title type list, choose None.
6
Click to expand the Inherit Style section. From the Plot list, choose Surface 1.
Deformation 1
1
Right-click Surface 2 and choose Deformation.
2
In the Settings window for Deformation, locate the Expression section.
3
In the r component text field, type -2*r.
4
In the z component text field, type 0.
5
Locate the Scale section. Select the Scale factor check box.
6
Annotation 1
1
In the Model Builder window, right-click Instantaneous Pressure - Without Narrow Region Acoustics and choose Annotation.
2
In the Settings window for Annotation, locate the Annotation section.
3
In the Text text field, type Pressure at 630 Hz.
4
Locate the Position section. In the r text field, type 10[mm].
5
In the z text field, type 20[mm].
6
Locate the Coloring and Style section. Clear the Show point check box.
Annotation 2
1
Right-click Annotation 1 and choose Duplicate.
2
In the Settings window for Annotation, locate the Position section.
3
In the r text field, type -140[mm].
4
Locate the Annotation section. In the Text text field, type Pressure at 600 Hz.
Line 1
1
In the Model Builder window, right-click Instantaneous Pressure - Without Narrow Region Acoustics and choose Line.
2
In the Settings window for Line, locate the Expression section.
3
In the Expression text field, type 0.
4
Click to expand the Title section. From the Title type list, choose None.
5
Locate the Coloring and Style section. From the Coloring list, choose Uniform.
6
From the Color list, choose Black.
Deformation 1
1
Right-click Line 1 and choose Deformation.
2
In the Settings window for Deformation, locate the Expression section.
3
In the r component text field, type -2*r.
4
In the z component text field, type 0.
5
Locate the Scale section. Select the Scale factor check box.
6
7
Click the  Zoom Extents button in the Graphics toolbar.
8
In the Instantaneous Pressure - Without Narrow Region Acoustics toolbar, click  Plot.
The result should look like Figure 9.
Add Study
1
In the Home toolbar, click  Add Study to open the Add Study window.
2
Go to the Add Study window.
3
Find the Physics interfaces in study subsection. In the table, clear the Solve check boxes for Magnetic Fields (mf) and Pressure Acoustics, Frequency Domain (acpr).
4
Find the Multiphysics couplings in study subsection. In the table, clear the Solve check boxes for Acoustic-Structure Boundary 1 (asb1) and Lorentz Coupling 1 (ltzc1).
5
Find the Studies subsection. In the Select Study tree, select General Studies>Eigenfrequency.
6
Click Add Study in the window toolbar.
7
In the Home toolbar, click  Add Study to close the Add Study window.
Eigenfrequency
1
In the Model Builder window, click Study 4.
2
In the Settings window for Study, type Eigenfrequency in the Label text field.
Step 1: Eigenfrequency
1
In the Model Builder window, under Eigenfrequency click Step 1: Eigenfrequency.
2
In the Settings window for Eigenfrequency, locate the Study Settings section.
3
Select the Desired number of eigenfrequencies check box.
4
5
From the Eigenfrequency search method around shift list, choose Larger real part.
6
In the Home toolbar, click  Compute.
Results
Eigenfrequency/Solution 7 (sol7)
In the Model Builder window, under Results>Datasets click Eigenfrequency/Solution 7 (sol7).
Selection
1
In the Results toolbar, click  Attributes and choose Selection.
2
In the Settings window for Selection, locate the Geometric Entity Selection section.
3
From the Geometric entity level list, choose Domain.
4
From the Selection list, choose Structural Domains.
Mode Shape, 3D (solid)
By looping through the different modes, you can reproduce the plot in Figure 11 and identify the modes that limit the frequency range of the speaker.
Appendix: Geometry Sequence Instructions
From the File menu, choose New.
New
In the New window, click  Blank Model.
Add Component
In the Home toolbar, click  Add Component and choose 2D Axisymmetric.
Geometry 1
1
In the Settings window for Geometry, locate the Units section.
2
From the Length unit list, choose mm.
Circle 1 (c1)
1
In the Geometry toolbar, click  Circle.
2
In the Settings window for Circle, locate the Size and Shape section.
3
In the Radius text field, type 180[mm].
4
Click to expand the Layers section. In the table, enter the following settings:
Circle 2 (c2)
1
In the Geometry toolbar, click  Circle.
2
In the Settings window for Circle, locate the Size and Shape section.
3
In the Radius text field, type 8[mm].
4
In the Sector angle text field, type 180.
5
Locate the Position section. In the r text field, type 74[mm].
6
Locate the Layers section. In the table, enter the following settings:
Delete Entities 1 (del1)
1
In the Model Builder window, right-click Geometry 1 and choose Delete Entities.
2
On the object c2, select Boundaries 2–4 only.
Rectangle 1 (r1)
1
In the Geometry toolbar, click  Rectangle.
2
In the Settings window for Rectangle, locate the Size and Shape section.
3
In the Width text field, type 120[mm].
4
In the Height text field, type 1[mm].
5
Locate the Position section. In the r text field, type 80.5[mm].
6
In the z text field, type -1[mm].
Difference 1 (dif1)
1
In the Geometry toolbar, click  Booleans and Partitions and choose Difference.
2
3
In the Settings window for Difference, locate the Difference section.
4
Find the Objects to subtract subsection. Select the  Activate Selection toggle button.
5
Rectangle 2 (r2)
1
In the Geometry toolbar, click  Rectangle.
2
In the Settings window for Rectangle, locate the Size and Shape section.
3
In the Width text field, type 42[mm].
4
In the Height text field, type 35[mm].
5
Locate the Position section. In the r text field, type 6[mm].
6
In the z text field, type -87[mm].
Rectangle 3 (r3)
1
In the Geometry toolbar, click  Rectangle.
2
In the Settings window for Rectangle, locate the Size and Shape section.
3
In the Width text field, type 35.5[mm].
4
In the Height text field, type 20[mm].
5
Locate the Position section. In the r text field, type 15.5[mm].
6
In the z text field, type -80[mm].
Rectangle 4 (r4)
1
In the Geometry toolbar, click  Rectangle.
2
In the Settings window for Rectangle, locate the Size and Shape section.
3
In the Width text field, type 1.2[mm].
4
In the Height text field, type 8[mm].
5
Locate the Position section. In the r text field, type 17.8[mm].
6
In the z text field, type -60[mm].
Rectangle 5 (r5)
1
In the Geometry toolbar, click  Rectangle.
2
In the Settings window for Rectangle, locate the Size and Shape section.
3
In the Width text field, type 26[mm].
4
In the Height text field, type 20[mm].
5
Locate the Position section. In the r text field, type 25[mm].
6
In the z text field, type -80[mm].
Polygon 1 (pol1)
1
In the Geometry toolbar, click  Polygon.
2
In the Settings window for Polygon, locate the Coordinates section.
3
From the Data source list, choose Vectors.
4
In the r text field, type 48[mm] 36[mm] 36[mm] 48[mm].
5
In the z text field, type -82[mm] -87[mm] -87[mm] -87[mm].
Difference 2 (dif2)
1
In the Geometry toolbar, click  Booleans and Partitions and choose Difference.
2
3
In the Settings window for Difference, locate the Difference section.
4
Find the Objects to subtract subsection. Select the  Activate Selection toggle button.
5
Select the objects pol1, r3, and r4 only.
Rectangle 6 (r6)
1
In the Geometry toolbar, click  Rectangle.
2
In the Settings window for Rectangle, locate the Size and Shape section.
3
In the Width text field, type 0.2[mm].
4
In the Height text field, type 25[mm].
5
Locate the Position section. In the r text field, type 18.2[mm].
6
In the z text field, type -64[mm].
7
Click to expand the Layers section. In the table, enter the following settings:
8
Clear the Layers on bottom check box.
9
Select the Layers on top check box.
Rectangle 7 (r7)
1
In the Geometry toolbar, click  Rectangle.
2
In the Settings window for Rectangle, locate the Size and Shape section.
3
In the Width text field, type 0.6[mm].
4
In the Height text field, type 9.4[mm].
5
Locate the Position section. In the r text field, type 18.2[mm].
6
In the z text field, type -60.7[mm].
Polygon 2 (pol2)
1
In the Geometry toolbar, click  Polygon.
2
In the Settings window for Polygon, locate the Coordinates section.
3
From the Data source list, choose Vectors.
4
In the r text field, type 18.4 [mm] 23[mm] 26[mm] 26[mm] 32[mm] 32[mm] 38[mm] 38[mm] 44[mm] 44[mm] 50[mm] 50[mm] 56[mm] 56[mm] 59[mm] 66[mm] 66[mm] 59[mm] 56[mm] 56[mm] 50[mm] 50[mm] 44[mm] 44[mm] 38[mm] 38[mm] 32[mm] 32[mm] 26[mm] 26[mm] 23[mm] 18.4 [mm].
5
In the z text field, type -44.1[mm] -44.1[mm] -42.1[mm] -42.1[mm] -46.1[mm] -46.1[mm] -42.1[mm] -42.1[mm] -46.1[mm] -46.1[mm] -42.1[mm] -42.1[mm] -46.1[mm] -46.1[mm] -44.1[mm] -44.1[mm] -44.5[mm] -44.5[mm] -46.5[mm] -46.5[mm] -42.5[mm] -42.5[mm] -46.5[mm] -46.5[mm] -42.5[mm] -42.5[mm] -46.5[mm] -46.5[mm] -42.5[mm] -42.5[mm] -44.5[mm] -44.5[mm].
Polygon 3 (pol3)
1
In the Geometry toolbar, click  Polygon.
2
In the Settings window for Polygon, locate the Coordinates section.
3
From the Data source list, choose Vectors.
4
In the r text field, type 18.4[mm] 66[mm] 66[mm] 67.5[mm] 67.5[mm] 18.4[mm] 18.4[mm] 18.4[mm].
5
In the z text field, type -39[mm] 0 0 0 0 -40.26[mm] -40.26[mm] -39[mm].
Quadratic Bézier 1 (qb1)
1
In the Geometry toolbar, click  More Primitives and choose Quadratic Bézier.
2
In the Settings window for Quadratic Bézier, locate the Control Points section.
3
In row 1, set r to -18.2[mm].
4
In row 3, set r to 18.2[mm].
5
In row 1, set z to -39[mm].
6
In row 2, set z to -23.5[mm].
7
In row 3, set z to -39[mm].
8
Locate the Weights section. In the 2 text field, type 1.
Line Segment 1 (ls1)
1
In the Geometry toolbar, click  More Primitives and choose Line Segment.
2
In the Settings window for Line Segment, locate the Starting Point section.
3
From the Specify list, choose Coordinates.
4
Locate the Endpoint section. From the Specify list, choose Coordinates.
5
Locate the Starting Point section. In the r text field, type 18.2[mm].
6
Locate the Endpoint section. In the r text field, type 18.2[mm].
7
Locate the Starting Point section. In the z text field, type -39[mm].
8
Locate the Endpoint section. In the z text field, type -40.26[mm].
Quadratic Bézier 2 (qb2)
1
In the Geometry toolbar, click  More Primitives and choose Quadratic Bézier.
2
In the Settings window for Quadratic Bézier, locate the Control Points section.
3
In row 1, set r to 18.2[mm].
4
In row 3, set r to -18.2[mm].
5
In row 1, set z to -40.26[mm].
6
In row 2, set z to -24.26[mm].
7
In row 3, set z to -40.26[mm].
8
Locate the Weights section. In the 2 text field, type 1.
Line Segment 2 (ls2)
1
In the Geometry toolbar, click  More Primitives and choose Line Segment.
2
In the Settings window for Line Segment, locate the Starting Point section.
3
From the Specify list, choose Coordinates.
4
Locate the Endpoint section. From the Specify list, choose Coordinates.
5
Locate the Starting Point section. In the r text field, type -18.2[mm].
6
Locate the Endpoint section. In the r text field, type -18.2[mm].
7
Locate the Starting Point section. In the z text field, type -40.26[mm].
8
Locate the Endpoint section. In the z text field, type -39[mm].
Fillet 1 (fil1)
1
In the Geometry toolbar, click  Fillet.
2
On the object dif2, select Points 5–8 only.
3
In the Settings window for Fillet, locate the Radius section.
4
In the Radius text field, type 0.2[mm].
Rectangle 8 (r8)
1
In the Geometry toolbar, click  Rectangle.
2
In the Settings window for Rectangle, locate the Size and Shape section.
3
In the Width text field, type 1.2 [mm].
4
In the Height text field, type 7.6[mm].
5
Locate the Position section. In the r text field, type 17.8[mm].
6
In the z text field, type -59.8[mm].
7
In the Geometry toolbar, click  Build All.