Navigating the Model Object Using a GUI
The usual approach to navigate through the model object in a graphical user interface (GUI) is to load the model object at the COMSOL Desktop. Then transfer the model object from the COMSOL Multiphysics Server to the COMSOL Desktop as in Sharing the Model Between the COMSOL Desktop® and the MATLAB® Prompt.
An alternative approach is to call the function mphnavigator that displays the model object information in a MATLAB® GUI. To run the function at the MATLAB prompt enter the command:
mphnavigator
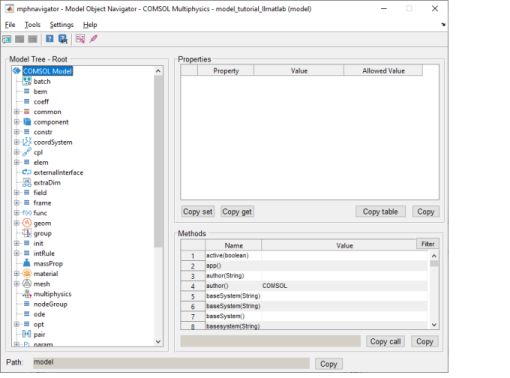
This command pops-up a MATLAB GUI as in this figure:
If you have installed the COMSOL apps in the MATLAB Apps ribbon, click the COMSOL Model Navigator icon ().
If the COMSOL model objected is not stored in the MATLAB variable model enter the command:
mphnavigator(<modelvar>)
where <modelvar> is the variable name in MATLAB that contains the model.
If a new model object is created with the same MATLAB object name, restart mphnavigator in order to have the updated model information.
The Menu Bar Items
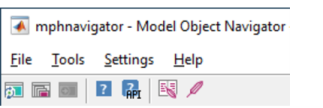
The mphnavigator GUI menu bar has the following options:
The File menu, where the current model object can be saved in the MPH-format, a new model object can be opened, and the mphnavigator window can be closed.
The Tools menu lists the navigation tools available for the model object. Search is a shortcut to the command mphsearch that starts a GUI to search expressions or tags in the model object (see Finding Model Expressions). Solutions starts a GUI to display the solution object available in the COMSOL Multiphysics model object. Warnings and Errors lists the error or warning nodes available in the model object (see Handling Errors and Warnings). Click Copy code: loop if you need to run a specific node in loop, then you can paste the commands in a code editor, you will get the following commands:
tag1 = <feattag1>;
tag2 = <feattag2>;
tags = cell(model.geom(tag1).feature(tag2).feature.tags);
for i=1:length(tags)
obj = model.geom(tag1).feature(tag2).feature(tags{i});
end
where <feattag1> and <feattag2> are the feature tags to reach the selected feature in the model.
The Settings menu only contains the Advanced options. Select or deselect the advanced model object methods that are displayed in the Model Viewer tree.
The Help menu.
The Shortcut Icon
Just under the menu bar are several shortcut buttons.
These buttons are unavailable if no method has been selected in the Model Tree section.
The Update properties and methods button () update the Properties and Methods section base on the change operated to the COMSOL model.
The Open plot window button () generate the plot in COMSOL of the selected node and transfer the image in a MATLAB figure. This supports other plot than geometry, mesh or plot group such as functions.
The Plot button () displays the geometry, the mesh, or a plot group in a MATLAB figure.
The Help button () shows context-sensitive help for the currently selected node in the model tree.
The Help for COMSOL API button () open the COMSOL API Documentation corresponding to the selected node.
The Report button () generate report node in the model, you can choose between brief, intermediate or complete report.
The Write report button (), write the report in a document.
The Model Tree Section
The Model Tree section has the list of the nodes of the model object. Use the scroll bar to the right to scroll down the list and click the + icon to expand the model object feature nodes.
When a feature node is selected, its associated command is listed just beneath the model tree. Click Copy to copy syntax to the clipboard and then paste it in your script.
The Model Tree list is slightly different to the Model Builder list available in the COMSOL Desktop. This is because mphnavigator displays all feature nodes and does not use the same filter as in the COMSOL Desktop to order the available feature nodes.
The Properties Section
The Properties and the Value sections list the properties of a selected feature node and the associated values respectively. The Allowed Value section list the allowed value for the corresponding property.
Click Copy set to copy to the clipboard the command that sets the selected property to its current value.
Click Copy get to copy to the clipboard the command to get the value of the currently selected property.
Click Copy Table to copy the entire properties table to the clipboard, then paste into a text or spreadsheet editor.
Click Copy to copy a selected cell in the properties table.
The Methods Section
The Methods section lists all the methods associated to the feature node selected in the Model Tree section.
Click Filter to filter the reduce the methods list to the one that returns simple information that is easy and fast to evaluate.
Select a method in the list to get its associated syntax at the button of the Methods section. Use the Copy button to copy the syntax to the clipboard. Click Copy call to copy the method syntax associated to the selected feature node, the syntax is ready to use at the MATLAB prompt.