Running the COMSOL Installer
The steps for running the COMSOL Installer are independent of the installation media option you used. If you have followed the above instructions, the COMSOL Installer should now appear.
1
Select your language for the installation and click Next. The language selected is also your default language in COMSOL. You may also need to install the fonts for the languages that you want to use when running COMSOL.
2
-
Click New COMSOL 5.6 Installation and proceed to Step 3 (License Page) to make a new installation.
-
Click Add/Remove Products and Reinstall and proceed to Step 5 (Platform Page) to change or reinstall an existing installation. For example, use Add/Remove Products and Reinstall when adding or removing documentation files for products installed or when adding or removing a product that your license includes.
-
Click Change License and proceed to Step 3 (License Page) to update the license of an existing installation. Use this option when COMSOL is installed and you get a new license file. The installer then removes products not licensed any more and lets you go through the Add/Remove Products procedure to add or remove products for the new license. If your trial license has expired you can use the Change License option to re-enable a paid-for license.
-
Click Uninstall COMSOL 5.6 to remove an existing installation. For instructions on this option, proceed to Removing (Uninstalling) the COMSOL Installation.
License Page
3
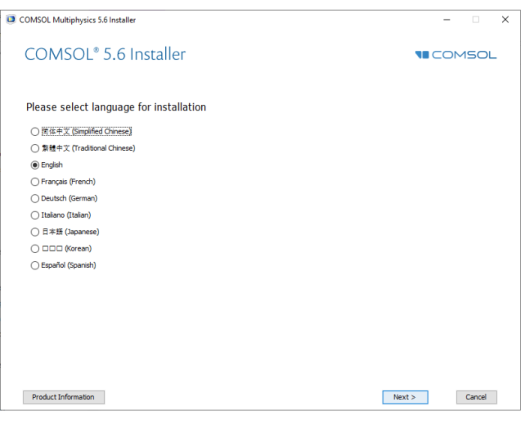
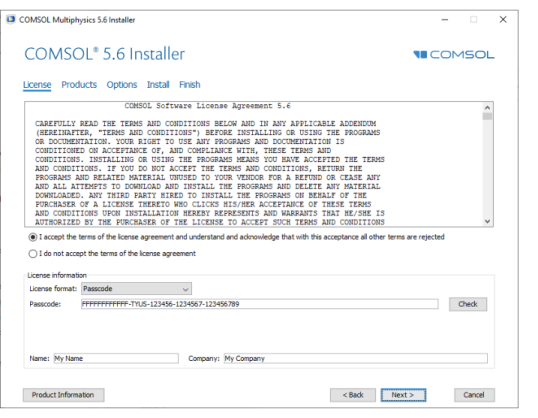
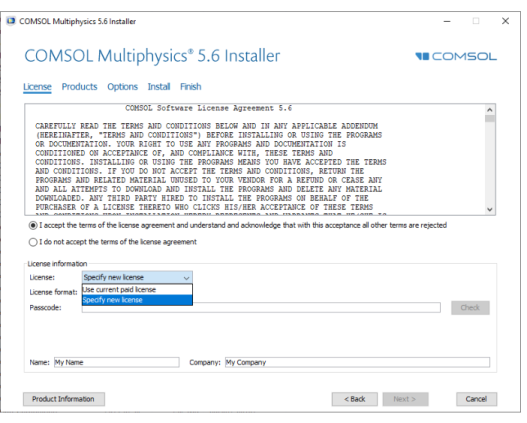
After reading the license agreement, click the I accept the terms of the license agreement button and specify the license. Choose one of the following license formats from the License format list, depending on which license you have:
-
Passcode: Use this option for a Single-User Trial License or Class Kit License. Enter your passcode, which is a series of characters and numbers that has a form similar to FFFFFFFFFFFF-TYUS-123456-1234567-123456789. Note that the passcode is case sensitive.
-
License file: Use this option for any type of regular paid-for license installation. Enter the path to an existing license file or click Browse to select the file license.dat. This license file is sent to you by a COMSOL representative, typically by email.
-
Port number and Hostname: Use this option if your license administrator has given you a port number and hostname for a license manager for COMSOL that is running somewhere on your organization’s network. Enter the Hostname of the computer or server running the license manager and its license manager port number.
-
Three-server redundancy: Use this option if your license administrator has given you three port numbers and hostnames for the three-server redundancy license manager option. Enter the hostnames and license server port numbers of the three-server redundant configuration.
Change License
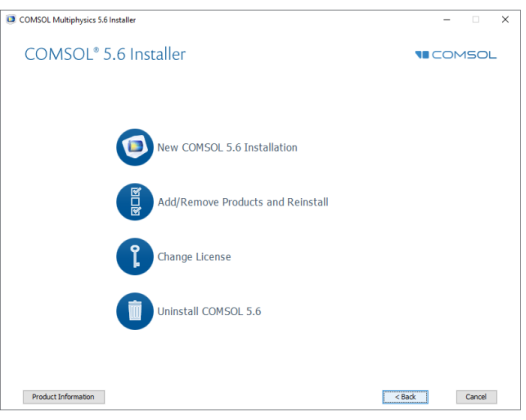
If Change License was selected in Step 2,first select Use a current paid license, to use an existing license, or Specify new license, to use a new license, from the License list.
Click Next and proceed to Step 5 if you want to change to a license with different products. Otherwise, proceed to Step 10.
4
Click Next.
You can also automate changing a license. If you specify a new license in setupconfig.ini and set installdir to an existing comsol installation directory (the installed version must match the version of the setup program), the installer will use the new license and will add or remove products as needed to match the new license. See the description of the Installer Mode inside the setupconfig.ini file.
License Number Page
This page only appears if you have a license file corresponding to several different licenses (a so-called merged license file). From the list of license numbers, select the one you want to install. Both COMSOL Multiphysics licenses and COMSOL Server licenses can appear here. The license number choice you make here will affect the available products on the next page.
Products Page
5
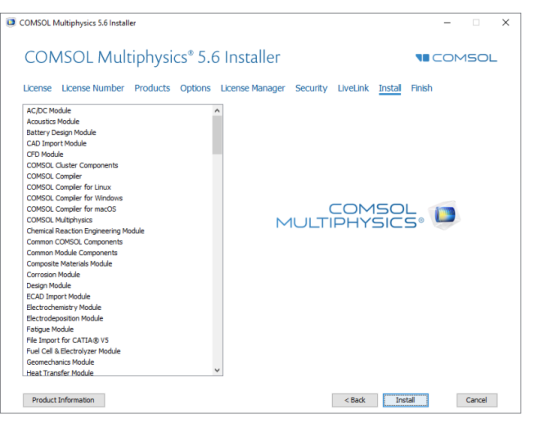
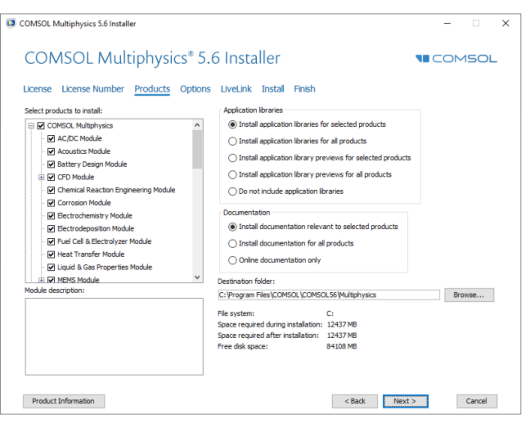
In the list of products under Select products to install, all products that your license includes are selected. In addition, the License Manager check box is selected. Depending on your region and operating system, the license type may require that the FlexNet license manager software is installed and started before running COMSOL (see License Management Tools). In some cases, however, the FlexNet license manager software is installed automatically during the COMSOL installation.
From the options under Application libraries, choose one of the following installation options for application libraries:
-
Install application libraries for selected products (the default) to install the application libraries for the licensed products that you have selected.
-
Install application libraries for all products to install the application libraries for all COMSOL products. You have then the possibility to browse and open applications from all products’ application libraries.
-
Install application library previews for selected products to install previews of all application files in the application libraries for the licensed products that you have selected.
-
Install application library previews for all products to install previews of all application files in the application libraries for all COMSOL products.
-
Do not include application libraries to not install any application libraries. You can choose to download selected applications after the installation using the Application Library Update.
From the options under Documentation, choose one of the following installation options for the product documentation:
-
Install documentation relevant to selected products (the default) to install the documentation for the licensed products that you have selected. For some products, documentation for other relevant products is also installed, so that you get access to documentation for functionality included in the licensed products but covered in other products’ documentation.
-
Install documentation for all products to install the documentation for all COMSOL products. You have then the possibility to view and search all COMSOL documentation, including documentation for products not included in your license.
-
Online documentation only to not install any documentation. You can still view documentation and access context help using online documentation provided by COMSOL, but no documentation files are installed on your computer.
Under Destination folder, a default installation destination is suggested; for Windows, typically C:\Program Files\COMSOL\COMSOL56\Multiphysics. Click Browse or type another destination directory if needed.
If Change License was selected earlier and you are changing the license of an already existing installation, you need to pay attention to which check boxes are selected. If you are adding products not previously part of your installation, but added with the new license file, then you need to verify the selection of the check boxes for the corresponding installation components. (If you do not, the license information is still correct but the software components needed to run the products will be missing.)
Add/Remove Products and Reinstall
-
If Add/Remove Products and Reinstall or Change License was selected in Step 2, the Products page includes a Reinstall selected and installed products check box. If you select this check box, the selected set of products determines which software components, documentation, and models are to be added or removed. Products that are selected are added if not previously installed, and products that are not selected are removed if previously installed. The selected set only affects those products that you have licensed..
6
Click Next.
Options page
7
-
-
-
Add Windows Firewall rules for COMSOL programs. This check box adds firewall rules that allows COMSOL server programs to open ports and communicate over the computer network. If you clear this check box, you may get a warning from the Microsoft Firewall when you start a COMSOL server programs, or a COMSOL server program may not work as expected when you run it as a Windows service.
-
If this check box is selected, you can open COMSOL models by double-clicking them.
-
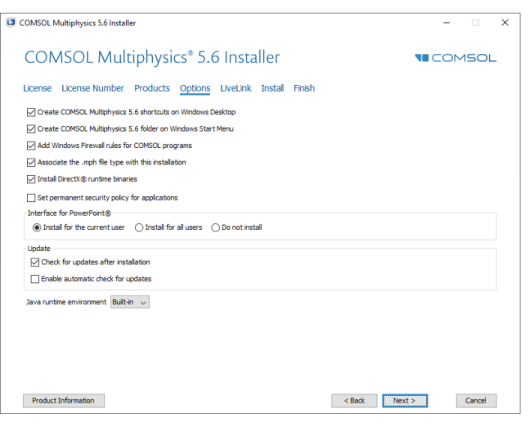
Clear the Install Microsoft DirectX® runtime binaries check box if you previously experienced problems using DirectX on your computer. DirectX can be used by COMSOL Multiphysics for accelerated graphics rendering. If you clear this check box, then you still have two graphics options: OpenGL or software rendering. Once installation is complete, you can change the graphics rendering method from the Preferences dialog box on the Options menu in the COMSOL Desktop.
-
Set permanent security policy for applications. If you select this option, the next page in the installer provides security options that you can set permanently; see Security Page. If you set a permanent security policy, the security settings in the Preferences dialog box is not available when you run COMSOL Multiphysics.
-
-
The following two options are available under Update:
-
Check for updates after installation. This option is selected by default. The installer then checks and applies all updates that are available for the version that you install.
-
Enable automatic updates after installation. Select this check box if you want COMSOL to automatically check for and apply available software updates.
-
-
By default, COMSOL 5.5 includes the AdoptOpenJDK 8 runtime update 212, indicated by Built-in in the Java runtime environment list. If you prefer COMSOL to use another Java 8 runtime that you have licensed and installed, specify its location in the Location field by first choosing Custom.
8
Click Next.
LiveLink Page
9
-
Install LiveLink™ for Excel® for all users. If you select this check box, the installation of LiveLink™ for Excel® is global to the machine and is available no matter which user is logged on. Otherwise, the installation is only available to the current user.
-
For the products LiveLink™ for MATLAB®, LiveLink™ for Simulink®, and PTC® Pro/ENGINEER®, specify the path to their respective installation or common file folders.
License Manager Page
10
The License Manager page appears if the COMSOL Installer installed the FlexNet license manager and your computer has been designated to run the license server. If this page does not appear you can manage the license server using LMTOOLS; see Starting the License Manager. This page contains the following options:
-
The Install license manager as a Windows service check box is selected by default; if you clear the check box, the license manager will not be available as a Windows service.
-
The Path to the debug log file field contains a file path to the location of the license manager debug log file (default: C:\ProgramData\COMSOL\comsol56.log). Click Browse to browse to and choose another file path.
-
The Service name field shows the service name, LMCOMSOL, for information only.
-
Under Additional license manager options, you can select any of the following check boxes:
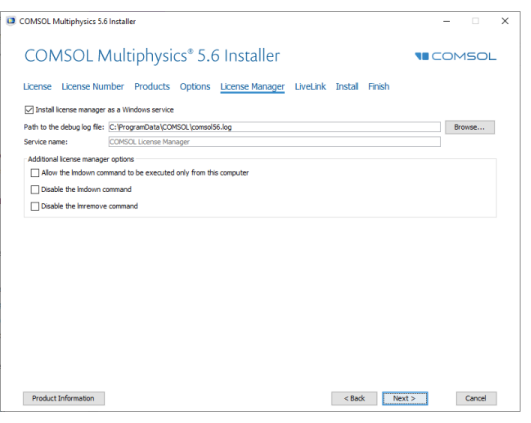
Select the Allow the lmdown command to be executed only from this computer check box to restrict the access to the lmdown command, which you can use to shut down the license manager, to this computer only.
Select the Disable the lmdown command check box to make the lmdown command unavailable.
Select the Disable the lmremove command check box to make the lmremove command, which you can use to remove a user’s license, unavailable.
Security Page
11
The Security page is only available if you have selected the Set permanent security policy for applications check box.
The COMSOL software includes security settings for controlling access to, for example, system properties, file systems, and runtime security settings from methods and external libraries, primarily for use in applications created using the Application Builder. The following security settings are available on the Security page in the installer:
-
Select the Allow batch jobs check box to allow batch jobs. This restriction affects the Batch, Batch Sweep, Cluster Computing, and Cluster Sweep nodes in the COMSOL Desktop model tree.
-
Select the Allow external processes check box to allow applications to start external processes on the computer. This includes using the built-in executeOS() method.
-
Select the Allow external libraries check box to allow external C libraries to be called from methods in an application.
-
Select the Allow external MATLAB® functions check box to call functions written in MATLAB (requires LiveLink™ for MATLAB®).
-
Select Allow running methods to allow running applications that include methods. If you clear this check box, it is not possible to run methods in applications.
-
Select Allow running applications to allow running applications in general. If you clear this check box, it is not possible to run any applications.
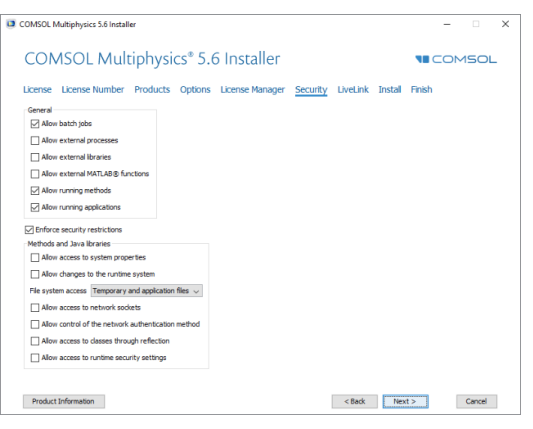
By default, all check boxes above except the Allow external processes, Allow external libraries, and Allow external MATLAB® functions check boxes are selected.
-
The Enforce security restrictions check box is selected by default. If selected, this check box enforces the following restrictions on methods and Java libraries under Methods and Java libraries:
-
Select the Allow access to system properties check box to read and write values to system properties such as System.getProperty("cs.np") which can be used to determine the number of cores that COMSOL Multiphysics currently uses.
-
Select the Allow changes to the runtime system check box to allow methods and Java libraries to change the runtime system — for instance, by modifying class loaders.
-
From the File system access list, select Temporary and application files (the default) to restrict methods and Java libraries to only have access to such files, or select All files to allow methods and Java libraries to access all files that you have permissions to access on the file system.
-
Select the Allow access to network sockets check box to allow methods and Java libraries to open sockets for network access.
-
Select the Allow control of the network authentication method check box to allow methods and Java libraries to control the network authentication method used.
-
Select the Allow access to classes through reflection check box to allow access to all members in a class through reflection.
-
Select the Allow access to runtime security settings check box to allow methods and Java libraries to access security settings.
All check boxes above are cleared by default, enforcing those security restrictions.
12
Click Next.
Install page
13
When you click Install the utility now installs or updates COMSOL. The installation process might take several minutes. A full installation including all products typically takes more than 15 minutes to complete. If you are installing over the internet, the installation time depends on your internet connection speed. The Finish page in Step 13 appears automatically when the installation process is finished.
Finish page
14
If warning or errors were detected, click View Log to open a window that shows the installation log. Do not hesitate to contact technical support if you encountered any errors and remember to send the installation log file along with your technical support inquiry.
15
Click Close to quit the installer.
For information on how to run COMSOL Multiphysics after installation, see Running COMSOL Multiphysics on Windows. If you are installing on macOS, see Running COMSOL Multiphysics on macOS. If you are installing on Linux, see Running COMSOL Multiphysics on Linux.