PDF

Vibrating Beam in Fluid Flow
Introduction
A classical flow pattern is the von Kármán vortex street that can form as fluid flows past an object. These vortices may induce vibrations in the object. This problem involves a fluid-structure interaction where the large deformation affects the flow path.
The magnitude and the frequencies of the oscillation generated by the fluid around the structure are computed and compared with the values proposed by Turek and Horn; see Ref. 1.
Model Definition
The model geometry consists of a structure inside a channel with a fluid flow as represented in Figure 1 below.
Figure 1: Model geometry including solid and fluid domains (blue and gray, respectively).
The fluid domain is a 2.5 m long and 0.41 m high channel. The structure is composed of a fixed circular domain with 0.05 m radius and centered at (0.20.2). The second domain of the structure is a 0.35 m by 0.02 m rectangular beam made of elastic material.
The fluid enters the channel from the left with a mean velocity of 2 m/s, and the inlet velocity profile is assumed to be fully developed.
With the inlet boundary so close to the solid structure, one can expect the inlet velocity condition to affect the flow pattern. To avoid such an effect, one might need to increase the distance between the inlet boundary and the solid structure. For the sake of comparison, the geometry in this model is kept as it is in the reference paper (Ref. 1).
The Reynolds number based on the diameter of the circle is about 200.
The fluid and solid properties are represented in the table below:
103 kg/m3
The quantities of interest are the beam rear tip displacements and the fluid forces acting on the structure. The magnitude and frequency targets (Ref. 1) are represented in the table below:
Table 2: Target results.
Results and Discussion
Figure 2 shows the velocity field and the von Mises stress in the structure on the deformed shape at different times. Note the von Kármán vortex street past the structure, which is significantly deformed and affects the flow field.
Figure 2: Velocity field in fluid and von Mises stress in structure for eight different time steps.
Figure 3 below shows the evolution of the fluid forces all along the time step. The oscillation is fully developed after t = 3.5 s. This is due to the external perturbation added at t = 1.5 s. Without this perturbation, the oscillation would develop after a longer time. Note that the oscillation can develop with some time shift due to nonlinearities in the model.
Figure 3: Drag and lift forces versus time.
Figure 4 shows the displacement of the tip of the beam in the x and y directions:
Figure 4: Tip displacement of the structure in the x and y directions (in green and blue respectively).
In the above figure, you can see that the magnitude of the x-displacement oscillation is about 2.4 mm around the average of 2.5 mm. The y-displacement varies around 1 mm with an oscillation magnitude of 32 mm, in good agreement with the targeted value.
The trajectory of the tip is shown in Figure 6.
Figure 5: Beam tip trajectory. The origin corresponds to the initial position.
Figure 6 below shows the frequency spectrum of the structure oscillation.
Figure 6: Frequency spectrum of the structure tip displacement.
The peaks show the main frequencies of the harmonic oscillation. For the x-displacement, the frequency is about 11 Hz, while for the y-displacement the main frequency is about 5.5 Hz, which agree well with the targeted results.
Figure 7 below shows the variations of the lift and drag forces applied to the structure:
Figure 7: Lift and drag forces (green and blue curves, respectively) after the periodic oscillations have established.
The average of the total lift force is about 2 N with an oscillation magnitude of 154 N, while the drag force average is about 451 N with an oscillation magnitude of 25 N.
Notes About the COMSOL Implementation
The default discretization for the flow equations in the fluid-structure interface is based on P1+P1 elements. This means that linear order elements are used for the velocity variables. Such discretization is more stable for high Reynolds number but has lower accuracy especially in the forces evaluation. In this model, use P2+P2 elements to increase the accuracy for the flow equations.
Reference
1. S. Turek and J. Hron, Proposal for numerical benchmarking of fluid-structure interaction between an elastic object and laminar incompressible flow, Institute for Applied Mathematics and Numerics, University of Dortmund.
Application Library path: Structural_Mechanics_Module/Verification_Examples/oscillating_fsi
Modeling Instructions
From the File menu, choose New.
New
In the New window, click  Model Wizard.
Model Wizard
1
In the Model Wizard window, click  2D.
2
In the Select Physics tree, select Fluid Flow > Fluid–Structure Interaction > Fluid–Solid Interaction.
3
Click Add.
4
Click  Study.
5
In the Select Study tree, select General Studies > Time Dependent.
6
Geometry 1
Rectangle 1 (r1)
1
In the Geometry toolbar, click  Rectangle.
2
In the Settings window for Rectangle, locate the Size and Shape section.
3
In the Width text field, type 2.5.
4
In the Height text field, type 0.41.
Circle 1 (c1)
1
In the Geometry toolbar, click  Circle.
2
In the Settings window for Circle, locate the Size and Shape section.
3
In the Radius text field, type 0.05.
4
Locate the Position section. In the x text field, type 0.2.
5
In the y text field, type 0.2.
Rectangle 2 (r2)
1
In the Geometry toolbar, click  Rectangle.
2
In the Settings window for Rectangle, locate the Size and Shape section.
3
In the Width text field, type 0.35+0.05.
4
In the Height text field, type 0.02.
5
Locate the Position section. From the Base list, choose Center.
6
In the x text field, type 0.2+0.4/2.
7
In the y text field, type 0.2.
Rectangle 3 (r3)
1
In the Geometry toolbar, click  Rectangle.
2
In the Settings window for Rectangle, locate the Size and Shape section.
3
In the Width text field, type 0.6.
4
In the Height text field, type 0.41.
5
Locate the Position section. In the x text field, type 0.2.
Solid
1
In the Geometry toolbar, click  Booleans and Partitions and choose Difference.
2
In the Settings window for Difference, type Solid in the Label text field.
3
4
Locate the Difference section. Click to select the  Activate Selection toggle button for Objects to subtract.
5
6
Select the Keep objects to add checkbox.
7
Select the Keep objects to subtract checkbox.
8
Locate the Selections of Resulting Entities section. Select the Resulting objects selection checkbox.
Fluid
1
In the Geometry toolbar, click  Booleans and Partitions and choose Difference.
2
In the Settings window for Difference, type Fluid in the Label text field.
3
Select the objects r1 and r3 only.
4
Locate the Difference section. Click to select the  Activate Selection toggle button for Objects to subtract.
5
Select the objects c1 and r2 only.
6
Locate the Selections of Resulting Entities section. Select the Resulting objects selection checkbox.
Form Union (fin)
1
In the Geometry toolbar, click  Build All.
2
In the Model Builder window, click Form Union (fin).
3
In the Settings window for Form Union/Assembly, click  Build Selected.
4
Click the  Zoom Extents button in the Graphics toolbar.
Moving Mesh
Deforming Domain 1
1
In the Model Builder window, under Component 1 (comp1) > Moving Mesh click Deforming Domain 1.
2
Definitions
Step 1 (step1)
1
In the Definitions toolbar, click  More Functions and choose Step.
2
In the Settings window for Step, locate the Parameters section.
3
In the Location text field, type 0.5[s].
4
Click to expand the Smoothing section. In the Size of transition zone text field, type 1.
Gaussian Pulse 1 (gp1)
1
In the Definitions toolbar, click  More Functions and choose Gaussian Pulse.
2
In the Settings window for Gaussian Pulse, locate the Parameters section.
3
In the Location text field, type 1.5[s].
4
In the Standard deviation text field, type 5e-2[s].
5
From the Normalization list, choose Peak value.
Laminar Flow (spf)
1
In the Model Builder window, under Component 1 (comp1) click Laminar Flow (spf).
2
In the Settings window for Laminar Flow, locate the Domain Selection section.
3
From the Selection list, choose Fluid.
4
Click the  Show More Options button in the Model Builder toolbar.
5
In the Show More Options dialog, in the tree, select the checkbox for the node Physics > Stabilization.
6
7
In the Settings window for Laminar Flow, click to expand the Consistent Stabilization section.
8
Find the Navier–Stokes equations subsection. Clear the Crosswind diffusion checkbox.
9
Click to expand the Discretization section. From the Discretization of fluids list, choose P2+P2.
Inlet 1
1
In the Physics toolbar, click  Boundaries and choose Inlet.
2
3
In the Settings window for Inlet, locate the Velocity section.
4
In the U0 text field, type 1.5*2[m/s]*Y*(0.41[m]-Y)/(0.41[m]/2)^2*step1(t).
Outlet 1
1
In the Physics toolbar, click  Boundaries and choose Outlet.
2
Solid Mechanics (solid)
1
In the Model Builder window, under Component 1 (comp1) click Solid Mechanics (solid).
2
In the Settings window for Solid Mechanics, locate the Domain Selection section.
3
From the Selection list, choose Solid.
Fixed Constraint 1
1
In the Physics toolbar, click  Boundaries and choose Fixed Constraint.
2
Point Load 1
1
In the Physics toolbar, click  Points and choose Point Load.
2
3
In the Settings window for Point Load, locate the Force section.
4
Specify the FP vector as
Materials
Material 1 (mat1)
1
In the Model Builder window, under Component 1 (comp1) right-click Materials and choose Blank Material.
2
In the Settings window for Material, locate the Geometric Entity Selection section.
3
From the Selection list, choose Solid.
4
Locate the Material Contents section. In the table, enter the following settings:
Material 2 (mat2)
1
Right-click Materials and choose Blank Material.
2
In the Settings window for Material, locate the Geometric Entity Selection section.
3
From the Selection list, choose Fluid.
4
Locate the Material Contents section. In the table, enter the following settings:
Mesh 1
In the Model Builder window, under Component 1 (comp1) right-click Mesh 1 and choose Edit Physics-Induced Sequence.
Size
1
In the Model Builder window, under Component 1 (comp1) > Mesh 1 click Size.
2
In the Settings window for Size, locate the Element Size section.
3
From the Predefined list, choose Coarse.
Size 1
1
In the Model Builder window, click Size 1.
2
In the Settings window for Size, locate the Element Size section.
3
From the Predefined list, choose Normal.
Free Triangular 1
1
In the Model Builder window, click Free Triangular 1.
2
In the Settings window for Free Triangular, locate the Domain Selection section.
3
From the Geometric entity level list, choose Domain.
4
Mapped 1
1
In the Mesh toolbar, click  Mapped.
2
Right-click Mapped 1 and choose Move Up.
Distribution 1
1
Right-click Mapped 1 and choose Distribution.
2
3
In the Settings window for Distribution, locate the Distribution section.
4
From the Distribution type list, choose Predefined.
5
In the Number of elements text field, type 40.
6
In the Element ratio text field, type 5.
7
Select the Reverse direction checkbox.
Boundary Layers 1
1
In the Model Builder window, under Component 1 (comp1) > Mesh 1 click Boundary Layers 1.
2
In the Settings window for Boundary Layers, click to expand the Corner Settings section.
3
From the Handling of sharp corners list, choose No special handling.
4
Click to expand the Transition section. Clear the Smooth transition to interior mesh checkbox.
5
Click  Build All.
You can now prepare the probe variables to display during the computation.
Definitions
Integration 1 (intop1)
1
In the Definitions toolbar, click  Nonlocal Couplings and choose Integration.
2
In the Settings window for Integration, locate the Source Selection section.
3
From the Geometric entity level list, choose Boundary.
4
Global Variable Probe 1 (var1)
1
In the Definitions toolbar, click  Probes and choose Global Variable Probe.
2
In the Settings window for Global Variable Probe, type drag in the Variable name text field.
3
Locate the Expression section. In the Expression text field, type -intop1(spf.T_stressx).
4
Select the Description checkbox. In the associated text field, type Drag.
5
Click to expand the Table and Window Settings section. Click  Add Plot Window.
Global Variable Probe 2 (var2)
1
Right-click Global Variable Probe 1 (drag) and choose Duplicate.
2
In the Settings window for Global Variable Probe, type lift in the Variable name text field.
3
Locate the Expression section. In the Expression text field, type -intop1(spf.T_stressy).
4
In the Description text field, type Lift.
Domain Point Probe 1
1
In the Definitions toolbar, click  Probes and choose Domain Point Probe.
2
In the Settings window for Domain Point Probe, locate the Point Selection section.
3
From the Frame list, choose Material.
4
In row Coordinates, set X to 0.595.
5
In row Coordinates, set Y to 0.2.
Point Probe Expression 1 (ppb1)
1
In the Model Builder window, expand the Domain Point Probe 1 node, then click Point Probe Expression 1 (ppb1).
2
In the Settings window for Point Probe Expression, type u in the Variable name text field.
3
Locate the Expression section. In the Expression text field, type u_solid.
4
From the Table and plot unit list, choose mm.
5
Click to expand the Table and Window Settings section. Click  Add Plot Window.
Point Probe Expression 2 (ppb2)
1
Right-click Component 1 (comp1) > Definitions > Domain Point Probe 1 > Point Probe Expression 1 (u) and choose Duplicate.
2
In the Settings window for Point Probe Expression, locate the Expression section.
3
In the Expression text field, type v_solid.
4
In the Variable name text field, type v.
Study 1
Step 1: Time Dependent
1
In the Model Builder window, under Study 1 click Step 1: Time Dependent.
2
In the Settings window for Time Dependent, locate the Study Settings section.
3
In the Output times text field, type range(0,5e-2,5).
4
Click to expand the Results While Solving section. Select the Plot checkbox.
5
From the Update at list, choose Time steps taken by solver.
Solution 1 (sol1)
1
In the Study toolbar, click  Show Default Solver.
For this 2D model, use the fully coupled solver instead of the default segregated one, this will give a faster and more robust computation.
2
In the Model Builder window, expand the Solution 1 (sol1) node.
3
Right-click Study 1 > Solver Configurations > Solution 1 (sol1) > Time-Dependent Solver 1 and choose Fully Coupled.
4
In the Settings window for Fully Coupled, click to expand the Method and Termination section.
5
In the Damping factor text field, type 0.9.
6
From the Jacobian update list, choose Once per time step.
7
In the Maximum number of iterations text field, type 8.
8
In the Tolerance factor text field, type 0.5.
9
From the Stabilization and acceleration list, choose Anderson acceleration.
10
In the Dimension of iteration space text field, type 5.
11
In the Mixing parameter text field, type 0.9.
12
In the Iteration delay text field, type 1.
13
In the Study toolbar, click  Compute.
Results
Surface 1
1
In the Model Builder window, expand the Results > Stress (solid) node.
2
Right-click Surface 1 and choose Copy.
Surface 1
In the Model Builder window, right-click Velocity (spf) and choose Paste Surface.
Arrow Surface 1
Right-click Velocity (spf) and choose Arrow Surface.
Animation 1
In the Velocity (spf) toolbar, click  Animation and choose Player.
Lift and Drag Forces
1
In the Settings window for 1D Plot Group, type Lift and Drag Forces in the Label text field.
2
Locate the Plot Settings section. Select the x-axis label checkbox.
3
Click to expand the Title section. From the Title type list, choose Manual.
4
In the Title text area, type Lift and drag forces (N).
5
Locate the Legend section. From the Position list, choose Middle left.
6
In the Lift and Drag Forces toolbar, click  Plot.
7
Locate the Axis section. Select the Manual axis limits checkbox.
8
In the x minimum text field, type 4.
9
In the x maximum text field, type 5.
10
In the y minimum text field, type -160.
11
In the y maximum text field, type 500.
12
Locate the Legend section. From the Position list, choose Upper right.
13
In the Lift and Drag Forces toolbar, click  Plot.
Beam Tip Displacement
1
In the Model Builder window, under Results click Probe Plot Group 2.
2
In the Settings window for 1D Plot Group, type Beam Tip Displacement in the Label text field.
3
Locate the Plot Settings section. Select the x-axis label checkbox.
4
Locate the Axis section. Select the Manual axis limits checkbox.
5
In the x minimum text field, type 4.
6
In the x maximum text field, type 5.
7
In the y minimum text field, type -40.
8
In the y maximum text field, type 40.
9
Locate the Title section. From the Title type list, choose Manual.
10
In the Title text area, type Beam tip displacement (mm).
11
In the Beam Tip Displacement toolbar, click  Plot.
Frequency Spectrum
1
In the Results toolbar, click  1D Plot Group.
2
In the Settings window for 1D Plot Group, type Frequency Spectrum in the Label text field.
3
Locate the Data section. From the Dataset list, choose Domain Point Probe 1.
4
From the Time selection list, choose Interpolated.
5
In the Times (s) text field, type range(3,5e-3,5).
Point Graph 1
1
Right-click Frequency Spectrum and choose Point Graph.
2
In the Settings window for Point Graph, locate the y-Axis Data section.
3
In the Expression text field, type u_solid.
4
From the Unit list, choose mm.
5
Locate the x-Axis Data section. From the Parameter list, choose Discrete Fourier transform.
6
From the Show list, choose Frequency spectrum.
7
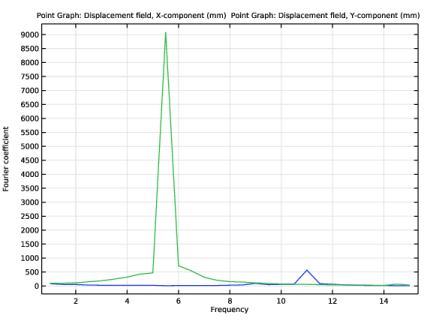
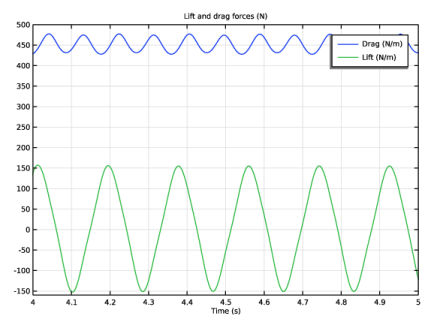
Select the Frequency range checkbox.
8
In the Minimum text field, type 1.
9
In the Maximum text field, type 15.
Point Graph 2
1
Right-click Point Graph 1 and choose Duplicate.
2
In the Settings window for Point Graph, locate the y-Axis Data section.
3
In the Expression text field, type v_solid.
4
In the Frequency Spectrum toolbar, click  Plot.
Beam Tip Trajectory
1
In the Results toolbar, click  1D Plot Group.
2
In the Settings window for 1D Plot Group, type Beam Tip Trajectory in the Label text field.
Table Graph 1
1
Right-click Beam Tip Trajectory and choose Table Graph.
2
In the Settings window for Table Graph, locate the Data section.
3
From the x-axis data list, choose Displacement field, X-component (mm), Point: (0.595, 0.2).
4
From the Plot columns list, choose Manual.
5
In the Columns list box, select Displacement field, Y-component (mm), Point: (0.595, 0.2).
6
In the Beam Tip Trajectory toolbar, click  Plot.