PDF

Self-Contact of a Loaded Spring
Introduction
The model in this example is an extension of Loaded Spring — Using Global Equations to Satisfy Constraints from the COMSOL Multiphysics Application Library. The same spring is here subjected to a load such that the spring contracts and self-intersects. The contact and friction introduce significant nonlinearity to the force-displacement response of the spring.
Model Definition
Figure 1 shows the geometry of the steel coil spring. The bottom end is fixed while a distributed load is applied to the top end, acting in the axial direction of the spring. As in the base model, the load is applied as a variable controlled by a global equation. The global equation here specifies that the displacement of the loaded end should be ramped linearly from 0 cm to 10 cm in the z direction.
Figure 1: The geometry of the coil spring, also showing the application point of the load.
As the applied deformation is ramped, the contraction of the spring will reach a point where the spring will self-intersect. To prevent any unphysical overlap of the geometry, an additional contact condition specifies that all spring boundaries (except the end points) must not overlap. A friction condition is also added so that there is a resistance to relative motion in the tangential directions of any boundaries in contact. The Coulomb friction model is used with a friction coefficient equal to 0.45. Both the contact and friction conditions are here implemented by the Nitsche method.
Results and Discussion
Figure 2 shows the deformed shape of the spring at different vertical displacements. It can be clearly seen how the coil of the spring self-intersects and that the contact prevents any overlap. This, moreover, causes the spring to rotate around the contact points as the displacement is further increased. The vertical displacement at which the coil self-intersects is also clearly visible in Figure 3, which shows the force applied to the spring. At approximately 4.5 cm, there is a change in the slope of the curve, which indicates that contact is established. After this point, it can be observed that the force versus displacement response becomes nonlinear, which is an effect of the slip between the contacting boundaries. If the displacement would be increased beyond 10 cm, the contact would eventually be lost as the friction resistance is overcome, increasing the nonlinearity of the response.
Figure 2: The deformed shape of the spring at a vertical displacement of -4 cm, -6 cm, -8 cm, and -10 cm.
Figure 3: Force versus vertical displacement measured at the end point at the top of the spring.
Notes About the COMSOL Implementation
In COMSOL Multiphysics, self-contact is modeled by selecting the same boundaries as source and destination in a Contact Pair.
Application Library path: Structural_Mechanics_Module/Contact_and_Friction/loaded_spring_contact
Modeling Instructions
Application Libraries
1
From the File menu, choose Application Libraries.
2
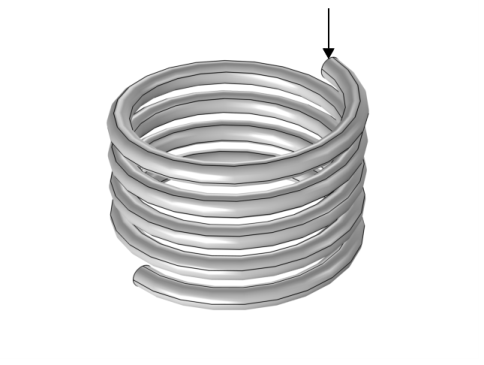
In the Application Libraries window, select COMSOL Multiphysics > Structural Mechanics > loaded_spring in the tree.
3
Definitions
Contact Pair 1 (p1)
1
In the Model Builder window, expand the Component 1 (comp1) node.
2
Right-click Component 1 (comp1) > Definitions and choose Pairs > Contact Pair.
To model self-contact, select the same boundaries as source and destination.
3
In the Settings window for Pair, locate the Source Boundaries section.
4
From the Selection list, choose All boundaries.
5
6
Locate the Destination Boundaries section. From the Selection list, choose All boundaries.
7
Click to select the  Activate Selection toggle button.
8
Solid Mechanics (solid)
Contact 1
1
In the Model Builder window, expand the Component 1 (comp1) > Solid Mechanics (solid) node, then click Contact 1.
2
In the Settings window for Contact, locate the Contact Method section.
3
The structural stiffness of the spring is much lower than the bulk stiffness used to estimate the penalty factor. Using a lower penalty factor will improve the stability of the solution.
4
Locate the Contact Pressure Penalty Factor section. From the Penalty factor control list, choose Manual tuning.
5
In the fp text field, type 0.01.
Friction 1
1
In the Physics toolbar, click  Attributes and choose Friction.
2
In the Settings window for Friction, locate the Friction Parameters section.
3
In the μ text field, type 0.45.
Study 1
Step 1: Stationary
1
In the Model Builder window, expand the Study 1 node, then click Step 1: Stationary.
2
In the Settings window for Stationary, click to expand the Results While Solving section.
3
Select the Plot checkbox.
4
From the Update at list, choose Steps taken by solver.
In this example, the spring is compressed incrementally.
5
Click to expand the Study Extensions section. Select the Auxiliary sweep checkbox.
6
7
Reset the solver to default since you are now solving a nonlinear problem.
Solution 1 (sol1)
In the Model Builder window, right-click Solver Configurations and choose Show Default Solver.
Results
Volume 1
1
In the Model Builder window, expand the Results > Stress (solid) node, then click Volume 1.
2
In the Settings window for Volume, locate the Expression section.
3
From the Unit list, choose GPa.
Deformation
1
In the Model Builder window, expand the Volume 1 node, then click Deformation.
2
In the Settings window for Deformation, locate the Scale section.
3
Select the Scale factor checkbox. In the associated text field, type 1.
Stress (solid)
In the Home toolbar, click  Compute.
Plot the displacement field in the deformed spring at different solution parameters using a Solution Array subnode.
Result Templates
1
In the Home toolbar, click  Windows and choose Result Templates.
2
Go to the Result Templates window.
3
In the tree, select Study 1/Solution 1 (sol1) > Solid Mechanics > Displacement (solid).
4
Click the Add Result Template button in the window toolbar.
5
In the Results toolbar, click  Result Templates to close the Result Templates window.
Results
Displacement (solid)
1
In the Settings window for 3D Plot Group, click to expand the Title section.
2
From the Title type list, choose Custom.
3
Find the Solution subsection. Clear the Solution checkbox.
4
Click to collapse the Title section. Locate the Plot Settings section. Clear the Plot dataset edges checkbox.
5
Click to expand the Plot Array section. From the Array type list, choose Square.
6
From the Array plane list, choose xz.
Solution Array 1
1
In the Model Builder window, expand the Displacement (solid) node.
2
Right-click Volume 1 and choose Solution Array.
3
In the Settings window for Solution Array, locate the Data section.
4
From the Parameter selection (dh) list, choose From list.
5
In the Parameter values (dh (cm)) list, choose -4, -6, -8, and -10.
6
Locate the Plot Array section. From the Array shape list, choose Square.
Annotation 1
1
In the Model Builder window, right-click Displacement (solid) and choose Annotation.
2
In the Settings window for Annotation, locate the Annotation section.
3
In the Text text field, type dh = eval(dh,cm,2) cm.
4
From the Geometry level list, choose Global.
5
Locate the Position section. In the Z text field, type -0.35.
6
Locate the Coloring and Style section. Clear the Show point checkbox.
7
From the Anchor point list, choose Center.
8
Click to expand the Plot Array section. Select the Manual indexing checkbox.
Solution Array 1
In the Model Builder window, under Results > Displacement (solid) > Volume 1 right-click Solution Array 1 and choose Copy.
Solution Array 1
In the Model Builder window, right-click Annotation 1 and choose Paste Solution Array.
Displacement (solid)
1
In the Settings window for 3D Plot Group, locate the Plot Settings section.
2
From the View list, choose New view.
3
In the Displacement (solid) toolbar, click  Plot.
4
Click the  Go to XZ View button in the Graphics toolbar.
5
Click the  Zoom Extents button in the Graphics toolbar.
6
Click the  Show Grid button in the Graphics toolbar.
7
Click the  Show Axis Orientation button in the Graphics toolbar.
Create a plot of the applied force versus the vertical displacement.
Force
1
In the Results toolbar, click  1D Plot Group.
2
In the Settings window for 1D Plot Group, type Force in the Label text field.
3
Click to expand the Title section. From the Title type list, choose None.
Global 1
1
Right-click Force and choose Global.
2
In the Settings window for Global, locate the y-Axis Data section.
3
4
Locate the x-Axis Data section. From the Parameter list, choose Expression.
5
In the Expression text field, type -dh.
6
From the Unit list, choose cm.
7
Select the Description checkbox. In the associated text field, type Vertical displacement.
8
Click to expand the Legends section. Clear the Show legends checkbox.
9
In the Force toolbar, click  Plot.