|
|
|
|
•
|
|
•
|
 ,
, 
|
|
|
|
|
|
|
|
|
|
|
|
|
|
|
|
|
|
|
|
|
|
|
|
|
 |
 |
|
|
|
|
|
|
|
|
|
|
|
|
|
|
|
|
|
|
|
|
|
|
|
|
|
|
|
|
|
|
||
|
|
||
|
|
||
|
|
|
|
|
|
|
|
|
|
|
|
|
|
|
|
|
|
|
|
|
|
|
|
|
|
|
•
|
|
•
|
The authors of Ref. 3 report the incorrectness of the analytical formula for the equivalent bending stiffness component
|

|
|
|
|
|
|
|
|
|
|
 |
|
|
|
 |
|
|
|
 |
|
|
|
 |

|
•
|
The analytical values of the extensional stiffness matrix component
|
|
•
|
The analytical values of the extensional stiffness matrix component
|
|
•
|
The numerical value of the equivalent bending stiffness matrix component
|
|
1
|
|
2
|
|
3
|
Click Add.
|
|
4
|
Click
|
|
5
|
|
6
|
Click
|
|
1
|
|
2
|
|
3
|
Locate the Parameters section. In the table, enter the following settings:
|
|
1
|
|
2
|
In the Settings window for Parameters, type Common Geometric and Material Properties in the Label text field.
|
|
3
|
|
4
|
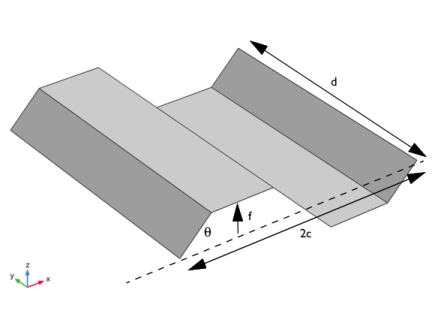
Browse to the model’s Application Libraries folder and double-click the file corrugated_sheet_parameters_trapezoidal.txt.
|
|
5
|
|
6
|
|
7
|
|
8
|
|
9
|
|
10
|
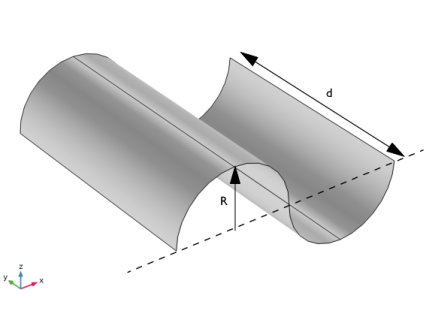
Browse to the model’s Application Libraries folder and double-click the file corrugated_sheet_parameters_round.txt.
|
|
11
|
In the Model Builder window, right-click Global Definitions and choose Geometry Parts > Part Libraries.
|
|
1
|
In the Part Libraries window, select COMSOL Multiphysics > Unit Cells and RVEs > Corrugated Sheets > round_corrugation in the tree.
|
|
2
|
Click
|
|
1
|
|
2
|
|
3
|
|
1
|
|
2
|
|
1
|
Drag and drop below End If 1 (endif1).
|
|
2
|
|
3
|
|
1
|
|
2
|
|
1
|
|
2
|
|
1
|
|
2
|
|
3
|
|
4
|
|
5
|
In the Add dialog, in the Selections to add list, choose Pair 1, Source (Trapezoidal Corrugation 1) and Pair 1, Source (Round Corrugation 1).
|
|
6
|
Click OK.
|
|
1
|
|
2
|
|
3
|
|
4
|
|
5
|
In the Add dialog, in the Selections to add list, choose Pair 1, Destination (Trapezoidal Corrugation 1) and Pair 1, Destination (Round Corrugation 1).
|
|
6
|
Click OK.
|
|
1
|
|
2
|
|
3
|
|
4
|
|
5
|
In the Add dialog, in the Selections to add list, choose Pair 2, Source (Trapezoidal Corrugation 1) and Pair 2, Source (Round Corrugation 1).
|
|
6
|
Click OK.
|
|
1
|
|
2
|
|
3
|
|
4
|
|
5
|
In the Add dialog, in the Selections to add list, choose Pair 2, Destination (Trapezoidal Corrugation 1) and Pair 2, Destination (Round Corrugation 1).
|
|
6
|
Click OK.
|
|
1
|
|
2
|
|
3
|
|
4
|
|
5
|
|
1
|
|
2
|
|
3
|
|
4
|
|
5
|
|
6
|
|
1
|
|
2
|
|
3
|
|
4
|
|
5
|
|
6
|
Click OK.
|
|
7
|
|
1
|
|
2
|
|
3
|
|
4
|
|
5
|
|
1
|
|
2
|
|
3
|
|
4
|
|
5
|
|
1
|
|
2
|
|
3
|
|
4
|
|
5
|
|
1
|
|
2
|
In the Settings window for Variables, type Analytical Stiffness Components by Xia et al. in the Label text field.
|
|
3
|
|
4
|
Browse to the model’s Application Libraries folder and double-click the file corrugated_sheet_variables_Xia.txt.
|
|
1
|
|
2
|
In the Settings window for Variables, type Analytical Stiffness Components by Park et al. in the Label text field.
|
|
3
|
|
4
|
Browse to the model’s Application Libraries folder and double-click the file corrugated_sheet_variables_Park.txt.
|
|
1
|
|
2
|
In the Settings window for Variables, type Analytical Stiffness Components by Ye et al. in the Label text field.
|
|
3
|
|
4
|
Browse to the model’s Application Libraries folder and double-click the file corrugated_sheet_variables_Ye.txt.
|
|
1
|
|
2
|
In the Settings window for Variables, type Numerical Stiffness Components Based on Reaction Forces in the Label text field.
|
|
3
|
|
4
|
Browse to the model’s Application Libraries folder and double-click the file corrugated_sheet_variables_reaction_forces.txt.
|
|
1
|
|
2
|
In the Settings window for Variables, type Numerical Stiffness Components Based on Energy Equivalence in the Label text field.
|
|
3
|
|
4
|
Browse to the model’s Application Libraries folder and double-click the file corrugated_sheet_variables_energy_equivalence.txt.
|
|
1
|
In the Model Builder window, under Component 1 (comp1) right-click Materials and choose Blank Material.
|
|
2
|
|
1
|
In the Model Builder window, under Component 1 (comp1) > Shell (shell) click Thickness and Offset 1.
|
|
2
|
|
3
|
|
1
|
|
2
|
|
1
|
|
2
|
|
3
|
|
4
|
Locate the Prescribed Displacement section. From the Displacement in x direction list, choose Prescribed.
|
|
5
|
|
6
|
|
7
|
|
8
|
Select the Free rotation around t1 direction checkbox.
|
|
1
|
|
2
|
|
3
|
|
4
|
Locate the Prescribed Displacement section. From the Displacement in x direction list, choose Prescribed.
|
|
5
|
|
6
|
|
7
|
|
8
|
Select the Free rotation around t1 direction checkbox.
|
|
1
|
|
2
|
|
3
|
|
4
|
Locate the Prescribed Displacement section. From the Displacement in y direction list, choose Prescribed.
|
|
5
|
|
6
|
Select the Free rotation around t2 direction checkbox.
|
|
1
|
|
2
|
|
3
|
|
4
|
Locate the Prescribed Displacement section. From the Displacement in y direction list, choose Prescribed.
|
|
5
|
|
6
|
Select the Free rotation around t2 direction checkbox.
|
|
1
|
|
2
|
|
3
|
|
1
|
|
2
|
|
3
|
|
4
|
|
1
|
|
2
|
|
3
|
|
4
|
|
5
|
Click
|
|
1
|
|
2
|
|
3
|
|
1
|
|
2
|
|
3
|
|
4
|
Click
|
|
1
|
|
2
|
|
3
|
Select the Modify model configuration for study step checkbox.
|
|
4
|
In the tree, select Component 1 (comp1) > Shell (shell) > Load Case 2: DA21 and DA22, Component 1 (comp1) > Shell (shell) > Load Case 3: DA33, Component 1 (comp1) > Shell (shell) > Load Case 4: DD11 and DD12, Component 1 (comp1) > Shell (shell) > Load Case 5: DD21 and DD22, and Component 1 (comp1) > Shell (shell) > Load Case 6: DD33.
|
|
5
|
Right-click and choose Disable.
|
|
6
|
|
1
|
|
2
|
|
3
|
Click
|
|
4
|
|
5
|
Click OK.
|
|
6
|
|
8
|
Click
|
|
9
|
|
10
|
Click OK.
|
|
11
|
|
13
|
Click
|
|
1
|
|
2
|
In the Settings window for 3D Plot Group, type Displacement for Translational Load Cases in the Label text field.
|
|
3
|
Locate the Data section. From the Dataset list, choose Study: Load Case 1/Parametric Solutions 1 (sol2).
|
|
4
|
|
5
|
|
6
|
|
1
|
|
2
|
|
3
|
|
1
|
In the Model Builder window, under Results > Displacement for Translational Load Cases right-click Surface 1 and choose Duplicate.
|
|
2
|
|
3
|
|
4
|
|
5
|
|
6
|
|
1
|
|
2
|
|
3
|
|
1
|
In the Displacement for Translational Load Cases toolbar, click
|
|
2
|
|
3
|
|
5
|
|
6
|
|
1
|
|
2
|
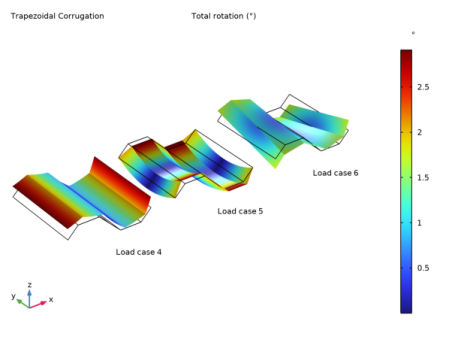
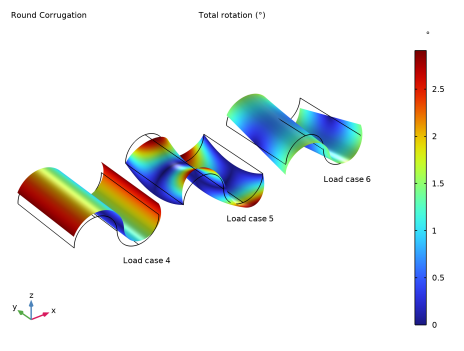
In the Settings window for 3D Plot Group, type Total Rotations for Rotational Load Cases in the Label text field.
|
|
3
|
Locate the Data section. From the Dataset list, choose Study: Load Case 4/Parametric Solutions 4 (sol14).
|
|
1
|
In the Model Builder window, expand the Total Rotations for Rotational Load Cases node, then click Surface 1.
|
|
2
|
|
3
|
|
1
|
|
2
|
|
3
|
|
1
|
In the Model Builder window, under Results > Total Rotations for Rotational Load Cases click Surface 2.
|
|
2
|
|
3
|
|
4
|
|
1
|
|
2
|
|
3
|
|
4
|
|
1
|
|
2
|
|
1
|
|
2
|
In the Settings window for Evaluation Group, type Analytical Extensional Stiffness Matrix by Xia et al. in the Label text field.
|
|
3
|
Locate the Data section. From the Dataset list, choose Study: Load Case 1/Parametric Solutions 1 (sol2).
|
|
4
|
|
5
|
|
6
|
|
7
|
|
1
|
|
2
|
|
4
|
|
1
|
|
2
|
In the Settings window for Evaluation Group, type Numerical Extensional Stiffness Matrix Based on Reaction Forces in the Label text field.
|
|
3
|
Locate the Data section. From the Dataset list, choose Study: Load Case 1/Parametric Solutions 1 (sol2).
|
|
4
|
|
5
|
|
6
|
|
7
|
|
1
|
Right-click Numerical Extensional Stiffness Matrix Based on Reaction Forces and choose Global Evaluation.
|
|
2
|
|
1
|
In the Model Builder window, right-click Numerical Extensional Stiffness Matrix Based on Reaction Forces and choose Global Evaluation.
|
|
2
|
|
3
|
|
4
|
|
5
|
|
6
|
Locate the Expressions section. In the table, enter the following settings:
|
|
1
|
Right-click Numerical Extensional Stiffness Matrix Based on Reaction Forces and choose Global Evaluation.
|
|
2
|
|
3
|
|
4
|
|
5
|
|
6
|
Locate the Expressions section. In the table, enter the following settings:
|
|
7
|
|
1
|
|
2
|
 ,
,