PDF

Rotordynamic Analysis of a Crankshaft
Introduction
A crankshaft of a 3-cylinder reciprocating engine is studied in a vibration analysis. Due to the eccentricity of the crankpin and balance masses on the crankshaft, it undergoes self-excited vibration under rotation. The crankshaft is modeled using solid elements to capture the effects of the eccentricity of the crankpin and balance masses accurately.
Model Definition
The crankshaft of a three cylinder reciprocating engine is shown in Figure 1. Four bearing locations are also highlighted.
Figure 1: Crankshaft geometry.
The load on the crankpin due to the piston is neglected in the analysis, and the rotor undergoes only the self-excited vibration due to the eccentric masses. Material damping is used in the rotor to reduce high frequency vibrations. The rotational speed of the crankshaft at the steady state is Ω = 3000 rpm, but it is ramped initially for a smooth startup. The duration of the ramp is chosen so that rotor completes one revolution with the linearly increasing speed from 0 to Ω and subsequently continues with the constant rotational speed Ω . Assuming that the ramp duration is t0 it then follows that
Therefore,
where f is the frequency corresponding to the rotational speed and N is the rpm. Therefore, the rotational speed can be defined as:
The Rayleigh coefficients for the damping are chosen such that the damping factor is close to 0.1 for the given rotational speed of the rotor. The proportionality constants chosen for the analysis are
Results and Discussion
Figure 2 shows the plot of the stress profile in the crankshaft. It can be seen that the bearing near the flywheel takes the maximum load so the stress has a maximum in the corresponding journal.
Figure 2: Stress in the crankshaft at 0.12 s.
The pressure profile in the bearings is shown in Figure 3. One can clearly see the bearings at different locations are loaded in different directions due to the tilting of the shaft in the bearings.
Figure 3: Pressure in the bearings at 0.12 s.
The orbits of the center of the journals are shown in Figure 4. The orbits of all the journals are stable and the journals finally attain their respective equilibrium positions in the steady state.
Figure 4: Journal orbits.
The lateral displacement components of the third journal are shown in Figure 5. The plot indicates that the lateral displacements of the journal undergo damped vibration and settle to an equilibrium value in the steady state as seen in the orbit plot in Figure 4.
Figure 5: Lateral displacement components at journal 3.
Notes About the COMSOL Implementation
A Solid Rotor with Hydrodynamic Bearing multiphysics interface is used to model the crankshaft-bearing assembly. This multiphysics coupling consists of a Solid Rotor interface, a Hydrodynamic Bearing interface, and a Solid Rotor–Bearing Coupling multiphysics coupling node. The Hydrodynamic Journal Bearing feature of the Hydrodynamic Bearing physics interface is used to model the thin fluid-film flow in the journal bearing. You need one such node per bearing.
Application Library path: Rotordynamics_Module/Automotive_and_Aerospace/reciprocating_engine_rotor
Modeling Instructions
From the File menu, choose New.
New
In the New window, click  Model Wizard.
Model Wizard
1
In the Model Wizard window, click  3D.
2
In the Select Physics tree, select Structural Mechanics > Rotordynamics > Solid Rotor with Hydrodynamic Bearing.
3
Click Add.
4
Click  Study.
5
In the Select Study tree, select General Studies > Time Dependent.
6
Geometry 1
Import 1 (imp1)
1
In the Geometry toolbar, click  Import.
2
In the Settings window for Import, locate the Source section.
3
Click  Browse.
4
5
Click  Import.
Global Definitions
Parameters 1
1
In the Model Builder window, under Global Definitions click Parameters 1.
2
In the Settings window for Parameters, locate the Parameters section.
3
Add Material
1
In the Materials toolbar, click  Add Material to open the Add Material window.
2
Go to the Add Material window.
3
In the tree, select Built-in > Structural steel.
4
Click the Add to Component button in the window toolbar.
5
In the Materials toolbar, click  Add Material to close the Add Material window.
Definitions
Define the ramp function for the angular speed of the rotor to get a smooth startup of the simulation.
Ramp 1 (rm1)
1
In the Definitions toolbar, click  More Functions and choose Ramp.
2
In the Settings window for Ramp, locate the Parameters section.
3
Select the Cutoff checkbox.
4
Click to expand the Smoothing section.
5
Select the Size of transition zone at start checkbox. In the associated text field, type 0.2.
6
Select the Size of transition zone at cutoff checkbox. In the associated text field, type 0.2.
Solid Rotor (rotsld)
Set the discretization to linear for the displacement to reduce the simulation time. For more accurate results you can use the quadratic discretization.
1
In the Model Builder window, under Component 1 (comp1) click Solid Rotor (rotsld).
2
In the Settings window for Solid Rotor, click to expand the Discretization section.
3
From the Displacement field list, choose Linear.
Rotating Frame 1
1
In the Model Builder window, under Component 1 (comp1) > Solid Rotor (rotsld) click Rotating Frame 1.
2
In the Settings window for Rotating Frame, locate the Axis of Rotation section.
3
From the e3 list, choose From point selection.
4
Locate the Axis of Rotation Point Selection 1 section. Click to select the  Activate Selection toggle button.
5
6
Locate the Axis of Rotation Point Selection 2 section. Click to select the  Activate Selection toggle button.
7
8
Locate the Rotational Velocity section. From the list, choose General revolutions per time.
9
In the Ωr text field, type Omega*rm1(Omega*t/2).
10
Locate the Spin Softening section. Clear the Spin softening checkbox.
Linear Elastic Material 1
Add damping in the rotor to reduce the high frequency vibrations and stabilize the transient solver.
1
In the Model Builder window, click Linear Elastic Material 1.
Damping 1
1
In the Physics toolbar, click  Attributes and choose Damping.
2
In the Settings window for Damping, locate the Damping Settings section.
3
In the αdM text field, type 6.04.
4
In the βdK text field, type 0.0005.
Fixed Axial Rotation 1
Suppress the axial rotation of the rotor at the flywheel end bearing.
1
In the Model Builder window, under Component 1 (comp1) > Solid Rotor (rotsld) click Fixed Axial Rotation 1.
2
Suppress the axial displacement of the rotor using the thrust bearings.
Thrust Bearing 1
1
In the Physics toolbar, click  Boundaries and choose Thrust Bearing.
2
Thrust Bearing 2
1
In the Physics toolbar, click  Boundaries and choose Thrust Bearing.
2
Hydrodynamic Bearing (hdb)
Select only the surfaces corresponding to the bearing locations.
1
In the Model Builder window, expand the Thrust Bearing 2 node, then click Component 1 (comp1) > Hydrodynamic Bearing (hdb).
2
In the Settings window for Hydrodynamic Bearing, locate the Boundary Selection section.
3
Click  Clear Selection.
4
Hydrodynamic Journal Bearing 1
1
In the Model Builder window, under Component 1 (comp1) > Hydrodynamic Bearing (hdb) click Hydrodynamic Journal Bearing 1.
2
In the Settings window for Hydrodynamic Journal Bearing, locate the Bearing Properties section.
3
In the C text field, type C.
4
From the Xc list, choose From geometry.
5
Locate the Fluid Properties section. From the μ list, choose User defined. In the associated text field, type mu_l.
6
From the ρ list, choose User defined. In the associated text field, type rho_l.
Add more Hydrodynamic Journal Bearing nodes; one for each bearing.
Hydrodynamic Journal Bearing 2
1
Right-click Component 1 (comp1) > Hydrodynamic Bearing (hdb) > Hydrodynamic Journal Bearing 1 and choose Duplicate.
2
In the Settings window for Hydrodynamic Journal Bearing, locate the Boundary Selection section.
3
Click  Clear Selection.
4
Hydrodynamic Journal Bearing 3
1
Right-click Hydrodynamic Journal Bearing 2 and choose Duplicate.
2
In the Settings window for Hydrodynamic Journal Bearing, locate the Boundary Selection section.
3
Click  Clear Selection.
4
Hydrodynamic Journal Bearing 4
1
Right-click Hydrodynamic Journal Bearing 3 and choose Duplicate.
2
In the Settings window for Hydrodynamic Journal Bearing, locate the Boundary Selection section.
3
Click  Clear Selection.
4
Mesh 1
1
In the Model Builder window, under Component 1 (comp1) click Mesh 1.
2
In the Settings window for Mesh, locate the Physics-Controlled Mesh section.
3
From the Element size list, choose Fine.
4
In the table, clear the Use checkbox for Geometric Analysis, Detail Size.
Study 1
Step 1: Time Dependent
1
In the Model Builder window, under Study 1 click Step 1: Time Dependent.
2
In the Settings window for Time Dependent, locate the Study Settings section.
3
In the Output times text field, type range(0,5e-4,0.12).
Solution 1 (sol1)
1
In the Study toolbar, click  Show Default Solver.
Set the appropriate scaling for the pressure.
2
In the Model Builder window, expand the Solution 1 (sol1) node.
3
In the Model Builder window, expand the Study 1 > Solver Configurations > Solution 1 (sol1) > Dependent Variables 1 node, then click Pressure (comp1.pfilm).
4
In the Settings window for Field, locate the Scaling section.
5
In the Scale text field, type 1e5.
Use the automatic damping in the Newton solver.
6
In the Model Builder window, expand the Study 1 > Solver Configurations > Solution 1 (sol1) > Time-Dependent Solver 1 node, then click Fully Coupled 1.
7
In the Settings window for Fully Coupled, click to expand the Method and Termination section.
8
From the Nonlinear method list, choose Automatic (Newton).
9
In the Study toolbar, click  Compute.
Results
Stress (rotsld)
The stress in the crankshaft, shown in Figure 2, is a default plot. Set the appropriate scale to highlight the deformation.
1
In the Settings window for 3D Plot Group, locate the Plot Settings section.
2
From the View list, choose New view.
3
In the Stress (rotsld) toolbar, click  Plot.
Surface
1
In the Model Builder window, expand the Stress (rotsld) node, then click Surface.
2
In the Settings window for Surface, click to expand the Range section.
3
Select the Manual color range checkbox.
4
In the Minimum text field, type 0.
5
In the Maximum text field, type 1e7.
6
Click to expand the Quality section. From the Evaluation settings list, choose Manual.
7
From the Smoothing list, choose Inside material domains.
8
Click the  Go to XY View button in the Graphics toolbar.
Deformation
1
In the Model Builder window, expand the Surface node, then click Deformation.
2
In the Settings window for Deformation, locate the Scale section.
3
Select the Scale factor checkbox. In the associated text field, type 500.
4
In the Stress (rotsld) toolbar, click  Plot.
5
Click the  Zoom Extents button in the Graphics toolbar.
The pressure in the bearing, shown in Figure 3, is a default plot.
Fluid Pressure (hdb)
1
In the Model Builder window, under Results click Fluid Pressure (hdb).
2
In the Fluid Pressure (hdb) toolbar, click  Plot.
3
Click the  Zoom Extents button in the Graphics toolbar.
Create the cut point dataset at the center of the bearing locations. You will need this for plotting the orbit of the crankshaft at different bearing locations as shown in Figure 4.
Cut Point 3D 1
1
In the Results toolbar, click  Cut Point 3D.
2
In the Settings window for Cut Point 3D, locate the Point Data section.
3
In the X text field, type -0.16 -0.055 0.055 0.154.
4
In the Y text field, type 0 0 0 0.
5
In the Z text field, type -0.28525 -0.28525 -0.28525 -0.28525.
6
Journal orbits
1
In the Results toolbar, click  1D Plot Group.
2
In the Settings window for 1D Plot Group, type Journal orbits in the Label text field.
3
Locate the Data section. From the Dataset list, choose Cut Point 3D 1.
4
Locate the Plot Settings section.
5
Select the x-axis label checkbox. In the associated text field, type y-displacement.
6
Select the y-axis label checkbox. In the associated text field, type z-displacement.
7
Click to expand the Title section. From the Title type list, choose Manual.
8
In the Title text area, type Journal orbit at different bearing locations.
9
Locate the Legend section. From the Position list, choose Upper left.
Point Graph 1
1
Right-click Journal orbits and choose Point Graph.
2
In the Settings window for Point Graph, locate the y-Axis Data section.
3
In the Expression text field, type w.
4
Locate the x-Axis Data section. From the Parameter list, choose Expression.
5
In the Expression text field, type v.
6
Click to expand the Coloring and Style section. From the Width list, choose 3.
7
Click to expand the Legends section. Select the Show legends checkbox.
8
From the Legends list, choose Manual.
9
Journal orbits
1
In the Model Builder window, click Journal orbits.
2
In the Settings window for 1D Plot Group, locate the Axis section.
3
Select the Preserve aspect ratio checkbox.
4
In the Journal orbits toolbar, click  Plot.
5
Click the  Zoom Extents button in the Graphics toolbar.
To plot the lateral displacements of a point on the third bearing, shown in Figure 5, follow the steps below.
Lateral displacements
1
In the Results toolbar, click  1D Plot Group.
2
In the Settings window for 1D Plot Group, type Lateral displacements in the Label text field.
Point Graph 1
1
Right-click Lateral displacements and choose Point Graph.
2
In the Settings window for Point Graph, locate the Selection section.
3
Click to select the  Activate Selection toggle button.
4
5
Locate the y-Axis Data section. In the Expression text field, type v.
6
Locate the Coloring and Style section. From the Width list, choose 3.
7
Locate the Legends section. Select the Show legends checkbox.
8
From the Legends list, choose Manual.
9
10
In the Lateral displacements toolbar, click  Plot.
Point Graph 2
1
Right-click Point Graph 1 and choose Duplicate.
2
In the Settings window for Point Graph, locate the y-Axis Data section.
3
In the Expression text field, type w.
4
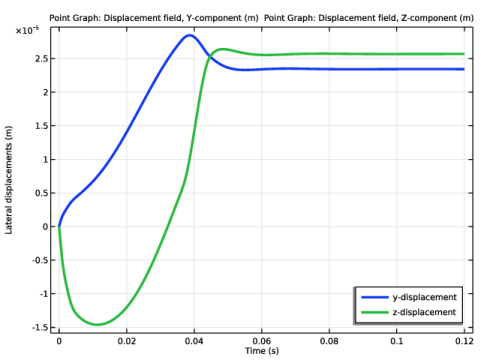
Locate the Legends section. In the table, enter the following settings:
Lateral displacements
1
In the Model Builder window, click Lateral displacements.
2
In the Settings window for 1D Plot Group, locate the Plot Settings section.
3
Select the y-axis label checkbox. In the associated text field, type Lateral displacements (m).
4
Locate the Legend section. From the Position list, choose Lower right.
5
In the Lateral displacements toolbar, click  Plot.
6
Click the  Zoom Extents button in the Graphics toolbar.
To generate the animation of the crankshaft vibration, follow the steps below.
Animation 1
1
In the Results toolbar, click  Animation and choose Player.
2
In the Settings window for Animation, locate the Frames section.
3
In the Number of frames text field, type 100.
4
Click the  Play button in the Graphics toolbar.