|
|
|
|
1
|
|
2
|
In the Select Physics tree, select Structural Mechanics > Rotordynamics > Solid Rotor (rotsld), Structural Mechanics > Rotordynamics > Solid Rotor, Fixed Frame (srotf), and Structural Mechanics > Rotordynamics > Beam Rotor (rotbm).
|
|
3
|
Click Add.
|
|
4
|
Click
|
|
5
|
In the Select Study tree, select Preset Studies for Selected Physics Interfaces > Eigenfrequency, Prestressed.
|
|
6
|
Click
|
|
1
|
|
2
|
|
3
|
Click
|
|
4
|
Browse to the model’s Application Libraries folder and double-click the file campbell_plot_comparison_general.txt.
|
|
5
|
|
1
|
|
2
|
|
3
|
Click
|
|
4
|
Browse to the model’s Application Libraries folder and double-click the file campbell_plot_comparison_stations.txt.
|
|
5
|
|
1
|
|
2
|
|
3
|
Click
|
|
4
|
Browse to the model’s Application Libraries folder and double-click the file campbell_plot_comparison_diameters.txt.
|
|
5
|
|
1
|
|
2
|
|
3
|
Click
|
|
4
|
Browse to the model’s Application Libraries folder and double-click the file campbell_plot_comparison_polygon.txt.
|
|
1
|
In the Model Builder window, under Component 1 (comp1) > Geometry 1 right-click Work Plane 1 (wp1) and choose Revolve.
|
|
2
|
|
3
|
|
4
|
|
5
|
Click
|
|
6
|
|
1
|
|
2
|
|
3
|
|
4
|
|
6
|
Select the Group by continuous tangent checkbox.
|
|
7
|
|
1
|
|
2
|
|
3
|
|
5
|
Select the Group by continuous tangent checkbox.
|
|
6
|
|
1
|
|
2
|
|
3
|
Click
|
|
5
|
|
1
|
|
2
|
|
3
|
Click
|
|
5
|
|
1
|
|
2
|
|
3
|
Click
|
|
4
|
Browse to the model’s Application Libraries folder and double-click the file campbell_plot_comparison_interpolation.txt.
|
|
5
|
Click
|
|
6
|
|
7
|
|
8
|
|
9
|
In the Argument table, enter the following settings:
|
|
10
|
Click
|
|
1
|
|
2
|
Go to the Add Material window.
|
|
3
|
|
4
|
Click the Add to Global Materials button in the window toolbar.
|
|
5
|
|
1
|
In the Model Builder window, under Component 1 (comp1) right-click Materials and choose More Materials > Material Link.
|
|
2
|
|
1
|
|
2
|
|
3
|
|
4
|
|
5
|
|
1
|
In the Model Builder window, under Component 1 (comp1) > Solid Rotor (rotsld) click Rotating Frame 1.
|
|
2
|
|
3
|
|
4
|
|
1
|
|
1
|
|
2
|
|
3
|
|
4
|
Locate the Bearing Properties section. From the Bearing model list, choose Total spring and damping constant.
|
|
5
|
|
6
|
|
1
|
|
2
|
|
3
|
|
4
|
|
1
|
|
2
|
|
3
|
|
4
|
|
1
|
In the Model Builder window, under Component 1 (comp1) > Solid Rotor, Fixed Frame (srotf) click Rotating Frame 1.
|
|
2
|
|
3
|
|
4
|
|
1
|
|
1
|
In the Model Builder window, under Component 1 (comp1) > Solid Rotor (rotsld), Ctrl-click to select Journal Bearing 1, Journal Bearing 2, and Journal Bearing 3.
|
|
2
|
Right-click and choose Copy.
|
|
1
|
|
2
|
|
1
|
|
2
|
|
3
|
|
1
|
|
2
|
|
3
|
|
1
|
|
2
|
|
3
|
|
4
|
|
5
|
Click to expand the Result Settings section. Find the General settings subsection. Clear the Include undeformed geometry in stress/whirl plot checkbox.
|
|
1
|
In the Model Builder window, under Component 1 (comp1) > Beam Rotor (rotbm) click Rotor Cross Section 1.
|
|
2
|
|
3
|
|
1
|
|
2
|
|
3
|
|
5
|
|
6
|
|
7
|
|
1
|
|
2
|
|
3
|
Click
|
|
1
|
|
2
|
|
3
|
Click
|
|
1
|
|
2
|
|
1
|
|
2
|
|
3
|
|
4
|
Click
|
|
1
|
|
2
|
|
1
|
|
2
|
|
3
|
|
4
|
Click
|
|
1
|
|
2
|
|
1
|
|
2
|
|
3
|
Click
|
|
1
|
|
2
|
|
3
|
Select the Modify model configuration for study step checkbox.
|
|
4
|
In the tree, select Component 1 (comp1) > Solid Rotor, Fixed Frame (srotf) and Component 1 (comp1) > Beam Rotor (rotbm).
|
|
5
|
Click
|
|
1
|
|
2
|
|
3
|
|
4
|
Locate the Physics and Variables Selection section. Select the Modify model configuration for study step checkbox.
|
|
5
|
In the tree, select Component 1 (comp1) > Solid Rotor, Fixed Frame (srotf), Controls spatial frame and Component 1 (comp1) > Beam Rotor (rotbm).
|
|
6
|
Click
|
|
7
|
Click to expand the Filtering and Sorting section. Find the Sorting subsection. Select the Mode following checkbox.
|
|
1
|
|
2
|
|
3
|
In the Model Builder window, expand the Study: Solid Rotor > Solver Configurations > Solution 1 (sol1) > Eigenvalue Solver 1 node, then click Mode Following 1.
|
|
4
|
|
5
|
Select the Follow extra modes checkbox.
|
|
6
|
|
7
|
|
8
|
|
9
|
|
1
|
|
2
|
|
3
|
|
4
|
|
5
|
|
1
|
|
2
|
Go to the Result Templates window.
|
|
3
|
|
4
|
Click the Add Result Template button in the window toolbar.
|
|
1
|
|
2
|
|
3
|
|
4
|
|
1
|
Go to the Result Templates window.
|
|
2
|
In the tree, select Study: Solid Rotor/Parametric Solutions 1 (sol3) > Solid Rotor > Campbell Diagram (rotsld).
|
|
3
|
Click the Add Result Template button in the window toolbar.
|
|
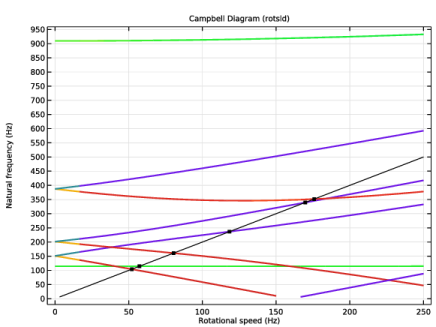
1
|
In the Model Builder window, expand the Campbell Diagram (rotsld) node, then click Natural Frequency.
|
|
2
|
|
4
|
|
1
|
|
2
|
Go to the Add Study window.
|
|
3
|
Find the Studies subsection. In the Select Study tree, select Preset Studies for Selected Physics Interfaces > Eigenfrequency, Prestressed.
|
|
4
|
Find the Physics interfaces in study subsection. In the table, clear the Solve checkboxes for Solid Rotor (rotsld) and Beam Rotor (rotbm).
|
|
5
|
Click the Add Study button in the window toolbar.
|
|
6
|
|
7
|
Find the Physics interfaces in study subsection. In the table, clear the Solve checkboxes for Solid Rotor (rotsld) and Solid Rotor, Fixed Frame (srotf).
|
|
8
|
Click the Add Study button in the window toolbar.
|
|
9
|
|
1
|
|
2
|
|
3
|
Click
|
|
1
|
|
2
|
|
3
|
Select the Modify model configuration for study step checkbox.
|
|
4
|
In the tree, select Component 1 (comp1) > Solid Rotor (rotsld) and Component 1 (comp1) > Beam Rotor (rotbm).
|
|
5
|
Click
|
|
6
|
Click to expand the Mesh Selection section. In the table, enter the following settings:
|
|
1
|
|
2
|
|
3
|
|
4
|
Locate the Physics and Variables Selection section. Select the Modify model configuration for study step checkbox.
|
|
5
|
In the tree, select Component 1 (comp1) > Solid Rotor (rotsld), Controls spatial frame and Component 1 (comp1) > Beam Rotor (rotbm).
|
|
6
|
Click
|
|
7
|
Click to expand the Mesh Selection section. In the table, enter the following settings:
|
|
8
|
Click to expand the Filtering and Sorting section. Find the Sorting subsection. Select the Mode following checkbox.
|
|
9
|
|
1
|
|
2
|
|
3
|
|
4
|
|
1
|
Go to the Result Templates window.
|
|
2
|
In the tree, select Study: SRFF/Parametric Solutions 2 (sol22) > Solid Rotor, Fixed Frame > Whirl (rotf1).
|
|
3
|
Click the Add Result Template button in the window toolbar.
|
|
1
|
|
2
|
|
3
|
|
4
|
|
1
|
Go to the Result Templates window.
|
|
2
|
In the tree, select Study: SRFF/Parametric Solutions 2 (sol22) > Solid Rotor, Fixed Frame > Campbell Diagram (srotf).
|
|
3
|
Click the Add Result Template button in the window toolbar.
|
|
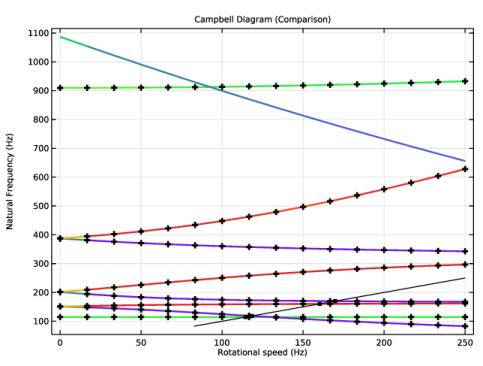
1
|
In the Settings window for 1D Plot Group, type Campbell Diagram (Comparison) in the Label text field.
|
|
2
|
|
3
|
|
1
|
In the Model Builder window, expand the Campbell Diagram (Comparison) node, then click Natural Frequency.
|
|
2
|
|
4
|
|
1
|
|
2
|
|
3
|
Locate the Data section. From the Dataset list, choose Study: Solid Rotor/Parametric Solutions 1 (sol3).
|
|
4
|
Locate the y-Axis Data section. In the table, enter the following settings:
|
|
5
|
|
6
|
|
7
|
Click Replace Expression in the upper-right corner of the x-Axis Data section. From the menu, choose Component 1 (comp1) > Solid Rotor > Acceleration and velocity > rotsld.rotf1.freqr - Revolutions per time - 1/s.
|
|
8
|
Click to expand the Coloring and Style section. Find the Line style subsection. From the Line list, choose None.
|
|
9
|
|
10
|
|
11
|
|
12
|
|
1
|
|
2
|
|
1
|
|
2
|
|
3
|
Click
|
|
1
|
|
2
|
|
3
|
Select the Modify model configuration for study step checkbox.
|
|
4
|
In the tree, select Component 1 (comp1) > Solid Rotor (rotsld) and Component 1 (comp1) > Solid Rotor, Fixed Frame (srotf).
|
|
5
|
Click
|
|
6
|
|
1
|
Go to the Result Templates window.
|
|
2
|
In the tree, select Study: Beam Rotor/Parametric Solutions 3 (sol40) > Beam Rotor > Campbell Diagram (rotbm).
|
|
3
|
Click the Add Result Template button in the window toolbar.
|
|
4
|
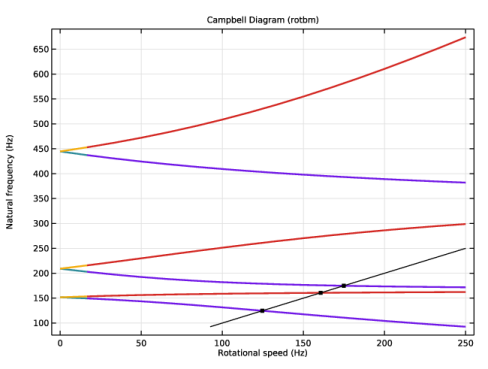
|
1
|
In the Model Builder window, expand the Campbell Diagram (rotbm) node, then click Natural Frequency.
|
|
2
|