PDF

Large-Strain Poroviscoelastic Model of Brain Tissue
Introduction
This model demonstrates how to set up a fully coupled poroviscoelastic model of biological tissue. The model is benchmarked by simulating a cyclic uniaxial tension–compression test on human brain tissue as reported by Greiner and others (Ref. 1).
The brain tissue is modeled as a biphasic material with incompressible solid and fluid constituents based on the theory of poroelasticity. Although the constituents are incompressible, the volume of the tissue can change due to fluid inflow or outflow.
The large-strain viscoelastic model of the solid phase is based on a compressible Ogden strain energy density function. Fluid permeation is modeled by Darcy’s law with a deformation-dependent permeability tensor.
Model Definition
A cyclic tension–compression test is performed on a cylindrical sample of 4 mm radius and height. Axial symmetry is taken into account. Three displacement-controlled tension–compression loading cycles are applied to the top boundary, while the lower boundary is fixed. Both the top and bottom of the cylinder are considered impermeable, while free fluid flow is allowed through the radial surfaces.
Under quasistatic conditions, the momentum balance equation reads
(1)
where P is the first Piola–Kirchhoff stress tensor of the mixture,
(2)
which includes volumetric and isochoric equilibrium contributions, isochoric nonequilibrium contributions from viscoelasticity, and a contribution from the pore pressure. The mass-balance equation is given by
(3)
where J is the volume ratio, K(J) is the deformation-dependent permeability tensor, p is the pore pressure, ρf the fluid density, and vD is the Darcy velocity.
Results and Discussion
Figure 1 shows the pore pressure and Darcy velocity (arrows) at two different times: at t = 15 s, when the sample is compressed (left), and at t = 45 s, when the sample is stretched (right).
The pore pressure increases under compression and results in fluid outflow (red arrows) and volume decrease (left). Conversely, the pore pressure is negative under tension, indicating fluid inflow (blue arrows) and volume increase (right).
Figure 1: Pore pressure and Darcy velocity under compression (left) and tension (right).
Figure 2: Mixture stress tensor, zz-component, at t = 15 s, when the sample is compressed.
Figure 2 and Figure 3 show the zz-component of the stress tensor for the compression case (after 15 s) and the tension case (after 45 s), respectively.
Figure 3: Mixture stress tensor, zz-component, at t = 45 s, when the sample is stretched.
The nominal stress is plotted against the applied stretch in Figure 4. The stress–stretch curve is in good agreement with Figure 3 in Ref. 1.
Figure 4: Stress–stretch curve for the uniaxial tension–compression test.
Notes About the COMSOL Implementation
The geometry and displacement field are interpolated using quadratic serendipity shape functions, combined with linear shape functions for the pore pressure p. The Ogden strain energy density is used in its compressible, uncoupled form.
The pore pressure acts as a load contribution in the momentum balance, and the volumetric changes in pore space contribute to the mass balance of fluid. These multiphysics effects are automatically included with the Poroelasticity node.
Reference
1. A. Greiner, N. Reiter, F. Paulsen, G.A. Holzapfel, P. Steinmann, E. Comellas, and S. Budday, “Poro-Viscoelastic Effects During Biomechanical Testing of Human Brain Tissue,” Front. Mech. Eng., vol. 7, 708350, 2021.
Application Library path: Porous_Media_Flow_Module/Poromechanics/brain_poroviscoelasticity
Modeling Instructions
From the File menu, choose New.
New
In the New window, click  Model Wizard.
Model Wizard
1
In the Model Wizard window, click  2D Axisymmetric.
2
In the Select Physics tree, select Structural Mechanics > Poroelasticity > Poroelasticity, Solid.
3
Click Add.
4
Click  Study.
5
In the Select Study tree, select General Studies > Time Dependent.
6
Root
1
In the Model Builder window, click the root node.
2
In the root node’s Settings window, locate the Unit System section.
3
From the Unit system list, choose MPa to set up the model according to Ref. 1.
Global Definitions
Next, define the model parameters. You can load them from an external file.
Parameters 1
1
In the Model Builder window, under Global Definitions click Parameters 1.
2
In the Settings window for Parameters, locate the Parameters section.
3
Click  Load from File.
4
Cyclic Loading
Define a Waveform function for applying the cyclic load.
1
In the Home toolbar, click  Functions and choose Global > Waveform.
2
In the Settings window for Waveform, type Cyclic Loading in the Label text field.
3
Locate the Parameters section. From the Type list, choose Triangle.
4
Clear the Smoothing checkbox.
5
In the T text field, type 4*T.
6
In the A text field, type -umax.
Geometry 1
1
In the Model Builder window, under Component 1 (comp1) click Geometry 1.
2
In the Settings window for Geometry, locate the Units section.
3
From the Length unit list, choose mm.
Rectangle 1 (r1)
1
In the Geometry toolbar, click  Rectangle.
2
In the Settings window for Rectangle, locate the Size and Shape section.
3
In the Width text field, type radius.
4
In the Height text field, type height.
5
Click  Build All Objects.
6
Click the  Zoom Extents button in the Graphics toolbar.
Definitions
Define variables for the volumetric strain energy density and the deformation-dependent permeability tensor.
Permeability Variables
1
In the Model Builder window, expand the Component 1 (comp1) > Definitions node.
2
Right-click Definitions and choose Variables.
3
In the Settings window for Variables, type Permeability Variables in the Label text field.
4
Locate the Variables section. In the table, enter the following settings:
Component 1 (comp1)
Now, set up the physics. Use quadratic serendipity shape functions for the geometry and the displacement field, combined with linear shape functions for the pore pressure.
1
In the Model Builder window, click Component 1 (comp1).
2
In the Settings window for Component, locate the Curved Mesh Elements section.
3
From the Geometry shape function list, choose Quadratic serendipity.
Solid Mechanics (solid)
Hyperelastic Material 1
1
In the Physics toolbar, click  Domains and choose Hyperelastic Material.
2
3
In the Settings window for Hyperelastic Material, locate the Hyperelastic Material section.
4
From the Material model list, choose Ogden.
5
From the Compressibility list, choose Compressible, uncoupled.
6
From the Volumetric strain energy list, choose User defined.
7
In the Wsvol text field, type lame1*(1-phiS)^2*((solid.Jel-1)/(1-phiS)-log((solid.Jel-phiS)/(1-phiS))).
8
In the Ogden parameters table, enter the following settings:
Viscoelasticity 1
1
In the Physics toolbar, click  Attributes and choose Viscoelasticity.
2
In the Settings window for Viscoelasticity, locate the Viscoelasticity Model section.
3
Fixed Constraint 1
1
In the Physics toolbar, click  Boundaries and choose Fixed Constraint.
2
Prescribed Displacement 1
1
In the Physics toolbar, click  Boundaries and choose Prescribed Displacement.
2
3
In the Settings window for Prescribed Displacement, locate the Prescribed Displacement section.
4
From the Displacement in r direction list, choose Prescribed.
5
From the Displacement in z direction list, choose Prescribed.
6
In the u0z text field, type wv1(t).
Darcy’s Law (dl)
1
In the Model Builder window, under Component 1 (comp1) click Darcy’s Law (dl).
2
In the Settings window for Darcy’s Law, click to expand the Discretization section.
3
From the Pressure list, choose Linear.
Fluid 1
1
In the Model Builder window, under Component 1 (comp1) > Darcy’s Law (dl) > Porous Medium 1 click Fluid 1.
2
In the Settings window for Fluid, locate the Fluid Properties section.
3
From the Fluid type list, choose Incompressible.
Porous Matrix 1
1
In the Model Builder window, click Porous Matrix 1.
2
In the Settings window for Porous Matrix, locate the Matrix Properties section.
3
From the κ list, choose User defined. From the list, choose Symmetric.
4
Specify the κ matrix as
Pressure 1
1
In the Physics toolbar, click  Boundaries and choose Pressure.
2
Multiphysics
Poroelasticity 1 (poro1)
1
In the Model Builder window, under Component 1 (comp1) > Multiphysics click Poroelasticity 1 (poro1).
2
In the Settings window for Poroelasticity, locate the Poroelastic Coupling Properties section.
3
From the Poroelasticity model list, choose Biphasic.
4
From the pref list, choose Reference pressure level (dl).
Materials
Having defined the physics, add a Porous Material and the required material properties.
Porous Material 1 (pmat1)
1
In the Model Builder window, under Component 1 (comp1) right-click Materials and choose More Materials > Porous Material.
2
In the Settings window for Porous Material, locate the Phase-Specific Properties section.
3
Click  Add Required Phase Nodes.
Fluid 1 (pmat1.fluid1)
1
In the Model Builder window, click Fluid 1 (pmat1.fluid1).
2
In the Settings window for Fluid, locate the Material Contents section.
3
Solid 1 (pmat1.solid1)
1
In the Model Builder window, right-click Porous Material 1 (pmat1) and choose Solid.
2
In the Settings window for Solid, locate the Solid Properties section.
3
In the θs text field, type phiS.
Porous Material 1 (pmat1)
1
In the Model Builder window, click Porous Material 1 (pmat1).
2
In the Settings window for Porous Material, locate the Homogenized Properties section.
3
Mesh 1
Mapped 1
In the Mesh toolbar, click  Mapped.
Distribution 1
1
Right-click Mapped 1 and choose Distribution.
2
3
In the Settings window for Distribution, locate the Distribution section.
4
From the Distribution type list, choose Predefined.
5
In the Number of elements text field, type 40.
6
In the Element ratio text field, type 4.
7
From the Growth rate list, choose Exponential to refine the mesh toward the lateral surface of the cylinder, which alternately serves as inflow or outflow boundary.
Distribution 2
1
In the Model Builder window, right-click Mapped 1 and choose Distribution.
2
3
In the Settings window for Distribution, locate the Distribution section.
4
In the Number of elements text field, type 20.
5
Click  Build All.
Study 1
Step 1: Time Dependent
1
In the Model Builder window, under Study 1 click Step 1: Time Dependent.
2
In the Settings window for Time Dependent, locate the Study Settings section.
3
In the Output times text field, type T*range(0,0.1,12).
Before solving the model, modify the default solver settings for faster convergence.
4
In the Model Builder window, click Study 1.
5
In the Settings window for Study, locate the Study Settings section.
6
Clear the Generate default plots checkbox.
Solution 1 (sol1)
1
In the Study toolbar, click  Show Default Solver.
2
In the Model Builder window, expand the Solution 1 (sol1) node, then click Time-Dependent Solver 1.
3
In the Settings window for Time-Dependent Solver, click to expand the Time Stepping section.
4
From the Steps taken by solver list, choose Strict.
5
Find the Algebraic variable settings subsection. From the Error estimation list, choose Exclude algebraic.
6
In the Model Builder window, expand the Study 1 > Solver Configurations > Solution 1 (sol1) > Time-Dependent Solver 1 node, then click Direct.
7
In the Settings window for Direct, locate the General section.
8
From the Solver list, choose PARDISO.
9
In the Model Builder window, under Study 1 > Solver Configurations > Solution 1 (sol1) > Time-Dependent Solver 1 click Fully Coupled 1.
10
In the Settings window for Fully Coupled, click to expand the Method and Termination section.
11
From the Jacobian update list, choose On every iteration.
12
In the Maximum number of iterations text field, type 25.
13
In the Study toolbar, click  Compute.
Results
Plot the pore pressure distribution and the Darcy velocity during both compression and tension. Here, it is suitable to use kPa as preferred unit for both stresses and pressures.
Preferred Units 1
1
In the Results toolbar, click  Configurations and choose Preferred Units.
2
In the Settings window for Preferred Units, locate the Units section.
3
Click  Add Physical Quantity.
4
In the Physical Quantity dialog, type stress in the text field.
5
In the tree, select Solid Mechanics > Stress tensor (MPa).
6
7
In the Settings window for Preferred Units, locate the Units section.
8
9
Select the Apply conversions to expressions with the same dimensions checkbox.
Result Templates
1
In the Home toolbar, click  Windows and choose Result Templates.
2
Go to the Result Templates window.
3
In the tree, select Study 1/Solution 1 (sol1) > Darcy’s Law > Pressure (dl).
4
Click the Add Result Template button in the window toolbar.
5
In the Home toolbar, click  Result Templates to close the Result Templates window.
Results
Pressure (dl)
1
In the Settings window for 2D Plot Group, locate the Plot Settings section.
2
Clear the Plot dataset edges checkbox.
3
Locate the Color Legend section. Select the Show maximum and minimum values checkbox.
Pore Pressure
1
In the Model Builder window, expand the Pressure (dl) node, then click Surface.
2
In the Settings window for Surface, type Pore Pressure in the Label text field.
3
Click to expand the Range section. Select the Manual color range checkbox.
4
In the Minimum text field, type -8.
5
In the Maximum text field, type 8.
6
Locate the Coloring and Style section. From the Color table list, choose Wave.
7
In the Number of bands text field, type 10.
Deformation 1
1
Right-click Pore Pressure and choose Deformation.
2
In the Settings window for Deformation, locate the Scale section.
3
Select the Scale factor checkbox. In the associated text field, type 1.
Pore Pressure
Add a Solution Array node to plot the pore pressure at two output times side by side in the Graphics window.
Solution Array 1
1
Right-click Pore Pressure and choose Solution Array.
2
In the Settings window for Solution Array, locate the Data section.
3
From the Time selection list, choose From list.
4
In the Times (s) list, choose 15 and 45.
Darcy Velocity (compression)
1
In the Model Builder window, right-click Pressure (dl) and choose Arrow Line.
2
In the Settings window for Arrow Line, type Darcy Velocity (compression) in the Label text field.
3
Locate the Data section. From the Dataset list, choose Study 1/Solution 1 (sol1).
4
From the Time (s) list, choose 15.
5
Locate the Expression section. In the R-component text field, type dl.u.
6
In the Z-component text field, type dl.w.
7
Locate the Arrow Positioning section. In the Number of arrows text field, type 50.
8
Locate the Coloring and Style section. From the Arrow length list, choose Logarithmic.
9
Select the Scale factor checkbox. In the associated text field, type 7e2.
10
Click to expand the Inherit Style section. From the Plot list, choose Pore Pressure.
11
Clear the Arrow scale factor checkbox.
12
Clear the Color checkbox.
13
Clear the Color and data range checkbox.
14
Click to expand the Plot Array section. Select the Manual indexing checkbox.
Selection 1
1
Right-click Darcy Velocity (compression) and choose Selection.
2
Deformation 1
In the Model Builder window, right-click Darcy Velocity (compression) and choose Deformation.
Darcy Velocity (tension)
1
Right-click Darcy Velocity (compression) and choose Duplicate.
2
In the Settings window for Arrow Line, type Darcy Velocity (tension) in the Label text field.
3
Locate the Data section. From the Time (s) list, choose 45.
4
Click to expand the Title section. From the Title type list, choose None.
5
Locate the Coloring and Style section. From the Color list, choose Blue.
6
Locate the Plot Array section. In the Index text field, type 1.
7
Locate the Coloring and Style section. From the Arrow base list, choose Head.
Mesh 1
1
In the Model Builder window, right-click Pressure (dl) and choose Mesh.
2
In the Settings window for Mesh, locate the Data section.
3
From the Dataset list, choose Study 1/Solution 1 (sol1).
4
From the Time (s) list, choose 15.
5
Click to expand the Title section. From the Title type list, choose None.
6
Locate the Coloring and Style section. From the Element color list, choose None.
7
Click to expand the Inherit Style section. From the Plot list, choose Pore Pressure.
8
Click to expand the Plot Array section. Select the Manual indexing checkbox.
Deformation 1
Right-click Mesh 1 and choose Deformation.
Mesh 2
1
In the Model Builder window, under Results > Pressure (dl) right-click Mesh 1 and choose Duplicate.
2
In the Settings window for Mesh, locate the Data section.
3
From the Time (s) list, choose 45.
4
Locate the Plot Array section. In the Index text field, type 1.
Pressure (dl)
1
In the Model Builder window, click Pressure (dl).
2
In the Settings window for 2D Plot Group, click to expand the Title section.
3
Find the Solution subsection. Clear the Solution checkbox.
Table Annotation 1
1
In the Pressure (dl) toolbar, click  More Plots and choose Table Annotation.
2
In the Settings window for Table Annotation, locate the Data section.
3
From the Source list, choose Local table.
4
5
Locate the Coloring and Style section. From the Anchor point list, choose Center.
6
Clear the Show point checkbox.
7
In the Pressure (dl) toolbar, click  Plot.
8
Click the  Zoom Extents button in the Graphics toolbar.
Result Templates
Next, create a 3D plot of the stress in the sample by modifying a plot from the Result Templates menu.
1
In the Home toolbar, click  Windows and choose Result Templates.
2
Go to the Result Templates window.
3
In the tree, select Study 1/Solution 1 (sol1) > Solid Mechanics > Stress, 3D (solid).
4
Click the Add Result Template button in the window toolbar.
5
In the Home toolbar, click  Result Templates to close the Result Templates window.
Results
Stress, 3D (solid)
1
In the Model Builder window, click Stress, 3D (solid).
2
In the Settings window for 3D Plot Group, locate the Data section.
3
From the Time (s) list, choose 15.
Surface 1
1
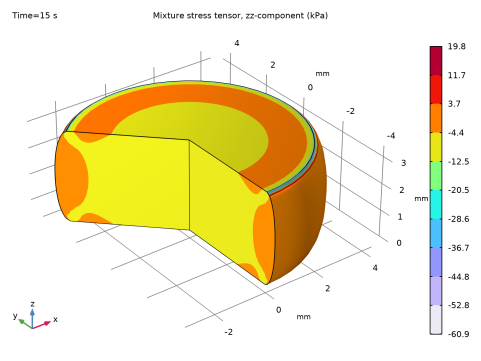
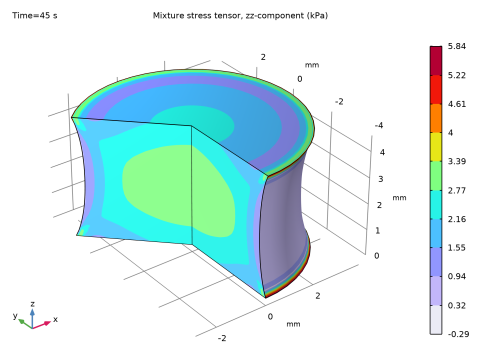
In the Model Builder window, expand the Results > Stress, 3D (solid) > Surface 1 node, then click Surface 1.
2
In the Settings window for Surface, click Replace Expression in the upper-right corner of the Expression section. From the menu, choose Component 1 (comp1) > Solid Mechanics > Stress > Mixture stress tensor (spatial frame) - MPa > poro1.sGpzz - Mixture stress tensor, zz-component.
3
Locate the Coloring and Style section. From the Color table type list, choose Discrete.
4
In the Stress, 3D (solid) toolbar, click  Plot.
5
Click the  Zoom Extents button in the Graphics toolbar.
Stress, 3D (solid)
You have now plotted the zz-component of the mixture stress tensor during compression. For the tension case, choose another output time.
1
In the Model Builder window, click Stress, 3D (solid).
2
In the Settings window for 3D Plot Group, locate the Data section.
3
From the Time (s) list, choose 45.
4
In the Stress, 3D (solid) toolbar, click  Plot.
5
Click the  Zoom Extents button in the Graphics toolbar.
Stress-Stretch Curve
Finally, plot the nominal stress-stretch curve as is typically measured in an experiment.
1
In the Results toolbar, click  1D Plot Group.
2
In the Settings window for 1D Plot Group, type Stress-Stretch Curve in the Label text field.
3
Locate the Grid section. Select the Manual spacing checkbox.
4
In the x spacing text field, type 0.05.
5
Locate the Legend section. Clear the Show legends checkbox.
Global 1
1
Right-click Stress-Stretch Curve and choose Global.
2
In the Settings window for Global, locate the y-Axis Data section.
3
4
Locate the x-Axis Data section. From the Parameter list, choose Expression.
5
In the Expression text field, type 1+wv1(t)/height.
6
Select the Description checkbox. In the associated text field, type Stretch.
7
In the Stress-Stretch Curve toolbar, click  Plot.