PDF

Shape Optimization of an MBB Beam
Introduction
Shape optimization can be used to alter the geometry of an existing product to improve its performance, but it can also be used as a postprocessing step for topology optimization. This model takes the design found in the model Topology Optimization of an MBB Beam and uses the Free Shape Boundary feature to further improve the stiffness without increasing the mass. The magnitude of the deformations in shape optimization can sometimes be limited by inverted elements. However, this is less of an issue with topology-optimized designs, because the design is already near optimality.
Model Definition
The result of topology optimization can be converted to a geometry by taking the 0.5 contour of the filtered material volume factor or the projected material volume factor. In theory the two are identical, but in practice the fields are approximated with a linear representation on a refined mesh, and therefore it can be preferable to use the contour of the filtered material volume factor. This means that it is the contour of the field on the left in Figure 1 that will be the starting point of the model.
Figure 1: The result of Topology Optimization of an MBB Beam is shown with the filtered material volume factor to the left and the projected material volume factor to the right.
The model uses the Free Shape Symmetry feature to prevent the design from going outside the box of the original topology optimization problem.
Results and Discussion
The Helmholtz filter used by the Density Model in Topology Optimization of an MBB Beam is known to cause 90-degree angles on the boundaries of the design domain. The shape optimization changes this, because it is a detail that is not optimal, but it also re-positions the triangular holes as seen in Figure 2.
Figure 2: The default shape optimization plot shows the edges of the old and new geometry in gray and black, respectively. An arrow plot of the actual displacement is colored with the relative normal boundary displacement. The colors of the arrows thus indicate that the shape deformation is not limited by the maximum displacement.
Notes About the COMSOL Implementation
This model combines the Shape Optimization and Solid Mechanics interfaces. The topology-optimized design can be extracted in several ways, but it is best to combine a Filter dataset, a Mesh Part, and an Import geometry feature because this allows recycling of the selections.
Application Library path: Optimization_Module/Shape_Optimization/mbb_beam_shape_optimization
Modeling Instructions
Application Libraries
1
From the File menu, choose Application Libraries.
2
In the Application Libraries window, select Optimization Module > Topology Optimization > mbb_beam_optimization in the tree.
3
Results
Filter 1
1
In the Results toolbar, click  More Datasets and choose Filter.
2
In the Settings window for Filter, locate the Data section.
3
From the Dataset list, choose Optimization/Parametric Solutions 1 (sol2).
4
Locate the Expression section. In the Expression text field, type dtopo1.theta_f.
5
Locate the Filter section. In the Lower bound text field, type 0.5.
6
In the Results toolbar, click  Attributes and choose Create Mesh Part.
Mesh Part 1
1
In the Model Builder window, under Global Definitions > Mesh Parts right-click Mesh Part 1 and choose Build All.
2
Right-click Global Definitions > Mesh Parts > Mesh Part 1 and choose Create Geometry.
Component 1: Topology Optimization
In the Settings window for Component, type Component 1: Topology Optimization in the Label text field.
Component 2: Shape Optimization
1
In the Model Builder window, click Component 2 (comp2).
2
In the Settings window for Component, type Component 2: Shape Optimization in the Label text field.
Geometry 2
In the Home toolbar, click  Build All.
Moving Boundaries
1
In the Geometry toolbar, click  Selections and choose Box Selection.
2
In the Settings window for Box Selection, type Moving Boundaries in the Label text field.
3
Locate the Geometric Entity Level section. From the Level list, choose Boundary.
4
Locate the Box Limits section. In the x minimum text field, type a*0.001.
5
In the x maximum text field, type a*0.999.
6
In the y minimum text field, type b*0.001.
7
In the y maximum text field, type b*0.999.
Roller Boundaries
1
In the Geometry toolbar, click  Selections and choose Complement Selection.
2
In the Settings window for Complement Selection, locate the Geometric Entity Level section.
3
From the Level list, choose Boundary.
4
Locate the Input Entities section. Click  Add.
5
In the Add dialog, in the Selections to invert list, choose Load Boundary (Import 1), Symmetry y (Import 1), Symmetry x (Import 1), and Moving Boundaries.
6
7
In the Settings window for Complement Selection, type Roller Boundaries in the Label text field.
Add Physics
1
In the Home toolbar, click  Add Physics to open the Add Physics window.
2
Go to the Add Physics window.
3
In the tree, select Structural Mechanics > Solid Mechanics (solid).
4
Find the Physics interfaces in study subsection. In the table, clear the Solve checkbox for Optimization.
5
Click the Add to Component 2: Shape Optimization button in the window toolbar.
6
In the Home toolbar, click  Add Physics to close the Add Physics window.
Add Material
1
In the Materials toolbar, click  Add Material to open the Add Material window.
2
Go to the Add Material window.
3
In the tree, select Built-in > Structural steel.
4
Click the Add to Component button in the window toolbar.
5
In the Materials toolbar, click  Add Material to close the Add Material window.
Solid Mechanics 2 (solid2)
Roller 1
1
In the Physics toolbar, click  Boundaries and choose Roller.
2
In the Settings window for Roller, locate the Boundary Selection section.
3
From the Selection list, choose Symmetry x (Import 1).
Prescribed Displacement 1
1
In the Physics toolbar, click  Boundaries and choose Prescribed Displacement.
2
In the Settings window for Prescribed Displacement, locate the Boundary Selection section.
3
From the Selection list, choose Symmetry y (Import 1).
4
Locate the Prescribed Displacement section. From the Displacement in y direction list, choose Prescribed.
Boundary Load 1
1
In the Physics toolbar, click  Boundaries and choose Boundary Load.
2
In the Settings window for Boundary Load, locate the Boundary Selection section.
3
From the Selection list, choose Load Boundary (Import 1).
4
Locate the Force section. From the Load type list, choose Total force.
5
Specify the Ftot vector as
Mesh 2
1
In the Model Builder window, under Component 2: Shape Optimization (comp2) click Mesh 2.
2
In the Settings window for Mesh, locate the Physics-Controlled Mesh section.
3
From the Element size list, choose Extra fine.
4
Click  Build All.
Free Triangular 2
In the Mesh toolbar, click  Free Triangular.
Size
1
In the Model Builder window, click Size.
2
In the Settings window for Size, click to expand the Element Size Parameters section.
3
In the Maximum element growth rate text field, type Inf.
4
In the Curvature factor text field, type Inf.
5
In the Resolution of narrow regions text field, type 0.
6
Click  Build All.
Add Study
1
In the Home toolbar, click  Add Study to open the Add Study window.
2
Go to the Add Study window.
3
Find the Studies subsection. In the Select Study tree, select General Studies > Stationary.
4
Find the Physics interfaces in study subsection. In the table, clear the Solve checkbox for Solid Mechanics (solid).
5
Click the Add Study button in the window toolbar.
6
In the Home toolbar, click  Add Study to close the Add Study window.
Study 1: Topology Optimization
In the Settings window for Study, type Study 1: Topology Optimization in the Label text field.
Study 2: Verification
1
In the Model Builder window, click Study 2.
2
In the Settings window for Study, type Study 2: Verification in the Label text field.
3
In the Study toolbar, click  Compute.
Results
Topology Optimization
In the Model Builder window, under Results right-click Topology Optimization and choose Delete.
Component 2: Shape Optimization (comp2)
Free Shape Domain 1
In the Physics toolbar, click  Optimization and choose Shape Optimization.
Symmetry/Roller 1
1
In the Shape Optimization toolbar, click  Symmetry/Roller.
2
In the Settings window for Symmetry/Roller, locate the Boundary Selection section.
3
From the Selection list, choose Roller Boundaries.
Free Shape Boundary 1
1
In the Shape Optimization toolbar, click  Free Shape Boundary.
2
In the Settings window for Free Shape Boundary, locate the Boundary Selection section.
3
From the Selection list, choose Moving Boundaries.
4
Locate the Control Variable Settings section. In the text field, type 0.1.
5
Locate the Filtering section. From the Rmin list, choose Medium.
Study 1: Topology Optimization
Step 1: Stationary
1
In the Model Builder window, expand the Study 1: Topology Optimization node, then click Step 1: Stationary.
2
In the Settings window for Stationary, locate the Physics and Variables Selection section.
3
In the Solve for column of the table, under Component 2: Shape Optimization (comp2), clear the checkbox for Deformed Geometry.
Study 2: Verification
1
In the Model Builder window, under Study 2: Verification click Step 1: Stationary.
2
In the Settings window for Stationary, locate the Physics and Variables Selection section.
3
In the Solve for column of the table, under Component 2: Shape Optimization (comp2), clear the checkbox for Deformed Geometry.
4
In the Solve for column of the table, under Component 1: Topology Optimization (comp1), clear the checkbox for Topology Optimization.
Add Study
1
In the Home toolbar, click  Add Study to open the Add Study window.
2
Go to the Add Study window.
3
Find the Studies subsection. In the Select Study tree, select General Studies > Stationary.
4
Find the Physics interfaces in study subsection. In the table, clear the Solve checkbox for Solid Mechanics (solid).
5
Click the Add Study button in the window toolbar.
6
In the Home toolbar, click  Add Study to close the Add Study window.
Study 3
Shape Optimization
1
In the Study toolbar, click  Optimization and choose Shape Optimization.
2
In the Settings window for Shape Optimization, locate the Optimization Solver section.
3
Clear the Move limits checkbox.
4
In the Maximum number of iterations text field, type 25.
5
Click Add Expression in the upper-right corner of the Objective Function section. From the menu, choose Component 2: Shape Optimization (comp2) > Solid Mechanics 2 > Global > comp2.solid2.Ws_tot - Total elastic strain energy - J.
6
Locate the Objective Function section. Find the Objective settings subsection. From the Objective scaling list, choose Initial solution based.
7
Locate the Control Variables section. In the table, clear the Solve for checkbox for Density Model 1 (dtopo1).
8
Click Add Expression in the upper-right corner of the Constraints section. From the menu, choose Component 2: Shape Optimization (comp2) > Definitions > Free Shape Domain 1 > comp2.fsd1.area - Free shape area - m².
9
Locate the Constraints section. In the table, enter the following settings:
Step 1: Stationary
1
In the Model Builder window, click Step 1: Stationary.
2
In the Settings window for Stationary, locate the Physics and Variables Selection section.
3
In the Solve for column of the table, under Component 1: Topology Optimization (comp1), clear the checkbox for Topology Optimization.
4
In the Study toolbar, click  Get Initial Value.
Results
Topology Optimization
In the Model Builder window, under Results right-click Topology Optimization and choose Delete.
Study 3
Shape Optimization
1
In the Model Builder window, under Study 3 click Shape Optimization.
2
In the Settings window for Shape Optimization, click to expand the Output section.
3
Select the Plot checkbox.
4
From the Plot group list, choose Shape Optimization.
5
In the Model Builder window, click Study 3.
6
In the Settings window for Study, type Study 3: Shape Optimization in the Label text field.
7
In the Study toolbar, click  Compute.
Results
1
Click the  Zoom Extents button in the Graphics toolbar.
2
In the Model Builder window, under Results click Shape Optimization.
3
In the Shape Optimization toolbar, click  Plot.
Shape Optimization (alternative plot)
1
In the Results toolbar, click  2D Plot Group.
2
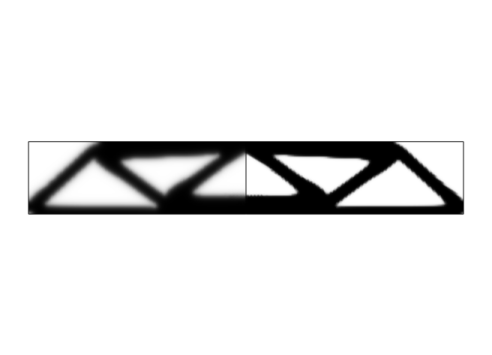
In the Settings window for 2D Plot Group, type Shape Optimization (alternative plot) in the Label text field.
3
Locate the Data section. From the Dataset list, choose Study 3: Shape Optimization/Solution 6 (6) (sol6).
4
Locate the Plot Settings section. Clear the Plot dataset edges checkbox.
Surface 1
1
Right-click Shape Optimization (alternative plot) and choose Surface.
2
In the Settings window for Surface, locate the Data section.
3
From the Dataset list, choose Study 2: Verification/Solution 5 (4) (sol5).
4
Locate the Expression section. In the Expression text field, type 1.
5
Locate the Coloring and Style section. From the Coloring list, choose Uniform.
6
From the Color list, choose Gray.
Surface 2
1
In the Model Builder window, right-click Shape Optimization (alternative plot) and choose Surface.
2
In the Settings window for Surface, locate the Expression section.
3
In the Expression text field, type 1.
4
Locate the Coloring and Style section. From the Coloring list, choose Uniform.
Line 1
1
Right-click Shape Optimization (alternative plot) and choose Line.
2
In the Settings window for Line, locate the Data section.
3
From the Dataset list, choose Study 2: Verification/Solution 5 (4) (sol5).
4
Locate the Coloring and Style section. From the Line type list, choose Tube.
5
Select the Radius scale factor checkbox. In the associated text field, type 0.0035.
6
From the Coloring list, choose Uniform.
7
From the Color list, choose Gray.
Line 2
1
Right-click Shape Optimization (alternative plot) and choose Line.
2
In the Settings window for Line, locate the Expression section.
3
In the Expression text field, type 1.
4
Locate the Coloring and Style section. From the Coloring list, choose Uniform.
5
From the Color list, choose Black.
6
From the Line type list, choose Tube.
7
Select the Radius scale factor checkbox. In the associated text field, type 0.0035.
8
In the Shape Optimization (alternative plot) toolbar, click  Plot.
9
Click the  Zoom Extents button in the Graphics toolbar.
Shaped Optimized Stress (solid2)
1
In the Model Builder window, under Results click Stress (solid2) 1.
2
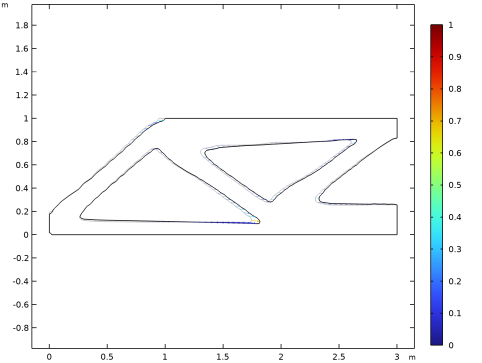
In the Settings window for 2D Plot Group, type Shaped Optimized Stress (solid2) in the Label text field.