PDF

Optimization of Chemical Etching
Introduction
This model is based on the model Chemical Etching in the Chemical Engineering folder of the COMSOL Multiphysics Application Library, which models wet etching under laminar flow using the Deformed Geometry interface.
In the model at hand, the symmetry of the etching is optimized by allowing the concentration and convection to change over time, while constraining the average etching depth.
Model Definition
The objective is to minimize the squared deviation between the two sides:
,
where yspatial,mirror is constructed using a General Extrusion operator. The minimization is achieved by allowing the concentration at the boundaries and the wall movement to be controlled by two separate Control Function features. The geometry is symmetric before etching, so a design without etching exists as a trivial solution to this optimization. This solution can be made infeasible by imposing a minimum value on the average etching depth
Note that the constraint is scaled so that a bound equal to 1 can be used. Similarly, the objective is scaled based on the initial value. A solution to the optimization problem is found with the MMA method using move limits equal to 0.1. The optimization is limited to 25 iterations to avoid a long computational time.
Results and Discussion
Figure 1 displays the optimized control functions. The convection causes the asymmetry, so it makes sense that this decreases when the concentration is increased. However, such changes tend to violate the constraint. Therefore, those trends are reversed toward the end of the simulation, where the convection introduces less anisotropy, because the cavity is larger than early on.
Figure 1: The plot shows that the concentration is doubled throughout the first half of the simulation and then drops sharply to half the initial value toward the end. In contrast, the wall movement behaves in the opposite way, dropping to the minimum value throughout the first half and then increasing to the maximum value toward the end.
The final shape of the cavity before and after optimization is shown in Figure 2. Some of the asymmetry remains, but most of it has been removed by the optimization.
Figure 2: The plot shows the concentration and velocity field at the end of the process before (top) and after optimization (bottom). The optimization increases the symmetry significantly without reducing the etching depth.
Notes About the COMSOL Implementation
The time-dependent part of the problem is initialized with the result of a stationary problem. However, there is no support for gradient-based optimization over the combination of a Stationary solver followed by a Time Dependent solver. Therefore, the Control Function features are set up with a Dirichlet boundary condition for the initial time, so that the optimization can be restricted to the Time Dependent study step.
Application Library path: Optimization_Module/Optimal_Control/chemical_etching_optimization
Modeling Instructions
This example starts from an existing model from the COMSOL Multiphysics Application Library.
Application Libraries
1
From the File menu, choose Application Libraries.
2
In the Application Libraries window, select COMSOL Multiphysics > Chemical Engineering > chemical_etching in the tree.
3
Study 1: Initial
1
In the Model Builder window, click Study 1.
2
In the Settings window for Study, type Study 1: Initial in the Label text field.
Results
Evaluation Group 1
1
In the Results toolbar, click  Evaluation Group.
2
In the Settings window for Evaluation Group, locate the Data section.
3
From the Time selection list, choose Last.
Line Average 1
1
Right-click Evaluation Group 1 and choose Average > Line Average.
2
In the Settings window for Line Average, locate the Selection section.
3
From the Selection list, choose Bottom.
4
Locate the Expressions section. In the table, enter the following settings:
5
In the Evaluation Group 1 toolbar, click  Evaluate.
Add the initial etching depth as a parameter together with the parameter for the time to allow the use of Control Function features with this argument in stationary solvers. Note that the value of the parameter will be overwritten by time dependent solvers.
Global Definitions
Parameters 1
1
In the Model Builder window, under Global Definitions click Parameters 1.
2
In the Settings window for Parameters, locate the Parameters section.
3
Component 1 (comp1)
The initial profile is symmetric, so it is easy to achieve a symmetric profile by avoiding etching. This trivial solution can be avoided by imposing a constraint on the etching depth using a Boundary Probe.
Definitions
Boundary Probe 1 (bnd1)
1
In the Model Builder window, expand the Component 1 (comp1) node.
2
Right-click Component 1 (comp1) > Definitions and choose Probes > Boundary Probe.
3
In the Settings window for Boundary Probe, type constr in the Variable name text field.
4
Locate the Source Selection section. Click  Clear Selection.
5
From the Selection list, choose Bottom.
6
Locate the Expression section. In the Expression text field, type y/yavg.
Control Function 1 (cfunc1)
1
In the Definitions toolbar, click  Control Variables and choose Control Function.
2
In the Settings window for Control Function, locate the Input section.
3
In the xend text field, type tmax.
4
Locate the Output section. In the fmin text field, type 0.1.
5
In the fmax text field, type 1.5.
6
From the Start boundary condition list, choose Dirichlet.
7
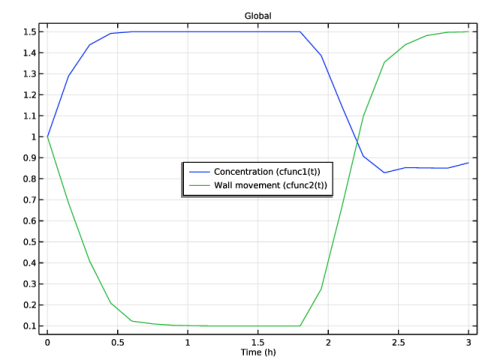
In the f(xstart) text field, type 1 to avoid setting unphysical initial conditions for the Time Dependent solver.
8
In the c0 text field, type 1.
9
Locate the Control Variable Discretization section. From the Control type list, choose Piecewise Bernstein polynomial.
10
In the Order text field, type 3 to increase the design freedom a bit.
Control Function 2 (cfunc2)
Right-click Control Function 1 (cfunc1) and choose Duplicate.
Use the control function to scale the concentration and wall movement.
Transport of Diluted Species (tds)
In the Model Builder window, expand the Component 1 (comp1) > Transport of Diluted Species (tds) node.
Transport of Diluted Species (tds)
Concentration 1
1
In the Model Builder window, expand the Component 1 (comp1) > Laminar Flow (spf) node, then click Component 1 (comp1) > Transport of Diluted Species (tds) > Concentration 1.
2
In the Settings window for Concentration, locate the Concentration section.
3
In the c0,cCuCl2 text field, type cCuCl2_bulk*cfunc1(t).
Laminar Flow (spf)
Wall 2
1
In the Model Builder window, under Component 1 (comp1) > Laminar Flow (spf) click Wall 2.
2
In the Settings window for Wall, click to expand the Wall Movement section.
3
Specify the utr vector as
Add a General Extrusion operator so that this can be used to construct an objective function that quantifies the asymmetry.
Definitions (comp1)
General Extrusion 1 (genext1)
1
In the Definitions toolbar, click  Nonlocal Couplings and choose General Extrusion.
2
In the Settings window for General Extrusion, locate the Source Selection section.
3
From the Geometric entity level list, choose Boundary.
4
From the Selection list, choose Bottom.
5
Locate the Destination Map section. In the x-expression text field, type -x.
6
In the y-expression text field, type Yg.
7
Locate the Source section. Select the Use source map checkbox.
8
In the yi-expression text field, type Yg.
Boundary Probe 2 (bnd2)
1
In the Definitions toolbar, click  Probes and choose Boundary Probe.
2
In the Settings window for Boundary Probe, type obj in the Variable name text field.
3
Locate the Source Selection section. Click  Clear Selection.
4
From the Selection list, choose Bottom.
5
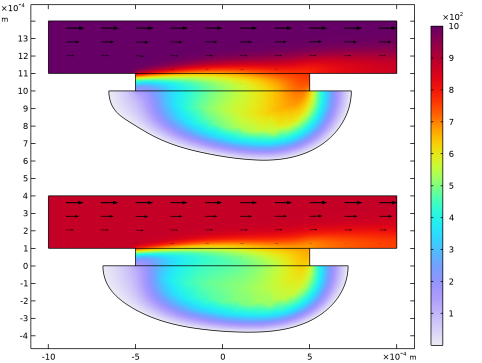
Locate the Expression section. In the Expression text field, type if(isnan(genext1(y)),0, (y-genext1(y))^2) to avoid contributions where the asymmetry prevents retrieval of a y coordinate for the comparison.
Add Study
1
In the Home toolbar, click  Windows and choose Add Study.
2
Go to the Add Study window.
3
Find the Studies subsection. In the Select Study tree, select General Studies > Stationary.
4
Click the Add Study button in the window toolbar.
5
In the Home toolbar, click  Add Study to close the Add Study window.
Study 1: Initial
Step 2: Time Dependent
1
In the Model Builder window, expand the Study 1: Initial node.
2
Right-click Study 1: Initial > Step 2: Time Dependent and choose Copy.
Study 2
In the Model Builder window, right-click Study 2 and choose Paste Time Dependent.
Step 1: Stationary
1
In the Settings window for Stationary, locate the Physics and Variables Selection section.
2
In the Solve for column of the table, under Component 1 (comp1), clear the checkbox for Deformed Geometry.
Shape Optimization
1
In the Study toolbar, click  Optimization and choose Shape Optimization.
2
In the Settings window for Shape Optimization, locate the Optimization Solver section.
3
From the Study step list, choose Time Dependent.
4
In the Move limits text field, type 0.2.
5
In the Maximum number of iterations text field, type 25.
6
Click Add Expression in the upper-right corner of the Objective Function section. From the menu, choose Component 1 (comp1) > Definitions > comp1.obj - Boundary Probe 2 - m².
7
Locate the Objective Function section. Find the Objective settings subsection. From the Objective scaling list, choose Initial solution based.
8
Click Add Expression in the upper-right corner of the Constraints section. From the menu, choose Component 1 (comp1) > Definitions > comp1.constr - Boundary Probe 1 - 1.
9
Locate the Constraints section. In the table, enter the following settings:
10
Click to expand the Output section. From the Probes list, choose None.
11
In the Model Builder window, click Study 2.
12
In the Settings window for Study, type Study 2: Optimization in the Label text field.
13
Locate the Study Settings section. Clear the Generate default plots checkbox.
14
In the Study toolbar, click  Get Initial Value.
Results
Concentration (tds), Deformed Geometry, Evaluation Group 1, Mesh, Pressure (spf), Velocity (spf)
1
In the Model Builder window, under Results, Ctrl-click to select Concentration (tds), Velocity (spf), Pressure (spf), Deformed Geometry, Mesh, and Evaluation Group 1.
2
Initial
In the Settings window for Group, type Initial in the Label text field.
Concentration (tds) 1
1
In the Model Builder window, right-click Concentration (tds) and choose Duplicate.
2
Expand the Results > Datasets node.
3
Right-click Concentration (tds) 1 and choose Move Out.
4
In the Model Builder window, click Concentration (tds) 1.
5
In the Settings window for 2D Plot Group, locate the Data section.
6
From the Dataset list, choose Study 2: Optimization/Solution 3 (sol3).
Study 2: Optimization
Shape Optimization
1
In the Model Builder window, under Study 2: Optimization click Shape Optimization.
2
In the Settings window for Shape Optimization, locate the Output section.
3
Select the Plot checkbox.
4
From the Plot group list, choose Concentration (tds) 1.
Solver Configurations
In the Model Builder window, expand the Study 2: Optimization > Solver Configurations node.
Solution 3 (sol3)
1
In the Model Builder window, expand the Study 2: Optimization > Solver Configurations > Solution 3 (sol3) node, then click Optimization Solver 1.
2
In the Settings window for Optimization Solver, locate the Optimization Solver section.
3
Clear the Globally Convergent MMA checkbox.
4
Click to expand the Advanced section. From the Compensate for nojac terms list, choose Off to avoid warnings in the log.
5
In the Model Builder window, expand the Study 2: Optimization > Solver Configurations > Solution 3 (sol3) > Optimization Solver 1 > Time-Dependent Solver 1 node, then click Advanced.
6
In the Settings window for Advanced, click to expand the Assembly Settings section.
7
Clear the Reuse sparsity pattern checkbox to avoid warnings in the log.
8
In the Study toolbar, click  Compute.
Results
Add a plot to visualize the concentration and wall movement as a function of time.
Control Functions
1
In the Results toolbar, click  1D Plot Group.
2
In the Settings window for 1D Plot Group, type Control Functions in the Label text field.
3
Locate the Data section. From the Dataset list, choose Study 2: Optimization/Solution 3 (sol3).
4
Locate the Legend section. From the Position list, choose Center.
Global 1
1
Right-click Control Functions and choose Global.
2
In the Settings window for Global, locate the y-Axis Data section.
3
4
Locate the x-Axis Data section. From the Unit list, choose h.
5
Click to expand the Legends section. Find the Include subsection. Clear the Solution checkbox.
6
Select the Expression checkbox.
7
In the Control Functions toolbar, click  Plot.
Use a Transformation dataset to simplify the construction of a thumbnail plot showing the initial and optimized profile together.
Transformation 2D 1
1
In the Results toolbar, click  More Datasets and choose Transformation 2D.
2
In the Settings window for Transformation 2D, locate the Transformation section.
3
Select the Move checkbox.
4
In the y text field, type 10*h_mask.
Concentration (tds) 1
In the Model Builder window, expand the Results > Concentration (tds) 1 node.
Arrow Surface 1, Surface 1
1
In the Model Builder window, under Results > Concentration (tds) 1, Ctrl-click to select Surface 1 and Arrow Surface 1.
2
Surface 2
1
In the Settings window for Surface, locate the Data section.
2
From the Dataset list, choose Transformation 2D 1.
3
Click to expand the Inherit Style section. From the Plot list, choose Surface 1.
Arrow Surface 2
1
In the Model Builder window, click Arrow Surface 2.
2
In the Settings window for Arrow Surface, locate the Data section.
3
From the Dataset list, choose Transformation 2D 1.
4
In the Concentration (tds) 1 toolbar, click  Plot.
Surface 2
1
In the Model Builder window, click Surface 2.
2
Thumbnail
1
In the Model Builder window, under Results click Concentration (tds) 1.
2
In the Settings window for 2D Plot Group, type Thumbnail in the Label text field.
3
Click to expand the Title section. From the Title type list, choose None.
Line 1
1
Right-click Thumbnail and choose Line.
2
In the Settings window for Line, locate the Data section.
3
From the Dataset list, choose Transformation 2D 1.
4
Locate the Expression section. In the Expression text field, type 1.
5
Locate the Coloring and Style section. From the Coloring list, choose Uniform.
6
From the Color list, choose Black.
7
In the Thumbnail toolbar, click  Plot.
Concentration (tds)
1
In the Model Builder window, under Results > Initial click Concentration (tds).
2
In the Concentration (tds) toolbar, click  Plot.