
|
|
|

|
•
|
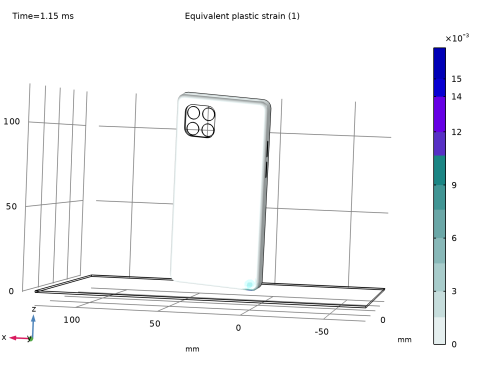
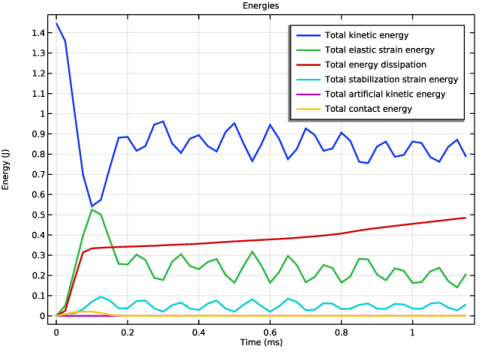
The Solid Mechanics, Explicit Dynamics interface along with the Explicit Dynamics study step automatically sets up explicit time stepping and provides automatic evaluation of the stable time step.
|
|
•
|
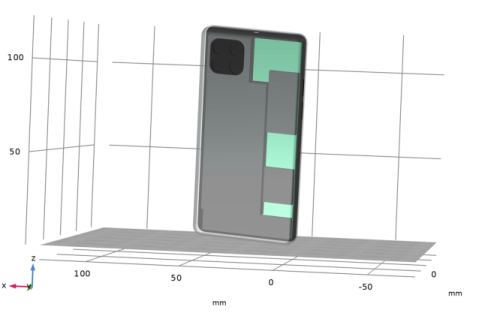
An Interior Contact node is added to model the contact between the screen and its support.
|
|
•
|
An Artificial Viscosity node is added to partially damp out the energy of the impact.
|
|
•
|
A Mass scaling node is added to inject localized artificial density where small elements would otherwise limit the stable time step.
|
|
•
|
Attachments between the internal components and the case are modeled by a Continuity condition. This allows nonconforming meshes at each interface, which in turn makes it easier to be better control of the mesh size and quality of each component.
|
|
1
|
|
2
|
In the Select Physics tree, select Structural Mechanics > Explicit Dynamics > Solid Mechanics, Explicit Dynamics (solid).
|
|
3
|
Click Add.
|
|
4
|
Click
|
|
5
|
In the Select Study tree, select Preset Studies for Selected Physics Interfaces > Explicit Dynamics.
|
|
6
|
Click
|
|
1
|
|
2
|
|
3
|
|
4
|
|
5
|
Browse to the model’s Application Libraries folder and double-click the file phone_drop_test_geom_sequence.mph.
|
|
6
|
In the Insert Sequence dialog, select Case and Screen in the Select geometry sequence to insert list.
|
|
7
|
Click OK.
|
|
8
|
|
9
|
|
1
|
In the Model Builder window, under Global Definitions right-click Geometry Parts and choose 3D Part.
|
|
2
|
|
3
|
|
4
|
Browse to the model’s Application Libraries folder and double-click the file phone_drop_test_geom_sequence.mph.
|
|
5
|
|
6
|
Click OK.
|
|
7
|
|
8
|
|
1
|
|
2
|
|
3
|
|
4
|
Browse to the model’s Application Libraries folder and double-click the file phone_drop_test_geom_sequence.mph.
|
|
5
|
|
6
|
Click OK.
|
|
7
|
|
8
|
|
1
|
|
2
|
|
3
|
|
4
|
Browse to the model’s Application Libraries folder and double-click the file phone_drop_test_geom_sequence.mph.
|
|
5
|
In the Insert Sequence dialog, select Other Components in the Select geometry sequence to insert list.
|
|
6
|
Click OK.
|
|
7
|
|
8
|
|
1
|
|
2
|
|
3
|
|
4
|
|
1
|
|
2
|
|
1
|
|
2
|
|
3
|
|
4
|
|
5
|
|
6
|
|
7
|
Click
|
|
1
|
|
2
|
|
3
|
|
4
|
|
5
|
|
6
|
|
7
|
Click to expand the Boundary Selections section. In the table, select the Keep checkbox for Camera - Attachments.
|
|
8
|
Click
|
|
1
|
|
2
|
|
3
|
|
4
|
|
5
|
|
6
|
Locate the Domain Selections section. In the table, select the Keep checkboxes for Other 1, Other 2, and Other Components.
|
|
7
|
Locate the Boundary Selections section. In the table, select the Keep checkbox for Board - Attachments.
|
|
8
|
Click
|
|
1
|
|
2
|
|
3
|
|
4
|
|
5
|
|
6
|
Click
|
|
1
|
|
2
|
|
3
|
|
4
|
|
5
|
|
6
|
|
7
|
|
8
|
Click
|
|
9
|
Click in the Graphics window and then press Ctrl+D to clear all objects.
|
|
1
|
|
2
|
|
3
|
|
4
|
|
5
|
|
6
|
|
7
|
|
8
|
Click
|
|
1
|
|
2
|
|
3
|
|
4
|
Clear the Create pairs checkbox.
|
|
5
|
Click
|
|
1
|
|
2
|
|
3
|
|
4
|
In the Paste Selection dialog, type 22, 27, 32, 34, 42, 43, 45, 52, 57, 64, 65, 69, 70, 78, 84, 91, 95, 97, 174, 179, 181, 205, 280, 288, 295, 298, 299, 301-307, 311, 323, 330, 347, 423, 440, 445, 447 in the Selection text field.
|
|
5
|
Click OK.
|
|
6
|
|
1
|
|
2
|
|
3
|
|
4
|
|
5
|
Click OK.
|
|
1
|
|
2
|
|
3
|
|
4
|
In the Paste Selection dialog, type 101, 106, 108, 113, 117, 122, 123, 128 in the Selection text field.
|
|
5
|
Click OK.
|
|
6
|
|
1
|
|
2
|
|
3
|
|
4
|
In the Paste Selection dialog, type 114, 120, 161, 162, 164, 165, 173-176, 181, 182, 184, 185, 193-196 in the Selection text field.
|
|
5
|
Click OK.
|
|
6
|
|
1
|
|
2
|
|
3
|
|
4
|
In the Paste Selection dialog, type 23, 25, 31, 36, 38, 43, 49, 51, 79, 82, 97, 100, 115, 118, 133, 136, 143, 164, 173, 176, 191, 194, 209, 212, 227, 230 in the Selection text field.
|
|
5
|
Click OK.
|
|
6
|
|
7
|
|
1
|
|
2
|
|
3
|
|
4
|
|
5
|
In the Add dialog, in the Selections to add list, choose Camera - Attachments (Camera 1) and Board - Attachments (Other Components 1).
|
|
6
|
Click OK.
|
|
7
|
|
1
|
|
2
|
|
3
|
In the Settings window for Domain Probe, type Domain Probe: Battery Vibration in the Label text field.
|
|
4
|
|
5
|
|
6
|
|
1
|
|
2
|
|
4
|
|
1
|
|
2
|
In the Settings window for Pair, type Contact Pair: Case-Internal Components in the Label text field.
|
|
3
|
Click in the Graphics window and then press Ctrl+A to select all boundaries.
|
|
4
|
|
5
|
|
6
|
|
7
|
Click OK.
|
|
8
|
|
9
|
Click to select the
|
|
10
|
Click
|
|
11
|
In the Paste Selection dialog, type 81-87, 91, 93-97, 99-103, 105-108, 111-114, 116, 117, 119, 120, 122, 123, 126, 149 in the Selection text field.
|
|
12
|
Click OK.
|
|
1
|
|
2
|
In the Settings window for Pair, type Identity Boundary Pair: Board-Internal Components in the Label text field.
|
|
4
|
|
6
|
|
7
|
|
1
|
|
2
|
|
3
|
|
4
|
|
5
|
Click OK.
|
|
6
|
|
7
|
Click
|
|
8
|
|
9
|
Click OK.
|
|
10
|
|
11
|
|
12
|
|
1
|
|
2
|
|
3
|
|
4
|
|
6
|
|
7
|
|
1
|
|
2
|
In the Settings window for Pair, type Identity Boundary Pair: Battery Attachment in the Label text field.
|
|
3
|
|
4
|
|
5
|
Click OK.
|
|
6
|
|
7
|
Click to select the
|
|
8
|
Click
|
|
9
|
|
10
|
Click OK.
|
|
11
|
|
12
|
|
13
|
|
1
|
|
2
|
Go to the Add Material window.
|
|
3
|
|
4
|
Click the Add to Component button in the window toolbar.
|
|
1
|
|
2
|
Click
|
|
1
|
Go to the Add Material window.
|
|
2
|
|
3
|
Click the Add to Component button in the window toolbar.
|
|
2
|
|
1
|
Go to the Add Material window.
|
|
2
|
|
3
|
Click the Add to Component button in the window toolbar.
|
|
1
|
|
2
|
|
1
|
Go to the Add Material window.
|
|
2
|
|
3
|
Click the Add to Component button in the window toolbar.
|
|
1
|
Go to the Add Material window.
|
|
2
|
|
3
|
Click the Add to Component button in the window toolbar.
|
|
1
|
Go to the Add Material window.
|
|
2
|
|
3
|
Click the Add to Component button in the window toolbar.
|
|
4
|
|
1
|
|
2
|
|
3
|
|
4
|
Locate the Material Contents section. In the table, enter the following settings:
|
|
1
|
In the Model Builder window, under Component 1 (comp1) click Solid Mechanics, Explicit Dynamics (solid).
|
|
3
|
In the Settings window for Solid Mechanics, Explicit Dynamics, click to expand the Energy Dissipation section.
|
|
4
|
|
1
|
In the Model Builder window, under Component 1 (comp1) > Solid Mechanics, Explicit Dynamics (solid) click Initial Values 1.
|
|
2
|
|
3
|
In the structural velocity field vector, enter
|
|
1
|
|
2
|
|
3
|
Click
|
|
1
|
|
2
|
|
1
|
|
2
|
|
3
|
Find the Damage evolution subsection. From the σp list, choose User defined. In the associated text field, type 14e6.
|
|
4
|
|
5
|
|
1
|
|
1
|
|
2
|
|
3
|
|
4
|
|
1
|
|
2
|
|
3
|
|
1
|
|
2
|
|
3
|
Click
|
|
4
|
|
5
|
Click OK.
|
|
6
|
|
7
|
|
1
|
|
2
|
|
3
|
Click the Custom button.
|
|
4
|
|
5
|
|
6
|
|
7
|
|
8
|
|
1
|
|
2
|
|
3
|
Click
|
|
4
|
|
5
|
Click OK.
|
|
6
|
|
7
|
|
1
|
|
2
|
|
3
|
Click
|
|
4
|
|
5
|
Click OK.
|
|
6
|
|
7
|
|
1
|
|
2
|
|
3
|
Click
|
|
4
|
|
5
|
Click OK.
|
|
6
|
|
7
|
|
8
|
Click
|
|
1
|
|
2
|
|
3
|
Click
|
|
4
|
|
5
|
Click OK.
|
|
6
|
|
7
|
|
8
|
Click
|
|
1
|
|
2
|
|
3
|
Click
|
|
4
|
|
5
|
Click OK.
|
|
6
|
|
7
|
Click
|
|
8
|
|
9
|
Click OK.
|
|
10
|
|
1
|
|
2
|
|
3
|
Click
|
|
4
|
|
5
|
Click OK.
|
|
6
|
|
7
|
Click
|
|
8
|
|
9
|
Click OK.
|
|
10
|
|
1
|
|
2
|
|
3
|
Click
|
|
4
|
In the Paste Selection dialog, type 150-156, 158-162, 164-173, 175-177, 179-184, 186-188, 190, 193, 195, 197, 200, 202-208, 211, 215-219 in the Selection text field.
|
|
5
|
Click OK.
|
|
6
|
|
7
|
Select the Adjust edge mesh checkbox.
|
|
1
|
|
2
|
|
3
|
Click
|
|
4
|
|
5
|
Click OK.
|
|
6
|
|
7
|
|
8
|
Click
|
|
1
|
|
2
|
|
3
|
Click
|
|
4
|
|
5
|
Click OK.
|
|
6
|
|
7
|
Select the Adjust edge mesh checkbox.
|
|
8
|
Click
|
|
1
|
|
2
|
|
3
|
Click
|
|
4
|
|
5
|
Click OK.
|
|
6
|
|
7
|
|
1
|
|
3
|
|
4
|
|
5
|
Click
|
|
1
|
|
2
|
|
3
|
Click
|
|
4
|
|
5
|
Click OK.
|
|
6
|
|
7
|
Click
|
|
8
|
|
9
|
Click OK.
|
|
10
|
|
1
|
|
2
|
|
3
|
|
4
|
Click
|
|
5
|
In the Paste Selection dialog, type 2, 23-25, 28-31, 33, 34, 36-43, 45-51, 53-59 in the Selection text field.
|
|
6
|
Click OK.
|
|
1
|
|
2
|
|
3
|
Click
|
|
4
|
Click
|
|
5
|
In the Paste Selection dialog, type 2 23 28 29 30 33 36 37 38 39 40 41 43 45 46 47 48 49 51 53 54 55 58 59 in the Selection text field.
|
|
6
|
Click OK.
|
|
7
|
|
8
|
|
9
|
Click
|
|
1
|
|
2
|
|
3
|
Click
|
|
4
|
|
5
|
Click OK.
|
|
6
|
|
1
|
|
2
|
|
3
|
|
4
|
Click
|
|
5
|
|
6
|
Click OK.
|
|
7
|
|
1
|
|
2
|
|
3
|
Click
|
|
4
|
|
5
|
Click OK.
|
|
6
|
|
1
|
|
2
|
|
3
|
Click
|
|
4
|
|
5
|
Click OK.
|
|
6
|
|
1
|
|
2
|
|
3
|
|
4
|
Click
|
|
5
|
|
6
|
Click OK.
|
|
1
|
|
2
|
|
3
|
|
4
|
Click
|
|
1
|
|
2
|
|
3
|
|
4
|
Click
|
|
5
|
|
6
|
Click OK.
|
|
7
|
|
8
|
|
1
|
|
2
|
|
3
|
Click
|
|
4
|
Click
|
|
5
|
|
6
|
Click OK.
|
|
7
|
|
8
|
|
9
|
Click
|
|
1
|
|
2
|
|
1
|
|
2
|
|
3
|
Clear the Generate default plots checkbox.
|
|
1
|
|
2
|
|
3
|
|
4
|
|
5
|
Click to expand the Results While Solving section. From the Update at list, choose Time steps taken by solver.
|
|
6
|
|
1
|
|
2
|
Go to the Result Templates window.
|
|
3
|
In the tree, select Study 1/Solution 1 (sol1) > Solid Mechanics, Explicit Dynamics > Cell Time (solid).
|
|
4
|
Click the Add Result Template button in the window toolbar.
|
|
5
|
|
1
|
|
3
|
|
4
|
|
1
|
|
2
|
|
3
|
|
4
|
|
1
|
|
2
|
Go to the Result Templates window.
|
|
3
|
In the tree, select Study 1/Solution 1 (sol1) > Solid Mechanics, Explicit Dynamics > Equivalent Plastic Strain (solid).
|
|
4
|
Click the Add Result Template button in the window toolbar.
|
|
5
|
|
1
|
|
2
|
|
3
|
|
4
|
Click OK.
|
|
1
|
|
2
|
|
3
|
|
4
|
|
5
|
|
6
|
|
7
|
|
8
|
|
9
|
|
10
|
|
11
|
|
12
|
|
13
|
|
14
|
|
15
|
|
1
|
|
2
|
|
3
|
|
4
|
|
1
|
|
2
|
|
3
|
|
1
|
|
2
|
|
3
|
|
4
|
|
5
|
|
6
|
|
7
|
|
8
|
|
1
|
|
2
|
|
3
|
Locate the Plot Settings section.
|
|
4
|
|
5
|
|
1
|
|
2
|
|
4
|
|
5
|
|
1
|
|
2
|
|
3
|
|
4
|
|
5
|
|
1
|
|
2
|
|
3
|
|
1
|
|
1
|
|
2
|
|
3
|
|
4
|
|
1
|
|
2
|
|
3
|
|
1
|
|
2
|
|
3
|
|
4
|
|
5
|
|
6
|
|
7
|
|
8
|
|
1
|
|
2
|
|
3
|
|
1
|
|
1
|
|
2
|
|
3
|
|
4
|
|
1
|
|
2
|
|
3
|
|
4
|
Clear the Casts shadows checkbox.
|
|
1
|
|
2
|
|
3
|
|
1
|
|
2
|
|
3
|
|
1
|
|
2
|
|
3
|
|
1
|
|
2
|
|
3
|
|
1
|
|
1
|
In the Model Builder window, right-click Battery and Internal Components and choose Material Appearance.
|
|
2
|
|
3
|
|
4
|
|
1
|
|
2
|
|
3
|
|
1
|
|
2
|
Click
|
|
1
|
|
2
|
|
3
|
|
4
|
|
1
|
|
2
|
|
3
|
|
4
|
|
5
|
|
6
|
Click
|
|
1
|
|
2
|
On the object r1, select Points 1–4 only.
|
|
3
|
|
4
|
|
5
|
Click
|
|
1
|
|
2
|
Select the object fil1 only.
|
|
3
|
|
4
|
|
5
|
|
6
|
Click
|
|
1
|
|
2
|
|
4
|
Click
|
|
5
|
|
1
|
|
2
|
|
3
|
|
4
|
|
5
|
In the Paste Selection dialog, type ext1: 10, 11, 15, 21, 24, 33, 36, 42 in the Selection text field.
|
|
6
|
Click OK.
|
|
1
|
|
2
|
Select the object proj1 only.
|
|
1
|
In the Model Builder window, under Global Definitions > Geometry Parts > Case and Screen click Work Plane 2 (wp2).
|
|
2
|
|
1
|
|
2
|
|
4
|
Click
|
|
1
|
|
2
|
|
3
|
|
4
|
|
5
|
Click OK.
|
|
6
|
|
7
|
|
8
|
Click
|
|
1
|
|
2
|
Click in the Graphics window and then press Ctrl+A to select both objects.
|
|
3
|
|
1
|
|
2
|
|
3
|
|
4
|
On the object uni1, select Boundary 5 only.
|
|
1
|
|
2
|
|
3
|
|
4
|
|
5
|
In the Paste Selection dialog, type uni1: 17, 18, 23, 32, 38, 50, 56, 65 in the Selection text field.
|
|
6
|
Click OK.
|
|
7
|
|
1
|
|
2
|
Select the object proj1 only.
|
|
3
|
|
4
|
|
5
|
Click
|
|
1
|
|
2
|
|
3
|
Select the Reverse direction checkbox.
|
|
4
|
Click
|
|
1
|
|
2
|
Select the object uni1 only.
|
|
3
|
|
4
|
|
5
|
Select the object ext3 only.
|
|
6
|
Click
|
|
1
|
|
2
|
|
3
|
|
1
|
|
2
|
|
3
|
|
4
|
|
5
|
In the Paste Selection dialog, type dif1: 14, 15, 18, 38, 52, 62, 76, 91 in the Selection text field.
|
|
6
|
Click OK.
|
|
7
|
|
1
|
|
2
|
Select the object proj1 only.
|
|
3
|
|
1
|
|
2
|
|
4
|
Select the Reverse direction checkbox.
|
|
5
|
Click
|
|
1
|
|
2
|
|
3
|
|
4
|
On the object dif1, select Boundary 20 only.
|
|
1
|
|
2
|
|
3
|
|
4
|
|
5
|
|
6
|
|
7
|
|
8
|
Click
|
|
1
|
|
2
|
On the object r1, select Points 1–4 only.
|
|
3
|
|
4
|
|
5
|
Click
|
|
1
|
|
2
|
Select the object fil1 only.
|
|
3
|
|
4
|
|
5
|
|
6
|
Click
|
|
1
|
|
2
|
Click in the Graphics window and then press Ctrl+A to select all objects.
|
|
3
|
|
4
|
Select the Keep input objects checkbox.
|
|
5
|
Click
|
|
1
|
|
2
|
|
3
|
|
4
|
|
5
|
|
6
|
|
7
|
Click
|
|
1
|
|
2
|
On the object r2, select Points 1–4 only.
|
|
3
|
|
4
|
|
5
|
Click
|
|
1
|
|
2
|
|
4
|
Select the Reverse direction checkbox.
|
|
5
|
Click
|
|
1
|
|
2
|
Select the object dif1 only.
|
|
3
|
|
4
|
|
5
|
Select the object ext5 only.
|
|
6
|
Click
|
|
1
|
|
2
|
|
3
|
|
4
|
On the object dif2, select Boundary 1 only.
|
|
1
|
|
2
|
|
3
|
|
4
|
|
5
|
|
6
|
|
7
|
|
8
|
Click
|
|
1
|
|
2
|
On the object r1, select Points 1–4 only.
|
|
3
|
|
4
|
|
5
|
Click
|
|
1
|
|
2
|
Select the object fil1 only.
|
|
3
|
|
4
|
|
5
|
|
6
|
Click
|
|
1
|
|
2
|
|
4
|
Select the Reverse direction checkbox.
|
|
5
|
Click
|
|
1
|
|
2
|
Select the object dif2 only.
|
|
3
|
|
4
|
|
5
|
Select the object ext6 only.
|
|
6
|
Click
|
|
1
|
|
2
|
|
3
|
|
4
|
On the object ext4, select Boundary 7 only.
|
|
1
|
|
2
|
|
3
|
|
4
|
|
5
|
|
6
|
|
7
|
Click
|
|
1
|
|
2
|
On the object r1, select Points 1–4 only.
|
|
3
|
|
4
|
|
5
|
Click
|
|
1
|
|
2
|
|
3
|
Select the Reverse direction checkbox.
|
|
4
|
Click
|
|
1
|
|
2
|
Select the object ext4 only.
|
|
3
|
|
4
|
|
5
|
Select the object ext7 only.
|
|
6
|
Click
|
|
1
|
|
2
|
|
3
|
|
4
|
On the object dif3, select Boundary 30 only.
|
|
1
|
|
2
|
|
3
|
|
4
|
|
5
|
|
6
|
|
7
|
|
8
|
Click
|
|
1
|
|
2
|
On the object r1, select Points 1–4 only.
|
|
3
|
|
4
|
|
5
|
Click
|
|
1
|
|
2
|
|
4
|
Select the Reverse direction checkbox.
|
|
5
|
Click
|
|
1
|
|
2
|
Select the object dif3 only.
|
|
3
|
|
4
|
|
5
|
Select the object ext8 only.
|
|
6
|
Click
|
|
1
|
|
2
|
On the object dif5, select Domain 1 only.
|
|
3
|
|
4
|
|
5
|
|
6
|
|
7
|
Click OK.
|
|
8
|
|
1
|
|
2
|
|
3
|
|
4
|
On the object pard1, select Point 3 only.
|
|
5
|
|
6
|
On the object pard1, select Point 1 only.
|
|
7
|
|
8
|
|
9
|
On the object pard1, select Point 29 only.
|
|
1
|
|
2
|
|
3
|
|
4
|
On the object pard1, select Point 21 only.
|
|
5
|
|
6
|
On the object pard1, select Point 20 only.
|
|
7
|
|
8
|
On the object pard1, select Point 48 only.
|
|
1
|
|
2
|
|
3
|
|
4
|
|
5
|
Click OK.
|
|
6
|
|
7
|
|
8
|
Click
|
|
1
|
|
2
|
|
3
|
|
4
|
|
5
|
Click OK.
|
|
6
|
|
1
|
|
2
|
|
3
|
|
4
|
On the object pard3, select Point 50 only.
|
|
5
|
|
6
|
On the object pard3, select Point 49 only.
|
|
7
|
|
8
|
On the object pard3, select Point 56 only.
|
|
9
|
Click
|
|
1
|
|
2
|
|
3
|
|
4
|
On the object pard3, select Point 190 only.
|
|
5
|
|
6
|
On the object pard3, select Point 189 only.
|
|
7
|
|
8
|
On the object pard3, select Point 195 only.
|
|
9
|
Click
|
|
1
|
|
2
|
|
3
|
|
4
|
|
5
|
Click OK.
|
|
6
|
|
1
|
|
2
|
|
3
|
|
4
|
|
5
|
Click OK.
|
|
6
|
|
7
|
|
8
|
Click
|
|
1
|
|
2
|
|
3
|
|
4
|
On the object pard5, select Point 188 only.
|
|
5
|
|
6
|
On the object pard5, select Point 186 only.
|
|
7
|
|
8
|
On the object pard5, select Point 187 only.
|
|
1
|
|
2
|
|
3
|
|
4
|
On the object pard5, select Point 152 only.
|
|
5
|
|
6
|
On the object pard5, select Point 150 only.
|
|
7
|
|
8
|
On the object pard5, select Point 151 only.
|
|
1
|
|
2
|
|
3
|
|
4
|
On the object pard5, select Domain 17 only.
|
|
5
|
Click
|
|
1
|
|
2
|
On the object pard6, select Domain 17 only.
|
|
3
|
|
1
|
|
2
|
|
3
|
|
4
|
On the object pard7, select Point 200 only.
|
|
5
|
|
6
|
On the object pard7, select Point 199 only.
|
|
7
|
|
8
|
On the object pard7, select Point 132 only.
|
|
1
|
|
2
|
|
3
|
|
4
|
On the object pard7, select Point 198 only.
|
|
5
|
|
6
|
On the object pard7, select Point 197 only.
|
|
7
|
|
8
|
On the object pard7, select Point 130 only.
|
|
1
|
|
2
|
|
3
|
|
4
|
On the object pard7, select Domains 17 and 24 only.
|
|
5
|
Click
|
|
1
|
|
2
|
On the object pard8, select Domains 17 and 25 only.
|
|
3
|
|
1
|
|
2
|
|
3
|
|
4
|
On the object dif4, select Point 27 only.
|
|
5
|
|
6
|
On the object dif4, select Point 25 only.
|
|
7
|
|
8
|
On the object dif4, select Point 22 only.
|
|
1
|
|
2
|
|
3
|
|
4
|
On the object dif4, select Point 21 only.
|
|
5
|
|
6
|
On the object dif4, select Point 19 only.
|
|
7
|
|
8
|
On the object dif4, select Point 16 only.
|
|
1
|
|
2
|
|
3
|
|
4
|
On the object dif4, select Domains 1 and 2 only.
|
|
5
|
Click
|
|
1
|
|
2
|
On the object pard10, select Domains 1 and 2 only.
|
|
3
|
|
1
|
|
2
|
On the object pard9, select Edge 351 only.
|
|
3
|
|
1
|
|
2
|
On the object pare1, select Boundary 180 only.
|
|
3
|
|
4
|
|
5
|
On the object pare1, select Points 201 and 220 only.
|
|
6
|
Click
|
|
1
|
|
2
|
On the object parf1, select Edge 129 only.
|
|
3
|
|
5
|
Click
|
|
1
|
|
2
|
On the object pare2, select Edges 124 and 134 only.
|
|
3
|
|
4
|
|
5
|
On the object pare2, select Point 133 only.
|
|
6
|
Click
|
|
1
|
|
2
|
On the object pare3, select Edge 283 only.
|
|
3
|
|
5
|
Click
|
|
1
|
|
2
|
On the object pare4, select Edges 118, 346, and 392 only.
|
|
3
|
|
4
|
|
5
|
On the object pare4, select Point 158 only.
|
|
6
|
Click
|
|
1
|
|
2
|
On the object pare5, select Boundaries 79, 150, and 175 only.
|
|
3
|
|
4
|
|
5
|
On the object pare5, select Points 59, 159, 200, and 222 only.
|
|
6
|
Click
|
|
1
|
|
2
|
On the object parf2, select Boundaries 84 and 88 only.
|
|
3
|
|
4
|
|
5
|
On the object parf2, select Points 134–136 only.
|
|
6
|
Click
|
|
1
|
|
2
|
On the object parf3, select Edges 119 and 123 only.
|
|
3
|
|
4
|
|
5
|
On the object parf3, select Point 134 only.
|
|
6
|
Click
|
|
1
|
|
2
|
On the object pare6, select Boundaries 79 and 81 only.
|
|
3
|
|
4
|
|
5
|
On the object pare6, select Points 134–136 only.
|
|
6
|
Click
|
|
1
|
|
2
|
On the object parf4, select Edges 258, 262, and 362 only.
|
|
3
|
|
4
|
|
5
|
On the object parf4, select Points 135, 138, and 224 only.
|
|
6
|
Click
|
|
1
|
|
2
|
On the object pare7, select Boundaries 138, 140, and 183 only.
|
|
3
|
|
4
|
|
5
|
On the object pare7, select Points 135, 138, 143, 144, 211, and 227 only.
|
|
6
|
Click
|
|
1
|
|
2
|
On the object parf5, select Edge 7 only.
|
|
3
|
|
4
|
|
5
|
On the object parf5, select Points 6, 8, 14, and 16 only.
|
|
6
|
Click
|
|
1
|
|
2
|
On the object pare8, select Edge 2 only.
|
|
3
|
|
4
|
|
5
|
On the object pare8, select Points 6, 9, 16, and 19 only.
|
|
6
|
Click
|
|
1
|
|
2
|
On the object pare9, select Boundary 1 only.
|
|
3
|
|
4
|
|
5
|
On the object pare9, select Points 6 and 9 only.
|
|
6
|
Click
|
|
1
|
|
2
|
On the object parf6, select Boundary 19 only.
|
|
3
|
|
4
|
|
5
|
On the object parf6, select Points 10 and 13 only.
|
|
6
|
Click
|
|
1
|
|
2
|
On the object parf7, select Boundary 23 only.
|
|
3
|
|
4
|
|
5
|
On the object parf7, select Points 18 and 21 only.
|
|
6
|
Click
|
|
1
|
|
2
|
On the object parf8, select Boundary 30 only.
|
|
3
|
|
4
|
|
5
|
On the object parf8, select Points 22 and 25 only.
|
|
6
|
Click
|
|
1
|
|
2
|
On the object parf9, select Edges 13, 34, 37, and 58 only.
|
|
3
|
|
1
|
|
2
|
On the object pare10, select Boundary 23 only.
|
|
3
|
|
4
|
|
5
|
On the object pare10, select Points 16 and 19 only.
|
|
6
|
Click
|
|
1
|
|
2
|
On the object parf10, select Edges 28, 34, and 38 only.
|
|
3
|
|
1
|
|
2
|
On the object pare11, select Boundaries 23 and 25 only.
|
|
3
|
|
4
|
|
5
|
On the object pare11, select Points 18–20 only.
|
|
6
|
Click
|
|
1
|
|
2
|
On the object parf11, select Edge 7 only.
|
|
3
|
|
5
|
Click
|
|
1
|
|
2
|
On the object pare12, select Edge 67 only.
|
|
3
|
|
5
|
Click
|
|
1
|
|
2
|
On the object pare13, select Edges 2 and 61 only.
|
|
3
|
|
4
|
|
5
|
On the object pare13, select Points 4 and 36 only.
|
|
6
|
Click
|
|
1
|
|
2
|
On the object pare14, select Boundaries 1 and 37 only.
|
|
3
|
|
4
|
|
5
|
On the object pare14, select Points 4, 5, 37, and 38 only.
|
|
6
|
Click
|
|
1
|
|
2
|
On the object parf12, select Edges 13 and 74 only.
|
|
3
|
|
4
|
|
5
|
On the object parf12, select Points 7 and 35 only.
|
|
6
|
Click
|
|
1
|
|
2
|
On the object pare15, select Boundaries 16 and 38 only.
|
|
3
|
|
4
|
|
5
|
On the object pare15, select Points 5, 8, 36, and 39 only.
|
|
6
|
Click
|
|
1
|
|
2
|
On the object parf13, select Edges 136 and 139 only.
|
|
3
|
|
5
|
Click
|
|
1
|
|
2
|
On the object pare16, select Edges 139 and 193 only.
|
|
3
|
|
4
|
|
5
|
On the object pare16, select Points 95 and 224 only.
|
|
6
|
Click
|
|
1
|
|
2
|
On the object pare17, select Boundary 75 only.
|
|
3
|
|
4
|
|
5
|
On the object pare17, select Points 95, 96, 225, and 226 only.
|
|
6
|
Click
|
|
1
|
|
2
|
On the object parf14, select Edge 194 only.
|
|
3
|
|
4
|
|
5
|
On the object parf14, select Points 147 and 151 only.
|
|
6
|
Click
|
|
1
|
|
2
|
On the object pare18, select Edge 195 only.
|
|
3
|
|
4
|
|
5
|
On the object pare18, select Points 149 and 154 only.
|
|
6
|
Click
|
|
1
|
|
2
|
On the object pare19, select Boundary 120 only.
|
|
3
|
|
4
|
|
5
|
On the object pare19, select Points 147, 150, 153, and 156 only.
|
|
6
|
Click
|
|
1
|
|
2
|
On the object parf15, select Edges 195 and 284 only.
|
|
3
|
|
5
|
Click
|
|
1
|
|
2
|
On the object pare20, select Edges 194 and 291 only.
|
|
3
|
|
4
|
|
5
|
On the object pare20, select Points 145 and 172 only.
|
|
6
|
Click
|
|
1
|
|
2
|
On the object pare21, select Boundaries 120 and 151 only.
|
|
3
|
|
4
|
|
5
|
On the object pare21, select Points 145, 146, 173, and 174 only.
|
|
6
|
Click
|
|
1
|
In the Model Builder window, under Global Definitions > Geometry Parts > Case and Screen, Ctrl-click to select Partition Domains 1 (pard1), Work Plane 9 (wp9), Work Plane 10 (wp10), Partition Domains 2 (pard2), Partition Domains 3 (pard3), Work Plane 11 (wp11), Work Plane 12 (wp12), Partition Domains 4 (pard4), Partition Domains 5 (pard5), Work Plane 13 (wp13), Work Plane 14 (wp14), Partition Domains 6 (pard6), Partition Domains 7 (pard7), Work Plane 15 (wp15), Work Plane 16 (wp16), Partition Domains 8 (pard8), Partition Domains 9 (pard9), Work Plane 17 (wp17), Work Plane 18 (wp18), Partition Domains 10 (pard10), Partition Domains 11 (pard11), Partition Edges 1 (pare1), Partition Faces 1 (parf1), Partition Edges 2 (pare2), Partition Edges 3 (pare3), Partition Edges 4 (pare4), Partition Edges 5 (pare5), Partition Faces 2 (parf2), Partition Faces 3 (parf3), Partition Edges 6 (pare6), Partition Faces 4 (parf4), Partition Edges 7 (pare7), Partition Faces 5 (parf5), Partition Edges 8 (pare8), Partition Edges 9 (pare9), Partition Faces 6 (parf6), Partition Faces 7 (parf7), Partition Faces 8 (parf8), Partition Faces 9 (parf9), Partition Edges 10 (pare10), Partition Faces 10 (parf10), Partition Edges 11 (pare11), Partition Faces 11 (parf11), Partition Edges 12 (pare12), Partition Edges 13 (pare13), Partition Edges 14 (pare14), Partition Faces 12 (parf12), Partition Edges 15 (pare15), Partition Faces 13 (parf13), Partition Edges 16 (pare16), Partition Edges 17 (pare17), Partition Faces 14 (parf14), Partition Edges 18 (pare18), Partition Edges 19 (pare19), Partition Faces 15 (parf15), Partition Edges 20 (pare20), Partition Edges 21 (pare21), and Partition Faces 16 (parf16).
|
|
2
|
Right-click and choose Group.
|
|
1
|
In the Model Builder window, under Global Definitions right-click Geometry Parts and choose 3D Part.
|
|
2
|
|
3
|
|
1
|
|
2
|
|
3
|
|
4
|
|
5
|
|
6
|
|
1
|
|
2
|
On the object blk1, select Domain 1 only.
|
|
3
|
|
4
|
|
1
|
In the Model Builder window, under Global Definitions right-click Geometry Parts and choose 3D Part.
|
|
2
|
|
3
|
|
1
|
|
2
|
|
3
|
|
4
|
|
5
|
|
6
|
Click
|
|
1
|
|
2
|
|
3
|
|
4
|
|
5
|
|
1
|
|
2
|
Select the object c1 only.
|
|
3
|
|
4
|
|
5
|
|
6
|
|
7
|
|
8
|
Click
|
|
1
|
|
2
|
|
4
|
Click
|
|
1
|
|
2
|
Select the object blk1 only.
|
|
3
|
|
4
|
|
5
|
Select the object ext1 only.
|
|
6
|
Click
|
|
1
|
|
2
|
|
3
|
|
4
|
On the object dif1, select Boundaries 8, 11, 18, and 21 only.
|
|
5
|
Locate the Distances section. In the table, enter the following settings:
|
|
6
|
Select the Reverse direction checkbox.
|
|
7
|
Click
|
|
1
|
|
2
|
|
3
|
|
4
|
On the object ext2, select Boundary 4 only.
|
|
1
|
|
2
|
|
3
|
|
4
|
|
5
|
|
6
|
Click
|
|
1
|
|
2
|
Select the object sq1 only.
|
|
3
|
|
4
|
|
5
|
|
6
|
|
7
|
|
8
|
Click
|
|
9
|
Click
|
|
1
|
|
2
|
Click in the Graphics window and then press Ctrl+A to select both objects.
|
|
3
|
|
1
|
|
2
|
|
3
|
|
4
|
|
1
|
|
2
|
|
3
|
|
4
|
On the object uni1, select Boundaries 4, 6, 48, and 49 only.
|
|
1
|
In the Model Builder window, under Global Definitions right-click Geometry Parts and choose 3D Part.
|
|
2
|
|
3
|
|
1
|
|
2
|
|
3
|
|
4
|
|
5
|
|
1
|
|
2
|
|
3
|
|
4
|
|
5
|
|
6
|
|
1
|
|
2
|
|
3
|
|
4
|
|
5
|
|
6
|
|
7
|
|
1
|
|
2
|
|
3
|
|
4
|
|
5
|
|
6
|
|
7
|
Click
|
|
1
|
|
2
|
|
3
|
|
4
|
|
5
|
|
6
|
|
7
|
|
1
|
|
2
|
|
3
|
|
4
|
|
5
|
|
6
|
|
7
|
|
8
|
Click
|
|
1
|
|
2
|
|
3
|
|
4
|
On the object blk1, select Boundary 4 only.
|
|
1
|
|
2
|
|
3
|
|
4
|
|
5
|
|
1
|
|
2
|
|
3
|
|
4
|
|
5
|
|
1
|
|
2
|
|
3
|
|
4
|
|
5
|
|
1
|
|
2
|
|
3
|
|
4
|
|
5
|
|
1
|
|
2
|
|
3
|
|
4
|
|
5
|
|
6
|
Click
|
|
1
|
In the Model Builder window, under Global Definitions > Geometry Parts > Other Components click Work Plane 1 (wp1).
|
|
2
|
|
1
|
|
2
|
|
3
|
On the object blk1, select Domain 1 only.
|
|
4
|
On the object blk2, select Domain 1 only.
|
|
5
|
On the object blk3, select Domain 1 only.
|
|
6
|
|
1
|
|
2
|
|
3
|
On the object blk4, select Domain 1 only.
|
|
4
|
On the object blk5, select Domain 1 only.
|
|
5
|
On the object blk6, select Domain 1 only.
|
|
6
|
|
1
|
|
2
|
|
3
|
|
4
|
|
5
|
Click OK.
|
|
1
|
|
2
|
|
3
|
|
1
|
|
2
|
Click
|
|
1
|
|
2
|
|
3
|
|
4
|
On the object fin, select Boundaries 10, 12, 25, 27, and 28 only.
|