|
|
|
|
•
|
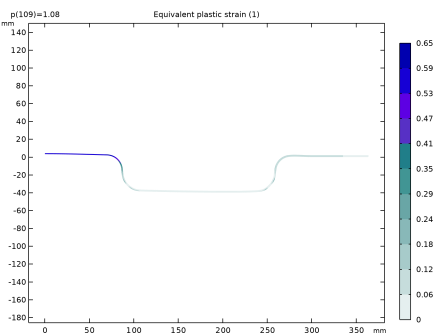
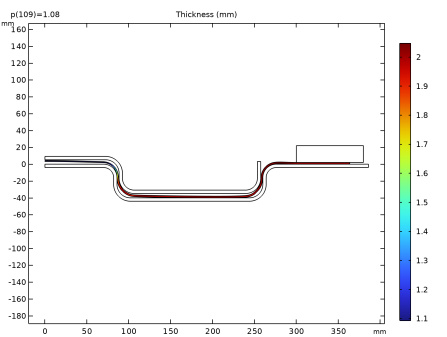
To compute the thickness of the deformed shape, a nonlocal projection coupling is used to define the variable th. Such a coupling can integrate any expression across a domain in the spatial frame. Here, integrating ‘1’ across the blank returns its deformed thickness.
|
|
1
|
|
2
|
|
3
|
Click Add.
|
|
4
|
|
5
|
Click
|
|
6
|
|
7
|
Click
|
|
1
|
|
2
|
|
3.8483E-17 m²·s4/kg²
|
|||
|
3.8483E-17 m²·s4/kg²
|
|||
|
2.6553E-17 m²·s4/kg²
|
|||
|
1
|
|
2
|
|
3
|
|
1
|
|
2
|
|
3
|
|
4
|
Locate the Coordinates section. In the table, enter the following settings:
|
|
1
|
|
2
|
On the object pol1, select Point 2 only.
|
|
3
|
|
4
|
|
1
|
|
2
|
On the object fil1, select Points 3 and 5 only.
|
|
3
|
|
4
|
|
1
|
|
2
|
Select the object fil2 only.
|
|
3
|
|
4
|
|
5
|
|
1
|
In the Model Builder window, under Component 1 (comp1) > Geometry 1, Ctrl-click to select Polygon 1 (pol1), Fillet 1 (fil1), Fillet 2 (fil2), and Thicken 1 (thi1).
|
|
2
|
Right-click and choose Group.
|
|
1
|
|
2
|
Click
|
|
1
|
|
2
|
|
3
|
|
4
|
Locate the Coordinates section. In the table, enter the following settings:
|
|
1
|
|
2
|
|
3
|
|
4
|
On the object pol2, select Points 3 and 5 only.
|
|
5
|
|
1
|
|
2
|
On the object fil3, select Points 3 and 5 only.
|
|
3
|
|
4
|
|
1
|
|
2
|
Select the object fil4 only.
|
|
3
|
|
4
|
|
5
|
|
1
|
In the Model Builder window, under Component 1 (comp1) > Geometry 1, Ctrl-click to select Polygon 2 (pol2), Fillet 3 (fil3), Fillet 4 (fil4), and Thicken 2 (thi2).
|
|
2
|
Right-click and choose Group.
|
|
1
|
|
2
|
Click
|
|
1
|
|
2
|
|
3
|
|
4
|
|
5
|
|
6
|
|
7
|
Click
|
|
1
|
|
2
|
|
3
|
|
4
|
|
5
|
Click
|
|
6
|
Click
|
|
1
|
|
2
|
|
3
|
|
4
|
|
5
|
|
1
|
|
2
|
|
3
|
In the Settings window for Interpolation, type Prescribed Punch Displacement in the Label text field.
|
|
4
|
|
6
|
|
7
|
In the Function table, enter the following settings:
|
|
1
|
|
2
|
|
3
|
|
5
|
|
6
|
In the Function table, enter the following settings:
|
|
1
|
|
3
|
|
4
|
|
1
|
|
2
|
|
3
|
|
5
|
|
1
|
|
2
|
|
3
|
|
1
|
|
2
|
|
3
|
|
1
|
|
2
|
|
3
|
|
1
|
|
2
|
|
3
|
|
1
|
|
3
|
|
1
|
|
3
|
|
1
|
|
2
|
|
1
|
|
3
|
|
1
|
|
3
|
|
4
|
|
5
|
|
6
|
|
1
|
|
2
|
|
4
|
|
1
|
|
2
|
|
3
|
|
4
|
|
5
|
Click OK.
|
|
1
|
|
2
|
|
3
|
Select the Manual control of selections and pair type checkbox.
|
|
4
|
|
5
|
|
6
|
|
1
|
|
2
|
|
3
|
Select the Manual control of selections and pair type checkbox.
|
|
4
|
|
5
|
|
6
|
|
1
|
|
2
|
|
3
|
Select the Manual control of selections and pair type checkbox.
|
|
4
|
|
5
|
|
6
|
|
1
|
|
2
|
Go to the Add Material window.
|
|
3
|
|
4
|
Click the Add to Component button in the window toolbar.
|
|
5
|
|
6
|
Click the Add to Component button in the window toolbar.
|
|
7
|
|
1
|
|
2
|
|
1
|
In the Model Builder window, under Component 1 (comp1) > Solid Mechanics (solid) click Linear Elastic Material 1.
|
|
1
|
|
2
|
|
3
|
|
4
|
|
5
|
|
6
|
|
7
|
|
8
|
|
1
|
|
2
|
|
3
|
From the list, choose Augmented Lagrangian.
|
|
4
|
|
5
|
Locate the Contact Pressure Penalty Factor section. From the Penalty factor control list, choose Manual tuning.
|
|
6
|
|
7
|
|
8
|
In the Show More Options dialog, in the tree, select the checkbox for the node Physics > Advanced Physics Options.
|
|
9
|
Click OK.
|
|
10
|
|
11
|
Clear the Use automatic quadrature settings checkbox.
|
|
12
|
|
1
|
|
2
|
|
3
|
|
1
|
|
2
|
|
3
|
|
4
|
Locate the Prescribed Displacement section. From the Displacement in r direction list, choose Prescribed.
|
|
5
|
|
6
|
|
1
|
|
2
|
|
m²·s4/kg²
|
||||
|
1
|
|
2
|
|
3
|
|
4
|
|
1
|
|
3
|
|
4
|
|
5
|
|
1
|
|
3
|
|
4
|
|
1
|
|
1
|
|
2
|
|
3
|
|
4
|
Click the Custom button.
|
|
5
|
Locate the Element Size Parameters section.
|
|
6
|
|
7
|
|
1
|
|
2
|
|
3
|
|
1
|
|
3
|
|
4
|
|
1
|
|
2
|
|
3
|
|
4
|
Click
|
|
1
|
|
2
|
Click Show Default Solver to customize the solver settings. Use a Constant (Newton) method as the nonlinear method in the Fully Coupled node and a Linear predictor in the Parametric node.
|
|
1
|
|
2
|
|
3
|
Select the Auxiliary sweep checkbox.
|
|
4
|
Click
|
|
1
|
In the Model Builder window, expand the Study 1 > Solver Configurations > Solution 1 (sol1) > Stationary Solver 1 node, then click Fully Coupled 1.
|
|
2
|
|
3
|
|
4
|
In the Model Builder window, under Study 1 > Solver Configurations > Solution 1 (sol1) > Stationary Solver 1 click Parametric.
|
|
5
|
|
6
|
Select the Tuning of step size checkbox.
|
|
7
|
|
8
|
|
9
|
|
10
|
|
11
|
Right-click Study 1 > Solver Configurations > Solution 1 (sol1) > Stationary Solver 1 > Parametric and choose Stop Condition.
|
|
12
|
|
13
|
Click
|
|
15
|
|
16
|
|
1
|
|
2
|
|
3
|
Select the Plot checkbox.
|
|
4
|
|
5
|
|
1
|
|
2
|
|
1
|
|
2
|
|
3
|
|
1
|
|
2
|
|
3
|
|
1
|
|
2
|
|
3
|
|
4
|
|
5
|
|
1
|
|
2
|
|
3
|
|
4
|
|
1
|
|
2
|
|
3
|
|
1
|
|
2
|
|
3
|
|
4
|
|
1
|
|
2
|
Go to the Result Templates window.
|
|
3
|
In the tree, select Study 1/Solution 1 (sol1) > Solid Mechanics > Equivalent Plastic Strain (solid).
|
|
4
|
Click the Add Result Template button in the window toolbar.
|
|
5
|
|
1
|
|
2
|
Clear the Plot dataset edges checkbox.
|
|
1
|
|
2
|
|
3
|
|
4
|
|
5
|
|
1
|
|
2
|
|
3
|
|
1
|
|
2
|
|
3
|
|
1
|
|
2
|
|
3
|
|
4
|
|
1
|
|
2
|
|
1
|
|
2
|
|
4
|
|
5
|
|
6
|
|
7
|
|
8
|