|
|
|

|
1
|
|
2
|
|
3
|
Click Add.
|
|
4
|
|
5
|
Click Add.
|
|
6
|
Click
|
|
7
|
|
8
|
Click
|
|
1
|
|
2
|
|
1
|
|
2
|
|
3
|
Click
|
|
4
|
Browse to the model’s Application Libraries folder and double-click the file balloon_inflation_shell_membrane_interpolation.txt.
|
|
5
|
|
6
|
In the Function table, enter the following settings:
|
|
1
|
|
2
|
|
1
|
|
2
|
|
3
|
|
4
|
|
5
|
|
1
|
|
2
|
On the object c1, select Boundaries 2 and 3 only.
|
|
3
|
|
1
|
In the Model Builder window, under Component 1 (comp1) right-click Materials and choose Layers > Single Layer Material.
|
|
2
|
|
3
|
Locate the Material Contents section. In the table, enter the following settings:
|
|
1
|
|
2
|
In the Settings window for Hyperelastic Material, Layered, type Neo-Hookean in the Label text field.
|
|
3
|
|
4
|
Locate the Hyperelastic Material section. From the Compressibility list, choose Nearly incompressible.
|
|
5
|
|
6
|
|
1
|
|
2
|
In the Settings window for Hyperelastic Material, Layered, type Mooney-Rivlin in the Label text field.
|
|
3
|
|
4
|
Locate the Hyperelastic Material section. From the Material model list, choose Mooney–Rivlin, two parameters.
|
|
5
|
|
6
|
|
7
|
|
1
|
|
2
|
|
3
|
|
4
|
|
5
|
Click Add twice.
|
|
6
|
In the Ogden parameters table, enter the following settings:
|
|
7
|
|
1
|
|
2
|
|
3
|
|
4
|
|
5
|
|
6
|
|
1
|
|
3
|
In the Settings window for Prescribed Displacement/Rotation, locate the Prescribed Displacement section.
|
|
4
|
|
5
|
|
1
|
|
2
|
|
3
|
|
1
|
|
3
|
In the Settings window for Prescribed Displacement/Rotation, locate the Coordinate System Selection section.
|
|
4
|
|
5
|
Locate the Prescribed Displacement section. From the Displacement in x3 direction list, choose Prescribed.
|
|
6
|
|
1
|
|
2
|
|
3
|
|
4
|
Locate the Coordinate System Selection section. From the Coordinate system list, choose Boundary System 1 (sys1).
|
|
5
|
Locate the Prescribed Displacement section. From the Displacement in n direction list, choose Prescribed.
|
|
6
|
|
7
|
|
1
|
|
2
|
|
3
|
|
4
|
|
5
|
|
1
|
|
2
|
|
3
|
|
5
|
|
6
|
Clear the Compute integral in revolved geometry checkbox.
|
|
1
|
|
2
|
|
4
|
|
5
|
In the Show More Options dialog, in the tree, select the checkbox for the node Physics > Equation Contributions.
|
|
6
|
Click OK to enable a global equations and other advanced modeling tools.
|
|
1
|
|
2
|
|
4
|
|
5
|
|
6
|
|
7
|
Click OK.
|
|
8
|
|
9
|
Click
|
|
10
|
|
11
|
|
12
|
Click OK.
|
|
1
|
In the Model Builder window, under Component 1 (comp1) > Membrane (mbrn) click Thickness and Offset 1.
|
|
2
|
|
3
|
|
1
|
|
2
|
|
3
|
|
4
|
Locate the Hyperelastic Material section. From the Compressibility list, choose Nearly incompressible.
|
|
5
|
|
6
|
|
1
|
|
2
|
|
3
|
|
4
|
Locate the Hyperelastic Material section. From the Material model list, choose Mooney–Rivlin, two parameters.
|
|
5
|
|
6
|
|
7
|
|
1
|
|
2
|
|
3
|
|
4
|
|
5
|
Click Add twice.
|
|
6
|
In the Ogden parameters table, enter the following settings:
|
|
7
|
|
1
|
|
2
|
|
3
|
|
4
|
|
5
|
|
6
|
|
1
|
|
3
|
|
4
|
|
1
|
|
3
|
|
4
|
|
5
|
Locate the Prescribed Displacement section. From the Displacement in x3 direction list, choose Prescribed.
|
|
1
|
|
2
|
|
3
|
|
4
|
Locate the Coordinate System Selection section. From the Coordinate system list, choose Boundary System 1 (sys1).
|
|
5
|
Locate the Prescribed Displacement section. From the Displacement in n direction list, choose Prescribed.
|
|
6
|
|
1
|
|
2
|
|
3
|
|
4
|
|
5
|
|
1
|
|
2
|
|
1
|
|
2
|
|
4
|
|
5
|
|
6
|
|
7
|
Click OK.
|
|
8
|
|
9
|
Click
|
|
10
|
|
11
|
|
12
|
Click OK.
|
|
1
|
|
2
|
|
1
|
|
2
|
|
3
|
|
1
|
|
2
|
|
3
|
|
4
|
Click
|
|
1
|
|
2
|
|
3
|
|
1
|
|
2
|
|
3
|
Select the Modify model configuration for study step checkbox.
|
|
4
|
|
5
|
Click
|
|
6
|
In the tree, select Component 1 (comp1) > Shell (shell), Spatial frame control disabled > Face Load 1 and Component 1 (comp1) > Shell (shell), Spatial frame control disabled > Global Equations 1 (ODE1).
|
|
7
|
Right-click and choose Disable.
|
|
8
|
In the tree, select Component 1 (comp1) > Membrane (mbrn), Controls spatial frame > Face Load 1 and Component 1 (comp1) > Membrane (mbrn), Controls spatial frame > Global Equations 1 (ODE2).
|
|
9
|
Right-click and choose Disable.
|
|
1
|
|
2
|
|
3
|
In the Model Builder window, expand the Study: Prestretch > Solver Configurations > Solution 1 (sol1) > Dependent Variables 1 node, then click Displacement of Shell Normals (comp1.ar).
|
|
4
|
|
5
|
|
6
|
|
1
|
|
2
|
Go to the Add Study window.
|
|
3
|
|
4
|
Click the Add Study button in the window toolbar.
|
|
5
|
|
1
|
|
2
|
|
1
|
|
2
|
|
3
|
Select the Modify model configuration for study step checkbox.
|
|
4
|
|
5
|
Click
|
|
6
|
In the tree, select Component 1 (comp1) > Shell (shell), Spatial frame control disabled > Mooney–Rivlin, Component 1 (comp1) > Shell (shell), Spatial frame control disabled > Ogden, Component 1 (comp1) > Shell (shell), Spatial frame control disabled > Varga, and Component 1 (comp1) > Shell (shell), Spatial frame control disabled > Prescribed Displacement/Rotation 3.
|
|
7
|
Right-click and choose Disable.
|
|
8
|
In the tree, select Component 1 (comp1) > Membrane (mbrn), Controls spatial frame > Mooney–Rivlin, Component 1 (comp1) > Membrane (mbrn), Controls spatial frame > Ogden, Component 1 (comp1) > Membrane (mbrn), Controls spatial frame > Varga, and Component 1 (comp1) > Membrane (mbrn), Controls spatial frame > Prescribed Displacement 3.
|
|
9
|
Right-click and choose Disable.
|
|
10
|
Click to expand the Values of Dependent Variables section. Find the Initial values of variables solved for subsection. From the Settings list, choose User controlled.
|
|
11
|
|
12
|
|
13
|
|
14
|
Click
|
|
1
|
|
2
|
|
3
|
|
4
|
|
5
|
In the Model Builder window, expand the Study: Neo-Hookean > Solver Configurations > Solution 2 (sol2) > Dependent Variables 1 node, then click Displacement of Shell Normals (comp1.ar).
|
|
6
|
|
7
|
|
8
|
In the Model Builder window, under Study: Neo-Hookean > Solver Configurations > Solution 2 (sol2) > Dependent Variables 1 click Displacement Field (comp1.u).
|
|
9
|
|
10
|
|
11
|
|
12
|
In the Model Builder window, expand the Study: Neo-Hookean > Solver Configurations > Solution 2 (sol2) > Stationary Solver 1 node, then click Parametric 1.
|
|
13
|
|
14
|
|
15
|
In the Model Builder window, under Study: Neo-Hookean > Solver Configurations > Solution 2 (sol2) > Stationary Solver 1 click Fully Coupled 1.
|
|
16
|
|
17
|
|
18
|
|
19
|
|
1
|
|
2
|
Go to the Add Study window.
|
|
3
|
|
4
|
Click the Add Study button in the window toolbar.
|
|
5
|
|
1
|
|
2
|
|
1
|
|
2
|
|
3
|
Select the Modify model configuration for study step checkbox.
|
|
4
|
|
5
|
Click
|
|
6
|
In the tree, select Component 1 (comp1) > Shell (shell), Spatial frame control disabled > Neo-Hookean, Component 1 (comp1) > Shell (shell), Spatial frame control disabled > Ogden, Component 1 (comp1) > Shell (shell), Spatial frame control disabled > Varga, and Component 1 (comp1) > Shell (shell), Spatial frame control disabled > Prescribed Displacement/Rotation 3.
|
|
7
|
Right-click and choose Disable.
|
|
8
|
In the tree, select Component 1 (comp1) > Membrane (mbrn), Controls spatial frame > Neo-Hookean, Component 1 (comp1) > Membrane (mbrn), Controls spatial frame > Ogden, Component 1 (comp1) > Membrane (mbrn), Controls spatial frame > Varga, and Component 1 (comp1) > Membrane (mbrn), Controls spatial frame > Prescribed Displacement 3.
|
|
9
|
Right-click and choose Disable.
|
|
10
|
Locate the Values of Dependent Variables section. Find the Initial values of variables solved for subsection. From the Settings list, choose User controlled.
|
|
11
|
|
12
|
|
13
|
|
14
|
Click
|
|
1
|
|
2
|
|
3
|
|
4
|
|
5
|
In the Model Builder window, expand the Study: Mooney–Rivlin > Solver Configurations > Solution 3 (sol3) > Dependent Variables 1 node, then click Displacement of Shell Normals (comp1.ar).
|
|
6
|
|
7
|
|
8
|
In the Model Builder window, under Study: Mooney–Rivlin > Solver Configurations > Solution 3 (sol3) > Dependent Variables 1 click Displacement Field (comp1.u).
|
|
9
|
|
10
|
|
11
|
|
12
|
In the Model Builder window, expand the Study: Mooney–Rivlin > Solver Configurations > Solution 3 (sol3) > Stationary Solver 1 node, then click Parametric 1.
|
|
13
|
|
14
|
|
15
|
In the Model Builder window, under Study: Mooney–Rivlin > Solver Configurations > Solution 3 (sol3) > Stationary Solver 1 click Fully Coupled 1.
|
|
16
|
|
17
|
|
18
|
|
19
|
|
1
|
|
2
|
Go to the Add Study window.
|
|
3
|
|
4
|
Click the Add Study button in the window toolbar.
|
|
5
|
|
1
|
|
2
|
|
1
|
|
2
|
|
3
|
Select the Modify model configuration for study step checkbox.
|
|
4
|
|
5
|
Click
|
|
6
|
In the tree, select Component 1 (comp1) > Shell (shell), Spatial frame control disabled > Neo-Hookean, Component 1 (comp1) > Shell (shell), Spatial frame control disabled > Mooney–Rivlin, Component 1 (comp1) > Shell (shell), Spatial frame control disabled > Varga, and Component 1 (comp1) > Shell (shell), Spatial frame control disabled > Prescribed Displacement/Rotation 3.
|
|
7
|
Right-click and choose Disable.
|
|
8
|
In the tree, select Component 1 (comp1) > Membrane (mbrn), Controls spatial frame > Neo-Hookean, Component 1 (comp1) > Membrane (mbrn), Controls spatial frame > Mooney–Rivlin, Component 1 (comp1) > Membrane (mbrn), Controls spatial frame > Varga, and Component 1 (comp1) > Membrane (mbrn), Controls spatial frame > Prescribed Displacement 3.
|
|
9
|
Right-click and choose Disable.
|
|
10
|
Locate the Values of Dependent Variables section. Find the Initial values of variables solved for subsection. From the Settings list, choose User controlled.
|
|
11
|
|
12
|
|
13
|
|
14
|
Click
|
|
1
|
|
2
|
|
3
|
|
4
|
|
5
|
In the Model Builder window, expand the Study: Ogden > Solver Configurations > Solution 4 (sol4) > Dependent Variables 1 node, then click Displacement of Shell Normals (comp1.ar).
|
|
6
|
|
7
|
|
8
|
In the Model Builder window, under Study: Ogden > Solver Configurations > Solution 4 (sol4) > Dependent Variables 1 click Displacement Field (comp1.u).
|
|
9
|
|
10
|
|
11
|
|
12
|
In the Model Builder window, expand the Study: Ogden > Solver Configurations > Solution 4 (sol4) > Stationary Solver 1 node, then click Parametric 1.
|
|
13
|
|
14
|
|
15
|
In the Model Builder window, under Study: Ogden > Solver Configurations > Solution 4 (sol4) > Stationary Solver 1 click Fully Coupled 1.
|
|
16
|
|
17
|
|
18
|
|
19
|
|
1
|
|
2
|
Go to the Add Study window.
|
|
3
|
|
4
|
Click the Add Study button in the window toolbar.
|
|
5
|
|
1
|
|
2
|
|
1
|
|
2
|
|
3
|
Select the Modify model configuration for study step checkbox.
|
|
4
|
|
5
|
Click
|
|
6
|
In the tree, select Component 1 (comp1) > Shell (shell), Spatial frame control disabled > Neo-Hookean, Component 1 (comp1) > Shell (shell), Spatial frame control disabled > Mooney–Rivlin, Component 1 (comp1) > Shell (shell), Spatial frame control disabled > Ogden, and Component 1 (comp1) > Shell (shell), Spatial frame control disabled > Prescribed Displacement/Rotation 3.
|
|
7
|
Right-click and choose Disable.
|
|
8
|
In the tree, select Component 1 (comp1) > Membrane (mbrn), Controls spatial frame > Neo-Hookean, Component 1 (comp1) > Membrane (mbrn), Controls spatial frame > Mooney–Rivlin, Component 1 (comp1) > Membrane (mbrn), Controls spatial frame > Ogden, and Component 1 (comp1) > Membrane (mbrn), Controls spatial frame > Prescribed Displacement 3.
|
|
9
|
Right-click and choose Disable.
|
|
10
|
Locate the Values of Dependent Variables section. Find the Initial values of variables solved for subsection. From the Settings list, choose User controlled.
|
|
11
|
|
12
|
|
13
|
|
14
|
Click
|
|
1
|
|
2
|
|
3
|
|
4
|
|
5
|
In the Model Builder window, expand the Study: Varga > Solver Configurations > Solution 5 (sol5) > Dependent Variables 1 node, then click Displacement of Shell Normals (comp1.ar).
|
|
6
|
|
7
|
|
8
|
In the Model Builder window, under Study: Varga > Solver Configurations > Solution 5 (sol5) > Dependent Variables 1 click Displacement Field (comp1.u).
|
|
9
|
|
10
|
|
11
|
|
12
|
In the Model Builder window, expand the Study: Varga > Solver Configurations > Solution 5 (sol5) > Stationary Solver 1 node, then click Parametric 1.
|
|
13
|
|
14
|
|
15
|
In the Model Builder window, under Study: Varga > Solver Configurations > Solution 5 (sol5) > Stationary Solver 1 click Fully Coupled 1.
|
|
16
|
|
17
|
|
18
|
|
19
|
|
1
|
|
2
|
|
3
|
Click
|
|
4
|
|
5
|
Click OK.
|
|
6
|
|
8
|
Click
|
|
9
|
|
10
|
Click OK.
|
|
11
|
|
13
|
Click
|
|
1
|
|
2
|
|
3
|
|
4
|
|
1
|
|
2
|
|
3
|
|
1
|
|
2
|
|
3
|
|
4
|
|
1
|
|
2
|
|
3
|
|
4
|
|
5
|
|
1
|
|
2
|
|
3
|
|
1
|
|
2
|
|
3
|
|
4
|
|
5
|
|
6
|
|
7
|
|
1
|
|
2
|
|
3
|
|
4
|
|
5
|
Locate the Scale section.
|
|
6
|
|
7
|
|
8
|
|
1
|
|
2
|
|
3
|
|
4
|
|
5
|
Locate the Plot Settings section.
|
|
6
|
|
7
|
|
8
|
|
9
|
|
10
|
|
11
|
|
12
|
|
1
|
|
2
|
|
3
|
|
5
|
|
6
|
|
7
|
Click Replace Expression in the upper-right corner of the x-Axis Data section. From the menu, choose Global definitions > Parameters > stretch - Applied stretch - 1.
|
|
8
|
|
9
|
|
10
|
|
1
|
|
2
|
|
3
|
|
4
|
Locate the Coloring and Style section. Find the Line markers subsection. From the Marker list, choose Circle.
|
|
5
|
|
6
|
Locate the Legends section. In the table, enter the following settings:
|
|
1
|
In the Model Builder window, under Results > Inflation Pressure right-click Point Graph 1 and choose Duplicate.
|
|
2
|
|
3
|
|
4
|
|
5
|
Locate the Legends section. In the table, enter the following settings:
|
|
1
|
In the Model Builder window, under Results > Inflation Pressure right-click Point Graph 2 and choose Duplicate.
|
|
2
|
|
3
|
|
4
|
|
5
|
Locate the Legends section. In the table, enter the following settings:
|
|
1
|
|
2
|
|
3
|
|
4
|
Locate the Coloring and Style section. Find the Line style subsection. From the Line list, choose None.
|
|
5
|
|
6
|
|
7
|
Locate the Legends section. In the table, enter the following settings:
|
|
1
|
In the Model Builder window, under Results > Inflation Pressure right-click Point Graph 1 and choose Duplicate.
|
|
2
|
|
3
|
|
4
|
|
5
|
Locate the Legends section. In the table, enter the following settings:
|
|
1
|
In the Model Builder window, under Results > Inflation Pressure right-click Point Graph 2 and choose Duplicate.
|
|
2
|
|
3
|
|
4
|
|
5
|
Locate the Legends section. In the table, enter the following settings:
|
|
6
|
|
1
|
|
2
|
|
3
|
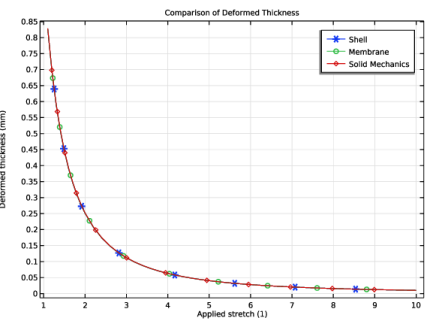
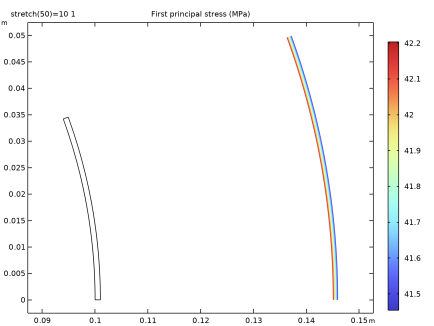
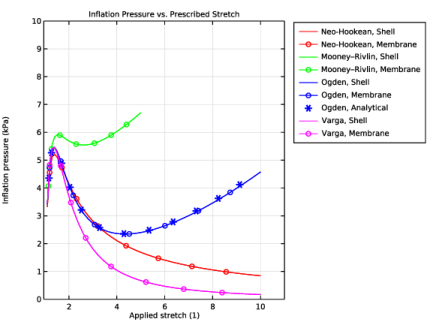
Locate the Title section. In the Title text area, type First Principal Stress vs. Prescribed Stretch.
|
|
4
|
Locate the Plot Settings section. In the y-axis label text field, type First principal stress (MPa).
|
|
5
|
|
6
|
|
1
|
|
2
|
|
3
|
|
4
|
|
1
|
|
2
|
|
3
|
|
1
|
|
2
|
|
3
|
|
4
|
|
1
|
|
2
|
|
3
|
|
1
|
|
2
|
|
3
|
|
4
|
|
1
|
|
2
|
|
3
|
|
1
|
|
2
|
|
3
|
|
4
|
|
1
|
|
2
|
|
3
|
|
4
|
|
1
|
|
2
|
|
3
|
|
4
|
|
1
|
|
2
|
|
3
|
|
4
|
|
5
|
|
6
|
Locate the Plot Settings section.
|
|
7
|
|
1
|
|
3
|
|
4
|
|
5
|
|
6
|
|
7
|
Click Replace Expression in the upper-right corner of the x-Axis Data section. From the menu, choose Global definitions > Parameters > stretch - Applied stretch - 1.
|
|
8
|
Locate the Coloring and Style section. Find the Line markers subsection. From the Marker list, choose Cycle.
|
|
9
|
|
10
|
|
11
|
|
1
|
|
2
|
|
3
|
|
4
|
|
5
|
Locate the Coloring and Style section. Find the Line markers subsection. In the Number text field, type 10.
|
|
6
|
Locate the Legends section. In the table, enter the following settings:
|
|
1
|
|
2
|
|
4
|
Click Replace Expression in the upper-right corner of the x-Axis Data section. From the menu, choose Global definitions > Parameters > stretch - Applied stretch - 1.
|
|
5
|
Click to expand the Coloring and Style section. Find the Line markers subsection. From the Marker list, choose Diamond.
|
|
6
|
|
7
|
|
8
|
|
10
|