
|
|
|


|
1
|
|
2
|
|
3
|
Click Add.
|
|
4
|
Click
|
|
5
|
|
6
|
Click
|
|
1
|
|
2
|
|
1
|
|
2
|
|
1
|
|
2
|
|
3
|
|
1
|
|
2
|
|
3
|
|
4
|
|
5
|
Click to expand the Layers section. In the table, enter the following settings:
|
|
6
|
Click
|
|
1
|
|
2
|
|
3
|
|
4
|
On the object c1, select Domain 1 only.
|
|
5
|
Click
|
|
1
|
|
2
|
|
3
|
|
4
|
Locate the Hyperelastic Material section. From the Compressibility list, choose Nearly incompressible.
|
|
5
|
|
6
|
|
1
|
|
2
|
|
3
|
|
4
|
Locate the Hyperelastic Material section. From the Material model list, choose Mooney–Rivlin, two parameters.
|
|
5
|
|
6
|
|
7
|
|
1
|
|
2
|
|
3
|
|
4
|
|
5
|
Click Add twice.
|
|
6
|
In the Ogden parameters table, enter the following settings:
|
|
7
|
|
1
|
|
2
|
|
3
|
|
4
|
|
5
|
|
6
|
|
1
|
|
1
|
|
3
|
|
4
|
|
5
|
|
1
|
|
2
|
|
3
|
|
5
|
|
6
|
Clear the Compute integral in revolved geometry checkbox.
|
|
1
|
|
2
|
|
1
|
|
2
|
In the Show More Options dialog, in the tree, select the checkbox for the node Physics > Equation Contributions.
|
|
3
|
Click OK enable global equations and other advanced modeling features to the Solid Mechanics interface.
|
|
1
|
|
2
|
|
4
|
|
5
|
|
6
|
|
7
|
Click OK.
|
|
8
|
|
9
|
Click
|
|
10
|
|
11
|
|
12
|
Click OK.
|
|
1
|
|
2
|
|
1
|
|
3
|
|
4
|
|
1
|
|
3
|
|
4
|
|
5
|
|
1
|
|
2
|
|
3
|
Select the Modify model configuration for study step checkbox.
|
|
4
|
In the tree, select Component 1 (comp1) > Solid Mechanics (solid), Controls spatial frame > Mooney–Rivlin, Component 1 (comp1) > Solid Mechanics (solid), Controls spatial frame > Ogden, and Component 1 (comp1) > Solid Mechanics (solid), Controls spatial frame > Varga.
|
|
5
|
Right-click and choose Disable.
|
|
1
|
|
2
|
Click
|
|
4
|
|
5
|
|
6
|
|
1
|
|
2
|
|
3
|
|
4
|
|
5
|
In the Model Builder window, expand the Neo-Hookean > Solver Configurations > Solution 1 (sol1) > Stationary Solver 1 node, then click Direct.
|
|
6
|
|
7
|
|
8
|
In the Model Builder window, under Neo-Hookean > Solver Configurations > Solution 1 (sol1) > Stationary Solver 1 click Parametric 1.
|
|
9
|
|
10
|
|
11
|
In the Model Builder window, under Neo-Hookean > Solver Configurations > Solution 1 (sol1) > Stationary Solver 1 click Fully Coupled 1.
|
|
12
|
|
13
|
|
14
|
|
1
|
|
2
|
Go to the Add Study window.
|
|
3
|
|
4
|
Click the Add Study button in the window toolbar.
|
|
1
|
|
2
|
|
1
|
|
2
|
|
3
|
Select the Modify model configuration for study step checkbox.
|
|
4
|
In the tree, select Component 1 (comp1) > Solid Mechanics (solid), Controls spatial frame > Neo-Hookean, Component 1 (comp1) > Solid Mechanics (solid), Controls spatial frame > Ogden, and Component 1 (comp1) > Solid Mechanics (solid), Controls spatial frame > Varga.
|
|
5
|
Right-click and choose Disable.
|
|
1
|
|
2
|
Click
|
|
1
|
|
2
|
|
3
|
|
4
|
|
5
|
In the Model Builder window, expand the Mooney–Rivlin > Solver Configurations > Solution 2 (sol2) > Stationary Solver 1 node, then click Direct.
|
|
6
|
|
7
|
|
8
|
In the Model Builder window, under Mooney–Rivlin > Solver Configurations > Solution 2 (sol2) > Stationary Solver 1 click Parametric 1.
|
|
9
|
|
10
|
|
11
|
In the Model Builder window, under Mooney–Rivlin > Solver Configurations > Solution 2 (sol2) > Stationary Solver 1 click Fully Coupled 1.
|
|
12
|
|
13
|
|
14
|
|
1
|
Go to the Add Study window.
|
|
2
|
|
3
|
Click the Add Study button in the window toolbar.
|
|
1
|
|
2
|
|
1
|
|
2
|
|
3
|
Select the Modify model configuration for study step checkbox.
|
|
4
|
In the tree, select Component 1 (comp1) > Solid Mechanics (solid), Controls spatial frame > Neo-Hookean, Component 1 (comp1) > Solid Mechanics (solid), Controls spatial frame > Mooney–Rivlin, and Component 1 (comp1) > Solid Mechanics (solid), Controls spatial frame > Varga.
|
|
5
|
Click
|
|
6
|
|
7
|
Click
|
|
1
|
|
2
|
|
3
|
|
4
|
|
5
|
In the Model Builder window, expand the Ogden > Solver Configurations > Solution 3 (sol3) > Stationary Solver 1 node, then click Direct.
|
|
6
|
|
7
|
|
8
|
In the Model Builder window, under Ogden > Solver Configurations > Solution 3 (sol3) > Stationary Solver 1 click Parametric 1.
|
|
9
|
|
10
|
|
11
|
In the Model Builder window, under Ogden > Solver Configurations > Solution 3 (sol3) > Stationary Solver 1 click Fully Coupled 1.
|
|
12
|
|
13
|
|
14
|
|
1
|
Go to the Add Study window.
|
|
2
|
|
3
|
Click the Add Study button in the window toolbar.
|
|
4
|
|
1
|
|
2
|
Clear the Generate default plots checkbox.
|
|
1
|
|
2
|
|
3
|
Select the Modify model configuration for study step checkbox.
|
|
4
|
In the tree, select Component 1 (comp1) > Solid Mechanics (solid), Controls spatial frame > Neo-Hookean, Component 1 (comp1) > Solid Mechanics (solid), Controls spatial frame > Mooney–Rivlin, and Component 1 (comp1) > Solid Mechanics (solid), Controls spatial frame > Ogden.
|
|
5
|
Click
|
|
6
|
|
7
|
Click
|
|
9
|
|
10
|
|
1
|
|
2
|
|
3
|
|
4
|
|
5
|
In the Model Builder window, expand the Varga > Solver Configurations > Solution 4 (sol4) > Stationary Solver 1 node, then click Direct.
|
|
6
|
|
7
|
|
8
|
In the Model Builder window, under Varga > Solver Configurations > Solution 4 (sol4) > Stationary Solver 1 click Parametric 1.
|
|
9
|
|
10
|
|
11
|
In the Model Builder window, under Varga > Solver Configurations > Solution 4 (sol4) > Stationary Solver 1 click Fully Coupled 1.
|
|
12
|
|
13
|
|
14
|
|
1
|
|
2
|
|
3
|
Click
|
|
4
|
|
5
|
Click OK.
|
|
6
|
|
8
|
Click
|
|
9
|
|
10
|
Click OK.
|
|
11
|
|
13
|
Click
|
|
1
|
|
2
|
Go to the Result Templates window.
|
|
3
|
|
4
|
Click the Add Result Template button in the window toolbar.
|
|
5
|
|
1
|
|
2
|
|
3
|
|
4
|
|
1
|
|
2
|
|
3
|
|
1
|
|
2
|
|
3
|
|
4
|
|
5
|
|
1
|
|
2
|
|
3
|
Locate the Plot Settings section.
|
|
4
|
|
5
|
|
6
|
|
1
|
|
2
|
|
3
|
|
5
|
|
6
|
|
7
|
Click Replace Expression in the upper-right corner of the x-Axis Data section. From the menu, choose Global definitions > Parameters > stretch - Applied stretch - 1.
|
|
8
|
|
9
|
|
11
|
|
1
|
|
2
|
|
3
|
|
4
|
Locate the Legends section. In the table, enter the following settings:
|
|
5
|
|
1
|
In the Model Builder window, under Results > Inflation Pressure right-click Point Graph 1 and choose Duplicate.
|
|
2
|
|
3
|
|
4
|
Locate the Legends section. In the table, enter the following settings:
|
|
5
|
|
1
|
|
2
|
|
3
|
|
4
|
Locate the Legends section. In the table, enter the following settings:
|
|
5
|
|
1
|
|
2
|
|
3
|
|
4
|
|
5
|
Click to expand the Coloring and Style section. Find the Line style subsection. From the Line list, choose None.
|
|
6
|
|
7
|
|
8
|
|
9
|
|
10
|
Locate the Legends section. In the table, enter the following settings:
|
|
11
|
|
1
|
|
2
|
|
3
|
|
4
|
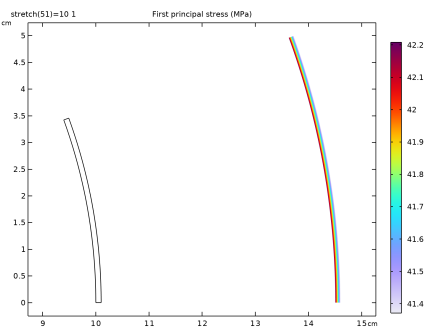
Locate the Plot Settings section. In the y-axis label text field, type First principal stress (MPa).
|
|
5
|
|
6
|
|
1
|
|
2
|
|
3
|
|
1
|
|
2
|
|
3
|
|
1
|
|
2
|
|
3
|
|
1
|
|
2
|
|
3
|
|
1
|
|
2
|
|
1
|
|
2
|
|
3
|
|
4
|
|
5
|