|
|
|
|
•
|
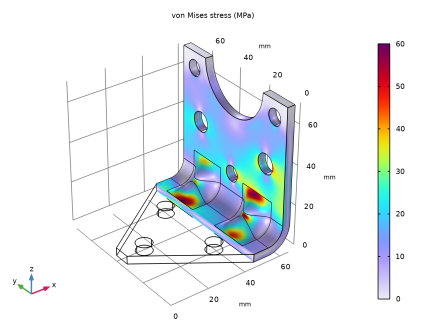
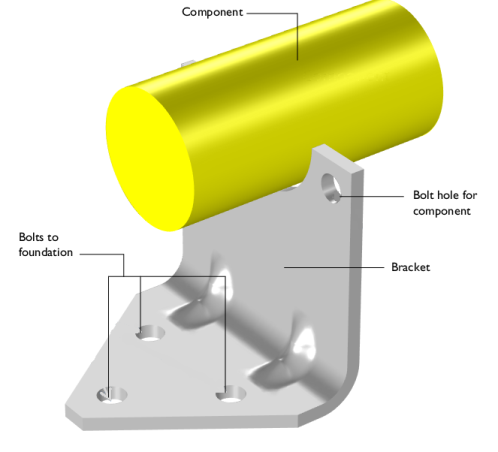
When exposed to a peak acceleration of 4g in all three global directions simultaneously, the effective stress is not allowed to exceed 80 MPa anywhere. This criterion is nondifferentiable, because the location of the peak stress can jump from one place to another. A gradient-free optimization algorithm must thus be used.
|
|
•
|

|
1
|
In SOLIDWORKS open the file bracket_optimization.SLDPRT located in the model’s Application Library folder.
|
|
1
|
|
2
|
|
3
|
Click Add.
|
|
4
|
Click
|
|
5
|
|
6
|
Click
|
|
1
|
|
2
|
|
3
|
|
1
|
|
2
|
|
3
|
Click Synchronize.
|
|
4
|
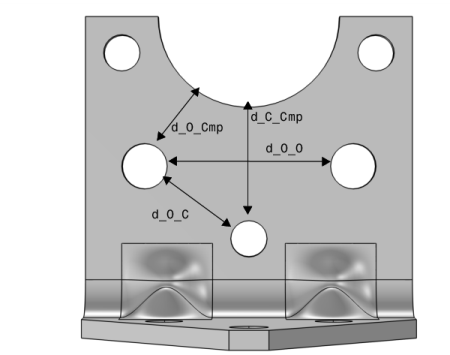
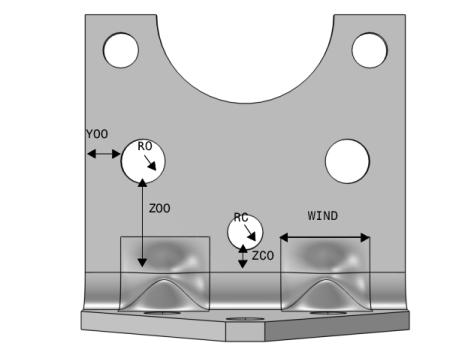
Click to expand the Parameters in CAD Package section. The table contains ten dimensions, THK, LX, LZ, DCMP, BDIA, RC, ZCO, RO, YOO and ZOO, which are part of the SOLIDWORKS model. In SOLIDWORKS, the Parameter Selection button on the COMSOL Multiphysics tab allows you to select and view dimensions for synchronization. These dimensions are retrieved, and appear in the CAD name column of the table. The corresponding entries in the COMSOL name column, LL_THK, LL_LX and so on, are global parameters in the COMSOL model. These are automatically generated during synchronization, and are assigned the values of the linked SOLIDWORKS dimensions. The parameter values are displayed in the COMSOL value column.
|
|
5
|
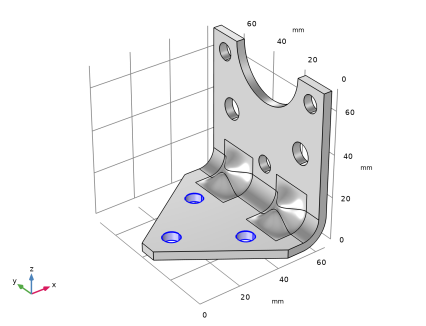
Click to expand the Boundary Selections section. The selections listed here are user defined selections saved in the SOLIDWORKS files for the components that they appear on. In SOLIDWORKS, you can set up selections using the Selections button on the COMSOL Multiphysics tab.
|
|
6
|
|
1
|
|
2
|
|
3
|
Click
|
|
4
|
Click
|
|
5
|
Browse to the model’s Application Libraries folder and double-click the file bracket_optimization_parameters.txt.
|
|
1
|
|
2
|
Go to the Add Material window.
|
|
3
|
|
4
|
Click the right end of the Add to Component split button in the window toolbar.
|
|
5
|
From the menu, choose Add to Component.
|
|
6
|
|
1
|
|
2
|
|
3
|
|
1
|
|
2
|
In the Settings window for Rigid Connector, type Rigid Connector (Mounted component) in the Label text field.
|
|
3
|
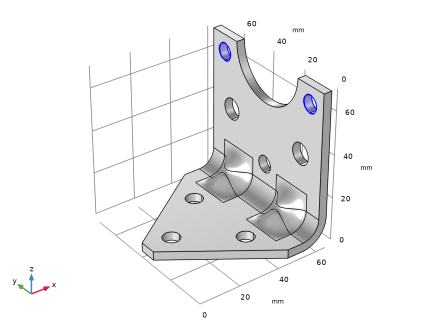
Locate the Boundary Selection section. From the Selection list, choose Rigid Connector (Mounted comp).
 |
|
4
|
|
5
|
|
1
|
|
2
|
In the Settings window for Mass and Moment of Inertia, locate the Mass and Moment of Inertia section.
|
|
3
|
|
4
|
From the list, choose Diagonal.
|
|
5
|
Specify the I matrix as
|
|
1
|
|
2
|
|
3
|
|
1
|
|
2
|
|
3
|
|
1
|
|
2
|
|
3
|
Click the Custom button.
|
|
4
|
Locate the Element Size Parameters section.
|
|
5
|
|
6
|
|
7
|
|
1
|
|
2
|
|
3
|
|
4
|
|
1
|
|
2
|
|
3
|
|
1
|
|
2
|
|
3
|
|
4
|
|
1
|
|
2
|
In the Settings window for Applied Force, type Force 4g on mounted component in the Label text field.
|
|
3
|
|
1
|
|
2
|
Go to the Add Study window.
|
|
3
|
|
4
|
Click the Add Study button in the window toolbar.
|
|
5
|
|
1
|
|
2
|
|
1
|
|
2
|
|
3
|
|
4
|
Click Replace Expression in the upper-right corner of the Expression section. From the menu, choose Component 1 (comp1) > Solid Mechanics > Material properties > solid.rho - Density - kg/m³.
|
|
1
|
|
2
|
|
3
|
|
4
|
|
5
|
Click Replace Expression in the upper-right corner of the Expression section. From the menu, choose Component 1 (comp1) > Solid Mechanics > Stress > solid.mises - von Mises stress - N/m².
|
|
1
|
|
2
|
|
1
|
|
2
|
|
3
|
|
1
|
|
2
|
|
1
|
|
2
|
|
3
|
|
4
|
|
1
|
|
2
|
Go to the Add Study window.
|
|
3
|
|
4
|
Click the Add Study button in the window toolbar.
|
|
5
|
|
1
|
|
2
|
|
3
|
|
1
|
|
2
|
|
3
|
|
1
|
|
2
|
|
3
|
|
4
|
|
5
|
|
6
|
Click Replace Expression in the upper-right corner of the Objective Function section. From the menu, choose Component 1 (comp1) > Definitions > comp1.mass - Domain Probe 1 - kg.
|
|
7
|
Locate the Objective Function section. In the table, enter the following settings:
|
|
8
|
|
9
|
|
10
|
Browse to the model’s Application Libraries folder and double-click the file bracket_optimization_ctrlvars.txt.
|
|
11
|
Locate the Constraints section. In the table, enter the following settings:
|
|
12
|
|
1
|
|
2
|
Click
|
|
1
|
|
2
|
|
1
|
In the Objective Table 3 table, right-click the last row and select Copy Selected Rows to New Parameter Cases.
|
|
1
|
In the Model Builder window, expand the Global Definitions > Parameters 1 node, then click Parameters 1.
|
|
2
|
|
1
|
|
2
|