PDF

Strength Reduction Method for Slope Stability
Introduction
The strength reduction method in combination with finite element analysis is a tool to find the factor of safety (FOS) in geomechanics, particularly for the stability of slopes and embankments. In the strength reduction method, the characteristic material properties are gradually reduced until failure occurs. Although the definition of an FOS depends on the context, in geotechnical problems it is defined with respect to the strength parameters of the soil, as discussed in Ref. 1.
The strength reduction method is applicable to linear failure criteria, like the Mohr–Coulomb criterion. When the Mohr–Coulomb criterion is used with the strength reduction method, the cohesion, the angle of internal friction, and the dilatation angle are simultaneously reduced until mechanical equilibrium is lost. Decreasing the material parameters results in a reduction of the shear strength of the soil, which eventually becomes unstable. This phenomena produces a collapse of the slope for a certain combination of loads, material parameters, and boundary conditions. The ratio between the initial cohesion and the cohesion at failure gives the FOS. More details of the method are given in Ref. 1 and Ref. 2.
The geometry, boundary conditions, loading conditions, and material parameters in this example are the same as discussed in Ref. 1. A similar example model can be found in Slope Stability in an Embankment Dam.
Model Definition
Figure 1 shows a cross section of the soil embankment. The lengths L1 and L2 are 85 m, and 20 m, respectively, and the heights of the embankment H1 and H2 are 20 m and 10 m, respectively. The slope angle α varies from 15° to 45°.
Figure 1: Geometry of the cross-section of an embankment.
The material properties for both associative and nonassociative plasticity are summarized in Table 1, and taken from Ref. 1.
ν
ϕ
ψ
ρ
A plane strain approximation is used to model the soil embankment in 2D. The effect of gravity is included. The material properties for the Mohr–Coulomb model are parameterized with respect to a factor of safety parameter, FOS. A parametric study increases the FOS parameter, thereby reducing the strength of the soil with every parameter step. The actual factor of safety is the value of the FOS parameter at which the model no longer converges, which is an indication of the collapse of the slope.
The Mohr–Coulomb yield function F and plastic potential Q are
(1)
(2)
where I1 is the first stress invariant and J2 is the second deviatoric stress invariant. The parameterized cohesion C, parameterized angle of internal friction Φ, and parameterized dilatation angle Φ are given in terms of the FOS,
(3)
where c is the cohesion, ϕ is the angle of internal friction, and ψ is the dilatation angle. Note that c, ϕ, and ψ are initial, unreduced material parameters. For the associative flow rule, ϕ = ψ.
For the nonassociative flow rule, ψ is kept constant as long as it is smaller than Φ, see Ref. 2 for details. However, in this example, ψ is zero when using the nonassociative flow rule, so no special treatment is needed, and Equation 3 is applicable to the associative as well as the nonassociative flow rule.
For the nonassociative flow rule, the strength reduction method might trigger numerical instabilities, which in turn can result in a nonunique failure surface and corresponding FOS. To avoid potential instabilities and convergence issues, the Davis procedure B approach, as suggested in Ref. 1 and Ref. 2, is used. In this approach, the associative flow rule is applied with reduced values of the cohesion and the angle of internal friction to capture the effects of the nonassociative flow rule. The reduced cohesion c' and the reduced angle of internal friction ϕ' are given by
(4)
where the reduction factor β is
Hence, Equation 3 is rewritten in terms of the reduced cohesion c' and the reduced angle of internal friction ϕ' for the associative and nonassociative flow rules, as the reduction factor β is unity for the associative flow rule.
Results and Discussion
The factor of safety (FOS) for different slope angles is shown in Figure 2. The FOS decreases as the slope angle increases, which is expected. The FOS for the same slope inclination with the nonassociative flow rule (material case 1) is always smaller than for the associative flow rule (material case 2), but the influence of the nonassociative flow rule is marginal for the material parameters chosen. The results presented in Figure 2 are in good agreement with the results presented in Figure 4 of Ref. 1. As a verification that we have reached failure, the maximum displacement of the soil embankment is shown in Figure 3 as a function of the FOS for all analyzed cases.
Figure 2: Factor of safety versus slope angle.
Figure 3: Maximum displacement in the soil embankment versus the factor of safety for material case 1 (solid) and material case 2(dashed).
The equivalent plastic strain for different slope angles just before collapse is shown in Figure 4 and Figure 5 for the two material sets. The localization of plastic strains in the figures gives an indication of the failure surface for different slope angles. It is evident that for lower slope angles, multiple failure surfaces develop in the embankment.
A 3D visualization of the displacement for a slope angle equal to 45° is shown in Figure 6. The results are qualitatively in good agreement with the results presented in Figure 2 of Ref. 1. The figures also clearly show how parts of the embankment outside the slip surface start sliding once the material becomes unstable.
Figure 4: Equivalent plastic strain just before collapse for material case 1 (nonassociative flow).
Figure 5: Equivalent plastic strain just before collapse for material case 2 (associative flow).
Figure 6: Displacement magnitude in the soil embankment.
Notes About the COMSOL Implementation
Two stationary study steps are added. The first study step computes the in-situ stresses due to gravity. The Mohr–Coulomb criterion is added in the second study to compute the elastoplastic failure due to the combined effect of gravity and the reduction in strength, where the initial stresses generated in the first step are incorporated in the analysis with the help of an Initial Stress and Strain node.
Two outer parametric sweeps are added to change the slope angle and the set of material parameters. A Stop Condition is added to the continuation parameter sweep such that the solution stops when the maximum displacement in the embankment exceeds a tenth of the length of the slope.
References
1. H.F. Schweiger “Strength reduction technique with finite element method for slopes without stabilization measures,” Benchmark, International Magazine for Engineers, Designers and Analysts from NAFEMS, pp. 51–58, 2020.
2. S. Oberhollenzer, F. Tschuchnigg, and H.F. Schweiger “Finite element analysis of slope stability problems using non-associated plasticity,” Journal of Rock Mechanics and Geotechnical Engineering, vol. 10, pp. 1091–1101, 2018.
Application Library path: Geomechanics_Module/Verification_Examples/strength_reduction_method
Modeling Instructions
From the File menu, choose New.
New
In the New window, click  Model Wizard.
Model Wizard
1
In the Model Wizard window, click  2D.
2
In the Select Physics tree, select Structural Mechanics > Solid Mechanics (solid).
3
4
Click  Study.
5
In the Select Study tree, select General Studies > Stationary.
6
Parameters for the model geometry, material, and solver are available in the appended text files.
Global Definitions
Geometry and Solver Parameters
1
In the Model Builder window, under Global Definitions click Parameters 1.
2
In the Settings window for Parameters, type Geometry and Solver Parameters in the Label text field.
3
Locate the Parameters section. Click  Load from File.
4
Material Parameters
1
In the Home toolbar, click  Parameters and choose Add > Parameters.
2
In the Settings window for Parameters, type Material Parameters in the Label text field.
3
Locate the Parameters section. Click  Load from File.
4
5
In the Home toolbar, click  Parameter Case.
6
In the Home toolbar, click  Parameter Case.
7
In the Settings window for Case, locate the Parameters section.
8
Click  Load from File.
9
Definitions
Define the parameterized cohesion and angle of internal friction for the Mohr–Coulomb criterion.
Variables 1
1
In the Model Builder window, expand the Component 1 (comp1) > Definitions node.
2
Right-click Definitions and choose Variables.
3
In the Settings window for Variables, locate the Variables section.
4
Geometry 1
Polygon 1 (pol1)
1
In the Geometry toolbar, click  Polygon.
2
In the Settings window for Polygon, locate the Coordinates section.
3
From the Data source list, choose Vectors.
4
In the x text field, type 0, L1,L1,L2+Lslope,L2,0.
5
In the y text field, type 0, 0, H1+H2,H1+H2,H1,H1.
6
Click  Build Selected.
Solid Mechanics (solid)
Linear Elastic Material 1
1
In the Model Builder window, under Component 1 (comp1) > Solid Mechanics (solid) click Linear Elastic Material 1.
2
In the Settings window for Linear Elastic Material, locate the Quadrature Settings section.
3
Select the Reduced integration checkbox.
Soil Plasticity 1
1
In the Physics toolbar, click  Attributes and choose Soil Plasticity.
2
In the Settings window for Soil Plasticity, locate the Soil Plasticity Model section.
3
From the Ff list, choose Mohr–Coulomb.
4
Click to expand the Nonlocal Plasticity Model section. From the list, choose Implicit gradient.
5
In the lint text field, type 0.1.
Linear Elastic Material 1
In the Model Builder window, click Linear Elastic Material 1.
Initial Stress and Strain 1
1
In the Physics toolbar, click  Attributes and choose Initial Stress and Strain.
Add two study steps in order to account for the in situ stresses due to gravity. Add the in situ stresses computed in the first study step as initial stresses for the second study step. You can access these stresses using the withsol operator as follows:
2
In the Settings window for Initial Stress and Strain, locate the Initial Stress and Strain section.
3
Specify the S0 matrix as
Gravity 1
In the Physics toolbar, click  Global and choose Gravity.
Roller 1
1
In the Physics toolbar, click  Boundaries and choose Roller.
2
Fixed Constraint 1
1
In the Physics toolbar, click  Boundaries and choose Fixed Constraint.
2
Materials
Soil Material
1
In the Model Builder window, under Component 1 (comp1) right-click Materials and choose Blank Material.
2
In the Settings window for Material, type Soil Material in the Label text field.
3
Locate the Material Contents section. In the table, enter the following settings:
Mesh 1
Mapped 1
In the Mesh toolbar, click  Mapped.
Size 1
1
Right-click Mapped 1 and choose Size.
2
In the Settings window for Size, locate the Element Size section.
3
Click the Custom button.
4
Locate the Element Size Parameters section.
5
Select the Maximum element size checkbox. In the associated text field, type 0.75.
6
In the Model Builder window, right-click Mesh 1 and choose Build All.
The material strengths are parameterized with the help of the FOS parameter. Add an auxiliary sweep for FOS in the second study step.
Add two Parametric Sweep nodes to change the slope angle and the material parameters.
Study 1
Step 1: Stationary
1
In the Model Builder window, under Study 1 click Step 1: Stationary.
2
In the Settings window for Stationary, locate the Physics and Variables Selection section.
3
Select the Modify model configuration for study step checkbox.
4
In the tree, select Component 1 (comp1) > Solid Mechanics (solid) > Linear Elastic Material 1 > Soil Plasticity 1 and Component 1 (comp1) > Solid Mechanics (solid) > Linear Elastic Material 1 > Initial Stress and Strain 1.
5
Step 2: Stationary 2
1
In the Study toolbar, click  Stationary.
2
In the Settings window for Stationary, click to expand the Values of Dependent Variables section.
3
Find the Initial values of variables solved for subsection. From the Settings list, choose User controlled.
4
Click to expand the Study Extensions section. Select the Auxiliary sweep checkbox.
5
6
Parametric Sweep
1
In the Study toolbar, click  Parametric Sweep.
2
In the Settings window for Parametric Sweep, locate the Study Settings section.
3
4
Parametric Sweep 2
1
In the Study toolbar, click  Parametric Sweep.
2
In the Settings window for Parametric Sweep, locate the Study Settings section.
3
From the Sweep type list, choose Parameter switch.
4
5
Solution 1 (sol1)
1
In the Study toolbar, click  Show Default Solver.
2
In the Model Builder window, expand the Solution 1 (sol1) node.
3
In the Model Builder window, expand the Study 1 > Solver Configurations > Solution 1 (sol1) > Stationary Solver 2 node, then click Parametric 1.
4
In the Settings window for Parametric, locate the General section.
5
From the On error list, choose Skip parameter step.
6
Click to expand the Continuation section. Select the Tuning of step size checkbox.
7
In the Initial step size text field, type 0.2.
8
In the Maximum step size text field, type 0.2.
9
From the Predictor list, choose Constant.
10
Click to expand the Output section. From the Parameters to store list, choose Steps taken by solver.
Add a Stop Condition to stop the solution when the maximum displacement in the embankment exceeds a tenth of the length of the slope.
11
Right-click Study 1 > Solver Configurations > Solution 1 (sol1) > Stationary Solver 2 > Parametric 1 and choose Stop Condition.
Definitions
Maximum 1 (maxop1)
1
In the Definitions toolbar, click  Nonlocal Couplings and choose Maximum.
2
Study 1
Solution 1 (sol1)
1
In the Model Builder window, under Study 1 > Solver Configurations > Solution 1 (sol1) > Stationary Solver 2 > Parametric 1 click Stop Condition 1.
2
In the Settings window for Stop Condition, locate the Stop Expressions section.
3
4
5
In the Model Builder window, under Study 1 > Solver Configurations > Solution 1 (sol1) > Stationary Solver 2 click Fully Coupled 1.
6
In the Settings window for Fully Coupled, click to expand the Method and Termination section.
7
From the Nonlinear method list, choose Constant (Newton).
8
In the Maximum number of iterations text field, type 8.
9
In the Study toolbar, click  Compute.
Create a plot showing the FOS as a function of the slope angle for the two sets of material parameters.
Results
Evaluation Group 1
1
In the Results toolbar, click  Evaluation Group.
2
In the Settings window for Evaluation Group, click to expand the Format section.
3
From the Include parameters list, choose Off.
Global Evaluation 1
1
Right-click Evaluation Group 1 and choose Global Evaluation.
2
In the Settings window for Global Evaluation, locate the Data section.
3
From the Dataset list, choose Study 1/Parametric Solutions 1 (sol3).
4
From the Material Parameters list, choose From list.
5
In the Material Parameters list box, select Case 1.
6
From the Parameter selection (FOS) list, choose Last.
7
Locate the Expressions section. In the table, enter the following settings:
Global Evaluation 2
1
Right-click Global Evaluation 1 and choose Duplicate.
2
In the Settings window for Global Evaluation, locate the Expressions section.
3
Global Evaluation 3
1
Right-click Global Evaluation 2 and choose Duplicate.
2
In the Settings window for Global Evaluation, locate the Data section.
3
In the Material Parameters list box, select Case 2.
4
In the Evaluation Group 1 toolbar, click  Evaluate.
FOS vs. Slope Angle
1
In the Results toolbar, click  1D Plot Group.
2
In the Settings window for 1D Plot Group, type FOS vs. Slope Angle in the Label text field.
3
Locate the Plot Settings section.
4
Select the y-axis label checkbox. In the associated text field, type Factor of safety (1).
Table Graph 1
1
Right-click FOS vs. Slope Angle and choose Table Graph.
2
In the Settings window for Table Graph, locate the Data section.
3
From the Source list, choose Evaluation group.
4
Locate the Coloring and Style section. Find the Line markers subsection. From the Marker list, choose Circle.
5
Click to expand the Legends section. Select the Show legends checkbox.
6
From the Legends list, choose Manual.
7
8
In the FOS vs. Slope Angle toolbar, click  Plot.
Create a plot showing the maximum displacement in the embankment as a function of the FOS for all analysis cases.
Displacement vs. FOS
1
In the Results toolbar, click  1D Plot Group.
2
In the Settings window for 1D Plot Group, type Displacement vs. FOS in the Label text field.
3
Click to expand the Title section. From the Title type list, choose None.
4
Locate the Legend section. From the Position list, choose Upper left.
5
Locate the Plot Settings section.
6
Select the x-axis label checkbox. In the associated text field, type Factor of safety (1).
Global 1
1
Right-click Displacement vs. FOS and choose Global.
2
In the Settings window for Global, click to expand the Legends section.
3
Locate the Data section. From the Dataset list, choose Study 1/Parametric Solutions 1 (sol3).
4
From the Material Parameters list, choose From list.
5
In the Material Parameters list box, select Case 1.
6
Locate the y-Axis Data section. In the table, enter the following settings:
7
Locate the Legends section. From the Legends list, choose Evaluated.
8
In the Legend text field, type \alpha = eval(alpha,deg)<sup>\circ</sub>.
Global 2
1
Right-click Global 1 and choose Duplicate.
2
In the Settings window for Global, locate the Data section.
3
In the Material Parameters list box, select Case 2.
4
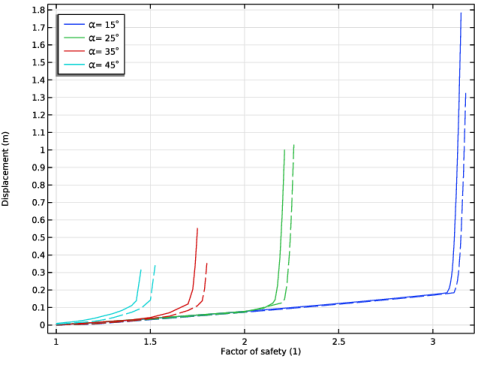
Click to expand the Coloring and Style section. Find the Line style subsection. From the Line list, choose Dashed.
5
From the Color list, choose Cycle (reset).
6
Locate the Legends section. Clear the Show legends checkbox.
7
In the Displacement vs. FOS toolbar, click  Plot.
Add plots to visualize the failure of the embankment for all cases.
Result Templates
1
In the Results toolbar, click  Result Templates to open the Result Templates window.
2
Go to the Result Templates window.
3
In the tree, select Study 1/Parametric Solutions 1 (sol3) > Solid Mechanics > Equivalent Plastic Strain (solid).
4
Click the Add Result Template button in the window toolbar.
5
In the Results toolbar, click  Result Templates to close the Result Templates window.
Results
Equivalent Plastic Strain (Case 1)
1
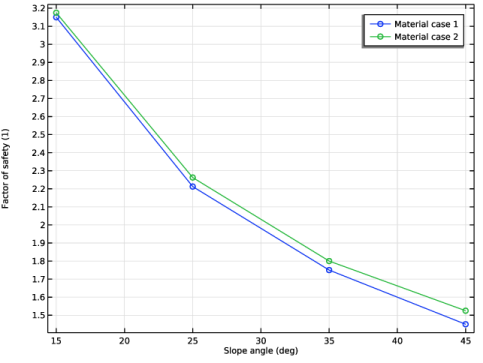
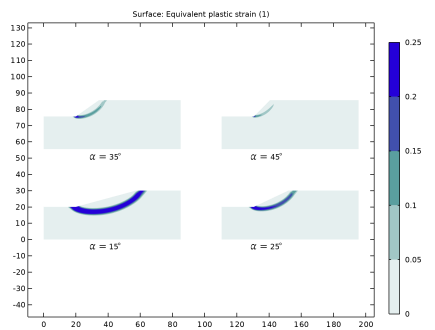
In the Settings window for 2D Plot Group, type Equivalent Plastic Strain (Case 1) in the Label text field.
2
Locate the Data section. From the Dataset list, choose None.
3
Click to expand the Title section. From the Title type list, choose Custom.
4
Find the Solution subsection. Clear the Solution checkbox.
5
Locate the Plot Settings section. Clear the Plot dataset edges checkbox.
6
Click to expand the Plot Array section. From the Array type list, choose Square.
Surface 1
1
In the Model Builder window, expand the Equivalent Plastic Strain (Case 1) node, then click Surface 1.
2
In the Settings window for Surface, locate the Data section.
3
From the Dataset list, choose Study 1/Parametric Solutions 1 (sol3).
4
Click to expand the Range section. Select the Manual color range checkbox.
5
In the Maximum text field, type 0.25.
6
Locate the Coloring and Style section. In the Number of bands text field, type 5.
Solution Array 1
1
Right-click Surface 1 and choose Solution Array.
2
In the Settings window for Solution Array, locate the Data section.
3
From the Material Parameters list, choose First.
4
From the Parameter selection (FOS) list, choose Last.
5
Locate the Plot Array section. From the Array shape list, choose Square.
Equivalent Plastic Strain (Case 1)
In the Model Builder window, under Results click Equivalent Plastic Strain (Case 1).
Table Annotation 1
1
In the Equivalent Plastic Strain (Case 1) toolbar, click  More Plots and choose Table Annotation.
2
In the Settings window for Table Annotation, locate the Data section.
3
From the Source list, choose Local table.
4
5
Select the LaTeX markup checkbox.
6
Locate the Coloring and Style section. Clear the Show point checkbox.
7
In the Equivalent Plastic Strain (Case 1) toolbar, click  Plot.
8
Click the  Zoom Extents button in the Graphics toolbar.
Set up a duplicate plot group for the second material parameter case.
Equivalent Plastic Strain (Case 2)
1
Right-click Equivalent Plastic Strain (Case 1) and choose Duplicate.
2
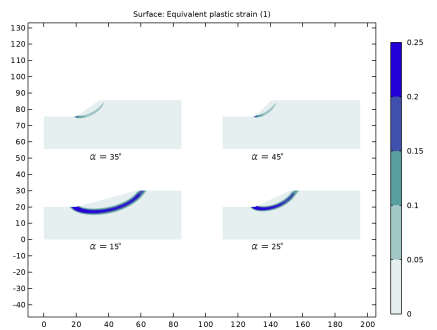
In the Settings window for 2D Plot Group, type Equivalent Plastic Strain (Case 2) in the Label text field.
3
In the Model Builder window, expand the Equivalent Plastic Strain (Case 2) node.
Solution Array 1
1
In the Model Builder window, expand the Results > Equivalent Plastic Strain (Case 2) > Surface 1 node, then click Solution Array 1.
2
In the Settings window for Solution Array, locate the Data section.
3
From the Material Parameters list, choose Last.
4
In the Equivalent Plastic Strain (Case 2) toolbar, click  Plot.
5
Click the  Zoom Extents button in the Graphics toolbar.
Create a 3D visualization of the displacements in the embankment at failure.
Extrusion 2D 1
1
In the Results toolbar, click  More Datasets and choose Extrusion 2D.
2
In the Settings window for Extrusion 2D, locate the Data section.
3
From the Dataset list, choose Study 1/Parametric Solutions 1 (sol3).
4
Locate the Extrusion section. In the z maximum text field, type L1+L2.
5
Find the Embedding subsection. From the Map plane to list, choose xz-plane.
Displacement
1
In the Results toolbar, click  3D Plot Group.
2
In the Settings window for 3D Plot Group, type Displacement in the Label text field.
Surface 1
Right-click Displacement and choose Surface.
Deformation 1
1
In the Model Builder window, right-click Surface 1 and choose Deformation.
2
In the Settings window for Deformation, locate the Scale section.
3
Select the Scale factor checkbox. In the associated text field, type 1.
4
In the Displacement toolbar, click  Plot.
5
Click the  Zoom Extents button in the Graphics toolbar.