|
|
|


|
1
|
|
2
|
|
3
|
Click Add.
|
|
4
|
|
5
|
Click Add.
|
|
6
|
Click
|
|
7
|
|
8
|
Click
|
|
1
|
|
2
|
|
1
|
|
2
|
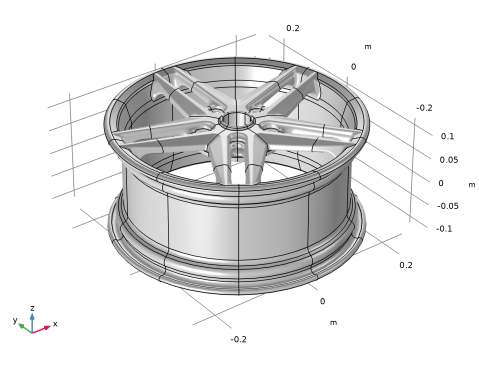
Browse to the model’s Application Libraries folder and double-click the file rim_fatigue_optimization_geom_sequence.mph.
|
|
3
|
|
4
|
|
5
|
|
1
|
|
2
|
|
3
|
|
4
|
|
5
|
Click to expand the Element Size Parameters section. Locate the Element Size section. Click the Custom button.
|
|
6
|
Locate the Element Size Parameters section.
|
|
7
|
|
1
|
|
2
|
|
3
|
|
1
|
|
2
|
|
3
|
|
4
|
|
5
|
|
6
|
Locate the Element Size Parameters section.
|
|
7
|
|
8
|
|
9
|
|
1
|
|
2
|
|
3
|
|
1
|
|
2
|
|
3
|
|
1
|
|
2
|
|
3
|
|
4
|
|
1
|
|
2
|
|
3
|
|
1
|
|
2
|
|
3
|
|
1
|
|
2
|
|
3
|
|
4
|
|
5
|
Locate the Element Size Parameters section.
|
|
6
|
|
1
|
|
2
|
|
3
|
|
1
|
|
2
|
|
3
|
|
4
|
|
1
|
|
2
|
|
3
|
|
4
|
|
1
|
|
2
|
|
3
|
|
4
|
|
1
|
|
2
|
|
3
|
|
4
|
|
5
|
Click
|
|
1
|
|
2
|
|
3
|
|
1
|
|
2
|
|
3
|
|
1
|
|
2
|
|
3
|
|
4
|
|
5
|
|
1
|
|
2
|
|
3
|
|
1
|
Go to the Add Material window.
|
|
2
|
|
3
|
Click the Add to Component button in the window toolbar.
|
|
4
|
|
5
|
Click the Add to Component button in the window toolbar.
|
|
6
|
|
1
|
|
2
|
|
3
|
|
1
|
|
2
|
|
3
|
|
4
|
|
5
|
Click to expand the Material Properties section. In the Material properties tree, select Solid Mechanics > Fatigue Behavior > Stress-Based > Findley > Limit factor (f_Findley).
|
|
6
|
Click
|
|
7
|
Locate the Material Contents section. In the table, enter the following settings:
|
|
8
|
|
1
|
|
2
|
|
3
|
|
4
|
|
1
|
|
2
|
|
3
|
Locate the Geometric Entity Selection section. From the Geometric entity level list, choose Boundary.
|
|
4
|
|
5
|
Click Replace Expression in the upper-right corner of the P-norm section. From the menu, choose Component 1 (comp1) > Solid Mechanics > Stress > comp1.solid.mises - von Mises stress - N/m².
|
|
6
|
|
7
|
|
1
|
|
2
|
|
3
|
Locate the Definition section. In the Expression text field, type (min(abs(atan2(x,y)-z),abs(2*pi+atan2(x,y)-z))<pi/6)*cos(3*(atan2(x,y)-z)).
|
|
4
|
|
5
|
|
1
|
|
2
|
|
1
|
|
2
|
|
3
|
|
4
|
|
5
|
|
1
|
|
2
|
|
3
|
|
4
|
|
5
|
|
1
|
|
2
|
|
3
|
|
4
|
Locate the Coordinate System Selection section. From the Coordinate system list, choose Cylindrical System 2 (sys2).
|
|
5
|
|
1
|
|
2
|
|
3
|
|
4
|
|
1
|
|
2
|
|
3
|
In the Solve for column of the table, under Component 1 (comp1), clear the checkbox for Fatigue (ftg).
|
|
4
|
|
5
|
Click
|
|
7
|
|
8
|
|
9
|
|
10
|
|
1
|
|
2
|
Go to the Add Study window.
|
|
3
|
Find the Studies subsection. In the Select Study tree, select Preset Studies for Selected Physics Interfaces > Fatigue > Fatigue.
|
|
4
|
Click the Add Study button in the window toolbar.
|
|
1
|
|
2
|
Find the Values of variables not solved for subsection. From the Settings list, choose User controlled.
|
|
3
|
|
4
|
|
5
|
|
6
|
|
7
|
|
1
|
|
2
|
In the Settings window for Evaluation Group, type Objective and Constraints in the Label text field.
|
|
1
|
|
2
|
|
4
|
|
1
|
Go to the Objective and Constraints window.
|
|
1
|
|
2
|
|
3
|
|
1
|
|
2
|
|
3
|
|
4
|
|
1
|
|
2
|
|
3
|
|
1
|
|
2
|
|
3
|
|
1
|
Go to the Add Study window.
|
|
2
|
|
3
|
Click the Add Study button in the window toolbar.
|
|
4
|
|
1
|
|
2
|
In the Solve for column of the table, under Component 1 (comp1), clear the checkbox for Fatigue (ftg).
|
|
3
|
|
4
|
Click
|
|
1
|
|
2
|
|
3
|
|
4
|
|
5
|
Click Add Expression in the upper-right corner of the Objective Function section. From the menu, choose Component 1 (comp1) > Definitions > comp1.obj - P-norm - N/m².
|
|
6
|
|
7
|
Find the Objective settings subsection. From the Objective scaling list, choose Initial solution based to scale the objective. Do the same for the constraints.
|
|
8
|
Click Add Expression in the upper-right corner of the Constraints section. From the menu, choose Component 1 (comp1) > Definitions > Free Shape Domain 1 > comp1.fsd1.relVolume - Material volume divided by geometry volume - 1.
|
|
9
|
Locate the Constraints section. In the table, enter the following settings:
|
|
10
|
|
11
|
|
12
|
|
13
|
Select the Plot checkbox.
|
|
14
|
|
1
|
|
2
|
|
3
|
In the Model Builder window, expand the Study 3 > Solver Configurations > Solution 3 (sol3) > Optimization Solver 1 > Stationary Solver 1 > Segregated 1 node, then click Solid Mechanics.
|
|
4
|
|
5
|
From the Linear solver list, choose Suggested Iterative Solver (solid) to reduce the memory consumption.
|
|
6
|
In the Model Builder window, expand the Study 3 > Solver Configurations > Solution 3 (sol3) > Optimization Solver 1 > Stationary Solver 1 > Suggested Iterative Solver (solid) node, then click Multigrid 1.
|
|
7
|
|
8
|
|
1
|
|
2
|
|
3
|
In the Solve for column of the table, under Component 1 (comp1), clear the checkbox for Deformed Geometry.
|
|
1
|
|
2
|
|
3
|
|
1
|
|
2
|
Go to the Add Study window.
|
|
3
|
|
4
|
Find the Physics interfaces in study subsection. In the table, clear the Solve checkbox for Fatigue (ftg).
|
|
5
|
Click the Add Study button in the window toolbar.
|
|
1
|
|
2
|
In the Solve for column of the table, under Component 1 (comp1), clear the checkboxes for Shape Optimization and Deformed Geometry.
|
|
3
|
Click to expand the Values of Dependent Variables section. Find the Values of variables not solved for subsection. From the Settings list, choose User controlled.
|
|
4
|
|
5
|
|
6
|
|
7
|
Click
|
|
9
|
|
10
|
|
11
|
|
12
|
|
1
|
Go to the Add Study window.
|
|
2
|
Find the Studies subsection. In the Select Study tree, select Preset Studies for Selected Physics Interfaces > Fatigue > Fatigue.
|
|
3
|
Find the Physics interfaces in study subsection. In the table, clear the Solve checkbox for Solid Mechanics (solid).
|
|
4
|
Click the Add Study button in the window toolbar.
|
|
5
|
|
1
|
|
2
|
Find the Values of variables not solved for subsection. From the Settings list, choose User controlled.
|
|
3
|
|
4
|
|
5
|
|
6
|
|
7
|
|
1
|
In the Model Builder window, under Results > Objective and Constraints right-click Global Evaluation 1 and choose Duplicate.
|
|
2
|
|
3
|
|
4
|
Locate the Expressions section. In the table, enter the following settings:
|
|
5
|
|
1
|
|
2
|
|
3
|
|
1
|
|
2
|
|
3
|
|
4
|
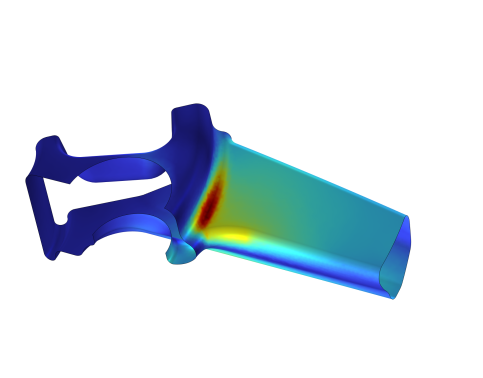
Click Add Expression in the upper-right corner of the Expressions section. From the menu, choose Component 1 (comp1) > Fatigue > ftg.fus - Fatigue usage factor - 1.
|
|
1
|
|
2
|
|
3
|
|
4
|
|
1
|
|
2
|
|
3
|
|
1
|
|
2
|
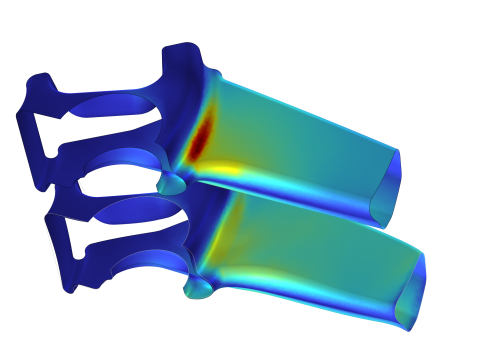
In the Settings window for Surface, click Replace Expression in the upper-right corner of the Expression section. From the menu, choose Component 1 (comp1) > Fatigue > ftg.fus - Fatigue usage factor - 1.
|
|
3
|
|
1
|
|
2
|
|
3
|
|
1
|
|
2
|
|
3
|
|
4
|
|
5
|
|
1
|
|
2
|
|
3
|
|
1
|
In the Model Builder window, under Results > Fatigue Comparison right-click Surface 1 and choose Duplicate.
|
|
2
|
|
3
|
|
4
|
|
1
|
|
2
|
|
3
|
|
1
|
|
2
|
|
3
|
|
1
|
In the Model Builder window, under Results > Fatigue Comparison right-click Line 1 and choose Duplicate.
|
|
2
|
|
3
|
|
1
|
|
2
|
|
3
|
|
4
|
|
1
|
|
2
|
In the Settings window for Deformation, click Replace Expression in the upper-right corner of the Expression section. From the menu, choose Component 1 (comp1) > Frames > Material > material.dX,...,material.dZ - Material mesh displacement (geometry frame).
|
|
3
|
|
4
|
|
5
|
|
6
|
Locate the Scale section.
|
|
7
|
|
8
|
|
1
|
|
2
|
|
3
|
|
1
|
|
2
|
|
3
|
|
4
|
|
5
|
|
6
|
|
7
|
|
1
|
|
2
|
|
3
|
In the Logical expression for inclusion text field, type centroid((pi/2-pi/5<atan2(Y,X))*(atan2(Y,X)<pi/2)).
|
|
1
|
|
2
|
|
1
|
|
2
|
|
3
|
|
4
|
|
1
|
|
2
|
|
1
|
|
2
|
|
3
|
|
4
|
|
5
|
Click
|
|
6
|
|
7
|
Locate the Selections of Resulting Entities section. Select the Resulting objects selection checkbox.
|
|
8
|
|
1
|
|
2
|
|
3
|
|
1
|
|
2
|
|
3
|
|
4
|
|
5
|
Locate the Selections of Resulting Entities section. Select the Resulting objects selection checkbox.
|
|
1
|
|
2
|
|
3
|
Select the Resulting objects selection checkbox.
|
|
1
|
|
2
|
|
3
|
|
1
|
|
2
|
|
3
|
|
1
|
|
2
|
|
3
|
|
4
|
|
5
|
|
6
|
|
7
|
Locate the Selections of Resulting Entities section. Select the Resulting objects selection checkbox.
|
|
8
|
Click
|
|
1
|
|
2
|
|
3
|
|
4
|
|
5
|
|
6
|
|
7
|
Click
|
|
1
|
|
2
|
|
3
|
|
4
|
|
5
|
|
6
|
Click OK.
|
|
1
|
|
2
|
|
3
|
|
4
|
|
5
|
|
6
|
Click
|
|
1
|
|
2
|
|
3
|
|
4
|
|
5
|
|
1
|
|
2
|
|
3
|
|
4
|
|
5
|
|
6
|
|
7
|
|
1
|
|
2
|
|
3
|
|
4
|
|
5
|
|
6
|
|
1
|
|
2
|
|
3
|
|
4
|
|
5
|
|
1
|
|
2
|
|
3
|
|
4
|
|
5
|
|
6
|
|
7
|
|
8
|
|
9
|
Click
|
|
1
|
|
2
|
|
3
|
|
4
|
|
5
|
|
6
|
Click
|
|
1
|
|
2
|
|
3
|
|
4
|
|
5
|
|
6
|
Click
|
|
1
|
|
2
|
In the Settings window for Cylinder Selection, type Critical Fillet Boundary in the Label text field.
|
|
3
|
|
4
|
|
5
|
Clear the Inner radius text field.
|
|
6
|
|
7
|
|
8
|
|
9
|
|
10
|
|
1
|
|
2
|
|
3
|
|
4
|
|
5
|
|
6
|
|
7
|
|
1
|
|
2
|
|
3
|
|
4
|
|
5
|
|
1
|
|
2
|
In the Settings window for Complement Selection, type Nonsymmetry Boundaries in the Label text field.
|
|
3
|
|
4
|
|
5
|
In the Add dialog, in the Selections to invert list, choose Symmetry Boundary 1 and Symmetry Boundary 2.
|
|
6
|
Click OK.
|
|
1
|
|
2
|
|
3
|
|
4
|
|
5
|
Click
|
|
6
|
|
7
|
Click OK.
|
|
8
|
|
9
|
|
10
|
|
11
|
|
1
|
|
2
|
|
3
|
|
4
|
|
5
|
|
6
|
Click
|
|
1
|
|
2
|
|
3
|
|
4
|
Select the Keep input objects checkbox.
|
|
5
|
Click
|
|
1
|
|
2
|
|
1
|
|
2
|
|
3
|
|
4
|
|
1
|
|
2
|
|
3
|
|
4
|
|
5
|
Click Build Preceding State.
|
|
6
|
|
7
|
|
8
|
|
9
|
Click OK.
|
|
1
|
|
2
|
|
3
|
|
4
|
|
5
|
|
6
|
|
7
|
Click
|
|
1
|
|
2
|
|
3
|
|
4
|
|
5
|
In the Add dialog, in the Selections to invert list, choose Cylinder 1, Symmetry Boundary 1, Symmetry Boundary 2, Outer Boundaries, Fixed Boundary, Nondesign Boundaries 1, and Nondesign Boundaries 2.
|
|
6
|
Click OK.
|
|
1
|
|
2
|
|
3
|
|
4
|
|
5
|
|
6
|
Click OK.
|
|
7
|
|
8
|
|
9
|
In the Add dialog, in the Selections to subtract list, choose Inner Boundaries and Critical Fillet Boundary.
|
|
10
|
Click OK.
|
|
1
|
|
2
|
|
3
|
|
4
|
|
5
|
|
6
|
|
7
|
Click OK.
|
|
1
|
|
2
|
|
3
|
|
4
|
|
5
|
|
6
|
|
7
|
|
8
|
|
9
|
|
10
|
Click OK.
|
|
1
|
|
2
|
|
3
|
|
4
|
|
5
|
|
1
|
|
2
|
In the Settings window for Cylinder Selection, type Design Sector Boundaries in the Label text field.
|
|
3
|
|
4
|
Click
|
|
5
|
|
6
|
|
1
|
|
2
|
In the Settings window for Intersection Selection, type Free Shape Boundaries in the Label text field.
|
|
3
|
|
1
|
|
2
|
|
3
|
|
4
|
|
5
|
|
6
|
|
7
|
|
8
|
Click
|
|
1
|
|
2
|
|
1
|
|
2
|
|
3
|
|
4
|
Click
|
|
1
|
|
2
|
|
3
|
|
4
|
|
5
|
In the Add dialog, in the Selections to add list, choose Symmetry Boundary 1 and Symmetry Boundary 2.
|
|
6
|
Click OK.
|
|
1
|
In the Model Builder window, under Component 1 (comp1) > Geometry 1 right-click Form Composite Faces 1 (cmf1) and choose Duplicate.
|
|
2
|
|
3
|
|
4
|
|
5
|
Click
|
|
1
|
|
2
|
In the Settings window for Difference Selection, type Boundaries to Merge 2 in the Label text field.
|
|
3
|
|
4
|
|
5
|
|
6
|
Click OK.
|
|
7
|
|
8
|
|
9
|
In the Add dialog, in the Selections to subtract list, choose Fixed Boundary, Design Boundaries, Keep Boundaries, and Symmetry Boundaries.
|
|
10
|
Click OK.
|
|
11
|
|
1
|
In the Model Builder window, under Component 1 (comp1) > Geometry 1 right-click Form Composite Faces 2 (cmf2) and choose Duplicate.
|
|
2
|
|
3
|
|
4
|
Click
|
|
1
|
|
2
|
In the Settings window for Difference Selection, type Destination Boundaries in the Label text field.
|
|
3
|
|
4
|
|
5
|
|
6
|
Click OK.
|
|
7
|
|
8
|
|
9
|
In the Add dialog, in the Selections to subtract list, choose Free Shape Boundaries and Symmetry Boundaries.
|
|
10
|
Click OK.
|
|
11
|
|
12
|
|
13
|
|
1
|
|
2
|
|
3
|
Click Build Preceding State.
|
|
4
|
Click
|
|
5
|
In the Add dialog, in the Selections to intersect list, choose Design Boundaries and Design Sector Boundaries.
|
|
6
|
Click OK.
|
|
1
|
|
2
|
|
1
|
|
2
|
In the Settings window for Cylinder Selection, type Source Critical Fillet Boundary in the Label text field.
|
|
3
|
|
4
|
|
5
|
Click
|
|
6
|
|
7
|
Click OK.
|
|
8
|
|
9
|
|
10
|
|
11
|
|
12
|
|
13
|
Click
|
|
1
|
|
2
|
|
3
|
|
4
|
|
5
|
|
6
|
|
1
|
|
2
|
|
3
|
|
4
|
Click
|
|
1
|
|
2
|
|
1
|
|
2
|
|
3
|
|
4
|
|
5
|
|
6
|
Click OK.
|
|
7
|
|
8
|
|
9
|
In the Add dialog, in the Selections to subtract list, choose Outer Boundaries and Nondesign Boundaries 1.
|
|
10
|
Click OK.
|
|
1
|
|
2
|
In the Settings window for Adjacent Selection, type External Free Shape Edges in the Label text field.
|
|
3
|
|
4
|
Click
|
|
5
|
|
6
|
Click OK.
|
|
7
|
|
8
|
|
1
|
|
2
|
|
3
|
|
4
|
|
5
|
|
6
|
|
7
|
|
8
|
|
1
|
|
2
|
|
3
|
|
4
|
|
5
|
|
6
|
|
7
|
|
1
|
|
2
|
In the Settings window for Cylinder Selection, type Unmapped and Mapped Boundaries in the Label text field.
|
|
3
|
|
4
|
|
5
|
|
6
|
|
7
|
|
8
|
|
9
|
|
1
|
|
2
|
|
3
|
|
4
|
|
5
|
|
6
|
|
7
|
|
8
|
|
9
|
|
1
|
|
2
|
|
3
|
|
4
|
|
5
|
Click
|
|
1
|
|
2
|
In the Settings window for Intersection Selection, type Mapped Boundaries 2 in the Label text field.
|
|
3
|
|
4
|
|
5
|
In the Add dialog, in the Selections to intersect list, choose Intersection Input 1 and Intersection Input 2.
|
|
6
|
Click OK.
|
|
1
|
|
2
|
|
3
|
|
4
|
|
5
|
|
6
|
Click OK.
|
|
7
|
|
8
|
|
9
|
|
10
|
Click OK.
|
|
1
|
|
2
|
|
3
|
|
4
|
|
5
|
|
6
|
|
7
|
|
8
|
|
1
|
|
2
|
|
3
|
|
4
|
|
5
|
Click
|
|
1
|
|
2
|
|
3
|
|
4
|
|
5
|
|
6
|
|
1
|
|
2
|
|
3
|
|
4
|
|
5
|
|
6
|
|
7
|
|
1
|
|
2
|
|
3
|
|
4
|
|
5
|
In the Add dialog, in the Selections to add list, choose Center Rim Boundaries and Center Hub Boundaries.
|
|
6
|
Click OK.
|
|
7
|
|
8
|
|
9
|
|
10
|
Click OK.
|
|
1
|
|
2
|
|
3
|
|
4
|
Click
|
|
5
|
|
6
|
Click OK.
|
|
7
|
|
8
|
|
9
|
|
10
|
|
11
|
|
12
|
Click OK.
|
|
1
|
|
2
|
|
3
|
|
4
|
|
5
|
|
6
|
Click OK.
|
|
1
|
|
2
|
|
3
|
|
4
|
|
5
|
Click
|
|
6
|
|
7
|
Click OK.
|
|
8
|
|
9
|
|
10
|
|
11
|
Click
|
|
1
|
|
2
|
|
3
|
|
4
|
|
5
|
Click OK.
|
|
1
|
|
2
|
|
3
|
|
4
|
|
5
|
Click
|
|
6
|
|
7
|
Click OK.
|
|
8
|
|
9
|
|
10
|
|
11
|
|
12
|
|
13
|
|
14
|
|
15
|
Click
|
|
1
|
|
2
|
|
3
|
|
4
|
|
5
|
|
6
|
|
1
|
|
2
|
|
3
|
|
4
|
|
1
|
|
2
|
|
3
|
|
4
|
|
1
|
|
2
|
|
3
|
|
4
|
|
1
|
|
2
|
|
3
|
|
4
|
|
5
|
In the Add dialog, in the Selections to add list, choose Hole 1, Hole 2, Hole 3, Hole 4, and Hole 5.
|
|
6
|
Click OK.
|
|
1
|
|
2
|
|
3
|
|
4
|
|
5
|
|
6
|
|
7
|
|
8
|
|
9
|
Click
|
|
10
|
|
11
|
Click OK.
|
|
12
|
|
1
|
|
2
|
|
3
|
|
4
|
|
5
|
Click
|
|
1
|
|
2
|
|
3
|
|
4
|
|
5
|
|
6
|
Click OK.
|
|
1
|
|
2
|
|
3
|
|
4
|
|
5
|
|
6
|
|
7
|
|
8
|
|
9
|
|
10
|
Click
|
|
11
|
|
12
|
Click OK.
|
|
13
|
|
1
|
|
2
|
|
3
|
|
4
|
|
5
|
|
6
|
Click OK.
|
|
1
|
|
2
|
|
3
|
|
4
|
|
5
|
In the Add dialog, in the Selections to add list, choose External Free Shape Edges, Hub Edges YZ, and Hub Edges 1.
|
|
6
|
Click OK.
|
|
7
|
|
8
|
|
9
|
|
10
|
Click OK.
|
|
11
|
|
12
|
In the Model Builder window, under Component 1 (comp1) > Geometry 1 right-click Edges (difsel7) and choose Group.
|
|
1
|
|
2
|
|
3
|
|
4
|
|
5
|
Clear the Interior edges checkbox.
|
|
6
|
|
7
|
In the Add dialog, in the Input selections list, choose Symmetry Boundary 1 and Symmetry Boundary 2.
|
|
8
|
Click OK.
|
|
9
|
|
1
|
|
2
|
|
3
|
|
4
|
|
5
|
|
6
|
|
7
|
Click
|
|
1
|
|
2
|
|
3
|
|
4
|
|
5
|
Click
|
|
6
|
|
7
|
Click OK.
|
|
8
|
|
1
|
|
2
|
In the Settings window for Union Selection, type Source and Destination Edges in the Label text field.
|
|
3
|
|
4
|
|
5
|
|
6
|
Click OK.
|
|
7
|
|
1
|
In the Model Builder window, under Component 1 (comp1) > Geometry 1 > Mesh right-click Partition Edge (cylsel32) and choose Duplicate.
|
|
2
|
|
3
|
|
4
|
|
5
|
Click
|
|
1
|
|
2
|
In the Settings window for Cylinder Selection, type Spoke Edges Destination 0 in the Label text field.
|
|
3
|
|
4
|
|
5
|
Click
|
|
1
|
In the Model Builder window, under Component 1 (comp1) > Geometry 1 > Mesh right-click Inner Symmetry Edges (cylsel33) and choose Duplicate.
|
|
2
|
|
3
|
|
4
|
|
5
|
|
6
|
Click
|
|
7
|
Click
|
|
8
|
|
9
|
Click OK.
|
|
10
|
|
1
|
|
2
|
In the Settings window for Cylinder Selection, type Spoke Edges Destination 1 in the Label text field.
|
|
3
|
|
4
|
|
5
|
Click
|
|
1
|
|
2
|
|
3
|
|
4
|
|
5
|
In the Add dialog, in the Selections to add list, choose Spoke Edges Destination 0, Spoke Edges Source 1, and Spoke Edges Destination 1.
|
|
6
|
Click OK.
|
|
7
|
|
1
|
In the Model Builder window, under Component 1 (comp1) > Geometry 1 > Mesh right-click Spoke Edges Destination 1 (cylsel37) and choose Duplicate.
|
|
2
|
In the Settings window for Cylinder Selection, type Spoke Edges Destination 2 in the Label text field.
|
|
3
|
|
4
|
|
5
|
Click
|
|
1
|
|
2
|
In the Settings window for Cylinder Selection, type Spoke Edges Destination 3 in the Label text field.
|
|
3
|
|
4
|
|
5
|