PDF

Cubic Autocatalysis: Exploring the Gray–Scott Model
Introduction
An autocatalytic reaction is by definition sped up by its own product. The influence of the product on the rate of the reaction typically means that the reaction is of higher order and therefore nonlinear. For the simple nonlinear model reaction A + B 2B, the autocatalysis is said to be quadratic, or to have an overall second reaction order, since it depends on two concentrations, namely those of A and B. In this model, the even more nonlinear cubic case of A + 2B 3B is studied. This model reaction, in the setting of a continuous stirred tank reactor, was the subject of a series of papers in the 1980s by the authors Gray and Scott, and their name stuck to the reaction. The authors found that the system exhibited a surprisingly rich set of behaviors, in spite of its compactness. Furthermore, if modeled spatially with competing reaction and diffusion contributions, a mesmerizing evolution of so-called Turing patterns, named after the famous British mathematician, occur.
Model Definition
The articles Ref. 1 and Ref. 2, by Gray and Scott, found that a very simple chemical reaction network consisting of one autocatalytic conversion of a substance, and a competing decay of the product, exhibit multistability in the setting of a continuous stirred tank reactor (CSTR):
(1)
(2)
Not only does the system show multistability, but under certain conditions, the system may become oscillatory. At the critical transitions between two distinct stable states, the system is exceedingly sensitive to small perturbations in parameter values.
Homogeneous Treatment
As a first step, the reaction system is studied in a 0D component, an external source is given to represent the continuous inflow in the CSTR. The sensitivity is exemplified by a parameter sweep, where the rate coefficient of the first reaction is varied in small steps, followed by the plotting of the respective results. The parameters used are presented in Table 1.
The k parameter is swept across 10 equidistant values, to highlight the multistability of the system.
Heterogeneous MODEL
A 2D component describing a square with periodic boundary conditions is generated based on the Reaction Engineering interface. It is known (see Ref. 3) that for a linear reaction system of activator or inhibitor type, instabilities in reaction-diffusion systems can only arise when the diffusion coefficient (divided by its stoichiometric multiplicity) of the activator is less than the corresponding value of the inhibitor. Inspired by this fact for linear systems, substance A is given a diffusion coefficient twice as large as B (see Table 2).
2•10-5 m2/s
1•10-5 m2/s
These initial concentrations are inspired by the motifs given in Ref. 5. It should be noted that careful tweaking of the initial conditions is needed for the system to exhibit features such as traveling wavefronts. The k parameters is swept in both cases, and the outcomes are contrasted in line plots and animations, respectively.
Results and Discussion
The results from the time-dependent study for the 0D component is shown in Figure 1.
Figure 1: Time evolution of concentration of A and B in the CSTR model for 10 different values of k. The color legend encodes k - 0.0601/s.
Notice how the lower five values of k give rise to transitional oscillations into a steady state where both A and B coexist. Whereas the higher five values of k lead to extinction.
The 2D case gives rise to some spectacular Turing patterns (see Ref. 4) for the highest value of k. Check out the end of the modeling instructions on how to use the animation player in COMSOL Multiphysics to view the time evolution of these patterns. It is well worth the effort.
The end state for the run with the highest value of k is shown in Figure 2.
Figure 2: Final  state of concentration of A (left) and B (right) for k = 0.06011.
References
1. P. Gray and S.K. Scott, “Autocatalytic Reactions in the Isothermal Continuous Stirred Tank Reactor, Isolas and other forms of multistability,” Chemical Engineering Science, vol. 38, pp. 29–43, 1983.
2. P. Gray and S.K. Scott, “Autocatalytic Reactions in the Isothermal Continuous Stirred Tank Reactor, Oscillations and instabilities in the system A + 2B=>3B; B=>C,” Chemical Engineering Science, vol. 39, pp. 1087–1097, 1984.
3. M.C. Cross and P.C. Hohenberg, “Pattern formation outside equilibrium,” Rev. Mod. Phys., vol. 65, pp. 851–1112, 1993.
4. A.M. Turing, “The chemical basis of morphogenesis,” Phil. Trans. R. Soc. Lond. B, vol. 237, pp. 37–72, 1952.
5. R.P. Munafo, “Stable localized moving patterns in the 2-D Gray-Scott model,” arXiv:1501.01990 [nlin.PS], 2014.
Application Library path: Chemical_Reaction_Engineering_Module/Ideal_Tank_Reactors/cubic_autocatalysis
Modeling Instructions
From the File menu, choose New.
New
In the New window, click  Model Wizard.
Model Wizard
1
In the Model Wizard window, click  0D.
2
In the Select Physics tree, select Chemical Species Transport > Reaction Engineering (re).
3
Click Add.
4
Click  Study.
5
In the Select Study tree, select General Studies > Time Dependent.
6
Global Definitions
Parameters 1
1
In the Model Builder window, under Global Definitions click Parameters 1.
2
In the Settings window for Parameters, locate the Parameters section.
3
Click  Load from File.
4
Reaction Engineering (re)
Reaction 1
1
In the Reaction Engineering toolbar, click  Reaction.
2
In the Settings window for Reaction, locate the Reaction Formula section.
3
In the Formula text field, type A+2B=>3B.
Species: B
1
In the Model Builder window, click Species: B.
2
In the Settings window for Species, locate the Chemical Formula section.
3
Clear the Enable formula checkbox.
Reaction 2
1
In the Reaction Engineering toolbar, click  Reaction.
2
In the Settings window for Reaction, locate the Reaction Formula section.
3
In the Formula text field, type B=>0B.
4
Locate the Rate Constants section. In the kf text field, type f+k.
Reaction 3
1
In the Reaction Engineering toolbar, click  Reaction.
2
In the Settings window for Reaction, locate the Reaction Formula section.
3
In the Formula text field, type A=>0A.
4
Locate the Rate Constants section. In the kf text field, type f.
Additional Source 1
1
In the Reaction Engineering toolbar, click  Additional Source.
2
In the Settings window for Additional Source, locate the Additional Rate Expression section.
3
In the Volumetric species table, enter the following settings:
Initial Values 1
1
In the Model Builder window, click Initial Values 1.
2
In the Settings window for Initial Values, locate the Volumetric Species Initial Values section.
3
Study 1
Parametric Sweep
1
In the Study toolbar, click  Parametric Sweep.
2
In the Settings window for Parametric Sweep, locate the Study Settings section.
3
4
Step 1: Time Dependent
1
In the Model Builder window, click Step 1: Time Dependent.
2
In the Settings window for Time Dependent, locate the Study Settings section.
3
In the Output times text field, type range(0,5,500).
4
In the Study toolbar, click  Compute.
Results
Concentration (re)
1
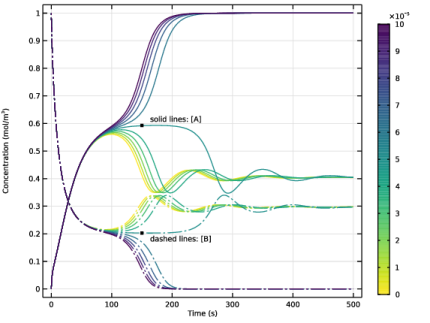
In the Model Builder window, expand the Results > Concentration (re) node, then click Concentration (re).
2
In the Settings window for 1D Plot Group, click to expand the Title section.
3
From the Title type list, choose None.
Color Expression 1
1
In the Model Builder window, right-click Global 1 and choose Color Expression.
2
In the Settings window for Color Expression, locate the Expression section.
3
In the Expression text field, type k-0.0602.
4
Locate the Coloring and Style section. From the Color table list, choose Viridis.
5
From the Color table transformation list, choose Reverse.
Global 1
1
In the Model Builder window, click Global 1.
2
In the Settings window for Global, locate the y-Axis Data section.
3
Click  Clear Table.
4
5
Click to expand the Legends section. Clear the Show legends checkbox.
Global 2
1
Right-click Results > Concentration (re) > Global 1 and choose Duplicate.
2
In the Settings window for Global, locate the y-Axis Data section.
3
4
Click to expand the Coloring and Style section. Find the Line style subsection. From the Line list, choose Dash-dot.
Color Expression 1
1
In the Model Builder window, expand the Global 2 node, then click Color Expression 1.
2
In the Settings window for Color Expression, locate the Coloring and Style section.
3
Clear the Color legend checkbox.
Annotation 1
1
In the Model Builder window, right-click Concentration (re) and choose Annotation.
2
In the Settings window for Annotation, locate the Position section.
3
In the x text field, type 150.
4
In the y text field, type 0.593.
5
Locate the Annotation section. In the Text text field, type solid lines: [A].
6
Locate the Coloring and Style section. From the Anchor point list, choose Lower left.
Annotation 2
1
Right-click Annotation 1 and choose Duplicate.
2
In the Settings window for Annotation, locate the Annotation section.
3
In the Text text field, type dashed lines: [B].
4
Locate the Position section. In the y text field, type 0.203.
5
Locate the Coloring and Style section. From the Anchor point list, choose Upper left.
6
In the Concentration (re) toolbar, click  Plot.
This is Figure 1.
Reaction Engineering (re)
Generate Space-Dependent Model 1
1
In the Reaction Engineering toolbar, click  Generate Space-Dependent Model.
2
In the Settings window for Generate Space-Dependent Model, locate the Component Settings section.
3
From the Component to use list, choose 2D: New.
4
Locate the Study Type section. From the Study type list, choose Time dependent.
5
Locate the Space-Dependent Model Generation section. Click Create/Refresh.
Definitions (comp2)
Variables 1
1
In the Model Builder window, expand the Component 2 (comp2) node.
2
Right-click Component 2 (comp2) > Definitions and choose Variables.
3
In the Settings window for Variables, locate the Variables section.
4
Click  Load from File.
5
Geometry 1(2D)
Square 1 (sq1)
1
In the Model Builder window, expand the Component 2 (comp2) node.
2
Right-click Component 2 (comp2) > Geometry 1(2D) and choose Square.
3
In the Settings window for Square, locate the Size section.
4
In the Side length text field, type 2*l.
5
Locate the Position section. In the x text field, type -l/2.
6
In the y text field, type -l/2.
Chemistry (chem)
1
In the Model Builder window, expand the Component 2 (comp2) > Chemistry (chem) node, then click Chemistry (chem).
2
In the Settings window for Chemistry, click to expand the Calculate Transport Properties section.
3
Clear the Calculate mixture properties checkbox.
Species: B
1
In the Model Builder window, under Component 2 (comp2) > Chemistry (chem) click Species: B.
2
In the Settings window for Species, locate the Chemical Formula section.
3
Clear the Enable formula checkbox.
Transport of Diluted Species (tds)
Initial Values 1
1
In the Model Builder window, expand the Component 2 (comp2) > Transport of Diluted Species (tds) node, then click Initial Values 1.
2
In the Settings window for Initial Values, locate the Initial Values section.
3
In the cA text field, type cA0.
4
In the cB text field, type cB0.
Periodic Condition 1
1
In the Physics toolbar, click  Boundaries and choose Periodic Condition.
2
Periodic Condition 2
1
In the Physics toolbar, click  Boundaries and choose Periodic Condition.
2
Fluid 1
1
In the Model Builder window, click Fluid 1.
2
In the Settings window for Fluid, locate the Diffusion section.
3
In the DcA text field, type DA.
4
In the DcB text field, type DB.
Mesh 1
Mapped 1
In the Mesh toolbar, click  Mapped.
Distribution 1
1
Right-click Mapped 1 and choose Distribution.
2
In the Settings window for Distribution, locate the Distribution section.
3
In the Number of elements text field, type 200.
4
Locate the Boundary Selection section. From the Selection list, choose All boundaries.
5
Click  Build All.
Study 2
Parametric Sweep
1
In the Study toolbar, click  Parametric Sweep.
2
In the Settings window for Parametric Sweep, locate the Study Settings section.
3
4
5
In the Study toolbar, click  Show Default Plots.
Results
Arrow Surface 1
1
In the Model Builder window, expand the Concentration, A (tds) node.
2
Right-click Arrow Surface 1 and choose Delete.
Concentration, B (tds)
In the Model Builder window, right-click Concentration, B (tds) and choose Delete.
Concentration, A (tds)
1
In the Model Builder window, under Results click Concentration, A (tds).
2
In the Settings window for 2D Plot Group, click to expand the Plot Array section.
3
From the Array type list, choose Square.
cA
1
In the Model Builder window, under Results > Concentration, A (tds) click Surface 1.
2
In the Settings window for Surface, type cA in the Label text field.
3
Click to expand the Plot Array section. Select the Manual indexing checkbox.
4
In the Column index text field, type 1.
Height Expression 1
1
Right-click cA and choose Height Expression.
2
In the Settings window for Height Expression, locate the Axis section.
3
Select the Scale factor checkbox. In the associated text field, type 1.0.
cA
1
In the Model Builder window, click cA.
2
In the Settings window for Surface, locate the Coloring and Style section.
3
From the Color table list, choose Cividis.
cB
1
Right-click cA and choose Duplicate.
2
In the Settings window for Surface, type cB in the Label text field.
3
Locate the Expression section. In the Expression text field, type cB.
4
Locate the Coloring and Style section. From the Color table list, choose Viridis.
5
Locate the Plot Array section. In the Column index text field, type 0.
Study 2
Step 1: Time Dependent
1
In the Model Builder window, under Study 2 click Step 1: Time Dependent.
2
In the Settings window for Time Dependent, locate the Study Settings section.
3
In the Output times text field, type range(0, 1, 10-1) range(10, 10, 300-10) range(300, 100, 1000-100) range(1e3, 1e3, 2e4-1e3) range(2e4, 2.5e3, 5e4-2.5e3) range(5e4, 1e4, 1e5-1e4) range(1e5, 2.5e4, 6e5).
4
From the Tolerance list, choose User controlled.
5
In the Relative tolerance text field, type 0.001.
6
Click to expand the Results While Solving section. Select the Plot checkbox.
7
8
In the Study toolbar, click  Compute.
Results
Concentration, A (tds)
1
In the Settings window for 2D Plot Group, click to expand the Title section.
2
From the Title type list, choose None.
3
Locate the Color Legend section. Select the Show units checkbox.
4
From the Position list, choose Alternating.
Animation 1
1
In the Concentration, A (tds) toolbar, click  Animation and choose Player.
2
In the Settings window for Animation, locate the Frames section.
3
From the Frame selection list, choose All.
4
Click the  Play button in the Graphics toolbar.
This is Figure 2. Change the animation to show the time evolution corresponding to the intermediate value of k.
5
Locate the Animation Editing section. From the Parameter value (k (1/s)) list, choose 0.06105.
6
Click the  Play button in the Graphics toolbar.