
|
|
|

|
|
|
1
|
|
2
|
In the Select Physics tree, select Fluid Flow > Multiphase Flow > Three-Phase Flow, Phase Field > Laminar Three-Phase Flow, Phase Field.
|
|
3
|
Click Add.
|
|
4
|
Click
|
|
5
|
|
6
|
Click
|
|
1
|
|
2
|
|
3
|
|
1
|
|
2
|
|
3
|
Click
|
|
4
|
Browse to the model’s Application Libraries folder and double-click the file three_phase_bubble_parameters.txt.
|
|
1
|
In the Model Builder window, under Component 1 (comp1) right-click Definitions and choose Variables.
|
|
2
|
|
3
|
Click
|
|
4
|
Browse to the model’s Application Libraries folder and double-click the file three_phase_bubble_variables.txt.
|
|
1
|
|
2
|
|
3
|
|
4
|
|
5
|
|
6
|
|
7
|
|
8
|
|
1
|
|
2
|
|
3
|
|
4
|
|
5
|
|
6
|
|
1
|
|
2
|
|
1
|
In the Model Builder window, under Component 1 (comp1) > Ternary Phase Field (terpf) click Mixture Properties 1.
|
|
2
|
|
3
|
|
4
|
Locate the Surface Tension section. From the Surface tension coefficient of interface between phase A and phase B list, choose User defined. In the σA,B text field, type sigma_AB.
|
|
5
|
From the Surface tension coefficient of interface between phase B and phase C list, choose User defined. In the σB,C text field, type sigma_BC.
|
|
6
|
From the Surface tension coefficient of interface between phase A and phase C list, choose User defined. In the σA,C text field, type sigma_AC.
|
|
1
|
|
3
|
|
4
|
|
1
|
|
1
|
|
2
|
|
3
|
|
1
|
In the Model Builder window, under Component 1 (comp1) > Multiphysics click Three-Phase Flow, Phase Field 1 (tfpf1).
|
|
2
|
|
3
|
Click
|
|
1
|
In the Model Builder window, under Component 1 (comp1) > Materials > Multiphase Material 1 (mpmat1) click Phase 1 (mpmat1.phase1).
|
|
2
|
|
4
|
|
1
|
In the Model Builder window, under Component 1 (comp1) > Materials > Multiphase Material 1 (mpmat1) click Phase 2 (mpmat1.phase2).
|
|
2
|
|
3
|
Locate the Material Contents section. In the table, enter the following settings:
|
|
1
|
|
2
|
|
4
|
|
1
|
|
2
|
|
3
|
|
4
|
Select the Cutoff checkbox.
|
|
5
|
Click
|
|
1
|
|
2
|
|
3
|
Select the Include gravity checkbox.
|
|
1
|
|
2
|
|
3
|
Specify the g vector as
|
|
1
|
|
1
|
|
2
|
|
3
|
From the list, choose User-controlled mesh.
|
|
1
|
|
2
|
|
3
|
Click the Custom button.
|
|
4
|
|
5
|
Click
|
|
1
|
|
2
|
|
3
|
|
1
|
|
2
|
|
3
|
Select the Plot checkbox.
|
|
4
|
|
1
|
In the Model Builder window, expand the Study 1 > Solver Configurations > Solution 1 (sol1) node, then click Time-Dependent Solver 1.
|
|
2
|
|
3
|
|
4
|
|
1
|
|
2
|
Right-click Study 1 > Solver Configurations > Solution 1 (sol1) > Time-Dependent Solver 1 and choose Get Initial Value.
|
|
1
|
|
3
|
|
1
|
|
2
|
|
3
|
|
4
|
|
5
|
|
6
|
|
7
|
|
8
|
Clear the Color legend checkbox.
|
|
9
|
|
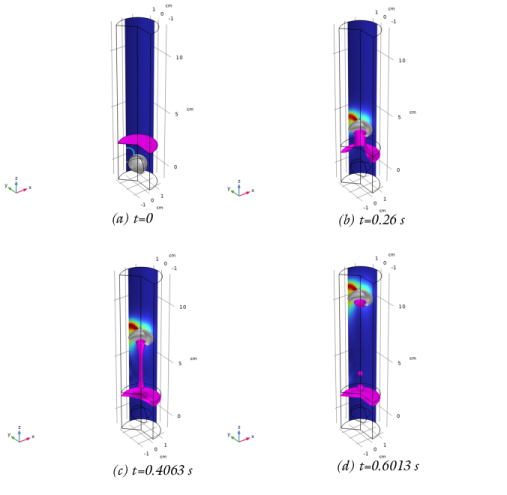
1
|
|
2
|
|
3
|
|
4
|
|
5
|
|
6
|
|
7
|
|
8
|
|
9
|
|
10
|
|
1
|
|
2
|
|
3
|
|
4
|
|
5
|
|
1
|
|
2
|
|
3
|
|
4
|
|
5
|
|
6
|
|
7
|
Locate the Scale section.
|
|
8
|
|
9
|
|
1
|
|
2
|
|
3
|
|
4
|
|
5
|
|
6
|
|
7
|
|
8
|
|
9
|
|
10
|
|
11
|
|
12
|
|
1
|
|
2
|
|
3
|
|
4
|
Locate the Expressions section. In the table, enter the following settings:
|
|
5
|
Click
|
|
1
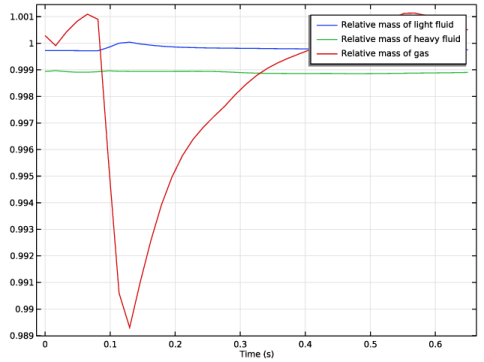
|
Go to the Table 1 window.
|
|
2
|
Click the Table Graph button in the window toolbar.
|
|
1
|
|
2
|
Select the Show legends checkbox.
|
|
3
|