|
|
|
|
1
|
|
2
|
|
3
|
Click Add.
|
|
4
|
|
5
|
Click Add.
|
|
6
|
Click
|
|
7
|
In the Select Study tree, select Preset Studies for Selected Physics Interfaces > Lithium-Ion Battery > Time Dependent with Initialization.
|
|
8
|
Click
|
|
1
|
|
2
|
|
3
|
Click
|
|
4
|
Browse to the model’s Application Libraries folder and double-click the file internal_short_circuit_parameters.txt.
|
|
1
|
|
2
|
|
3
|
|
4
|
|
5
|
Click to expand the Layers section. In the table, enter the following settings:
|
|
6
|
Click
|
|
1
|
|
2
|
|
3
|
|
4
|
Locate the Coordinates section. In the table, enter the following settings:
|
|
1
|
|
2
|
|
3
|
|
4
|
|
5
|
|
1
|
|
2
|
|
3
|
|
4
|
|
5
|
Click
|
|
6
|
Click
|
|
1
|
|
2
|
|
3
|
|
4
|
Locate the Coordinates section. In the table, enter the following settings:
|
|
5
|
Click
|
|
1
|
|
2
|
|
1
|
|
2
|
|
1
|
|
2
|
|
1
|
|
2
|
|
1
|
|
2
|
|
1
|
|
2
|
|
1
|
|
2
|
|
3
|
|
4
|
In the Add dialog, in the Selections to add list, choose Negative CC, Positive CC, and Penetrating Filament.
|
|
5
|
Click OK.
|
|
1
|
|
2
|
|
3
|
|
1
|
|
2
|
|
3
|
|
1
|
|
2
|
|
3
|
|
4
|
|
5
|
|
6
|
Click OK.
|
|
1
|
|
2
|
Go to the Add Material window.
|
|
3
|
|
4
|
Click the Add to Component button in the window toolbar.
|
|
5
|
|
6
|
Click the Add to Component button in the window toolbar.
|
|
7
|
In the tree, select Battery > Electrodes > NMC 111, LiNi0.33Mn0.33Co0.33O2 (Positive, Li-ion Battery).
|
|
8
|
Click the Add to Component button in the window toolbar.
|
|
9
|
|
10
|
Click the Add to Component button in the window toolbar.
|
|
11
|
|
12
|
Click the Add to Component button in the window toolbar.
|
|
13
|
|
14
|
Right-click and choose Add to Component 1 (comp1).
|
|
15
|
|
1
|
|
2
|
|
1
|
|
2
|
|
3
|
|
1
|
In the Model Builder window, click NMC 111, LiNi0.33Mn0.33Co0.33O2 (Positive, Li-ion Battery) (mat3).
|
|
2
|
|
3
|
|
1
|
|
2
|
|
3
|
|
1
|
|
2
|
|
3
|
|
1
|
|
2
|
|
3
|
|
1
|
In the Model Builder window, under Component 1 (comp1) > Lithium-Ion Battery (liion) click Separator 1.
|
|
2
|
|
3
|
|
1
|
|
2
|
In the Settings window for Porous Electrode, type Porous Electrode 1 (Negative) in the Label text field.
|
|
3
|
|
4
|
Locate the Electrolyte Properties section. From the Electrolyte material list, choose LiPF6 in 3:7 EC:EMC (Liquid, Li-ion Battery) (mat5).
|
|
5
|
|
6
|
|
7
|
|
1
|
|
2
|
|
3
|
|
4
|
|
5
|
|
1
|
|
2
|
|
3
|
|
4
|
|
1
|
|
2
|
In the Settings window for Porous Electrode, type Porous Electrode 2 (Positive) in the Label text field.
|
|
3
|
|
4
|
|
5
|
|
6
|
|
1
|
In the Model Builder window, expand the Porous Electrode 2 (Positive) node, then click Particle Intercalation 1.
|
|
2
|
|
3
|
From the Particle material list, choose NMC 111, LiNi0.33Mn0.33Co0.33O2 (Positive, Li-ion Battery) (mat3).
|
|
4
|
|
1
|
|
2
|
|
3
|
|
4
|
|
1
|
|
2
|
In the Settings window for Porous Electrode, type Porous Electrode 1 (Negative, Electrochemically Inactive) in the Label text field.
|
|
4
|
|
1
|
In the Model Builder window, expand the Porous Electrode 1 (Negative, Electrochemically Inactive) node, then click Porous Electrode Reaction 1.
|
|
2
|
|
3
|
|
4
|
Locate the Electrode Kinetics section. From the iloc,expr list, choose User defined. Click to expand the Heat of Reaction section. From the list, choose User defined.
|
|
1
|
|
2
|
In the Settings window for Porous Electrode, type Porous Electrode 2 (Positive, Electrochemically Inactive) in the Label text field.
|
|
4
|
|
1
|
In the Model Builder window, expand the Porous Electrode 2 (Positive, Electrochemically Inactive) node, then click Porous Electrode Reaction 1.
|
|
2
|
|
3
|
|
4
|
Locate the Electrode Kinetics section. From the iloc,expr list, choose User defined. Locate the Heat of Reaction section. From the list, choose User defined.
|
|
1
|
|
2
|
|
3
|
|
4
|
|
1
|
|
2
|
|
3
|
|
1
|
|
2
|
|
3
|
|
4
|
|
1
|
|
2
|
|
3
|
Select the Define cell state of charge (SOC) and initial charge inventory checkbox.
|
|
1
|
|
2
|
In the Settings window for SOC and Initial Charge Distribution, locate the Initial Cell Charge Distribution section.
|
|
3
|
|
4
|
|
1
|
|
2
|
In the Settings window for Negative Electrode Domain Selection, locate the Domain Selection section.
|
|
3
|
|
1
|
|
2
|
In the Settings window for Positive Electrode Domain Selection, locate the Domain Selection section.
|
|
3
|
|
1
|
|
2
|
|
3
|
|
4
|
|
1
|
|
2
|
|
3
|
|
1
|
In the Model Builder window, under Component 1 (comp1) > Materials click NMC 111, LiNi0.33Mn0.33Co0.33O2 (Positive, Li-ion Battery) (mat3).
|
|
2
|
|
1
|
|
2
|
|
1
|
|
2
|
|
3
|
|
4
|
|
1
|
In the Model Builder window, under Component 1 (comp1) > Materials click Lithium Metal, Li (Negative, Li-ion Battery) (mat6).
|
|
2
|
|
1
|
|
2
|
|
3
|
|
1
|
|
2
|
|
3
|
Click
|
|
4
|
|
5
|
Click OK.
|
|
6
|
|
7
|
|
1
|
|
2
|
|
3
|
Click
|
|
4
|
|
5
|
Click OK.
|
|
6
|
|
7
|
|
8
|
|
9
|
|
10
|
Select the Reverse direction checkbox.
|
|
11
|
Click
|
|
1
|
|
2
|
|
3
|
|
4
|
|
1
|
|
2
|
|
3
|
|
1
|
|
2
|
|
3
|
|
1
|
|
2
|
|
3
|
Click
|
|
5
|
|
6
|
|
7
|
Clear the Generate default plots checkbox.
|
|
8
|
|
1
|
|
2
|
|
3
|
|
4
|
|
1
|
|
2
|
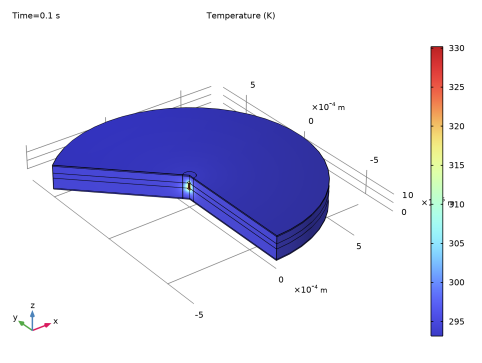
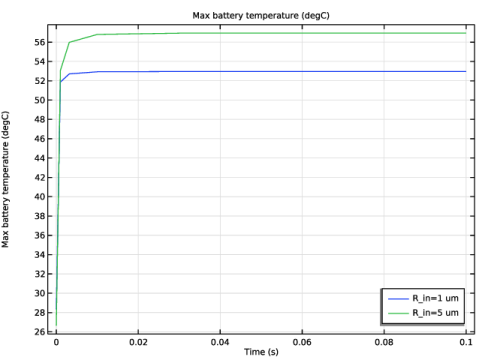
In the Settings window for 3D Plot Group, type Temperature (revolution plot) in the Label text field.
|
|
1
|
|
2
|
|
3
|
|
4
|
|
1
|
|
2
|
|
3
|
|
4
|
|
1
|
|
3
|
|
4
|
|
5
|
|
6
|
|
7
|
|
1
|
|
2
|
|
1
|
|
2
|
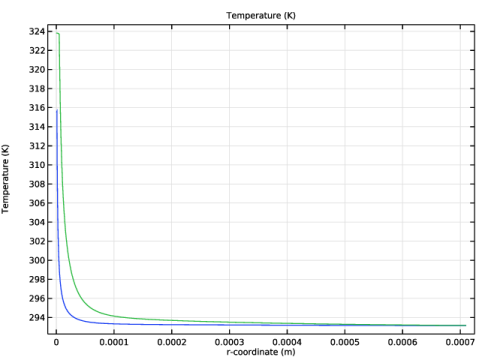
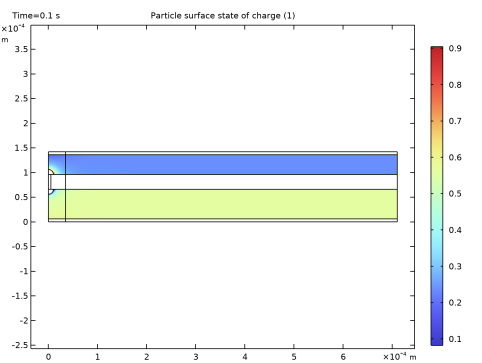
In the Settings window for Surface, click Replace Expression in the upper-right corner of the Expression section. From the menu, choose Component 1 (comp1) > Lithium-Ion Battery > Particle intercalation > liion.socloc_surface - Particle surface state of charge - 1.
|
|
3
|
|
1
|
|
2
|
|
3
|
|
4
|
|
1
|
|
2
|
|
4
|
|
5
|