|
|
|
|
1
|
|
2
|
|
3
|
Click Add.
|
|
4
|
Click
|
|
5
|
|
6
|
Click
|
|
1
|
|
2
|
|
3
|
|
4
|
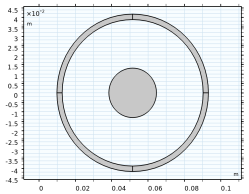
Browse to the model’s Application Libraries folder and double-click the file submarine_cable_a_geom_parameters.txt.
|
|
1
|
|
2
|
|
3
|
|
4
|
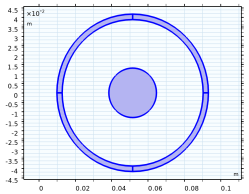
Browse to the model’s Application Libraries folder and double-click the file submarine_cable_b_geom_parameters.txt.
|
|
5
|
|
1
|
|
2
|
|
3
|
|
4
|
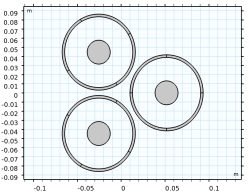
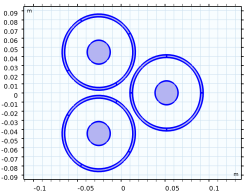
Browse to the model’s Application Libraries folder and double-click the file submarine_cable_c_elec_parameters.txt.
|
|
1
|
|
2
|
|
3
|
|
4
|
|
5
|
Locate the Selections of Resulting Entities section. Select the Resulting objects selection checkbox.
|
|
6
|
Click
|
|
7
|
|
1
|
|
2
|
|
3
|
|
4
|
|
5
|
Click to expand the Layers section. In the table, enter the following settings:
|
|
6
|
Click
|
|
7
|
|
1
|
|
2
|
|
3
|
|
4
|
|
5
|
Click
|
|
6
|
|
1
|
|
2
|
|
3
|
|
4
|
Clear the Keep interior boundaries checkbox.
|
|
5
|
|
1
|
|
2
|
|
3
|
|
4
|
|
5
|
Locate the Selections of Resulting Entities section. Select the Resulting objects selection checkbox.
|
|
6
|
|
1
|
|
2
|
|
3
|
|
4
|
|
5
|
|
6
|
|
1
|
|
2
|
|
3
|
|
4
|
Locate the Selections of Resulting Entities section. Select the Resulting objects selection checkbox.
|
|
5
|
Click
|
|
6
|
|
1
|
|
2
|
|
3
|
|
1
|
|
2
|
|
3
|
|
1
|
|
2
|
|
3
|
|
4
|
|
5
|
Click OK.
|
|
1
|
|
2
|
|
3
|
|
4
|
|
1
|
|
2
|
|
3
|
Select the Show material color and texture checkbox.
|
|
1
|
|
2
|
Go to the Add Material window.
|
|
3
|
|
4
|
Right-click and choose Add to Component 1 (comp1).
|
|
5
|
|
1
|
|
1
|
|
2
|
|
3
|
|
4
|
|
5
|
|
1
|
|
2
|
|
3
|
|
4
|
|
1
|
|
2
|
|
3
|
|
4
|
|
1
|
In the Model Builder window, under Component 1 (comp1) > Materials, add the following material properties:
|
|
1
|
|
2
|
In the Settings window for Magnetic Fields, type Magnetic Fields, Section 1 in the Label text field.
|
|
3
|
|
1
|
|
2
|
|
4
|
Click to collapse the Material Type section, the Coordinate System Selection section, and the Constitutive Relation sections.
|
|
5
|
|
1
|
|
2
|
|
4
|
|
1
|
|
2
|
|
4
|
|
1
|
|
2
|
|
3
|
|
4
|
|
1
|
In the Model Builder window, expand the Results > Magnetic Flux Density (mf) node, then click Surface 1.
|
|
2
|
|
3
|
|
1
|
|
2
|
|
3
|
|
4
|
|
1
|
|
2
|
|
3
|
|
4
|
Locate the Expressions section. In the table, enter the following settings:
|
|
5
|
Click
|
|
1
|
|
2
|
|
3
|
|
4
|
Locate the Expressions section. In the table, enter the following settings:
|
|
5
|
Click
|
|
1
|
Go to the Table 2 window.
|
|
1
|
|
2
|
|
3
|
Locate the Expressions section. In the table, enter the following settings:
|
|
4
|
Click
|
|
1
|
|
2
|
|
3
|
Locate the Expressions section. In the table, enter the following settings:
|
|
4
|
Click
|
|
1
|
Go to the Table 4 window.
|
|
1
|
|
2
|
|
4
|
|
1
|
|
2
|
|
4
|
|
1
|
|
2
|
|
4
|
|
1
|
Go to the Table window.
|
|
1
|
|
2
|
|
3
|
Locate the Expressions section. In the table, enter the following settings:
|
|
4
|
Click
|
|
1
|
Go to the Table 5 window.
|
|
1
|
|
2
|
|
3
|
|
1
|
|
2
|
Go to the Add Physics window.
|
|
3
|
|
4
|
Click the Add to Component 1 button in the window toolbar.
|
|
5
|
|
6
|
Click the Add to Component 1 button in the window toolbar.
|
|
7
|
|
8
|
Click the Add to Component 1 button in the window toolbar.
|
|
9
|
|
1
|
In the Settings window for Magnetic Fields, type Magnetic Fields, Section 2 in the Label text field.
|
|
2
|
|
1
|
|
2
|
In the Settings window for Magnetic Fields, type Magnetic Fields, Section 3 in the Label text field.
|
|
3
|
|
1
|
In the Model Builder window, under Component 1 (comp1) > Magnetic Fields, Section 1 (mf) click Screen 1.
|
|
2
|
|
3
|
|
1
|
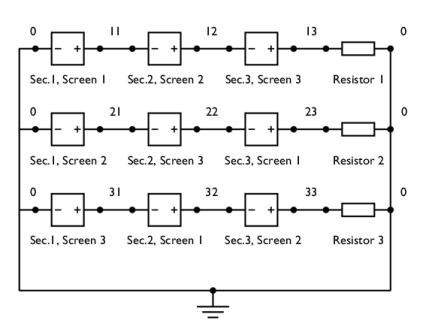
In the Model Builder window, under Component 1 (comp1) > Magnetic Fields, Section 1 (mf), Ctrl-click to select Ampère’s Law in Solids 1, Phase 1, Phase 2, Phase 3, Screen 1, Screen 2, and Screen 3.
|
|
2
|
Right-click and choose Copy.
|
|
1
|
In the Model Builder window, under Component 1 (comp1) right-click Magnetic Fields, Section 2 (mf2) and choose Paste Multiple Items.
|
|
2
|
|
1
|
|
2
|
|
4
|
|
1
|
|
2
|
|
4
|
|
1
|
|
2
|
|
4
|
|
1
|
|
2
|
|
4
|
|
1
|
|
1
|
Go to the Table window.
|
|
1
|
|
2
|
In the table, update the descriptions. Type Voltage across screen 1,2,3 (cross bonding), that is; replace “single-point bonding” with “cross bonding”.
|
|
3
|
|
1
|
Go to the Table 5 window.
|
|
1
|
|
2
|
Browse to a suitable folder and type the filename submarine_cable_05_bonding_inductive.mph.
|