|
|
|


|
1
|
|
2
|
|
3
|
Click Add.
|
|
4
|
Click
|
|
5
|
|
6
|
Click
|
|
1
|
|
2
|
Browse to the model’s Application Libraries folder and double-click the file rfid_geom_sequence.mph.
|
|
3
|
|
4
|
|
5
|
|
6
|
|
7
|
|
8
|
|
9
|
Clear the Automatic detection of small details checkbox.
|
|
1
|
|
2
|
|
3
|
|
5
|
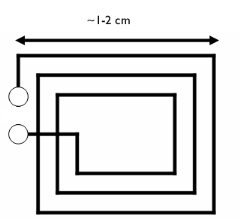
Use the Select Box tool to select the transponder antenna. Verify that the selected edges are 15-23, 29-34, and 38-40.
|
|
1
|
|
2
|
|
3
|
|
4
|
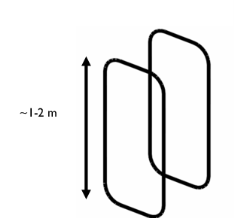
Select all the edges of the reader coil behind the transponder. Verify that you have selected edges 8-10, 13, 14, 43, 44, and 46 only.
|
|
1
|
|
2
|
|
3
|
|
4
|
Select all the edges of the reader in front of the transponder. Verify that you have selected edges 5-7, 11, 12, 41, 42, and 45.
|
|
1
|
|
2
|
Go to the Add Material window.
|
|
3
|
|
4
|
Click the Add to Component button in the window toolbar.
|
|
5
|
|
1
|
|
2
|
|
3
|
|
4
|
|
1
|
|
2
|
|
3
|
|
4
|
|
1
|
|
2
|
|
3
|
|
4
|
|
1
|
|
2
|
|
3
|
|
4
|
Click
|
|
1
|
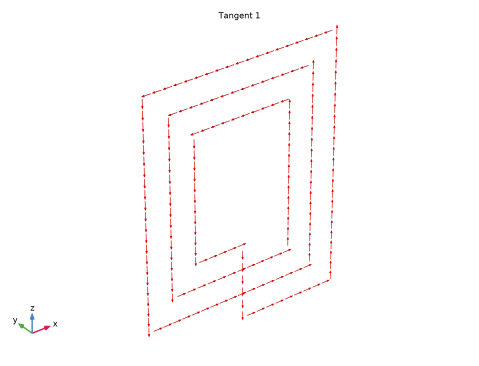
In the Model Builder window, expand the Magnetic Flux Density (mf) node, then click Streamline Multislice 1.
|
|
2
|
|
3
|
|
4
|
|
5
|
|
6
|
|
1
|
|
2
|
|
3
|
|
4
|
|
5
|
|
6
|
|
7
|
|
8
|
|
9
|
|
10
|
|
11
|
|
1
|
|
2
|
|
3
|
|
4
|
|
5
|
|
6
|
Select the Radius scale factor checkbox.
|
|
1
|
|
2
|
|
3
|
Click
|
|
4
|
In the Paste Selection dialog, type 5 6 7 8 9 10 11 12 13 14 41 42 43 44 45 46 in the Selection text field.
|
|
5
|
Click OK.
|
|
1
|
|
2
|
|
3
|
|
4
|
|
5
|
|
1
|
|
2
|
|
3
|
Clear the Plot dataset edges checkbox.
|
|
4
|
|
1
|
|
2
|
|
3
|
|
4
|
|
5
|
|
1
|
|
2
|
|
3
|
|
4
|
|
5
|
|
6
|
|
1
|
|
2
|
|
3
|
|
4
|
Locate the Expressions section. In the table, enter the following settings:
|
|
5
|
Click
|
|
1
|
Go to the Table 1 window.
|