From the Windows menu on the
Home toolbar, select
Chatbot to open a window for communicating with an OpenAI, Azure OpenAI , or OpenAI API-compatible model. This feature assists with generating and correcting COMSOL API for Java® code directly within COMSOL Multiphysics, as well as answering modeling questions related to the software. Using the
Chatbot window can help with both programming tasks using the COMSOL API for Java and general modeling tasks within the COMSOL Desktop. The
Chatbot window is available in both the Model Builder and Application Builder workspaces.
The Chatbot window is only available with the Windows version of the COMSOL Desktop. The COMSOL software must also be installed with the CHATBOT feature included in the installation and enabled using the Enable
Chatbot checkbox on the
Chatbot page in the
Preferences window.
The Chatbot window requires authentication details for your selected provider, for example, an API key or connection settings for OpenAI, Azure OpenAI, or another OpenAI API–compatible service.
The first time that you use the Chatbot window you need to configure a chatbot provider. In the
Chatbot window, click
Configure Chatbot Provider, which opens the
Preferences window. Choose a
Provider and
Model and enter your key in the
API key field and click
OK. If you are using Azure OpenAI, also enter an endpoint URL in the
Endpoint field and a model deployment name in the
Deployment name field. For the OpenAI API-compatible option, instead enter a
Base URL and
Model id.
If enabled, the Tool calling option allows the
Chatbot to browse the COMSOL documentation for information.

The
Chatbot window functionality connects to an external AI system. A subscription agreement with the AI system host is needed to obtain an API key. COMSOL is not a party in this agreement, and use of the external AI system may be subject to additional fees.
The following Chatbot window examples use various models from OpenAI. The output may vary depending on the selected provider and model, and due to the nature of large language models (LLMs), some random variation between responses is expected.
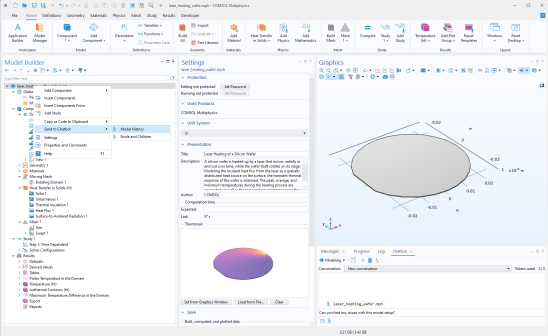
The Chatbot window includes a set of toolbar buttons and menus, as shown in the figure below. In addition, information on the number of tokens used is displayed in the
Chatbot window’s top-right corner, next to
Tokens used:

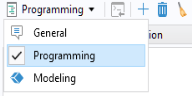
From the list in the top-left corner of the Chatbot window, you can select a subject:
General,
Programming, and
Modeling, as shown in the figure below.
For example, let us use the Chatbot window to add annotations to the Pacemaker Electrode tutorial model which is available in the Application Libraries under
COMSOL Multiphysics>Electromagnetics with the filename
pacemaker_electrode.mph.
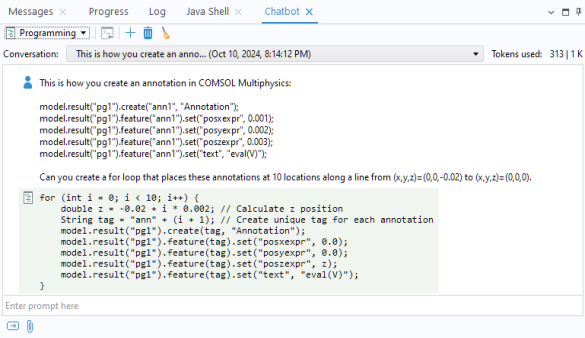
Say that you would like to create 10 such annotations along a line. While having the Programming subject selected, the following prompt will then guide the chatbot to write functional code:
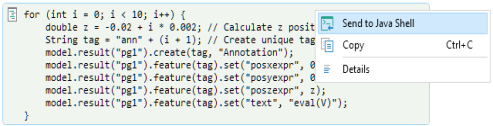
The figure below shows the resulting output from the Chatbot window, which can be used to automate this task by entering the code in a method or in the
Java Shell window.
To run the code in the Java Shell window, right-click in the output area and select
Send to Java Shell. Alternatively, you can click the
Send to Java Shell button in the toolbar.
Then, in the Java Shell window, click
Run. The result is shown in the figure below.
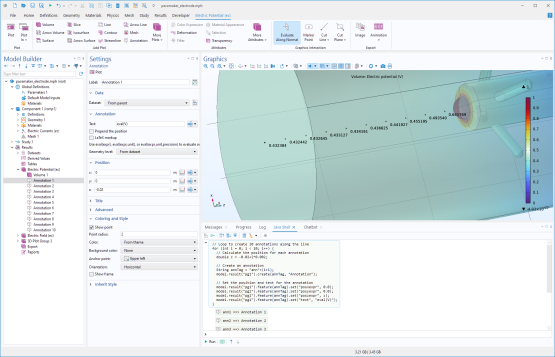
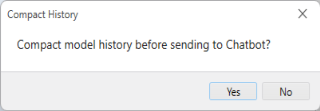
When prompted to compact the model history, choose Yes to remove redundant steps, unless you specifically want to include them.