PDF

Turbulent Flow Around a Factory Chimney
Introduction
The role of a chimney is to disperse the flue gases, typically from a household fireplace or a process in a factory, above the roof of the building, in order to get the potentially harmful flue gases dispersed and diluted in the air. The further away from people, the better. As a result, factory chimneys can be several tens of meters high. While being very tall structures, the chimney will be subjected to large and varying wind loads over time. Such wind loads are important factors to take into account when designing a factory chimney. If a cylinder is placed in a uniform flow field, vortexes will form as the flow separates in the region downstream of the chimney. These vortexes will start shedding and a von Kármán vortex street will be established. The vortexes of a tall cylinder may be shed uniformly along the length of the chimney, and there will be a significant transverse force component that acts periodically on the chimney. If the frequency of these transverse forces are close to the structural eigen-frequencies of the chimney, catastrophic failure can occur. To remedy such simultaneous shedding, one can add helical strakes to the chimney. These are thin structures that coil in a helical manner along the exterior of the chimney. They help to change the vortex shedding frequency and distribute the vortex shedding forces, as vortexes will not be shed simultaneously along the length of the chimney due to the ever changing geometry in the vertical direction.
The shedding frequency of a cylinder subjected to external uniform flow can be found with the equation
where St(Re) is the Strouhal number which is dependent on the Reynolds number, Re, f is the shedding frequency, D is the diameter of the cylinder and V is the flow velocity. The Strouhal number usually takes a value between 0.18 and 0.22. Thus, with a diameter of 3 m and a flow velocity of 25 m/s, the shedding frequency can be calculated to be around 1.8 Hz. For a cylinder with strakes, the effective diameter is increased, and also the geometry is constantly changing. Thus, the location of flow detachment for the vortexes will vary along the length of the chimney. The transverse forces on the chimney will also cancel out when integrated over the whole chimney.
The geometry of the helical strakes has been studied since the 1950s, and it has been found that three strakes separated by 120 degrees with a pitch of five times the diameter of the chimney is the best configuration.
Model Definition
The chimney model consists of a factory building which is 50 m long, 30 m wide, and 8 m high. In the middle of the factory, a chimney of 3 m diameter rises up 25 m above the roof. Three strake fins are modeled using the interior wall boundary condition and they have a width of 20% of the chimney radius. The strakes, whose pitch is five times the chimney diameter, are helically wrapped around the outside of the chimney.
The factory is placed inside a block which is 90 m long, 100 m wide, and 37.5 m high. A few mesh control domains are added so that it is easier to refine the mesh downstream of the chimney. The model geometry is shown in Figure 1.
Figure 1: Geometry of the computational domain with mesh domains included downstream of the chimney.
The inlet velocity is set to have a profile that varies in the vertical direction. The velocity profile is given as
The factory, the chimney, and the ground surfaces are modeled as wall with automatic wall treatment. Furthermore, all other exterior surfaces are modeled as open boundaries. The RANS SST turbulence model is employed in the current study. This model is capable of resolving the near-wall turbulence that is induced by the chimney. Thus, it reproduces the dynamic motion of the separation point, which gives rise to the vortex shedding phenomena. The first solution of the model gives a stationary solution on a relatively coarse mesh that is not capable of resolving the boundary layer to a sufficient level of accuracy. To solve the model with a finer mesh that resolves the boundary layer to a sufficient degree would require a computer with at least 250 GB RAM. Moreover, using a time-dependent solver leads to longer computational time. In the final part of the results section, some plots of such a model with finer mesh resolution are shown.
Results and Discussion
Figure 2 and Figure 3 show slice plots of the velocity magnitude for the stationary solutions without and with strakes, respectively. Notice the difference in the wakes that form downstream of the chimney. The model with strakes, as shown in Figure 3, has its wake region consisting of several smaller flow structures, resulting in a more complex flow field.
Figure 2: Vertical slice plot of the velocity magnitude for the model without strakes.
Figure 3: Vertical slice plot of the velocity magnitude for the model with strakes.
Figure 4 and Figure 5 show horizontal cut planes, colored by velocity magnitude, for the stationary solutions without and with strakes. Notice the shorter downstream extent of the wake for the chimney equipped with strakes.
Figure 4: Horizontal slice plot of the velocity magnitude for the model without strakes.
Figure 5: Horizontal slice plot of the velocity magnitude for the model with strakes.
Figure 6 shows the pressure distribution on the chimney and in a vertical cut plane.
Figure 6: Pressure distribution on the surface of the chimney and in a vertical cut plane with strakes.
In a model with a refined mesh that resolves the boundary layers down to around 40 viscous units, one can see in Figure 7 and Figure 8 that the vortex structures downstream the chimney are refined and much more complex, creating local recirculation zones that you cannot see for a mesh-refined model of the chimney without strakes Figure 9.
Figure 7: Snapshot at t = 7 s of the velocity magnitude for a model with strakes and a refined mesh.
Figure 8: Snapshot at t = 10 s of the velocity magnitude for a model with strakes and a refined mesh. Notice the change in some of the recirculation patterns compared to previous image.
Figure 9: Snapshot at t = 4 s of the velocity magnitude for a model without strakes but with a refined mesh. Notice that the separation line on the downstream surface of the chimney is rather uniform along the height.
In Figure 10, a snapshot of the streamlines, colored by the turbulent kinetic energy, is shown for the time-dependent study with strakes.
Figure 10: Streamline plot colored by the turbulent kinetic energy at t = 10 s for the model with strakes and a refined mesh. Note the increase in turbulent energy, as well as the complex periodicity in the flow downstream of the chimney.
Figure 11: Streamline plot colored by the turbulent kinetic energy at t = 10 s for the model without strakes, but with a refined mesh. An oscillatory behavior can be seen on the streamlines.
Notes About the COMSOL Implementation
The instructions below are for a stationary simulation with a coarse mesh. In order to obtain a stationary solution, isotropic diffusion had to be added. This stabilizes the solution, but smears out the results to some degree. To resolve the time dependent shedding of vortexes, a finer mesh must be applied, both in the boundary layer on the chimney and in its downstream wake. The isotropic diffusion also needs to be removed. If the required mesh size were to be implemented in a full 3D model, it would result in nearly 80 million degrees of freedom.
Application Library path: CFD_Module/Single-Phase_Flow/chimney
Modeling Instructions
From the File menu, choose New.
New
In the New window, click  Model Wizard.
Model Wizard
1
In the Model Wizard window, click  3D.
2
In the Select Physics tree, select Fluid Flow > Single-Phase Flow > Turbulent Flow > Turbulent Flow, SST (spf).
3
Click Add.
4
Click  Study.
5
In the Select Study tree, select Preset Studies for Selected Physics Interfaces > Stationary with Initialization.
6
First, define some parameters for the geometry.
Global Definitions
Parameters 1
1
In the Model Builder window, under Global Definitions click Parameters 1.
2
In the Settings window for Parameters, locate the Parameters section.
3
Analytic 1 (an1)
1
In the Home toolbar, click  Functions and choose Global > Analytic.
2
In the Settings window for Analytic, type U_in in the Function name text field.
3
Locate the Definition section. In the Expression text field, type 20*(x/15)^0.27.
4
Locate the Units section. In the Function text field, type m/s.
5
6
Locate the Plot Parameters section. In the table, enter the following settings:
7
Geometry 1
Work Plane 1 (wp1)
1
In the Geometry toolbar, click  Work Plane.
2
In the Settings window for Work Plane, locate the Plane Definition section.
3
From the Plane list, choose xz-plane.
Work Plane 1 (wp1) > Plane Geometry
In the Model Builder window, click Plane Geometry.
Work Plane 1 (wp1) > Polygon 1 (pol1)
1
In the Work Plane toolbar, click  Polygon.
2
In the Settings window for Polygon, locate the Coordinates section.
3
4
Click  Build Selected.
Work Plane 1 (wp1) > Array 1 (arr1)
1
In the Work Plane toolbar, click  Transforms and choose Array.
2
3
In the Settings window for Array, locate the Size section.
4
In the xw size text field, type 5.
5
Locate the Displacement section. In the xw text field, type fw.
6
Click  Build Selected.
Extrude 1 (ext1)
1
In the Model Builder window, under Component 1 (comp1) > Geometry 1 right-click Work Plane 1 (wp1) and choose Extrude.
2
In the Settings window for Extrude, locate the Distances section.
3
4
Select the Reverse direction checkbox.
5
Locate the Selections of Resulting Entities section. Find the Cumulative selection subsection. Click New.
6
In the New Cumulative Selection dialog, type Factory building in the Name text field.
7
8
In the Settings window for Extrude, click  Build All Objects.
Work Plane 2 (wp2)
1
In the Geometry toolbar, click  Work Plane.
2
In the Settings window for Work Plane, locate the Plane Definition section.
3
In the z-coordinate text field, type fh-fwh.
Work Plane 2 (wp2) > Plane Geometry
In the Model Builder window, click Plane Geometry.
Work Plane 2 (wp2) > Circle 1 (c1)
1
In the Work Plane toolbar, click  Circle.
2
In the Settings window for Circle, locate the Size and Shape section.
3
In the Radius text field, type c_d/2.
4
Locate the Position section. In the xw text field, type fw*fn/2.
5
In the yw text field, type fd/2.
6
Click  Build Selected.
7
Click  Build Selected.
Extrude 2 (ext2)
1
In the Model Builder window, under Component 1 (comp1) > Geometry 1 right-click Work Plane 2 (wp2) and choose Extrude.
2
In the Settings window for Extrude, locate the Distances section.
3
4
Click  Build Selected.
Add an if-condition for the number of strakes. This part of the sequence is just active if the number of strakes are larger than 0
If 1 (if1)
1
In the Geometry toolbar, click  Programming and choose If + End If.
2
In the Settings window for If, locate the If section.
3
In the Condition text field, type sn>0.
Work Plane 3 (wp3)
1
In the Geometry toolbar, click  Work Plane.
2
In the Settings window for Work Plane, locate the Plane Definition section.
3
From the Plane type list, choose Face parallel.
4
On the object ext2, select Boundary 4 only.
Work Plane 3 (wp3) > Plane Geometry
In the Model Builder window, click Plane Geometry.
Work Plane 3 (wp3) > Polygon 1 (pol1)
1
In the Work Plane toolbar, click  Polygon.
2
In the Settings window for Polygon, locate the Coordinates section.
3
4
Click  Build Selected.
Work Plane 3 (wp3) > Rotate 1 (rot1)
1
In the Work Plane toolbar, click  Transforms and choose Rotate.
2
3
In the Settings window for Rotate, locate the Rotation section.
4
In the Angle text field, type range(0,360/sn,359).
5
Click  Build Selected.
Extrude 3 (ext3)
1
In the Model Builder window, under Component 1 (comp1) > Geometry 1 right-click Work Plane 3 (wp3) and choose Extrude.
2
In the Settings window for Extrude, locate the Distances section.
3
4
Select the Reverse direction checkbox.
5
Click to expand the Scales section. Click to expand the Displacements section. Click to expand the Twist Angles section. In the table, enter the following settings:
6
Click  Build Selected.
Array 1 (arr1)
1
In the Geometry toolbar, click  Transforms and choose Array.
2
3
In the Settings window for Array, locate the Size section.
4
In the z size text field, type ceil(c_h/sp*sn).
5
Locate the Displacement section. In the z text field, type -sp/sn.
6
Click  Build Selected.
End If 1 (endif1)
1
In the Model Builder window, click End If 1 (endif1).
2
In the Settings window for End If, click  Build Selected.
Block 1 (blk1)
1
In the Geometry toolbar, click  Block.
2
In the Settings window for Block, locate the Size and Shape section.
3
In the Width text field, type d_w.
4
In the Depth text field, type d_l.
5
In the Height text field, type d_h.
6
Click to select the Height text field. Right-click and choose Create Parameter.
7
In the Create Parameter dialog, type d_h in the Name text field.
8
In the Expression text field, type c_h*1.5.
9
10
In the Settings window for Block, locate the Position section.
11
In the x text field, type -(d_w-fw*fn)/2.
12
In the y text field, type -d_b.
Adding some domains for mesh control may be useful for further development of the model, albeit they are not used in this tutorial.
Work Plane 4 (wp4)
1
In the Geometry toolbar, click  Work Plane.
2
In the Settings window for Work Plane, locate the Plane Definition section.
3
From the Plane type list, choose Face parallel.
4
On the object ext2, select Boundary 4 only.
Work Plane 4 (wp4) > Plane Geometry
In the Model Builder window, click Plane Geometry.
Work Plane 4 (wp4) > Circle 1 (c1)
1
In the Work Plane toolbar, click  Circle.
2
In the Settings window for Circle, locate the Size and Shape section.
3
In the Radius text field, type c_d/2+1.
Work Plane 4 (wp4) > Polygon 1 (pol1)
1
In the Work Plane toolbar, click  Polygon.
2
In the Settings window for Polygon, locate the Coordinates section.
3
4
Click  Build Selected.
Work Plane 4 (wp4) > Union 1 (uni1)
1
In the Work Plane toolbar, click  Booleans and Partitions and choose Union.
2
Click in the Graphics window and then press Ctrl+A to select both objects.
3
In the Settings window for Union, locate the Union section.
4
Clear the Keep interior boundaries checkbox.
5
Click  Build Selected.
Work Plane 4 (wp4) > Circle 2 (c2)
1
In the Work Plane toolbar, click  Circle.
2
In the Settings window for Circle, locate the Size and Shape section.
3
In the Radius text field, type c_d/2*(1+swf+0.1).
Work Plane 4 (wp4) > Difference 1 (dif1)
1
In the Work Plane toolbar, click  Booleans and Partitions and choose Difference.
2
3
In the Settings window for Difference, locate the Difference section.
4
Click to select the  Activate Selection toggle button for Objects to subtract.
5
6
Click  Build Selected.
Extrude 4 (ext4)
1
In the Model Builder window, under Component 1 (comp1) > Geometry 1 right-click Work Plane 4 (wp4) and choose Extrude.
2
In the Settings window for Extrude, locate the Distances section.
3
Select the Reverse direction checkbox.
4
5
Click  Build Selected.
6
Click the  Wireframe Rendering button in the Graphics toolbar.
Work Plane 5 (wp5)
1
In the Geometry toolbar, click  Work Plane.
2
In the Settings window for Work Plane, locate the Plane Definition section.
3
From the Plane list, choose xz-plane.
4
In the y-coordinate text field, type d_l/2.
Partition Objects 1 (par1)
1
In the Geometry toolbar, click  Booleans and Partitions and choose Partition Objects.
2
3
In the Settings window for Partition Objects, locate the Partition Objects section.
4
From the Partition with list, choose Work plane.
Difference 1 (dif1)
1
In the Geometry toolbar, click  Booleans and Partitions and choose Difference.
2
Select the objects blk1 and par1 only.
3
In the Settings window for Difference, locate the Difference section.
4
Click to select the  Activate Selection toggle button for Objects to subtract.
5
Click the  Select Box button in the Graphics toolbar.
6
Select the objects arr1(1,1,1), arr1(1,1,2), arr1(1,1,3), arr1(1,1,4), arr1(1,1,5), ext1, and ext2 only.
7
Click  Build Selected.
Mesh Control Domains 1 (mcd1)
1
In the Geometry toolbar, click  Virtual Operations and choose Mesh Control Domains.
2
On the object fin, select Domains 2 and 3 only.
Extrude 2 (ext2)
1
In the Model Builder window, click Extrude 2 (ext2).
2
In the Settings window for Extrude, locate the Selections of Resulting Entities section.
3
Find the Cumulative selection subsection. Click New.
4
In the New Cumulative Selection dialog, type Chimney in the Name text field.
5
Extrude 3 (ext3)
1
In the Model Builder window, click Extrude 3 (ext3).
2
In the Settings window for Extrude, locate the Selections of Resulting Entities section.
3
Find the Cumulative selection subsection. Click New.
4
In the New Cumulative Selection dialog, type Strakes in the Name text field.
5
Chimney and Strakes
1
In the Geometry toolbar, click  Selections and choose Union Selection.
2
In the Settings window for Union Selection, type Chimney and Strakes in the Label text field.
3
Locate the Geometric Entity Level section. From the Level list, choose Boundary.
4
Locate the Input Entities section. Click  Add.
5
In the Add dialog, in the Selections to add list, choose Chimney and Strakes.
6
Explicit Selection 1 (sel1)
1
In the Geometry toolbar, click  Selections and choose Explicit Selection.
2
In the Settings window for Explicit Selection, locate the Entities to Select section.
3
From the Geometric entity level list, choose Boundary.
4
On the object mcd1, select Boundary 3 only.
Factory and ground
1
In the Geometry toolbar, click  Selections and choose Union Selection.
2
In the Settings window for Union Selection, locate the Geometric Entity Level section.
3
From the Level list, choose Boundary.
4
Locate the Input Entities section. Click  Add.
5
In the Add dialog, in the Selections to add list, choose Factory building and Explicit Selection 1.
6
7
In the Settings window for Union Selection, type Factory and ground in the Label text field.
8
Click  Build Selected.
Add a union selection for all boundaries that should have boundary layers. This is necessary when we use a parametric sweep later on to run the simulation with and without strakes.
Boundary layer boundaries
1
In the Geometry toolbar, click  Selections and choose Union Selection.
2
In the Settings window for Union Selection, type Boundary layer boundaries in the Label text field.
3
Locate the Geometric Entity Level section. From the Level list, choose Boundary.
4
Locate the Input Entities section. Click  Add.
5
In the Add dialog, in the Selections to add list, choose Chimney, Strakes, and Factory and ground.
6
Add Material
1
In the Materials toolbar, click  Add Material to open the Add Material window.
2
Go to the Add Material window.
3
In the tree, select Built-in > Air.
4
Click the Add to Component button in the window toolbar.
5
In the Materials toolbar, click  Add Material to close the Add Material window.
Turbulent Flow, SST (spf)
Inlet 1
1
In the Physics toolbar, click  Boundaries and choose Inlet.
2
3
In the Settings window for Inlet, locate the Velocity section.
4
In the U0 text field, type U_in(z).
Open Boundary 1
1
In the Physics toolbar, click  Boundaries and choose Open Boundary.
2
3
In the Settings window for Open Boundary, locate the Turbulence Conditions section.
4
In the Uref text field, type 20[m/s].
Interior Wall 1
1
In the Physics toolbar, click  Boundaries and choose Interior Wall.
2
In the Settings window for Interior Wall, locate the Boundary Selection section.
3
From the Selection list, choose Strakes.
To stabilize the solution, add inconsistent stabilization (isotropic diffusion) contributions to the navier stokes and turbulence equations. This is needed in such cases where no stationary solution can be found. This smooth out the solution, and makes it possible to find a stationary solution even though it would not converge without isotropic diffusion.
4
Click the  Show More Options button in the Model Builder toolbar.
5
In the Show More Options dialog, select Physics > Stabilization in the tree.
6
7
8
In the Model Builder window, click Turbulent Flow, SST (spf).
9
In the Settings window for Turbulent Flow, SST, click to expand the Inconsistent Stabilization section.
10
Find the Navier-Stokes equations subsection. Select the Isotropic diffusion checkbox.
11
Find the Turbulence equations subsection. Select the Isotropic diffusion checkbox.
12
Find the Navier-Stokes equations subsection. In the δid text field, type 0.15.
13
Find the Turbulence equations subsection. In the δid text field, type 0.15.
Definitions
Integration 1 (intop1)
1
In the Model Builder window, expand the Component 1 (comp1) > Definitions node.
2
Right-click Definitions and choose Nonlocal Couplings > Integration.
3
In the Settings window for Integration, locate the Source Selection section.
4
From the Geometric entity level list, choose Boundary.
5
From the Selection list, choose Strakes.
Integration 2 (intop2)
1
In the Definitions toolbar, click  Nonlocal Couplings and choose Integration.
2
In the Settings window for Integration, locate the Source Selection section.
3
From the Geometric entity level list, choose Boundary.
4
From the Selection list, choose Chimney.
Variables 1
1
Right-click Definitions and choose Variables.
2
In the Settings window for Variables, locate the Variables section.
3
Modify the mesh sequence so that we have at least 2 elements in the width of the strakes. Also, add the predefined "Boundary layer boundaries"-selection to make sure boundary layers are created on the strakes during the parametric sweep.
Mesh 1
1
In the Model Builder window, under Component 1 (comp1) click Mesh 1.
2
In the Settings window for Mesh, locate the Sequence Type section.
3
From the list, choose User-controlled mesh.
Size 1
1
In the Model Builder window, under Component 1 (comp1) > Mesh 1 right-click Size 1 and choose Build Selected.
2
In the Settings window for Size, locate the Geometric Entity Selection section.
3
From the Selection list, choose Boundary layer boundaries.
Size 2
1
In the Model Builder window, click Size 2.
2
In the Settings window for Size, locate the Geometric Entity Selection section.
3
From the Selection list, choose Strakes.
4
Click to expand the Element Size Parameters section. In the Maximum element size text field, type .15.
5
In the Minimum element size text field, type 0.1.
Boundary Layer Properties 1
1
In the Model Builder window, expand the Component 1 (comp1) > Mesh 1 > Boundary Layers 1 node, then click Boundary Layer Properties 1.
2
In the Settings window for Boundary Layer Properties, locate the Boundary Selection section.
3
From the Selection list, choose Boundary layer boundaries.
Study 1
Parametric Sweep
1
In the Model Builder window, expand the Study 1 node.
2
Right-click Study 1 and choose Parametric Sweep.
3
In the Settings window for Parametric Sweep, locate the Study Settings section.
4
5
6
In the Study toolbar, click  Compute.
Results
Velocity (spf)
In the Model Builder window, expand the Velocity (spf) node.
Vertical velocity slice
1
In the Model Builder window, expand the Velocity (spf) node.
2
Right-click Results and choose 3D Plot Group.
3
In the Settings window for 3D Plot Group, type Vertical velocity slice in the Label text field.
4
Locate the Data section. From the Dataset list, choose Study 1/Parametric Solutions 1 (sol3).
Slice 1
1
Right-click Vertical velocity slice and choose Slice.
2
In the Settings window for Slice, locate the Plane Data section.
3
In the Planes text field, type 1.
4
In the Vertical velocity slice toolbar, click  Plot.
Surface 1
1
In the Model Builder window, right-click Vertical velocity slice and choose Surface.
2
In the Settings window for Surface, click to expand the Inherit Style section.
3
From the Plot list, choose Slice 1.
Selection 1
1
Right-click Surface 1 and choose Selection.
2
In the Settings window for Selection, locate the Selection section.
3
From the Selection list, choose Chimney and Strakes.
4
In the Vertical velocity slice toolbar, click  Plot.
5
From the Selection list, choose Chimney.
Vertical velocity slice
In the Model Builder window, under Results click Vertical velocity slice.
Surface Slit 1
1
In the Vertical velocity slice toolbar, click  More Plots and choose Surface Slit.
2
In the Settings window for Surface Slit, locate the Expression on the Upside section.
3
In the Expression text field, type up(spf.U).
4
Locate the Expression on the Downside section. In the Expression text field, type down(spf.U).
5
Click to expand the Inherit Style section. From the Plot list, choose Slice 1.
Selection 1
1
Right-click Surface Slit 1 and choose Selection.
2
In the Settings window for Selection, locate the Selection section.
3
From the Selection list, choose Strakes.
Surface 2
1
In the Model Builder window, right-click Vertical velocity slice and choose Surface.
2
In the Settings window for Surface, click to expand the Title section.
3
From the Title type list, choose None.
Selection 1
1
Right-click Surface 2 and choose Selection.
2
In the Settings window for Selection, locate the Selection section.
3
From the Selection list, choose Factory building.
Material Appearance 1
1
In the Model Builder window, right-click Surface 2 and choose Material Appearance.
2
In the Settings window for Material Appearance, locate the Appearance section.
3
From the Appearance list, choose Custom.
4
From the Material type list, choose Steel.
Surface 3
Right-click Surface 2 and choose Duplicate.
Selection 1
1
In the Model Builder window, expand the Surface 3 node, then click Selection 1.
2
In the Settings window for Selection, locate the Selection section.
3
Click  Clear Selection.
4
Material Appearance 1
1
In the Model Builder window, click Material Appearance 1.
2
In the Settings window for Material Appearance, locate the Appearance section.
3
From the Material type list, choose Rock.
Material Appearance 1
1
In the Model Builder window, right-click Surface 1 and choose Material Appearance.
2
In the Settings window for Material Appearance, locate the Appearance section.
3
From the Appearance list, choose Custom.
4
From the Material type list, choose Steel.
5
Locate the Color section. Select the Use the plot’s color checkbox.
Vertical velocity slice
1
In the Model Builder window, under Results click Vertical velocity slice.
2
In the Settings window for 3D Plot Group, locate the Plot Settings section.
3
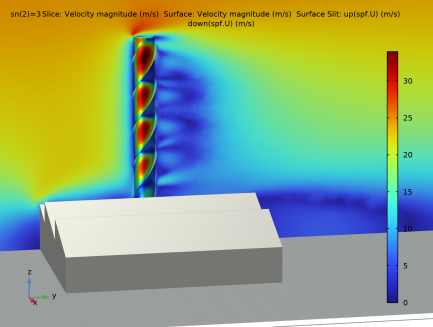
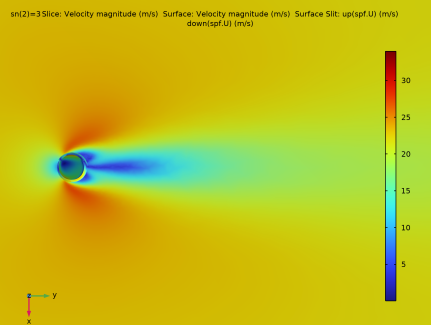
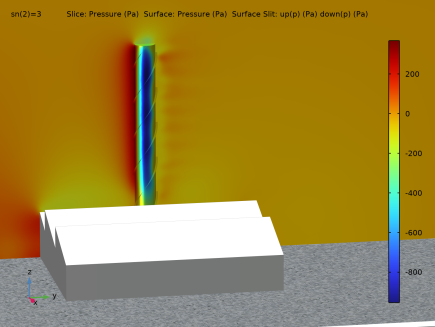
Clear the Plot dataset edges checkbox.
4
In the Vertical velocity slice toolbar, click  Plot.
Horizontal velocity slice
1
Right-click Vertical velocity slice and choose Duplicate.
2
In the Model Builder window, click Vertical velocity slice 1.
3
In the Settings window for 3D Plot Group, type Horizontal velocity slice in the Label text field.
Slice 1
1
In the Model Builder window, click Slice 1.
2
In the Settings window for Slice, locate the Plane Data section.
3
From the Plane list, choose xy-planes.
4
In the Planes text field, type 1.
5
In the Horizontal velocity slice toolbar, click  Plot.
Pressure slice
1
In the Model Builder window, right-click Vertical velocity slice and choose Duplicate.
2
In the Settings window for 3D Plot Group, type Pressure slice in the Label text field.
Slice 1
1
In the Model Builder window, expand the Pressure slice node, then click Slice 1.
2
In the Settings window for Slice, locate the Expression section.
3
In the Expression text field, type p.
Surface 1
1
In the Model Builder window, click Surface 1.
2
In the Settings window for Surface, locate the Expression section.
3
In the Expression text field, type p.
Surface Slit 1
1
In the Model Builder window, click Surface Slit 1.
2
In the Settings window for Surface Slit, locate the Expression on the Upside section.
3
In the Expression text field, type up(p).
4
Locate the Expression on the Downside section. In the Expression text field, type down(p).
Surface 2
1
In the Model Builder window, click Surface 2.
2
In the Settings window for Surface, locate the Expression section.
3
In the Expression text field, type 1.
Surface 3
1
In the Model Builder window, click Surface 3.
2
In the Settings window for Surface, locate the Expression section.
3
In the Expression text field, type 1.
4
Click to expand the Title section. From the Title type list, choose None.
Surface 2
1
In the Model Builder window, click Surface 2.
2
In the Settings window for Surface, locate the Title section.
3
From the Title type list, choose None.
4
In the Pressure slice toolbar, click  Plot.