PDF

Single-Particle Modeling of Lithium-Ion Batteries
Introduction
The single-particle approach (Ref. 1 and Ref. 2) is a way to simplify the intercalating porous electrode formulation in the traditional Doyle–Fuller–Newman (DFN) model (see the 1D Isothermal Lithium-Ion Battery model example). In the single-particle model (SPM), the local potential and concentration gradients in the solution (electrolyte) phase are ignored, and instead the electrolyte potential losses are accounted for using a lumped solution resistance term. At the same time, the potential gradients in the solid phase of the electrodes are also neglected. As for the DFN model, the single-particle formulation accounts for solid diffusion in the electrode particles and the intercalation reaction kinetics. However, all particles are assumed to be identical, and since the reaction current distribution across the porous electrodes is assumed to be uniform, all particles are subjected to the same conditions, with the result that all particles may be treated as one “single” particle.
The assumptions of the single-particle formulation are typically valid for low to medium applied current densities. Additionally, the validity of the assumptions and the applicability of the model also depends on the parameters values and electrode-electrolyte chemistry used in the model. Typically the assumptions are applicable to thin, or highly conductive, electrodes.
The single-particle model formulation is typically used to reduce computational load in, for instance, capacity fade modeling, battery pack simulations, control systems, or parameter estimation applications.
As mentioned above, the traditional SPM model defines the electrolyte as a lumped resistor. However, it is also possible to keep the electrolyte transport model of the DFN model, solving for both the salt concentration and potential in the electrolyte phase, and combine it with the single-particle approach for the electrodes. This extension is often called SPMe in scientific literature.
This tutorial example demonstrates how to use the Thin Porous Electrode nodes in the Lithium-Ion Battery interface for defining SPMe and SPM models, as well as the Two Electrodes option in the Lumped Battery interface for defining a SPM model.
First a DFN model is defined in 1D, and the cell voltage response to a charge–discharge load cycle is computed. The voltage profile is then compared to the different single-particle models.
Model Definition
Doyle–Fuller–Newman base model
The DFN model is based on the Lithium-Ion Battery Base Model in 1D. The model is defined using the Lithium-Ion Battery interface, using two Porous Electrode and one Separator domain node. (Compared with the Lithium-Ion Battery Base Model in 1D, the electrode thicknesses are increased somewhat in order to see larger differences between the DFN and single-particle models.)
Single-Particle model with Electrolyte salt Transport
The SPMe makes use of a single Separator domain node in the Lithium-Ion Battery interface, and uses the same Binary 1:1 liquid electrolyte charge balance model as the DFN model. The two single-particle electrodes are defined using the Thin Porous Electrode boundary nodes.
The length of the single domain Lel (m) in the SPMe model is defined as
(1)
where Lsep (m), Lneg (m), and Lpos (m) are the lengths of the separator, negative electrode and positive electrode, respectively.
Apart from the size of the single domain, the SPMe is parameterized in the same way as the DFN model.
Single-particle model with constant electrolyte resistance
The SPM defined in the tutorial uses the same setup as the SPMe, but with the charge balance model set to Single-ion conductor using a user-defined effective electrolyte conductivity. This excludes solving for the electrolyte salt concentration in the single separator domain.
The lumped solution resistance R (Ω) of the SPM is defined as
(2)
where EIR,1C (V) is the electrolyte voltage drop when operating the cell at a 1C current, and I1C (A) is the 1C current.
The effective conductivity σeff (S/m) used in the SPM model is then defined as
(3)
where Acell (m2) is the cross-sectional area of the cell.
In the tutorial, the computational solution of the SPMe is used to estimate EIR,1C. The resulting effective conductivity of the SPM is slightly lower than for the SPMe due to the impact of concentration polarization effects in the electrolyte.
Due to the simplified equation formulation, a linear discretization may be used in combination with one mesh element only.
Single-particle model using the Lumped battery Interface
A second SPM (Lumped) model is also defined in the tutorial, using the Two Electrodes model option in the Lumped Battery interface.
The SPM (Lumped) model is mathematically equivalent to the SPM. There is a difference however with regards to what parameters are used to define the two models. Whereas the Lithium-Ion Battery interface makes use of locally defined parameters in the geometry, the Lumped Battery interface make use of lumped zero-dimensional parameters.
The host capacity Qhost (C) of each electrode in the SPM (Lumped) model is defined as
(4)
where is ε (1) the electrode phase volume fraction, cs,max (mol/m3) the maximum concentration of intercalated lithium and L the electrode thickness.
For the solid intercalation, the diffusion time constants τ (s) of the two electrodes are defined as
(5)
where rp (m) is the electrode particle radius and D (m2/s) the diffusivity.
An advantage of using the Lumped Battery interface is that the model may be defined in 0D, so that no geometry needs to be defined.
Another difference between the SPM and SPM (Lumped) models is the handling of the Butler–Volmer kinetics-based activation overpotentials. In the SPM (Lumped) model, the activation overpotential is defined using an analytical function of the form
(6)
where η is the activation overpotential (V) and I0 is the exchange current (A). This allows for decoupling of the electrode and electrolyte phase potentials in the equation system and removes the need to solve for the potentials as dependent variables in the model. This lowers the computational complexity of the model. The above equation for the activation overpotential is however only valid for the case of symmetric transfer coefficients and one single electrode reaction.
Load Cycle
A load cycle, starting from 75% SOC, discharging at 1C for 2000 s, resting for 300 s, and then recharging at 1C for 2000 s, is defined using the Events interface.
Components and Studies
The DFN, SPMe, SPM, and SPM(Lumped) models are defined in separate components, using separate geometries and meshes.
The Events interface defining the load cycle, is defined in Component 1, but is used by all models.
Each model is solved for in an individual time-dependent study, simulating the same charge-discharge cycle for 5000 s.
Results and Discussion
Figure 2 shows the cell voltage vs time for all four models. The discrepancies between the models are generally relatively small, with the largest deviations seen between the DFN and the other models. These differences are due changes in the current distribution within the porous electrodes of the DFN models, something the SPMe and SPM models are unable to capture.
Figure 1: Cell voltage comparison for all four models.
Figure 2 shows a closeup of the cell voltages at the initiation of the charge pulse. The SPMe differs from the SPM models only during the first 20 s after initiation of the charge, during which a steady-state concentration profile in the electrolyte establishes.
Figure 2: Cell voltage comparison for all four models (closeup).
Table 1 shows the number of degrees of freedoms (DOFs) and solution time as reported in the solver log when solving the four different models (the solution time may vary depending on computer). The lower amount of DOFs and shorter solution time for SPM (Lumped) compared to SPM is related to the treatment of the nonlinear activation overpotential, which allows for decoupling of the electrolyte and electrode potentials.
References
1. S. Santhanagopalan, Q. Guo, P. Ramadass, and R.E. White, “Review of Models for Predicting the Cycling Performance of Lithium Ion Batteries,” J. Power Sources, vol. 156, no. 2, pp. 620–628, 2006.
2. M. Guo, G. Sikha, and R.E. White, “Single Particle Model for a Lithium Ion Cell: Thermal Behavior,” J. Electrochem. Soc., vol. 158, no. 2, pp. A122–A132, 2011.
Application Library path: Battery_Design_Module/Lithium-Ion_Batteries,_Performance/lib_single_particle
Modeling Instructions
Application Libraries
1
From the File menu, choose Application Libraries.
2
In the Application Libraries window, select Battery Design Module > Lithium-Ion Batteries, Performance > lib_base_model_1d in the tree.
3
First define an Events-based load cycle for the Doyle-Fuller-Newman (DFN) model. We will compare the probe cell voltage output for the DFN model to the various single-particle models defined later.
Component 1 - DFN
1
In the Model Builder window, click Component 1 (comp1).
2
In the Settings window for Component, type Component 1 - DFN in the Label text field.
Add Physics
1
In the Home toolbar, click  Windows and choose Add Physics.
2
Go to the Add Physics window.
3
In the tree, select Mathematics > ODE and DAE Interfaces > Events (ev).
4
Click the Add to Component 1 - DFN button in the window toolbar.
5
In the Home toolbar, click  Add Physics to close the Add Physics window.
Events (ev)
Explicit Event List 1
1
In the Physics toolbar, click  Global and choose Explicit Event List.
2
In the Settings window for Explicit Event List, locate the Discrete State section.
3
In the u text field, type C_rate.
4
In the text field, type C rate.
5
In the u0 text field, type -1.
6
Locate the Explicit Events section. Click  Add.
7
8
Lithium-Ion Battery (liion)
Electrode Current Density 1
1
In the Model Builder window, expand the Component 1 - DFN (comp1) > Lithium-Ion Battery (liion) node, then click Electrode Current Density 1.
2
In the Settings window for Electrode Current Density, locate the Electrode Current Density section.
3
In the in,s text field, type I_1C*C_rate.
Global Definitions
Parameters 1
1
In the Model Builder window, under Global Definitions click Parameters 1.
2
In the Settings window for Parameters, locate the Parameters section.
3
Definitions (comp1)
Point Probe - DFN
1
In the Model Builder window, expand the Component 1 - DFN (comp1) > Definitions node, then click Point Probe 1 (E_cell).
2
In the Settings window for Point Probe, type Point Probe - DFN in the Label text field.
3
Locate the Expression section. In the Description text field, type Cell Voltage - DFN.
Study 1
Step 2: Time Dependent
1
In the Model Builder window, expand the Study 1 node, then click Step 2: Time Dependent.
2
In the Settings window for Time Dependent, locate the Study Settings section.
3
From the Time unit list, choose s.
4
In the Output times text field, type 0 5000.
5
In the Model Builder window, click Study 1.
6
In the Settings window for Study, type Study 1 - DFN in the Label text field.
7
Locate the Study Settings section. Clear the Generate default plots checkbox.
8
In the Study toolbar, click  Compute.
Results
Probe Plot Group 1
1
In the Model Builder window, under Results click Probe Plot Group 1.
2
In the Settings window for 1D Plot Group, locate the Legend section.
3
From the Position list, choose Lower right.
4
In the Probe Plot Group 1 toolbar, click  Plot.
Component 1 - DFN (comp1)
1
In the Model Builder window, collapse the Component 1 - DFN (comp1) node.
The next step is to define a model using single particles for the electrodes, but with the same electrolyte transport model as in the DFN model. The new model is referred to as SPMe.
Global Definitions
DFN Parameters
1
In the Model Builder window, under Global Definitions click Parameters 1.
2
In the Settings window for Parameters, type DFN Parameters in the Label text field.
Lumped Parameters
1
In the Home toolbar, click  Parameters and choose Add > Parameters.
Load some additional lumped parameters from a text file. These parameters will be used to define the simplified single-particle models.
2
In the Settings window for Parameters, type Lumped Parameters in the Label text field.
3
Locate the Parameters section. Click  Load from File.
4
Root
Define the SMPe model in a separate component, using a different geometry and mesh than the DFN model.
Add Component
In the Model Builder window, right-click the root node and choose Add Component > 1D.
Component 2 - SPMe
In the Settings window for Component, type Component 2 - SPMe in the Label text field.
Geometry 2
Interval 1 (i1)
1
In the Model Builder window, under Component 2 - SPMe (comp2) right-click Geometry 2 and choose Interval.
2
In the Settings window for Interval, locate the Interval section.
3
The length L_el of the domain, defined in the parameter file you imported before, is longer than the separator domain length in the DFN model.
Add Physics
1
In the Home toolbar, click  Windows and choose Add Physics.
2
Go to the Add Physics window.
3
In the tree, select Electrochemistry > Batteries > Lithium-Ion Battery (liion).
4
Click the Add to Component 2 - SPMe button in the window toolbar.
5
In the Home toolbar, click  Add Physics to close the Add Physics window.
Lithium-Ion Battery 2 (liion2)
1
In the Settings window for Lithium-Ion Battery, locate the Cross-Sectional Area section.
2
In the Ac text field, type A_cell.
Separator 1
The settings for the Separator node are identical to the DFN model.
1
In the Model Builder window, under Component 2 - SPMe (comp2) > Lithium-Ion Battery 2 (liion2) click Separator 1.
2
In the Settings window for Separator, locate the Electrolyte Properties section.
3
From the Electrolyte material list, choose LiPF6 in 3:7 EC:EMC (Liquid, Li-ion Battery) (mat1).
4
Locate the Porous Matrix Properties section. In the εl text field, type epsl_sep.
Thin Porous Electrode 1
1
In the Physics toolbar, click  Boundaries and choose Thin Porous Electrode.
2
3
In the Settings window for Thin Porous Electrode, locate the Porous Matrix Properties section.
4
In the dpe text field, type L_neg.
5
In the εs text field, type epss_neg.
Particle Intercalation 1
The settings for the Particle Intercalation and Porous Electrode Reaction child nodes are identical to the corresponding settings in the DFN model.
1
In the Model Builder window, click Particle Intercalation 1.
2
In the Settings window for Particle Intercalation, locate the Material section.
3
From the Particle material list, choose Graphite, LixC6 MCMB (Negative, Li-ion Battery) (mat2).
4
Locate the Particle Transport Properties section. In the rp text field, type rp_neg.
Porous Electrode Reaction 1
1
In the Model Builder window, click Porous Electrode Reaction 1.
2
In the Settings window for Porous Electrode Reaction, locate the Material section.
3
From the Material list, choose Graphite, LixC6 MCMB (Negative, Li-ion Battery) (mat2).
4
Locate the Electrode Kinetics section. In the i0,ref(T) text field, type i0_ref_neg.
Thin Porous Electrode 2
1
In the Physics toolbar, click  Boundaries and choose Thin Porous Electrode.
2
3
In the Settings window for Thin Porous Electrode, locate the Porous Matrix Properties section.
4
In the dpe text field, type L_pos.
5
In the εs text field, type epss_pos.
6
Locate the Electrode Phase Potential Condition section. From the Electrode phase potential condition list, choose Total current.
The total current will be specified later as a multiple of the C-rate current variable liion2.I_1C_cell. This variable and the option to specify a C-rate multiple value will be available once we have enabled the SOC and Initial Charge Distribution node later.
Particle Intercalation 1
1
In the Model Builder window, click Particle Intercalation 1.
2
In the Settings window for Particle Intercalation, locate the Material section.
3
From the Particle material list, choose NMC 111, LiNi0.33Mn0.33Co0.33O2 (Positive, Li-ion Battery) (mat3).
4
Locate the Particle Transport Properties section. In the rp text field, type rp_pos.
Porous Electrode Reaction 1
1
In the Model Builder window, click Porous Electrode Reaction 1.
2
In the Settings window for Porous Electrode Reaction, locate the Material section.
3
From the Material list, choose NMC 111, LiNi0.33Mn0.33Co0.33O2 (Positive, Li-ion Battery) (mat3).
4
Locate the Electrode Kinetics section. In the i0,ref(T) text field, type i0_ref_pos.
5
In the Model Builder window, click Lithium-Ion Battery 2 (liion2).
6
In the Settings window for Lithium-Ion Battery, locate the Cell Settings section.
7
Select the Define cell state of charge (SOC) and initial charge inventory checkbox.
SOC and Initial Charge Distribution 1
1
In the Model Builder window, under Component 2 - SPMe (comp2) > Lithium-Ion Battery 2 (liion2) click SOC and Initial Charge Distribution 1.
2
In the Settings window for SOC and Initial Charge Distribution, locate the Electrode Selection Type section.
3
From the Negative electrode list, choose Boundary.
4
From the Positive electrode list, choose Boundary.
5
Locate the Initial Cell Charge Distribution section. In the SOC0 text field, type soc_init.
Negative Electrode Boundary Selection 1
1
In the Model Builder window, click Negative Electrode Boundary Selection 1.
2
Positive Electrode Boundary Selection 1
1
In the Model Builder window, click Positive Electrode Boundary Selection 1.
2
Thin Porous Electrode 2
1
In the Model Builder window, under Component 2 - SPMe (comp2) > Lithium-Ion Battery 2 (liion2) click Thin Porous Electrode 2.
2
In the Settings window for Thin Porous Electrode, locate the Electrode Phase Potential Condition section.
3
From the Specify list, choose C-rate multiple.
4
In the Crate text field, type comp1.C_rate.
Definitions (comp2)
Global Variable Probe - SPMe
1
In the Definitions toolbar, click  Probes and choose Global Variable Probe.
2
In the Settings window for Global Variable Probe, type Global Variable Probe - SPMe in the Label text field.
3
Click Replace Expression in the upper-right corner of the Expression section. From the menu, choose Component 2 - SPMe (comp2) > Lithium-Ion Battery 2 > liion2.phis_tpce2 - Electric potential - V.
4
Locate the Expression section.
5
Select the Description checkbox. In the associated text field, type Cell Voltage - SPMe.
6
Click to expand the Table and Window Settings section. Click  Add Table.
7
From the Plot window list, choose Probe Plot 1.
Also add an integration operator. This operator will be used later when computing the total electrolyte potential drop.
Integration 1 (intop1)
1
In the Definitions toolbar, click  Nonlocal Couplings and choose Integration.
2
In the Settings window for Integration, locate the Source Selection section.
3
From the Geometric entity level list, choose Boundary.
4
5
In the Operator name text field, type intop_neg.
Add Study
1
In the Home toolbar, click  Windows and choose Add Study.
2
Go to the Add Study window.
3
Find the Studies subsection. In the Select Study tree, select Preset Studies for Selected Physics Interfaces > Suggested by Some Physics Interfaces > Time Dependent with Initialization.
4
Find the Physics interfaces in study subsection. In the table, clear the Solve checkbox for Lithium-Ion Battery (liion).
5
Find the Studies subsection. Right-click and choose Add Study.
6
In the Model Builder window, click the root node.
7
In the Home toolbar, click  Add Study to close the Add Study window.
Study 2
Step 2: Time Dependent
1
In the Settings window for Time Dependent, locate the Study Settings section.
2
In the Output times text field, type 0 5000.
3
Click to expand the Results While Solving section. From the Probes list, choose Manual.
4
In the Probes list, select Point Probe - DFN (E_cell).
5
Under Probes, click  Delete.
6
In the Model Builder window, click Study 2.
7
In the Settings window for Study, type Study 2 - SPMe in the Label text field.
8
Locate the Study Settings section. Clear the Generate default plots checkbox.
9
In the Study toolbar, click  Compute.
Results
Probe Plot Group 1
The probe plot should now show a comparison between the DFN and SPMe cell voltage outputs.
1
In the Model Builder window, under Results click Probe Plot Group 1.
2
In the Probe Plot Group 1 toolbar, click  Plot.
Electrolyte domain potential drop in SPMe model
The next step is to create a single particle model where we treat the electrolyte transport as a constant resistor, which will be called SPM. In order to compute the corresponding resistivity, we evaluate the total electrolyte potential drop of the SPMe model as follows:
1
In the Results toolbar, click  1D Plot Group.
2
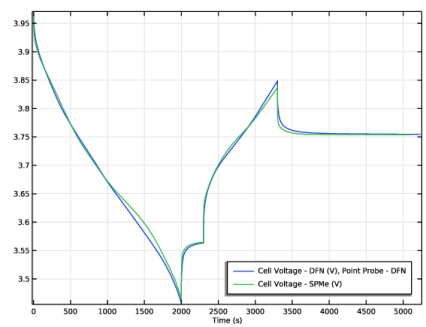
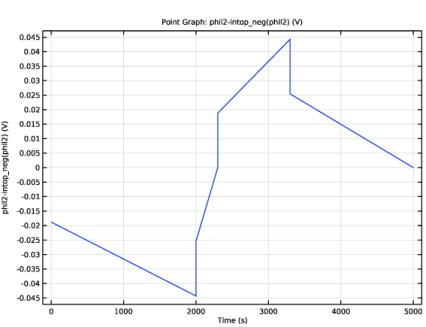
In the Settings window for 1D Plot Group, type Electrolyte domain potential drop in SPMe model in the Label text field.
3
Locate the Data section. From the Dataset list, choose Study 2 - SPMe/Solution 3 (5) (sol3).
Point Graph 1
1
Right-click Electrolyte domain potential drop in SPMe model and choose Point Graph.
2
3
In the Settings window for Point Graph, locate the y-Axis Data section.
4
In the Expression text field, type phil2-intop_neg(phil2).
Electrolyte domain potential drop in SPMe model
1
In the Model Builder window, click Electrolyte domain potential drop in SPMe model.
2
In the Electrolyte domain potential drop in SPMe model toolbar, click  Plot.
Note that the voltage drop at the end of the 1C current loads is about 45 mV.
Component 2 - SPMe (comp2)
Make a copy of the whole SPMe model and paste it into a new component. We will use the new component to create the SPM model.
1
In the Model Builder window, right-click Component 2 - SPMe (comp2) and choose Copy.
Component 2 - SPMe 1 (comp3)
In the Model Builder window, right-click the root node and choose Paste Multiple Items.
Component 2 - SPMe 1 (comp3), Definitions (comp3), Geometry 2, Lithium-Ion Battery 2 (liion3), Mesh 2
1
In the Messages from Paste dialog, click OK.
In the copy operation the name of the llion2 interface was pasted as liion3. As a result of this, we will have to make updates various variable names in order to get the SPM model to work properly.
Component 2 - SPMe (comp2)
In the Model Builder window, collapse the Component 2 - SPMe (comp2) node.
Component 3 - SPM
1
In the Model Builder window, click Component 2 - SPMe 1 (comp3).
2
In the Settings window for Component, type Component 3 - SPM in the Label text field.
Definitions (comp3)
Global Variable Probe - SPM
1
In the Model Builder window, under Component 3 - SPM (comp3) > Definitions click Global Variable Probe - SPMe (var2).
2
In the Settings window for Global Variable Probe, type Global Variable Probe - SPM in the Label text field.
3
Locate the Expression section. In the Expression text field, type liion3.phis_tpce2.
4
In the Description text field, type Cell Voltage - SPM.
5
Locate the Table and Window Settings section. Click  Add Table.
Variables 2
1
In the Model Builder window, right-click Definitions and choose Variables.
As conductivity value we will use a constant effective conductivity value based on the average electrolyte potential drop value we estimated in the SPMe model. Define this as a variable here for later use when defining the Separator domain.
2
In the Settings window for Variables, locate the Variables section.
3
E_IR_1C equals 27 mV in the parameter list.
Lithium-Ion Battery 3
The difference between the SPMe and the SPM model lies in the electrolyte transport formulation. The SPM model models the electrolyte as a resistor. This can be accomplished by using the Single-Ion Conductor model in the Lithium-Ion Batteryinterface.
1
In the Model Builder window, under Component 3 - SPM (comp3) click Lithium-Ion Battery 2 (liion3).
2
In the Settings window for Lithium-Ion Battery, type Lithium-Ion Battery 3 in the Label text field.
3
Locate the Charge Balance Model section. From the list, choose Single-ion conductor.
4
Click to expand the Discretization section. Since there are no source terms present in the single separator domain in the SPM model, it suffices to use a linear discretization of the electrolyte potential. This saves computational resources.
5
From the Electrolyte potential list, choose Linear.
Separator 1
1
In the Model Builder window, expand the Component 3 - SPM (comp3) > Lithium-Ion Battery 3 (liion3) node, then click Separator 1.
2
In the Settings window for Separator, locate the Electrolyte Properties section.
3
From the σl list, choose User defined. In the associated text field, type sigmal_eff.
4
Locate the Effective Transport Parameter Correction section. From the Electrolyte conductivity list, choose No correction.
Mesh 2
Edge 1
In the Mesh toolbar, click  Edge.
Distribution 1
1
Right-click Edge 1 and choose Distribution.
Since there are no source terms present in the single domain in the SPM model, it suffices to use a single mesh element. This also saves computational resources.
2
In the Settings window for Distribution, locate the Distribution section.
3
In the Number of elements text field, type 1.
Add Study
1
In the Home toolbar, click  Windows and choose Add Study.
2
Go to the Add Study window.
3
Find the Studies subsection. In the Select Study tree, select Preset Studies for Selected Physics Interfaces > Suggested by Some Physics Interfaces > Time Dependent with Initialization.
4
Find the Physics interfaces in study subsection. In the table, clear the Solve checkboxes for Lithium-Ion Battery (liion) and Lithium-Ion Battery 2 (liion2).
5
Click the Add Study button in the window toolbar.
6
In the Model Builder window, click the root node.
7
In the Home toolbar, click  Add Study to close the Add Study window.
Study 3
Step 2: Time Dependent
1
In the Settings window for Time Dependent, locate the Study Settings section.
2
In the Output times text field, type 0 5000.
3
Locate the Results While Solving section. From the Probes list, choose Manual.
4
In the Probes list, choose Point Probe - DFN (E_cell) and Global Variable Probe - SPMe (var1).
5
Under Probes, click  Delete.
6
In the Model Builder window, click Study 3.
7
In the Settings window for Study, type Study 3 - SPM in the Label text field.
8
Locate the Study Settings section. Clear the Generate default plots checkbox.
9
In the Study toolbar, click  Compute.
Results
Probe Plot Group 1
1
In the Model Builder window, under Results click Probe Plot Group 1.
2
In the Probe Plot Group 1 toolbar, click  Plot.
Component 3 - SPM (comp3)
1
In the Model Builder window, collapse the Component 3 - SPM (comp3) node.
It is also possible to create a SPM model by using the Lumped Battery interface, we will now proceed to make such a model, which we will call SPM (Lumped).
Root
By the use of the Lumped Battery interface, no geometry needs to be defined, and the model may hence be created in 0D.
Add Component
In the Model Builder window, right-click the root node and choose Add Component > 0D.
Add Physics
1
In the Home toolbar, click  Add Physics to open the Add Physics window.
2
In the Settings window for Component, type Component 4 - SPM (Lumped) in the Label text field.
3
Go to the Add Physics window.
4
In the tree, select Electrochemistry > Batteries > Lumped Battery, Two Electrodes (lb).
5
Click the Add to Component 4 - SPM (Lumped) button in the window toolbar.
6
In the Home toolbar, click  Add Physics to close the Add Physics window.
Lumped Battery (lb)
1
In the Settings window for Lumped Battery, locate the Operation Mode section.
2
From the list, choose C-rate multiple.
3
In the Crate text field, type comp1.C_rate.
The SPM (Lumped) model makes use of a number of lumped parameters, defined in the parameters file you imported earlier.
4
Locate the Initial Capacity section. In the Qhost,neg,0 text field, type Q_host_neg.
5
In the Qhost,pos,0 text field, type Q_host_pos.
6
Locate the Initial Cell Charge Distribution section. In the SOCcell,0 text field, type soc_init.
Negative Equilibrium Potential 1
1
In the Model Builder window, under Component 4 - SPM (Lumped) (comp4) > Lumped Battery (lb) click Negative Equilibrium Potential 1.
2
In the Settings window for Negative Equilibrium Potential, locate the Material section.
3
From the Electrode material list, choose Graphite, LixC6 MCMB (Negative, Li-ion Battery) (mat2).
4
Locate the Model Input section. In the T text field, type T.
Positive Equilibrium Potential 1
1
In the Model Builder window, click Positive Equilibrium Potential 1.
2
In the Settings window for Positive Equilibrium Potential, locate the Material section.
3
From the Electrode material list, choose NMC 111, LiNi0.33Mn0.33Co0.33O2 (Positive, Li-ion Battery) (mat3).
4
Locate the Model Input section. In the T text field, type T.
Definitions (comp4)
Also add some variable expressions for the lumped exchange current densities as follows:
Variables 3
1
In the Model Builder window, under Component 4 - SPM (Lumped) (comp4) right-click Definitions and choose Variables.
2
In the Settings window for Variables, locate the Variables section.
3
Lumped Battery (lb)
Voltage Losses 1
1
In the Model Builder window, under Component 4 - SPM (Lumped) (comp4) > Lumped Battery (lb) click Voltage Losses 1.
2
In the Settings window for Voltage Losses, locate the Ohmic Overpotential section.
3
In the ηIR,1C text field, type E_IR_1C.
4
Locate the Model Input section. In the T text field, type T.
5
Locate the Activation Overpotential, Negative section. In the J0,neg text field, type J0_neg.
6
Locate the Activation Overpotential, Positive section. In the J0,pos text field, type J0_pos.
7
Locate the Concentration Overpotential, Negative section. Select the Include concentration overpotential, negative checkbox.
8
In the τneg text field, type tau_neg.
9
Locate the Concentration Overpotential, Positive section. Select the Include concentration overpotential, positive checkbox.
10
In the τpos text field, type tau_pos.
Add Study
1
In the Home toolbar, click  Windows and choose Add Study.
2
Go to the Add Study window.
3
Find the Studies subsection. In the Select Study tree, select General Studies > Time Dependent.
4
Find the Physics interfaces in study subsection. In the table, clear the Solve checkboxes for Lithium-Ion Battery (liion), Lithium-Ion Battery 2 (liion2), and Lithium-Ion Battery 3 (liion3).
5
Click the Add Study button in the window toolbar.
Definitions (comp4)
Global Variable Probe - SPM (Lumped)
1
In the Definitions toolbar, click  Probes and choose Global Variable Probe.
2
In the Settings window for Global Variable Probe, type Global Variable Probe - SPM (Lumped) in the Label text field.
3
Locate the Expression section.
4
Select the Description checkbox. In the associated text field, type Cell potential, SPM (Lumped).
5
Locate the Table and Window Settings section. Click  Add Table.
6
From the Plot window list, choose Probe Plot 1.
7
In the Home toolbar, click  Add Study to close the Add Study window.
Study 4
Step 1: Time Dependent
1
In the Settings window for Time Dependent, locate the Study Settings section.
2
In the Output times text field, type 0 5000.
3
Locate the Results While Solving section. From the Probes list, choose Manual.
4
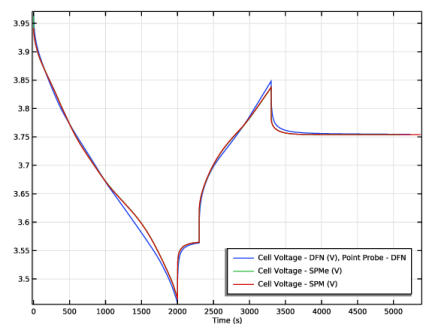
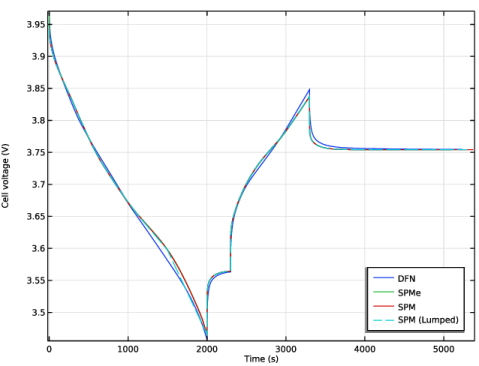
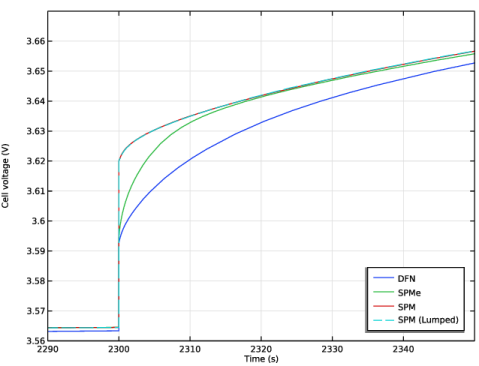
In the Probes list, choose Point Probe - DFN (E_cell), Global Variable Probe - SPMe (var1), and Global Variable Probe - SPM (var2).
5
Under Probes, click  Delete.
6
In the Model Builder window, click Study 4.
7
In the Settings window for Study, type Study 4 - SPM (Lumped) in the Label text field.
8
Locate the Study Settings section. Clear the Generate default plots checkbox.
9
In the Study toolbar, click  Compute.
Results
Cell Voltage Comparison
1
In the Model Builder window, under Results click Probe Plot Group 1.
2
In the Probe Plot Group 1 toolbar, click  Plot.
Finally, polish the cell voltage comparison plot as follows:
3
In the Settings window for 1D Plot Group, type Cell Voltage Comparison in the Label text field.
Probe Table Graph 1
1
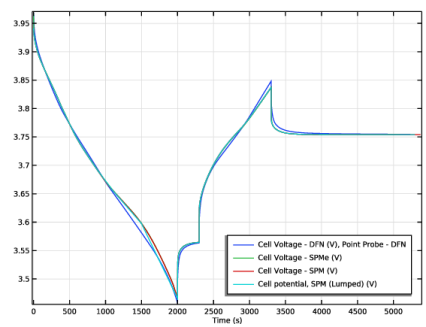
In the Model Builder window, expand the Cell Voltage Comparison node, then click Probe Table Graph 1.
2
In the Settings window for Table Graph, click to expand the Legends section.
3
From the Legends list, choose Manual.
4
Probe Table Graph 2
1
In the Model Builder window, click Probe Table Graph 2.
2
In the Settings window for Table Graph, locate the Legends section.
3
From the Legends list, choose Manual.
4
Probe Table Graph 3
1
In the Model Builder window, click Probe Table Graph 3.
2
In the Settings window for Table Graph, locate the Legends section.
3
From the Legends list, choose Manual.
4
Probe Table Graph 4
1
In the Model Builder window, click Probe Table Graph 4.
2
In the Settings window for Table Graph, locate the Coloring and Style section.
3
Find the Line style subsection. From the Line list, choose Dashed.
4
Locate the Legends section. From the Legends list, choose Manual.
5
Cell Voltage Comparison
1
In the Model Builder window, click Cell Voltage Comparison.
2
In the Settings window for 1D Plot Group, locate the Plot Settings section.
3
Select the y-axis label checkbox. In the associated text field, type Cell voltage (V).
4
In the Cell Voltage Comparison toolbar, click  Plot.
5
Locate the Axis section. Select the Manual axis limits checkbox.
6
In the x minimum text field, type 2290.
7
In the x maximum text field, type 2350.
8
In the y minimum text field, type 3.56.
9
In the y maximum text field, type 3.67.
10
In the Cell Voltage Comparison toolbar, click  Plot.