
|
|
|
|
1
|
|
2
|
|
3
|
Click Add.
|
|
4
|
Click
|
|
5
|
|
6
|
Click
|
|
1
|
|
2
|
|
1
|
|
2
|
|
3
|
Click
|
|
4
|
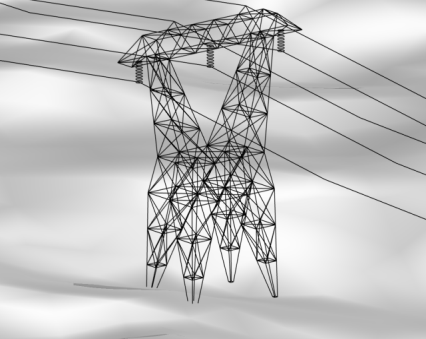
Browse to the model’s Application Libraries folder and double-click the file power_line_magnetic_field.mphbin.
|
|
5
|
Click
|
|
1
|
|
2
|
|
3
|
|
4
|
|
5
|
|
6
|
|
7
|
|
8
|
|
1
|
|
2
|
|
3
|
|
1
|
|
1
|
|
3
|
|
4
|
|
1
|
|
2
|
|
3
|
Click
|
|
4
|
|
5
|
Click OK.
|
|
6
|
|
7
|
|
1
|
|
2
|
|
3
|
Click
|
|
4
|
|
5
|
Click OK.
|
|
6
|
|
7
|
|
1
|
In the Model Builder window, under Component 1 (comp1) right-click Materials and choose Blank Material.
|
|
2
|
|
3
|
|
4
|
Click OK.
|
|
6
|
|
1
|
|
2
|
|
3
|
|
4
|
|
1
|
|
2
|
|
3
|
|
4
|
Click
|
|
1
|
|
2
|
|
3
|
|
4
|
|
5
|
|
6
|
Clear the Generate default plots checkbox.
|
|
7
|
|
1
|
|
2
|
|
3
|
|
4
|
|
5
|
|
6
|
|
1
|
|
2
|
|
3
|
|
4
|
|
5
|
|
6
|
|
7
|
Select the Radius scale factor checkbox.
|
|
8
|
|
9
|
|
1
|
|
2
|
|
3
|
Click
|
|
4
|
In the Paste Selection dialog, type 14-31, 65, 66, 69, 70, 72-75, 86, 87, 105, 106, 116, 118, 120, 122-466, 468-476, 478-483, 485-493, 495-507, 509-517, 519-779, 813-820, 828, 831, 832, 840, 842-848, 851, 852, 854, 856, 864, 867, 868, 876, 878-1248, 1250-1264, 1266-1287, 1289-1519, 1553, 1554, 1557, 1558, 1570, 1571, 1589, 1590, 1599-1602, 1604, 1606, 1608, 1610-1612 in the Selection text field.
|
|
5
|
Click OK.
|
|
1
|
|
2
|
|
3
|
|
4
|
|
1
|
|
2
|
|
3
|
|
4
|
|
5
|
|
6
|
|
7
|
Select the Radius scale factor checkbox.
|
|
8
|
|
9
|
|
1
|
|
2
|
|
3
|
Click
|
|
4
|
In the Paste Selection dialog, type 32-64, 67, 68, 71, 77-84, 88-103, 107-115, 117, 119, 121, 780-811, 821-827, 829, 833-839, 841, 857-863, 865, 869-875, 877, 1520-1552, 1555, 1556, 1559, 1561-1568, 1572-1587, 1591-1598, 1603, 1605, 1607, 1609 in the Selection text field.
|
|
5
|
Click OK.
|
|
1
|
|
2
|
|
3
|
|
4
|
|
5
|
|
6
|
|
1
|
|
2
|
|
3
|
Click
|
|
4
|
In the Paste Selection dialog, type 76, 85, 104, 477, 494, 518, 812, 830, 866, 1249, 1265, 1288, 1560, 1569, 1588 in the Selection text field.
|
|
5
|
Click OK.
|
|
1
|
|
2
|
|
3
|
|
1
|
|
1
|
|
2
|
|
3
|
|
4
|
|
5
|
|
6
|