Using a Branch to Update Many Models
In the previous example, you used a draft to replace a material in a model. This enabled you to do the change in isolation and at your own pace — all while leaving the main model untouched in the interim. This strategy is the recommended approach when working on changes to a single model, but how should you proceed if there is more than one model you need to update? You could create drafts of all the models, do your updates to each draft, and then save each draft back to its original model. This strategy works in principle but is rather tedious and risks leaving the models in a half-finished state while your work is progressing. If you later want to undo your changes, there would potentially be a lot of cleaning up to do in the form of reverting commits.
As a concrete example, say you have a few models that all share the same CAD geometry. Imagine that your CAD engineer colleague has sent you a new geometry that you would like to update your models with. If the models are stored on a file system shared with other simulation engineers, you perhaps begin by copying all the MPH-files to a new folder on the file system. You replace the geometry in the models using the new CAD data file, test out your changes, and then overwrite the original MPH-files when you are satisfied with the update.
Model Manager enables you to solve such a multi-update problem for models and data files using the concept of branches. A branch is another name for the sequence, or history, of commits shown in the Commits window. You can create a new branch from the initial Main branch, thereby creating an alternative history of commits. You can think of the commits on the Main branch as the trunk of a growing tree, with the oldest commit found at the base of the tree. The alternative commit sequences are tree branches growing out from this tree trunk. When you save commits on such a new branch, any changes made to models and data files are invisible to users working on the Main branch — thereby enabling you to do your changes in isolation until you are ready to share your work by merging the changes to the Main branch.
Creating the New Branch
As an example of working simultaneously with many model changes, you will replace a CAD geometry used as an input file by a few models in the demo database for Model Manager.
1
Write thermal actuator in the text field in the Model Manager window and click Search.
2
Right-click the thermal_actuator.mphbin data file () and select References ().
The References window is opened in the Model Manager workspace showing three models using the selected data file as an input file. The selected file is a CAD geometry stored in the COMSOL native CAD format mphbin, which the models all reference via a geometry Import node ().
You will assign a tag to the three models and the data file to collect them together in the database.
1
Press Ctrl and select the thermal_actuator.mphbin data file () and the Thermal actuator model () in the Model Manager window.
2
In the Home toolbar, in the Database section, click the New Tag button ().
3
In the Title field, write CAD Update Project.
4
A new tag is created in the database. The tag is also assigned to the CAD data file and one of the models referencing the file.
1
Write joule heating and click Search.
2
Press Ctrl and select the Joule Heating of a Microactuator model () and the Joule Heating of a Microactuator — Distributed Parameter Version model ().
3
In the Home toolbar, in the Database section, click the Set Tags button ().
4
In the Set Tags dialog box, select the CAD Update Project tag tree node ().
5
You are now ready to create a new branch in your database that contains the three models and the data file.
1
Write cad update project and click Search.
2
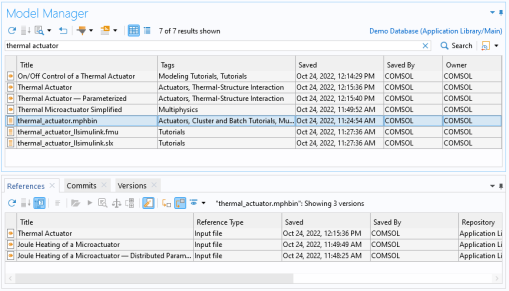
Press Ctrl and select the three models and the thermal_actuator.mphbin data file () in the Model Manager window.
3
The Create Branch dialog box is opened with the three models and the single data file listed in a table at the bottom of the dialog box.
4
In the Name field, write CAD update to thermal actuator.
5
In the Search list, select Only item fields. This reduces the disk space used by indexed search data at the expense of less filter capabilities on the new branch. This is a reasonable tradeoff as the new branch will only contain four, easy-to-find, items.
6
You could have also right-clicked the CAD Update Project tag tree node () in the Tree View of the Model Manager window and selected Branch ().
A branch containing the three models and the CAD geometry data file has been created in the database. Click the Reset button () in the Model Manager window — you will indeed only see four items in the search result.
An initial commit was saved to the database when the CAD update to thermal actuator branch was created. You can see this commit as the top table row in the Commits window. The table also includes the commits on the Main branch up to the point where the new branch was created.
1
Click the link button in the upper-right corner in the Model Manager window — you will find it above the Search button ().
2
In the Select Location dialog box, select the Main branch node () in the tree.
3
The Model Manager window is updated to show the latest versions of items on the Main branch. Also, the Commits window only shows the commits on the Main branch, not on the CAD update to thermal actuator branch. To return to your new branch, click the link button in the Model Manager window, select the CAD update to thermal actuator branch node () in the tree, and click OK.
Double-click the top table row in the Commits window. The Commit Details dialog box is opened for the initial commit on the CAD update to thermal actuator branch. You will find that the Changes table is empty as no items were changed when the new branch was created — the latest item versions and the tag assignments on the new branch are, at least initially, identical to those on the Main branch. You can compare this with the file system analogy of copying MPH-files to a new location on the file system.
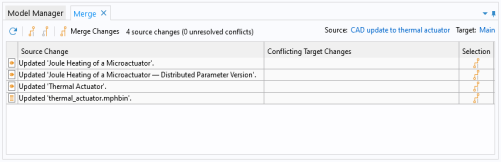
While the CAD update to thermal actuator branch contains copies of the four versions selected in the Main branch, the new branch uses little additional disk space for these copies thanks to data deduplication in Model Manager.
Updating the CAD Input File
You will update the CAD data file in the database with a file found in the COMSOL installation folder.
1
Select the thermal_actuator.mphbin data file () in the Model Manager window.
2
In the Description field in the Settings window, write CAD geometry for a thermal actuator.
3
In the Contents section in the Settings window, select thermal_actuator.mphbin.
4
Click the Replace button () and locate the file thermal_actuator.mphbin in the application library folder of the COMSOL installation folder. Its default location in Windows® is
C:\Program Files\COMSOL\COMSOL62\Multiphysics\applications\
COMSOL_Multiphysics\Multiphysics\thermal_actuator.mphbin
Double-click to replace, or click Open.
5
Click Save () in the Settings window.
6
Click OK in the Save File dialog.
The CAD data file is now updated with a new version on the CAD update to thermal actuator branch. Right-click the thermal_actuator.mphbin data file () and select Versions () to open the Versions window for the file. The window shows all versions of the file with respect to the CAD update to thermal actuator branch. The top table row is the latest version on the branch, the middle row is an identical copy of the version found on the Main branch. For convenience, the original version on the Main branch is also appended at the bottom of the table. This last version is also the only version that users currently browsing the Main branch sees.
Updating the Models
You will continue your work on the branch by using the new CAD geometry in your models.
1
Double-click the Thermal actuator model () in the Model Manager window.
The model is opened in the Model Builder workspace.
2
In the Model Builder window, select Geometry 1>Import ().
3
In the Settings window, click the expand button next to Browse () and select Browse From ().
4
In the Select File window, select the demo database in the list of options.
5
Click the Main link button — you will find it above the Search button ().
6
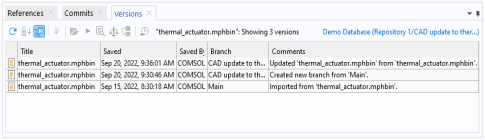
In the Select Location dialog box, select the CAD update to thermal actuator branch node (). Click OK.
7
Double-click the thermal_actuator.mphbin data file () to select it as a new input file.
The model now references the updated CAD geometry in the new branch. Click the Import button () to import the geometry into the model. Finish by saving a new version of the model.
1
From the File menu, select Save To ().
The Save window is opened for the demo database with the new branch automatically selected in the Location field.
2
In the Comments field, write Updated geometry using new CAD data.
3
Click Save ().
A new version of the model is saved to the CAD update to thermal actuator branch. Much like the updated data file, this model version is not visible on the Main branch.
Open the Model Manager workspace and repeat the update for the remaining two models, Joule Heating of a Microactuator and Joule Heating of a Microactuator — Distributed Parameter Version. In the Select File window, you may use the Recent () list option to quickly select the thermal_actuator.mphbin data file ().
Merging the Changes
With the model updates completed, the final step is to merge the changes from the CAD update to thermal actuator branch to the Main branch. This will save the latest versions on the source branch as new latest versions on the target branch.
1
2
In the Database toolbar, in the Database section, click the Databases button () to open the Databases window.
3
Right-click the CAD update to thermal actuator branch node () and select Merge ().
The Merge window is opened in the Model Manager workspace. The window lists all changes that will be merged from the source branch to the target branch — in this case there are four changes corresponding to the updated items.
4
Click the Merge Changes button () in the toolbar.
5
In the Merge dialog box, click OK.
The Merge window is closed and the four changes are saved as a single commit to the Main branch.
6
Select the Main branch node () in the Databases window.
The Model Manager window is automatically updated to show the search result for Main branch node.
The three models and the data file are now updated on the Main branch. At this point, you could either continue your work on the CAD update to thermal actuator branch, save versions of your models, and merge any new changes to the Main branch.
Opting instead to delete the branch.
1
Right-click the CAD update to thermal actuator branch node () and select Delete ().
2
Click Yes in the Delete Branch dialog box.
This concludes this tutorial on the version control tools available in the Model Manager. While creating branches is useful when you want to make sweeping changes involving many models and data files, it comes at the cost of added complexity. You should always consider if a draft can solve your particular version control problem before you create a new branch.