Using a Draft to Update a Single Model
In the tutorial Example: Modeling Using Version Control, you built a model for the structural integrity of a wrench. That model can also be found in the demo database for Model Manager.
1
Click the Model Manager () button in the Workspace section of the Home toolbar in Model Builder to open the Model Manager workspace.
2
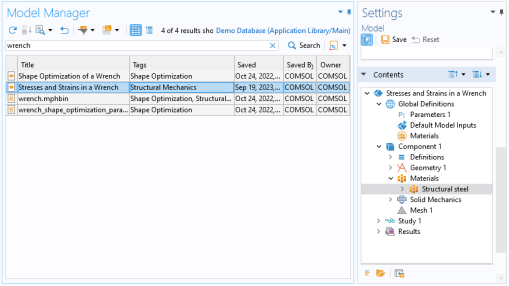
In the Database section of the Home toolbar, select the demo database for Model Manager via the database selector expand button.
The Model Manager window is updated with a search result for the demo database.
3
Write wrench in the text field and click Search.
4
Select the Stresses and Strains in a Wrench model () in the table.
The Settings window is updated to show the latest version of the model. If you have already worked through the tutorial Example: Browsing, Organizing, and Searching Models and Data Files, this is the version in which you added a node comment to the component node. Otherwise, it is the first version that was imported from the COMSOL Application Libraries.
5
Expand Component 1>Materials () in the Contents section of the Settings window to find that the latest version of the model uses a Structural steel material.
You will make a small update to this model by changing to the low alloy steel material Steel AISI 4340. In the process, you will encounter some new version control tools that go beyond what you learned in the tutorial Example: Browsing, Organizing, and Searching Models and Data Files.
1
Select Structural steel () in the Contents section and click the Open Node button () in the toolbar below the tree.
The model version is loaded from the database and opened in the Model Builder workspace with the Component 1>Materials>Structural steel node () selected.
2
Right-click Component 1>Materials>Structural steel () and select Delete (). Click Yes in the Confirm Delete dialog box.
The material node is removed from the model tree.
3
Right-click Component 1>Materials () and select Add Material from Library ().
4
In the Add Material window, click to expand the Built-In tree node. Scroll down to find Steel AISI 4340, right-click, and select Add to Component 1.
5
From the File menu, select Save To ().
6
In the Comments field, write Changed the material to a low alloy steel.
7
Click Save ().
A new version of the model has been saved to the database. In the tutorial Example: Modeling Using Version Control, you saw that you could view the current version history of the model opened in the COMSOL Desktop from the Versions window in the Model Builder workspace. You can also view this version history from the Model Manager workspace.
1
2
Right-click Stresses and Strains in a Wrench in the Model Manager window and select Versions ().
The Versions window is opened with the first table row highlighted in bold indicating that the version is currently opened in the COMSOL Desktop. There are three versions in total (or two if you have not gone through the tutorial Example: Browsing, Organizing, and Searching Models and Data Files).
Imagine now that you regret saving a new version of the model with the changed material — you would rather have kept the Structural steel material. One solution is that you open the previous version in the COMSOL Desktop and immediately save that as a new latest version. Yet a simpler solution is to restore the previous version directly in the database.
1
Right-click the second table row from the top in the Versions window and select Restore Version ().
2
In the Restore Version dialog box, click OK.
The selected version is automatically restored as a new latest version in the database.
3
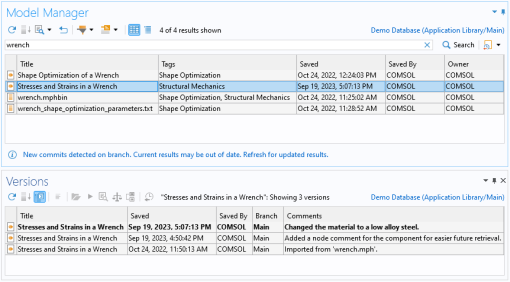
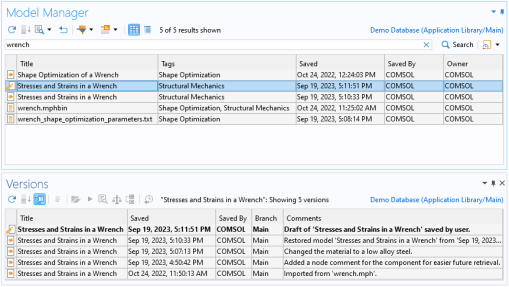
Click Yes when asked if you also want to open the restored version.
The selected version is opened in the Model Builder workspace.
An added benefit to using the Restore Version () functionality as opposed to manually opening and saving the model in the COMSOL Desktop is that you avoid any model migrations in case the model was originally saved in an older version of the COMSOL Multiphysics software.
You can verify that the opened model indeed uses the old Structural steel material by expanding Component 1>Materials ().
You already learned in the tutorial Example: Modeling Using Version Control that a better strategy to making changes to a model is by first creating a draft of the model. A draft is tailor-made for the use case of performing updates to a model without deciding upfront whether the changes are worth keeping.
1
Select Component 1>Materials>Structural steel () and press Del. Click Yes to delete the Structural steel material.
2
In the Add Material window, right-click Steel AISI 4340 and select Add to Component 1 to add the low alloy steel material once more.
3
Open the Model Manager workspace. Click the Refresh button () in the Model Manager window to refresh the table. You will find both the Stresses and Strains in a Wrench regular model () and a new Stresses and Strains in a Wrench draft model () in the search result.
1
Select the Stresses and Strains in a Wrench draft model () in the Model Manager window.
The Versions window shows the single version of the draft model in the top table row. For convenience, the table also contains the four versions of the regular model that the draft originated from.
2
Select the Stresses and Strains in a Wrench regular model () in the Model Manager window.
The Versions window shows the four versions of the regular model.
You can finish the draft work by saving the draft back as a new version of the regular model.
1
From the File menu, select Save To ().
2
In the Comments field, write Changed the material to a low alloy steel via a draft.
3
Click Save ().
The Stresses and Strains in a Wrench draft model () is automatically deleted and no longer visible in the Model Manager window. Select the Stresses and Strains in a Wrench regular model (). The Versions window shows five versions for the model.