You are viewing the documentation for an older COMSOL version. The latest version is
available here.
The Model Manager window lists these models and data files in a table. If you scroll down the table, you will notice that the table only contains the first 100 items in the database sorted alphabetically on their titles. This cutoff is an optimization to not cause unnecessary data traffic between the COMSOL Desktop and the database — something that may be especially important when connected to a Model Manager server over the network.
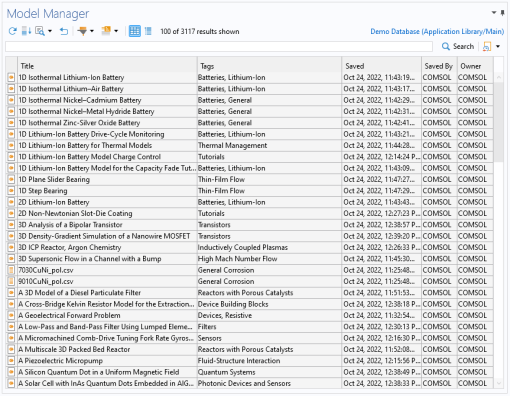
Click the Show More button (

) in the toolbar to append the next 100 items to the bottom of the table. You can repeat this as many times as you like until all items found in the database have been appended to the table.
You use the Model Manager window to find models and data files in the database by writing search terms in the text field above the table.
|
1
|
Write busbar and click Search. You can also press Enter.
|
|
2
|
Write bus and click Search.
|
|
3
|
Write electrical heating and click Search.
|
When you write multiple search terms separated by spaces, the search will match on all terms using Boolean AND-logic. In this case, you find all items for which both the word electrical and the word heating is found in the searched item fields.
Select the Thermal Analysis of a Bipolar Transistor model (

) in the table. The
Settings window updates to show various metadata fields for this model. You will find that the
Description field for the model contains the two search words electrical and heating, although not next to each other.
You can require that all search terms must match as a sentence by enclosing the search terms with quotations. Write "electrical heating" in the text field and click
Search. The
Thermal Analysis of a Bipolar Transistor model (

) is now no longer present in the search result.
Click the Reset button (

) to clear the text field and restore the search to match all models and data files in the database.
The default behavior in the Model Manager window is to search the latest versions of items. This is also the version shown in the
Settings window when you select a model or data file in the search result table. From the
Settings window, you can, for example, see the point in time when the version was saved in the
Saved field, the name of the user that saved the version in the
Saved by field, and the title of the version in the
Title field.
|
1
|
Write busbar in the text field again and click Search.
|
|
2
|
Select the Atmospheric Corrosion of a Busbar model (  ) in the search result table.
|
In the Contents section in the
Settings window, you can explore the model tree of the model as it looked when the version was saved to the database. Expand some of the nodes in the tree to discover that this is a model with a
3D component node containing three material nodes and two physics interface nodes.
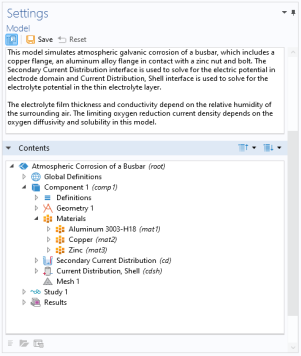
From the Contents tree, you can insert components, geometry parts, materials, parameters, and many other nodes into the model currently opened in the COMSOL Desktop using the
Insert into Model button (

). You can also select a node and click
Open Node (

) to open the model with the node selected in the
Model Builder window.
|
3
|
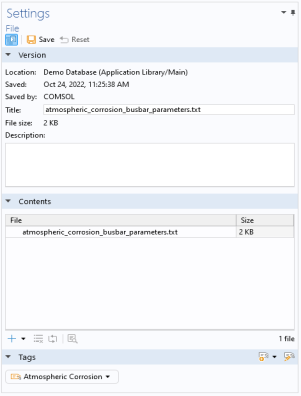
Select the atmospheric_corrosion_busbar_parameters.txt file (  ) in the search result table.
|
This is a file containing parameters that can be used in a Parameters node in the
Model Builder window. You can double-click the table row in the
Model Manager window to preview the data file with the default application used for a text file on your computer. The
Settings window shows, for example, the file size when the file is stored on a file system.
|
4
|
In the Description field in the Settings window, write Parameters for modeling atmospheric corrosion of a busbar. Click the Save button (  ).
|
The Save File dialog box is opened with a suggested save comment.
|
6
|
Click OK to save the changed description in a new version of the data file.
|
The Saved and
Saved by field are updated in the
Settings window to reflect the new latest version. The
Model Manager window is, however, not automatically updated. Click the link text informing you that the current search result is out of date at the bottom of the window to refresh the search result.

|
7
|
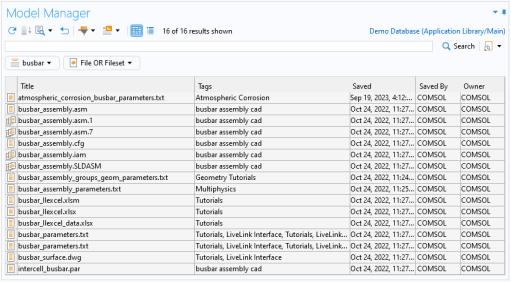
Select busbar_assembly.iam (  ) in the search result table.
|
This is a fileset, an item containing multiple data files that are version controlled as a collective whole. In this case, the data is a CAD assembly containing a main assembly file and several component files. You can see the file contents of the fileset in the
Contents section in the
Settings window.
|
8
|
Click the Reset button (  ) to reset the search result.
|
The Settings window is where you primarily view and update items in a Model Manager database. When you click the
Save button (

) in the top toolbar, a new version is saved using the current values found in the various fields in the window. You can, for example, change the title or description of an item, update a model from an MPH-file on your computer, or update the contents of a file or fileset using data files on your computer. The
Settings window is also where you update other types of objects found in a database.
Writing search terms in the text field in the Model Manager window is often the quickest way of finding a particular model or data file given that you know, for example, its title. As a complement to this, you can apply separate search filters.
|
1
|
Click the Add Filter button (  ) in the toolbar of the Model Manager window and select Filename (  ).
|
The Filter dialog box is opened enabling you to apply a filter on the filename used by a model or data file when exported to the file system.
|
2
|
In the Keyword field, write busbar.mph. Click OK.
|
|
2
|
In the Keyword field, change to busbar.
|
|
3
|
Select Prefix Match under Options to automatically append a wildcard asterisk character to the searched value. Click OK.
|
|
4
|
Click on the busbar* filter pill (  ) and select Remove (  ) to remove the filter.
|
As you may have previously noticed, writing busbar in the text field and clicking
Search (

) led to a search result containing items that did not have that particular word in their titles. Instead the word busbar was found in the description or assigned tags of the items. You can address this by applying an explicit filter on the title field. Click the
Add Filter button (

) and select
Title (

). In the
Filter dialog box, write
busbar in the
Text field. Click
OK. The search result now only contains models and data files with the word busbar in their titles.
You can add as many filters as you like. Click the Add Filter button (

) in the toolbar again and select
Item Version Type (

). Select the
File and
Fileset check boxes. Click
OK. The search result is further reduced to only contain data files.
Click the Reset button (

) to reset the search result.