You are viewing the documentation for an older COMSOL version. The latest version is
available here.
To enable this option in the context menu, click the Show More Options button (

) and select
Batch and Cluster in the
Show More Options dialog box.
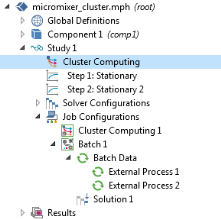
Use the Cluster Computing (

) study when you want to submit COMSOL Multiphysics
batch jobs to a job scheduler that in turn runs the batch job on a second computer or cluster. For more information, see
Cluster Computing (Job Configurations) and its related functionality. Also see
Figure 20-5.
Once you have specified the settings, click Compute 
to start a COMSOL process that solves the current study.
When the cluster computing process starts, the COMSOL Desktop follows the progress in The External Process Window. When the process finishes (or you click the
Detach Job button to no longer follow the process), an
External Process node is selected that represents the current running process. If you are running COMSOL Multiphysics in distributed mode, the model runs in the current process. In this case it is recommended that you do not create a
Cluster Computing study step.
You can specify the batch filename in the Filename field on the
Computing>Cluster page in the
Preferences dialog box if you have selected the
Specify batch filename check box on the same page first. If that check box is not selected, the batch filename is taken from the model filename. If you want to use another name, select the check box next to the Filename field and then specify the filename for the file in which to store the model in the
Filename field. The directory in which to store the model is the one in the
Batch directory field, which is also on the
Computing>Cluster page in the
Preferences dialog box.
Select the Generate solver sequence in external process check box to delay the generation of the solver sequence (for example, to avoid expensive mesh generation on the desktop before submitting the batch job).
Enter the Number of nodes (physical nodes) to use for this job (the default is 1 node).
Select the Use batch license check box to run using batch licenses. Batch licenses can be used to run multiple batch jobs for different models that only depend on a parameter. Usually you should use the
Cluster Sweep node. This option makes it possible submit a single batch job from the COMSOL Desktop and continue working there while the cluster job is computing on another computer or cluster in the background — this approach works with a license for one concurrent user.
Under Before sweep, select the
Clear meshes check box to clear the meshes before running the batch sweep. Also, select the
Clear solutions check box to clear the solutions before running the batch sweep.
Under During sweep, select the
Synchronize solutions check box to synchronize the solutions computed by the batch processes with the model. This allows additional postprocessing after the sweep has finished. The default is to disable solution synchronization. If desired, and the
Synchronize solutions check box is selected, select the
Clear synchronization data check box to clear synchronization files left by batch jobs. Log files, .status, .recovery, and batch job MPH-files are not removed. To save the model to file before removing all synchronization data, select the
Save model to file after synchronization is completed check box. The filename is the same as the one used for making a backup.
Under After sweep, select the
Output model to file check box to enable that all batch processes save the models to file. Selecting this check box ensures that the MPH-files that are automatically saved contain the solution (for each parameter). In most cases, the solution synchronization and probe synchronization functionality should be used instead because otherwise the data ends up in one file for each process and cannot be postprocessed efficiently.
From the Settings list, choose
Preference controlled (the default) to use settings from the
Cluster computing part of the
Multicore and Cluster Computing page in the
Preferences dialog box. Choose
User controlled to enter the following cluster computing settings:
Choose the Scheduler type:
General (the default),
Microsoft® HPC Pack,
OGS/GE,
SLURM,
PBS,
IBM LSF®, or
Not distributed.
Select General (the default) to configure to run on many types of clusters and schedulers, including Linux clusters.
|
•
|
The entry in the Host file field specifies the host file used for the job. If left empty, MPD looks for a file mpd.hosts in the Linux home directory.
|
Select Microsoft® HPC Pack to use the Microsoft HPC Pack job scheduler to submit the batch job.
When Microsoft® HPC Pack is selected:
|
•
|
The entry in the Scheduler field is the IP address of the enterprise adapter of the head node or the DNS name of the head node. The default is localhost, and it should only be changed if you submit your job from a different computer than the head node.
|
|
•
|
The entry in the User field is the user account that COMSOL Multiphysics uses for submitting the job. You provide the password in a separate command window that opens at execution time with the possibility to save the credentials.
|
Select OGS/GE to use the open grid scheduler/grid engine job scheduler to submit the batch job. When
OGS/GE is selected:
Select SLURM to use the SLURM job scheduler to submit the batch job. When
SLURM is selected:
|
•
|
The entry in the Scheduler field is the IP address of the enterprise adapter of the head node or the DNS name of the head node. The default is localhost, and it should only be changed if you submit your job from a different computer than the head node.
|
|
•
|
The entry in the User field is the user account that the COMSOL Multiphysics software uses for submitting the job.
|
Select PBS to use a PBS-based (Portable Batch System) job scheduler to submit the batch job. When
PBS is selected:
|
•
|
The entry in the Scheduler field is the IP address of the enterprise adapter of the head node or the DNS name of the head node. The default is localhost, and it should only be changed if you submit your job from a different computer than the head node.
|
|
•
|
The entry in the User field is the user account that the COMSOL Multiphysics software uses for submitting the job.
|
Select IBM LSF® to use an IBM LSF
®-based (IBM
® Platform Load Sharing Facility) job scheduler to submit the batch job. When
IBM LSF® is selected:
|
•
|
The entry in the Scheduler field is the IP address of the enterprise adapter of the head node or the DNS name of the head node. The default is localhost, and it should only be changed if you submit your job from a different computer than the head node.
|
|
•
|
The entry in the User field is the user account that the COMSOL Multiphysics software uses for submitting the job.
|
Select Not distributed when you want to run a batch job rather than using distributed computing. Enter details for the
Directory Settings for All Cluster Types.
|
•
|
If the batch job has another path to the directory, select the Specify external COMSOL batch directory path check box and enter the path to the external process (batch) directory in the Directory field or click Browse. The cluster job uses this path from the compute node to access the input file and write back the result. On Windows this must be a fully qualified UNC path, for example, \\head1\shared\clusterprojects. The external COMSOL batch directory path refers to the location where the batch process reads and writes the data.
|
See How to Specify Directory Paths for Batch Jobs and Cluster Jobs for some examples of which paths to specify for some common cluster or batch job configurations.
Enter the Number of job restarts. The default is 0. This is the maximum number of times the job can be restarted if it fails to complete.
Enter a value for the Alive time (seconds). The default is 300 seconds. This is the longest time the process is allowed to run before it must inform that it is still running. Failure to do so means that the process is considered dead, and a new process is started unless the maximum number of job restarts is reached.
If you are running a parametric sweep and want to distribute it by sending one parameter value to each compute node, select the Distribute parametric sweep check box. This requires that your study includes a parametric sweep. In the
Parametric Sweep node’s
Settings window, you must also select the
Distribute parametric sweep check box in the
Advanced Settings section.
This settings can be specified here or in the Preferences dialog box, on the
Remote Computing page. From the
Settings list under
Remote computing settings, choose
User controlled to specify the remote computing settings in this section., or choose
Preferences controlled to use the remote computing settings in the
Preferences dialog box. The remote computing settings are the same in both places.
Enable the Run remote check box if you want to run COMSOL Multiphysics on a remote machine using a remote start command such as SSH and using a file transfer program such as SCP to transfer the files to and from the remote computer. This allows you to run on a machine installed on your network without a client/server connection or on a machine installed on a remote cloud. Then specify the settings described below.
Choose the method for starting COMSOL Multiphysics remotely from the Remote invoke command list. You can choose
None,
SSH,
Write command to file,
MPI, or
User defined.
For the SSH method you can choose between using
SSH,
Putty, or a
User defined SSH command. You can select the SSH commands installation directory in the SSH directory if the SSH command is not available on the PATH. The SSH key file directory is set in the
SSH key file setting. You can set ports you want to forward in
Forward ports and the host you want to forward the ports to in
Port host. This is useful when you have the license manager installed locally, but the machine where COMSOL Multiphysics is running cannot access the license manager; for instance, if the machine is in the cloud. Specify the user name to use on the remote machine with SSH user.
The Write command to file method writes all batch command to a file that you specify in the
File with command line field. This file can then be used to run the command on another computer.
The MPI method uses MPI to launch COMSOL batch jobs on the hosts listed in the
Remote hosts table or file. On Windows, you want to launch
smpd on the hosts (see
Using Microsoft MPI and SMPD on Standalone Computers).
For the User-defined
Remote invoke command, you can enter a command in the
Command setting. In the
Command setting, any use of the keyword
{remotehost} is replaced by the name of the remote host when COMSOL Multiphysics starts.
Choose the method for transferring files to the remote computer in File transfer command. You can choose
None,
SCP,
File list or
User defined.
For the SCP method, you can choose between using
SCP,
Putty, or a
User defined SCP command. You can select the SCP commands installation directory in
SCP directory if the SCP command is not available on the PATH. The SCP key file directory is set in the
SCP key file setting. Specify the user name to use on the remote machine with SCP user.
The File list method stores a list of all files that should be transferred to another computer where the batch job runs. In
File with list of files to remote, it stores a list of all files to transfer to the other computer before running the batch job. In
File with list of files from remote, it stores a list of all files to transfer from the other computer after the batch jobs have finished. Note that unless you detach, COMSOL Multiphysics will be waiting for the data to be transferred to that remote computer and back and then update its solutions.
For the User-defined
File transfer command, you can enter a command in the
To remote command for the transfer of files from the local computer to the remote machine and
From remote command for the transfer of files from the remote machine to the local computer. In the settings, any use of the keyword
{remotehost} is replaced by the name of the remote host. Any use of the keyword
{localfile} is replaced by the name of the local file, and any use of the keyword
{remotefile} is replaced by the name of the remote file.
From the Remote hosts list, select
Table if the Remote host list should be read from the
Remote hosts table or
File if it should be read from a file.
In the Remote hosts table, list the hosts you want to run on. If several hosts are listed, COMSOL Multiphysics allocates a job on the first host that is free. The
Remote hosts file points to a file on the server side (in a client/server configuration; otherwise, on the current computer) that contains the list of hosts to run on remotely.
Use the Remote OS to specify if the remote computer is running the same OS (
Native) or is running
Linux or
Windows.
Select the Use graphics check box when the batch process should run results nodes that create graphical contents such as exporting to file.
Enter the Number of simultaneous jobs. The default is 1. This is the maximum number of batch processes that are allowed to run simultaneously.