PDF

Second Harmonic Generation of a Gaussian Beam
Introduction
Laser systems are an important application area in modern electronics. There are several ways to generate a laser beam, but they all have one thing in common: The wavelength is determined by the stimulated emission, which depends on material parameters. It is especially difficult to find lasers that generate short wavelengths (for example, ultraviolet light). With nonlinear materials it is possible to generate harmonics with frequencies that are multiples of the frequency of the laser light. Coherent light with half the wavelength of the fundamental beam is generated with second-order nonlinear materials. This model shows how to set up second harmonic generation as a transient wave simulation using nonlinear material properties. A Nd:YAG (λ = 1.06 μm) laser beam is focused on a nonlinear crystal, so that the waist of the beam is inside the crystal.
Model Definition
To simplify the problem and to save some calculation time this model is not a full 3D simulation, but rather a 2D model. The model uses COMSOL Multiphysics’ standard 2D coordinate system, assuming that the beam is propagating in the x direction, it has a transverse Gaussian intensity dependence in the y direction and that the electric field is polarized in the out-of-plane z direction.
When a laser beam propagates, it travels as an approximate plane wave with a cross-section intensity of Gaussian shape. At the focal point, the laser beam has its minimum width, w0. For a Gaussian beam with a minimum spot radius that is not too small compared to the wavelength (w0 > λ), the solution of the time-harmonic Maxwell’s equations for a 2D geometry1 can be approximated by the following analytical solution of the paraxial wave equation2:
where
In these expressions, w0 is the minimum waist, ω is the angular frequency, y is the in-plane transverse coordinate, and k is the wave number. The wavefront of the beam is not exactly planar; it propagates like a spherical wave with radius R(x). However, close to the focal point the wave is almost plane.
The laser beam is also modeled as a pulse in time, using a Gaussian envelope function. This produces a wave package with a Gaussian frequency spectrum.
These expressions are used as the input boundary conditions.
The nonlinear properties for second harmonic generation in a material can be defined with the following matrix,
where P is the polarization. The model only uses the d33 parameter for simplicity. To keep the problem size small the nonlinear parameter is magnified by some orders of magnitude. The crystal here has a value of 1017 F/V, when the values for most materials usually are in the 1022 F/V range. Without this magnification, to get a detectable second harmonics requires a much longer propagation distance, resulting in a large computational problem.
The mesh size is defined to resolve not only the fundamental wavelength, but also the second harmonic wavelength. Given the mesh size, the time step is calculated as
,
where CFL is the so called CFL number — named after Courant, Friedrichs, and Lewy — hmax is the maximum mesh element size, and c0 is the speed of light. In this model, a CFL number of 0.15 is used. In general, it should be in the range 0.1 to 0.2. For more information on how to define the time step for the time-dependent solver, see Ref. 2.
Results and Discussion
The main purpose of this simulation is to calculate the second harmonic generation when the pulse travels along the 20 μm geometry. So you have to solve for the time it takes for the pulse to enter, pass, and disappear from the volume. The pulse has a characteristic time of 10 fs, and below you can see the pulse after it has traveled 61 fs.
Figure 1: The pulse after 61 fs.
After 90 fs the pulse has reached the output boundary (see Figure 2). The simulation has to continue for another 30 fs until the pulse completely disappears.
Figure 2: The pulse after 90 fs. It has now reached the output boundary.
The simulation stores the times between 60 fs and 120 fs, which is when the pulse passes the output boundary. The electric field at this boundary has a second harmonic component that can be extracted using a frequency analysis. The result appears in Figure 3. The small peak on the right side of the large peak is the second harmonic generation. To the left of the large peak is also a smaller peak, due to difference frequency generation. This optical rectification effect is also a second-order nonlinear optical process.
Figure 3: The frequency spectrum of the beam at the output boundary. The peak on the right side of the large peak is the second harmonic generation. You also find smaller peaks for higher harmonics. There is also a tiny peak close to zero frequency that is due to difference frequency generation.
Reference
1. A. Yariv, Quantum Electronics, 3rd Edition, John Wiley & Sons, 1988.
2. COMSOL Knowledge Base 1118, “Resolving time-dependent waves,” https://www.comsol.com/support/knowledgebase/1118/.
Application Library path: RF_Module/Tutorials/second_harmonic_generation
Modeling Instructions
From the File menu, choose New.
New
In the New window, click  Model Wizard.
Model Wizard
1
In the Model Wizard window, click  2D.
2
In the Select Physics tree, select Radio Frequency>Electromagnetic Waves, Transient (temw).
3
Click Add.
4
Click  Study.
5
In the Select Study tree, select General Studies>Time Dependent.
6
Geometry 1
1
In the Model Builder window, under Component 1 (comp1) click Geometry 1.
2
In the Settings window for Geometry, locate the Units section.
3
From the Length unit list, choose µm.
Global Definitions
Parameters 1
1
In the Model Builder window, under Global Definitions click Parameters 1.
2
In the Settings window for Parameters, locate the Parameters section.
3
1E-17 s7·A³/(kg²·m4)
The last four parameters will be used for defining the maximum mesh element size and for defining the time step for the time-dependent solver.
Analytic 1 (an1)
1
In the Home toolbar, click  Functions and choose Global>Analytic.
2
In the Settings window for Analytic, type w in the Function name text field.
3
Locate the Definition section. In the Expression text field, type w0*sqrt(1+(x/x0)^2).
4
Locate the Units section. In the table, enter the following settings:
5
In the Function text field, type m.
Analytic 2 (an2)
1
In the Home toolbar, click  Functions and choose Global>Analytic.
2
In the Settings window for Analytic, type eta in the Function name text field.
3
Locate the Definition section. In the Expression text field, type atan2(x,x0)/2.
4
Locate the Units section. In the table, enter the following settings:
5
In the Function text field, type rad.
Analytic 3 (an3)
1
In the Home toolbar, click  Functions and choose Global>Analytic.
2
In the Settings window for Analytic, type R in the Function name text field.
3
Locate the Definition section. In the Expression text field, type x*(1+(x0/x)^2).
4
Locate the Units section. In the table, enter the following settings:
5
In the Function text field, type m.
Geometry 1
Create a rectangular calculation domain, where y = 0 is the symmetry plane for the laser beam.
Rectangle 1 (r1)
1
In the Geometry toolbar, click  Rectangle.
2
In the Settings window for Rectangle, locate the Size and Shape section.
3
In the Width text field, type 20.
4
In the Height text field, type 6.
5
Locate the Position section. In the x text field, type -10.
6
In the y text field, type -6.
7
Click  Build All Objects.
8
Click the  Zoom Extents button in the Graphics toolbar.
Materials
Assume that the laser beam propagates through an artificial material with the properties of air except for an additional second-order optical nonlinearity. You will specify the nonlinearity later, when setting up the wave equation.
Add Material
1
In the Home toolbar, click  Add Material to open the Add Material window.
2
Go to the Add Material window.
3
4
Click Add to Component in the window toolbar.
5
In the Home toolbar, click  Add Material to close the Add Material window.
Electromagnetic Waves, Transient (temw)
Only solve for the out-of-plane component.
1
In the Model Builder window, under Component 1 (comp1) click Electromagnetic Waves, Transient (temw).
2
In the Settings window for Electromagnetic Waves, Transient, locate the Components section.
3
From the Electric field components solved for list, choose Out-of-plane vector.
Perfect Magnetic Conductor 1
1
In the Physics toolbar, click  Boundaries and choose Perfect Magnetic Conductor.
2
Scattering Boundary Condition 1
1
In the Physics toolbar, click  Boundaries and choose Scattering Boundary Condition.
2
3
In the Settings window for Scattering Boundary Condition, locate the Scattering Boundary Condition section.
4
From the Incident field list, choose Wave given by E field.
5
Specify the E0 vector as
Scattering Boundary Condition 2
1
In the Physics toolbar, click  Boundaries and choose Scattering Boundary Condition.
2
Wave Equation, Electric 1
1
In the Model Builder window, click Wave Equation, Electric 1.
2
In the Settings window for Wave Equation, Electric, locate the Electric Displacement Field section.
3
From the Electric displacement field model list, choose Remanent electric displacement.
4
Specify the Dr vector as
Mesh 1
Mapped 1
In the Mesh toolbar, click  Mapped.
Distribution 1
1
Right-click Mapped 1 and choose Distribution.
2
3
In the Settings window for Distribution, locate the Distribution section.
4
From the Distribution type list, choose Explicit.
5
In the Relative placement of vertices along edge text field, type sin(range(0,0.025*pi,0.5*pi)). This creates a denser mesh closer to the upper boundary.
Size
1
In the Model Builder window, under Component 1 (comp1)>Mesh 1 click Size.
2
In the Settings window for Size, locate the Element Size section.
3
Click the Custom button.
4
Locate the Element Size Parameters section. In the Maximum element size text field, type hmax.
5
Click  Build All.
6
Click the  Zoom Extents button in the Graphics toolbar.
Definitions
To perform an FFT analysis, the number of time steps that have to be saved is very large. To store all solutions of the A-field results in a huge model file. However, for the FFT, it is only interesting to look at the field at the output boundary. You can take advantage of this fact by defining a Domain Point Probe that stores and displays the on-axis electric field at the output boundary, whereas the A-field is only stored at the times defined in the study.
Domain Point Probe 1
1
In the Definitions toolbar, click  Probes and choose Domain Point Probe.
2
In the Settings window for Domain Point Probe, locate the Point Selection section.
3
In row Coordinates, set x to 10.
Point Probe Expression 1 (ppb1)
1
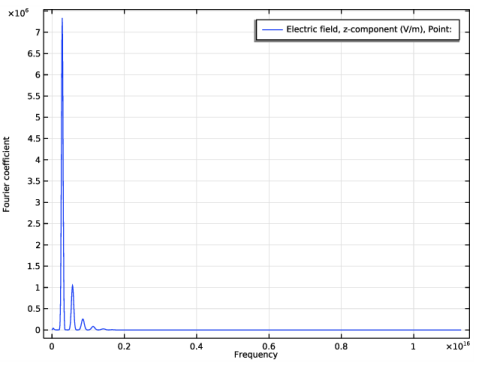
In the Model Builder window, expand the Domain Point Probe 1 node, then click Point Probe Expression 1 (ppb1).
2
In the Settings window for Point Probe Expression, type Eout in the Variable name text field.
3
Click Replace Expression in the upper-right corner of the Expression section. From the menu, choose Component 1 (comp1)>Electromagnetic Waves, Transient>Electric>Electric field - V/m>temw.Ez - Electric field, z-component.
Study 1
Step 1: Time Dependent
Now define the times for which to save the full field solutions.
1
In the Model Builder window, under Study 1 click Step 1: Time Dependent.
2
In the Settings window for Time Dependent, locate the Study Settings section.
3
In the Output times text field, type 0 61[fs] 90[fs] 120[fs].
4
Click to expand the Results While Solving section. Select the Plot check box.
Solution 1 (sol1)
1
In the Study toolbar, click  Show Default Solver.
Set the solver to calculate the output field every 0.2 fs.
2
In the Model Builder window, expand the Solution 1 (sol1) node, then click Time-Dependent Solver 1.
3
In the Settings window for Time-Dependent Solver, click to expand the Time Stepping section.
4
From the Steps taken by solver list, choose Manual.
5
In the Time step text field, type tstep.
6
In the Study toolbar, click  Compute.
Results
2D Plot Group 1
Now define the surface plots, as displayed in Figure 1 and Figure 2.
Surface 1
1
In the Model Builder window, expand the 2D Plot Group 1 node, then click Surface 1.
2
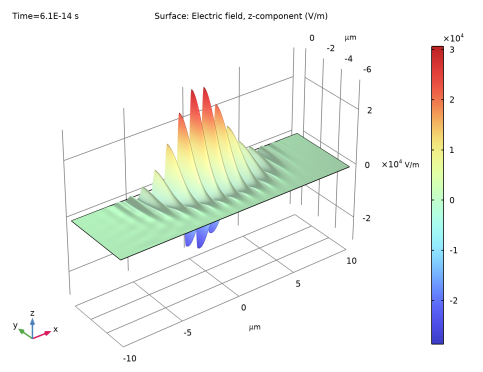
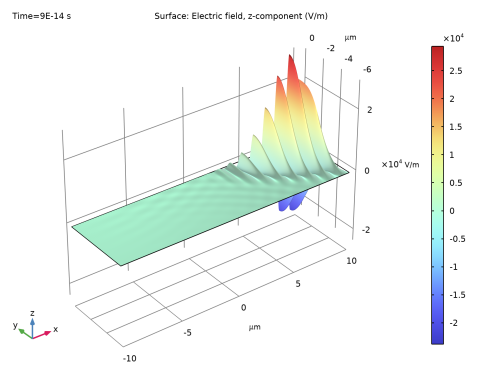
In the Settings window for Surface, click Replace Expression in the upper-right corner of the Expression section. From the menu, choose temw.Ez - Electric field, z-component - V/m.
Height Expression 1
Right-click Surface 1 and choose Height Expression.
2D Plot Group 1
1
In the Settings window for 2D Plot Group, locate the Data section.
2
From the Time (s) list, choose 6.1E-14.
3
In the 2D Plot Group 1 toolbar, click  Plot. You should now see the plot in Figure 1.
4
From the Time (s) list, choose 9E-14.
5
In the 2D Plot Group 1 toolbar, click  Plot. You should now see the plot in Figure 2.
Probe Table Graph 1
Finally, make a spectral analysis of the on-axis electric field at the output boundary.
1
In the Model Builder window, expand the Results>Probe Plot Group 2 node, then click Probe Table Graph 1.
2
In the Settings window for Table Graph, locate the Data section.
3
From the Transformation list, choose Discrete Fourier transform.
4
From the Show list, choose Frequency spectrum.
5
Select the Frequency range check box.
6
In the Probe Plot Group 2 toolbar, click  Plot.
Probe Plot Group 2
Now you should have a graph similar to the one in Figure 3.
 

1
Notice that the electric field is defined for a 2D Gaussian beam. In 2D, the amplitude is defined as the square root of the spot radius ratio and the Gouy phase shift η(x) is defined with a factor 1/2. In 3D the amplitude is defined using just the spot radius ratio and there is no factor 1/2 for the Gouy phase shift.

2
In the paraxial wave equation the second derivative with respect to the coordinate in the propagation direction is neglected. This approximation of the Helmholtz equation is not applicable for a strongly diverging beam, like a beam that is focused to a very small spot radius (w0 < λ).