PDF

Shape Optimization of a Tesla Microvalve
Introduction
A Tesla valve inhibits backward flow on a fixed geometry by utilizing friction forces instead of moving parts, Ref. 1. This means fluid can flow freely in one direction but not in the reverse direction. Typically the Reynolds number of the flow in microfluidics is up to 100. This model sets up a shape optimization model with inspiration from the model Optimization of a Tesla Microvalve, which finds a design for a Tesla valve using topology optimization. The optimization problem tends to favor thin walls, and therefore the model uses interior walls. The result of the optimization is verified by remeshing in the deformed configuration and varying the Reynolds number.
Model Definition
The physics of this model is identical to that of Optimization of a Tesla Microvalve, so the main difference is in the setup of the parameterized geometry. The result of the topology optimization is shown in Figure 1, while the initial geometry for this model is shown in Figure 2.
Figure 1: The topology optimized design computed in the model Optimization of a Tesla Microvalve.
Figure 2: The initial geometry used for this model uses interior walls to prevent inverted elements and topological changes.
The model uses 2nd order Bernstein polynomials to deform the geometry. This functionality is available via the Free Shape Domain and Polynomial Boundary features. Reducing the Maximum displacement is guaranteed to reduce the tendency for inverted elements or clashing of boundaries. Three lines will be deformed and two of them will be allowed to slide along Roller boundaries. The flow rates are fixed, so it is the pressure drop which is taken as the objective function. The optimization uses the adjoint method for the sensitivity analysis and therefore the model can be solved in approximately 10 minutes.
Results and Discussion
The optimization leads to significant distortion of the mesh as shown in Figure 3. Surprisingly, it is actually possible to improve on the result of topology optimization with shape optimization. This can be attributed to the fact that the optimization problem favors thin walls, which are trivial to realize with interior walls in shape optimization, but in topology optimization they require high damping and small elements.
Figure 3: The result of the optimization is shown in terms of the mesh and the backward flow velocity. Significant distortion of the mesh can be observed in the areas that are close to boundaries with larger deformations. The red lines indicate the initial geometry, while the green lines represent the optimal geometry.
The design is verified by remeshing in the deformed frame and varying the Reynolds number as plotted in Figure 4.
Figure 4: The pressure drop ratio is plotted as a function of the Reynolds number for three different mesh sizes.
Reference
1. S. Lin, “Topology Optimization of Micro Tesla Valve in low and moderate Reynolds number,” Chinese Academy of Sciences, China, September 27, 2011 http://senlin.weebly.com/uploads/6/6/1/4/6614199/sen_lin_topology_optimization_of_micro_tesla_valve.pdf.
Notes About the COMSOL Implementation
The model is set up using two Laminar Flow interfaces, one for the forward flow and one for the reverse.
Application Library path: Optimization_Module/Shape_Optimization/tesla_microvalve_shape_optimization
Modeling Instructions
From the File menu, choose New.
New
In the New window, click  Model Wizard.
Model Wizard
1
In the Model Wizard window, click  2D.
2
In the Select Physics tree, select Fluid Flow>Single-Phase Flow>Laminar Flow (spf).
3
Click Add.
4
Click Add.
5
Click  Study.
6
In the Select Study tree, select General Studies>Stationary.
7
Geometry 1
Create the geometry. To simplify this step, insert a prepared geometry sequence.
1
In the Geometry toolbar, click Insert Sequence and choose Insert Sequence.
2
Browse to the model’s Application Libraries folder and double-click the file tesla_microvalve_shape_optimization_geom_sequence.mph.
3
In the Geometry toolbar, click  Build All.
4
Click the  Zoom Extents button in the Graphics toolbar.
The geometry should now look like that in Figure 1. Note that the inserted geometry is parameterized and that the parameters used are automatically added to the list of global parameters in the model.
5
In the Model Builder window, collapse the Geometry 1 node.
Global Definitions
Geometrical Parameters
Add a new parameter group for calculating the average inlet velocity as a function of the Reynolds number.
1
In the Model Builder window, under Global Definitions click Parameters 1.
2
In the Settings window for Parameters, type Geometrical Parameters in the Label text field.
Parameters 2
1
In the Home toolbar, click  Parameters and choose Add>Parameters.
2
In the Settings window for Parameters, locate the Parameters section.
3
Materials
Add a blank material for rho0 and mu0.
Material 1 (mat1)
1
In the Model Builder window, under Component 1 (comp1) right-click Materials and choose Blank Material.
2
In the Settings window for Material, locate the Material Contents section.
3
Laminar Flow (spf)
Set up the boundary conditions for the two flow directions.
Interior Wall 1
1
In the Model Builder window, under Component 1 (comp1) right-click Laminar Flow (spf) and choose Interior Wall.
2
In the Settings window for Interior Wall, locate the Boundary Selection section.
3
From the Selection list, choose Interior Walls.
Symmetry 1
1
In the Physics toolbar, click  Boundaries and choose Symmetry.
2
In the Settings window for Symmetry, locate the Boundary Selection section.
3
From the Selection list, choose Symmetry.
Inlet 1
1
In the Physics toolbar, click  Boundaries and choose Inlet.
2
In the Settings window for Inlet, locate the Boundary Selection section.
3
From the Selection list, choose Left.
4
Locate the Boundary Condition section. From the list, choose Fully developed flow.
5
Locate the Fully Developed Flow section. In the Uav text field, type Uin.
Outlet 1
1
In the Physics toolbar, click  Boundaries and choose Outlet.
2
In the Settings window for Outlet, locate the Boundary Selection section.
3
From the Selection list, choose Right.
Laminar Flow 2 (spf2)
In the Model Builder window, under Component 1 (comp1) click Laminar Flow 2 (spf2).
Interior Wall 1
1
In the Physics toolbar, click  Boundaries and choose Interior Wall.
2
In the Settings window for Interior Wall, locate the Boundary Selection section.
3
From the Selection list, choose Interior Walls.
Symmetry 1
1
In the Physics toolbar, click  Boundaries and choose Symmetry.
2
In the Settings window for Symmetry, locate the Boundary Selection section.
3
From the Selection list, choose Symmetry.
Inlet 1
1
In the Physics toolbar, click  Boundaries and choose Inlet.
2
In the Settings window for Inlet, locate the Boundary Selection section.
3
From the Selection list, choose Right.
4
Locate the Boundary Condition section. From the list, choose Fully developed flow.
5
Locate the Fully Developed Flow section. In the Uav text field, type Uin.
Outlet 1
1
In the Physics toolbar, click  Boundaries and choose Outlet.
2
In the Settings window for Outlet, locate the Boundary Selection section.
3
From the Selection list, choose Left.
Mesh 1
Define the mesh using the meshsz parameter.
Size 1
1
In the Model Builder window, under Component 1 (comp1) right-click Mesh 1 and choose Size.
2
In the Settings window for Size, locate the Geometric Entity Selection section.
3
From the Geometric entity level list, choose Boundary.
4
From the Selection list, choose Interior Walls.
5
Locate the Element Size section. From the Predefined list, choose Extremely fine.
6
Click the Custom button.
7
Locate the Element Size Parameters section.
8
Select the Maximum element size check box. In the associated text field, type meshsz/2.
Free Triangular 1
In the Mesh toolbar, click  Free Triangular.
Size
1
In the Model Builder window, click Size.
2
In the Settings window for Size, click to expand the Element Size Parameters section.
3
Locate the Element Size section. From the Predefined list, choose Extremely fine.
4
Locate the Element Size Parameters section. In the Maximum element size text field, type meshsz.
5
In the Minimum element size text field, type meshsz/2.
6
In the Model Builder window, right-click Mesh 1 and choose Build All.
Definitions
Define the objective function as a variable using average operators.
Average 1 (aveop1)
1
In the Definitions toolbar, click  Nonlocal Couplings and choose Average.
2
In the Settings window for Average, locate the Source Selection section.
3
From the Geometric entity level list, choose Boundary.
4
From the Selection list, choose Left.
Average 2 (aveop2)
1
In the Definitions toolbar, click  Nonlocal Couplings and choose Average.
2
In the Settings window for Average, locate the Source Selection section.
3
From the Geometric entity level list, choose Boundary.
4
From the Selection list, choose Right.
Variables 1
1
In the Model Builder window, right-click Definitions and choose Variables.
2
In the Settings window for Variables, locate the Variables section.
3
Initial Design
1
In the Model Builder window, click Study 1.
2
In the Settings window for Study, type Initial Design in the Label text field.
3
In the Home toolbar, click  Compute.
Results
Pressure (spf), Pressure (spf2), Velocity (spf), Velocity (spf2)
1
In the Model Builder window, under Results, Ctrl-click to select Velocity (spf), Pressure (spf), Velocity (spf2), and Pressure (spf2).
2
Initial Design
In the Settings window for Group, type Initial Design in the Label text field.
Velocity (spf2)
1
In the Model Builder window, click Velocity (spf2).
2
In the Velocity (spf2) toolbar, click  Plot.
3
Click the  Zoom Extents button in the Graphics toolbar.
Evaluate the objective function for the initial design.
Global Evaluation 1
1
In the Results toolbar, click  Global Evaluation.
2
In the Settings window for Global Evaluation, locate the Expressions section.
3
4
Click  Evaluate.
Definitions
Define the shape optimization problem using Polynomial Boundary features.
Component 1 (comp1)
Free Shape Domain 1
1
In the Definitions toolbar, click  Optimization and choose Shape Optimization>Free Shape Domain.
2
In the Settings window for Free Shape Domain, locate the Domain Selection section.
3
From the Selection list, choose All domains.
Polynomial Boundary 1
1
In the Definitions toolbar, click  Optimization and choose Shape Optimization>Polynomial Boundary.
2
In the Settings window for Polynomial Boundary, locate the Boundary Selection section.
3
From the Selection list, choose Interior Walls.
4
Locate the Control Variable Settings section. In the dmax text field, type L3/2.
Symmetry/Roller 1
1
In the Definitions toolbar, click  Optimization and choose Shape Optimization>Symmetry/Roller.
2
In the Settings window for Symmetry/Roller, locate the Boundary Selection section.
3
From the Selection list, choose Top and Bottom.
Add a second Study to perform the optimization. Initialize the solution, so that a plot of the deformed geometry and mesh can be created.
Add Study
1
In the Home toolbar, click  Add Study to open the Add Study window.
2
Go to the Add Study window.
3
Find the Studies subsection. In the Select Study tree, select General Studies>Stationary.
4
Click Add Study in the window toolbar.
5
In the Home toolbar, click  Add Study to close the Add Study window.
Optimization
1
In the Model Builder window, click Study 2.
2
In the Settings window for Study, type Optimization in the Label text field.
3
In the Study toolbar, click  Get Initial Value.
Results
Pressure (spf) 1, Pressure (spf2) 1, Velocity (spf) 1, Velocity (spf2) 1
1
In the Model Builder window, under Results, Ctrl-click to select Velocity (spf) 1, Pressure (spf) 1, Velocity (spf2) 1, and Pressure (spf2) 1.
2
Optimized
In the Settings window for Group, type Optimized in the Label text field.
Line 1
1
In the Model Builder window, right-click Velocity (spf2) 1 and choose Line.
2
In the Settings window for Line, locate the Coloring and Style section.
3
From the Coloring list, choose Uniform.
4
From the Color list, choose Green.
Selection 1
1
Right-click Line 1 and choose Selection.
2
In the Settings window for Selection, locate the Selection section.
3
From the Selection list, choose Interior Walls.
Line 2
1
In the Model Builder window, right-click Velocity (spf2) 1 and choose Line.
2
In the Settings window for Line, locate the Data section.
3
From the Dataset list, choose Initial Design/Solution 1 (sol1).
4
Locate the Coloring and Style section. From the Coloring list, choose Uniform.
Selection 1
1
Right-click Line 2 and choose Selection.
2
In the Settings window for Selection, locate the Selection section.
3
From the Selection list, choose Interior Walls.
Mesh 1
1
In the Model Builder window, right-click Velocity (spf2) 1 and choose Mesh.
2
In the Settings window for Mesh, locate the Coloring and Style section.
3
From the Element color list, choose None.
Deformation 1
1
Right-click Mesh 1 and choose Deformation.
2
In the Settings window for Deformation, locate the Expression section.
3
In the x-component text field, type 0.
4
In the y-component text field, type -2*y.
5
Locate the Scale section.
6
Select the Scale factor check box. In the associated text field, type 1.
Optimization
Add a Shape Optimization study step and apply a continuation in the Reynolds number to increase stability. Use an if statement to avoid contributions to the objective function from the intermediate Reynolds number.
Shape Optimization
1
In the Model Builder window, right-click Optimization and choose Optimization>Shape Optimization.
2
In the Settings window for Shape Optimization, locate the Optimization Solver section.
3
From the Method list, choose IPOPT.
4
In the Maximum number of iterations text field, type 20.
5
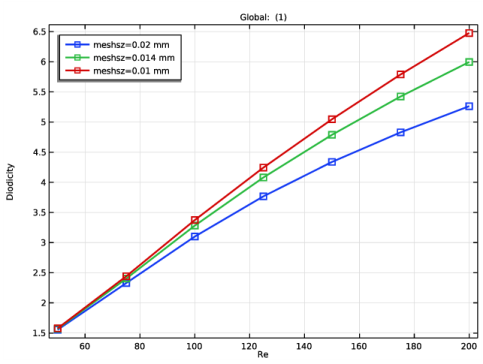
Click Add Expression in the upper-right corner of the Objective Function section. From the menu, choose Component 1 (comp1)>Definitions>Variables>comp1.Di - Diodicity.
Modify the expression, so that the objective function becomes zero for the first Reynolds number.
6
Locate the Objective Function section. In the table, enter the following settings:
7
From the Type list, choose Maximization.
8
Locate the Output While Solving section. Select the Plot check box.
9
From the Plot group list, choose Velocity (spf2) 1.
Step 1: Stationary
Use continuation in the Reynolds number to improve the robustness of the nonlinear solver.
1
In the Model Builder window, click Step 1: Stationary.
2
In the Settings window for Stationary, click to expand the Study Extensions section.
3
Select the Auxiliary sweep check box.
4
Perform a verification analysis by remeshing the deformed geometry and verifying the results for various meshes and Reynolds numbers.
5
6
In the Study toolbar, click  Compute.
Results
Global Evaluation 1
1
In the Model Builder window, under Results>Derived Values click Global Evaluation 1.
2
In the Settings window for Global Evaluation, locate the Data section.
3
From the Dataset list, choose Optimization/Solution 2 (sol2).
4
From the Parameter selection (Re) list, choose Last.
5
Clicknext to  Evaluate, then choose New Table.
Optimization/Solution 2 (sol2)
1
In the Model Builder window, expand the Results>Datasets node.
2
Right-click Results>Datasets>Optimization/Solution 2 (sol2) and choose Remesh Deformed Configuration.
Add Study
1
In the Home toolbar, click  Add Study to open the Add Study window.
2
Go to the Add Study window.
3
Find the Studies subsection. In the Select Study tree, select General Studies>Stationary.
4
Click Add Study in the window toolbar.
5
In the Home toolbar, click  Add Study to close the Add Study window.
Study 3
Step 1: Stationary
1
In the Settings window for Stationary, locate the Physics and Variables Selection section.
2
In the table, clear the Solve for check box for Deformed geometry (Component 1).
3
Click to expand the Values of Dependent Variables section. Find the Values of variables not solved for subsection. From the Settings list, choose User controlled.
4
From the Method list, choose Solution.
5
From the Study list, choose Optimization, Stationary.
6
Locate the Study Extensions section. Select the Auxiliary sweep check box.
7
8
9
In the Model Builder window, click Study 3.
10
In the Settings window for Study, type Verification in the Label text field.
11
Locate the Study Settings section. Clear the Generate default plots check box.
Parametric Sweep
1
In the Study toolbar, click  Parametric Sweep.
2
In the Settings window for Parametric Sweep, locate the Study Settings section.
3
4
5
In the Study toolbar, click  Compute.
Copy the plot from the second study.
Results
Verification
1
In the Model Builder window, right-click Velocity (spf2) 1 and choose Duplicate.
2
In the Settings window for 2D Plot Group, type Verification in the Label text field.
3
Locate the Data section. From the Dataset list, choose Verification/Parametric Solutions 1 (sol4).
4
From the Parameter value (Re) list, choose 100.
5
In the Verification toolbar, click  Plot.
6
Click the  Zoom Extents button in the Graphics toolbar.
7
Move out the Verification plot out of the group.
Global Evaluation 1
Evaluate the diodicity and plot it versus the Reynolds number.
1
In the Model Builder window, under Results>Derived Values click Global Evaluation 1.
2
In the Settings window for Global Evaluation, locate the Data section.
3
From the Dataset list, choose Verification/Parametric Solutions 1 (sol4).
4
From the Parameter selection (meshsz) list, choose Last.
5
From the Parameter selection (Re) list, choose Manual.
6
In the Parameter indices (1-7) text field, type 3.
7
Clicknext to  Evaluate, then choose New Table.
Diodicity vs. Re
1
In the Home toolbar, click  Add Plot Group and choose 1D Plot Group.
2
In the Settings window for 1D Plot Group, type Diodicity vs. Re in the Label text field.
3
Locate the Plot Settings section.
4
Select the y-axis label check box. In the associated text field, type Diodicity.
5
Locate the Legend section. From the Position list, choose Upper left.
Global 1
1
Right-click Diodicity vs. Re and choose Global.
2
In the Settings window for Global, locate the Data section.
3
From the Dataset list, choose Verification/Parametric Solutions 1 (sol4).
4
Locate the y-Axis Data section. In the table, enter the following settings:
5
Locate the x-Axis Data section. From the Axis source data list, choose Re.
6
In the Diodicity vs. Re toolbar, click  Plot.
7
Click to expand the Coloring and Style section. From the Width list, choose 2.
8
Find the Line markers subsection. From the Marker list, choose Square.
9
In the Diodicity vs. Re toolbar, click  Plot.
10
Click the  Zoom Extents button in the Graphics toolbar.
Arrow Line 1
1
In the Model Builder window, expand the Results>Shape Optimization node, then click Arrow Line 1.
2
In the Settings window for Arrow Line, locate the Arrow Positioning section.
3
In the Number of arrows text field, type 50.
4
In the Shape Optimization toolbar, click  Plot.
5
Click the  Zoom Extents button in the Graphics toolbar.
Geometry Modeling Instructions
If you want to create the geometry yourself, follow these steps.
Add Component
In the Home toolbar, click  Add Component and choose 2D.
Global Definitions
Parameters 1
1
In the Model Builder window, under Global Definitions click Parameters 1.
2
In the Settings window for Parameters, locate the Parameters section.
3
Geometry 1
1
In the Model Builder window, under Component 1 (comp1) click Geometry 1.
2
In the Settings window for Geometry, locate the Units section.
3
From the Length unit list, choose mm.
Rectangle 1 (r1)
1
In the Geometry toolbar, click  Rectangle.
2
In the Settings window for Rectangle, locate the Size and Shape section.
3
In the Width text field, type L.
4
In the Height text field, type H.
Rectangle 2 (r2)
1
In the Geometry toolbar, click  Rectangle.
2
In the Settings window for Rectangle, locate the Size and Shape section.
3
In the Width text field, type D/2.
4
In the Height text field, type D/2.
5
Locate the Position section. In the x text field, type -D/2.
Rectangle 3 (r3)
1
In the Geometry toolbar, click  Rectangle.
2
In the Settings window for Rectangle, click  Build Selected.
3
Locate the Size and Shape section. In the Width text field, type D/2.
4
In the Height text field, type D/2.
5
Locate the Position section. In the x text field, type L.
Polygon 1 (pol1)
1
In the Geometry toolbar, click  Polygon.
2
In the Settings window for Polygon, locate the Coordinates section.
3
Line Segment 1 (ls1)
1
In the Geometry toolbar, click  More Primitives and choose Line Segment.
2
In the Settings window for Line Segment, locate the Starting Point section.
3
From the Specify list, choose Coordinates.
4
In the x text field, type XT.
5
Locate the Endpoint section. From the Specify list, choose Coordinates.
6
In the x text field, type XT+LT.
7
In the y text field, type LT.
8
Locate the Selections of Resulting Entities section. Select the Resulting objects selection check box.
Line Segment 2 (ls2)
1
In the Geometry toolbar, click  More Primitives and choose Line Segment.
2
In the Settings window for Line Segment, locate the Starting Point section.
3
From the Specify list, choose Coordinates.
4
In the x text field, type XT2.
5
In the y text field, type H.
6
Locate the Endpoint section. From the Specify list, choose Coordinates.
7
In the x text field, type XT2+LT2.
8
In the y text field, type H-LT2.
9
Locate the Selections of Resulting Entities section. Select the Resulting objects selection check box.
Line Segment 3 (ls3)
1
In the Geometry toolbar, click  More Primitives and choose Line Segment.
2
In the Settings window for Line Segment, locate the Starting Point section.
3
From the Specify list, choose Coordinates.
4
In the x text field, type X1+L1*cos(phi1)/2.
5
In the y text field, type Y3+L3*sin(phi1)/2.
6
In the x text field, type X3+L3*cos(phi1)/2.
7
Locate the Endpoint section. From the Specify list, choose Coordinates.
8
In the x text field, type X3-L3*cos(phi1)/2.
9
In the y text field, type Y3-L3*sin(phi1)/2.
10
Locate the Selections of Resulting Entities section. Select the Resulting objects selection check box.
Difference 1 (dif1)
1
In the Geometry toolbar, click  Booleans and Partitions and choose Difference.
2
3
In the Settings window for Difference, locate the Difference section.
4
Find the Objects to subtract subsection. Click to select the  Activate Selection toggle button.
5
Symmetry
1
In the Geometry toolbar, click  Selections and choose Box Selection.
2
In the Settings window for Box Selection, type Symmetry in the Label text field.
3
Locate the Geometric Entity Level section. From the Level list, choose Boundary.
4
Locate the Box Limits section. In the y maximum text field, type 1e3*eps.
5
Locate the Output Entities section. From the Include entity if list, choose Entity inside box.
Left
1
In the Geometry toolbar, click  Selections and choose Box Selection.
2
In the Settings window for Box Selection, type Left in the Label text field.
3
Locate the Geometric Entity Level section. From the Level list, choose Boundary.
4
Locate the Box Limits section. In the x maximum text field, type -D/2+1e3*eps.
5
Locate the Output Entities section. From the Include entity if list, choose Entity inside box.
Right
1
In the Geometry toolbar, click  Selections and choose Box Selection.
2
In the Settings window for Box Selection, type Right in the Label text field.
3
Locate the Geometric Entity Level section. From the Level list, choose Boundary.
4
Locate the Box Limits section. In the x minimum text field, type L+D/2-1e3*eps.
5
Locate the Output Entities section. From the Include entity if list, choose Entity inside box.
Top
1
In the Geometry toolbar, click  Selections and choose Box Selection.
2
In the Settings window for Box Selection, type Top in the Label text field.
3
Locate the Geometric Entity Level section. From the Level list, choose Boundary.
4
Locate the Box Limits section. In the y minimum text field, type H*0.999.
5
Locate the Output Entities section. From the Include entity if list, choose Entity inside box.
Interior Walls
1
In the Geometry toolbar, click  Selections and choose Union Selection.
2
In the Settings window for Union Selection, type Interior Walls in the Label text field.
3
Locate the Geometric Entity Level section. From the Level list, choose Boundary.
4
Locate the Input Entities section. Click  Add.
5
In the Add dialog box, in the Selections to add list, choose Line Segment 1, Line Segment 2, and Line Segment 3.
6
Top and Bottom
1
In the Geometry toolbar, click  Selections and choose Union Selection.
2
In the Settings window for Union Selection, locate the Geometric Entity Level section.
3
From the Level list, choose Boundary.
4
In the Label text field, type Top and Bottom.
5
Locate the Input Entities section. Click  Add.
6
In the Add dialog box, in the Selections to add list, choose Symmetry and Top.
7
8
In the Geometry toolbar, click  Build All.
The model geometry is now complete.