|
|
|

|
1
|
|
2
|
In the Select Physics tree, select Acoustics>Pressure Acoustics>Pressure Acoustics, Frequency Domain (acpr).
|
|
3
|
Click Add.
|
|
4
|
|
5
|
Click Add.
|
|
6
|
Click
|
|
7
|
|
8
|
Click
|
|
1
|
|
2
|
|
3
|
|
4
|
Browse to the model’s Application Libraries folder and double-click the file rectangular_horn_shape_optimization_parameters.txt.
|
|
1
|
|
2
|
Browse to the model’s Application Libraries folder and double-click the file rectangular_horn_shape_optimization_geom_sequence.mph.
|
|
3
|
|
4
|
|
1
|
|
2
|
|
3
|
In the tree, select Built-in>Air.
|
|
4
|
|
5
|
|
1
|
In the Model Builder window, under Component 1 (comp1) right-click Pressure Acoustics, Frequency Domain (acpr) and choose Exterior Field Calculation.
|
|
2
|
|
3
|
|
4
|
Locate the Exterior Field Calculation section. From the Condition in the y = y0 plane list, choose Symmetric/Infinite sound hard boundary.
|
|
5
|
|
1
|
|
2
|
|
3
|
|
4
|
|
5
|
|
7
|
|
1
|
|
2
|
|
3
|
|
1
|
|
2
|
|
3
|
|
1
|
|
2
|
|
4
|
|
1
|
|
2
|
|
4
|
|
1
|
|
2
|
|
4
|
|
1
|
|
2
|
|
4
|
|
1
|
|
2
|
|
4
|
Locate the Current Measurement section. From the Measure current for device list, choose Inductor 2 (L2).
|
|
5
|
|
1
|
|
2
|
|
4
|
Locate the Current Measurement section. From the Measure current for device list, choose Resistor 1 (R1).
|
|
1
|
|
2
|
|
4
|
|
1
|
|
2
|
|
4
|
|
1
|
|
2
|
|
4
|
Locate the External Device section. From the V list, choose Voltage from lumped speaker boundary (acpr/lsb1).
|
|
1
|
|
2
|
|
3
|
|
1
|
|
2
|
|
3
|
|
1
|
|
2
|
|
3
|
|
4
|
|
1
|
|
2
|
|
3
|
|
4
|
|
1
|
|
2
|
|
3
|
|
4
|
|
5
|
|
1
|
|
2
|
|
3
|
|
4
|
|
1
|
|
2
|
|
3
|
|
4
|
|
5
|
|
6
|
|
1
|
In the Model Builder window, under Results, Ctrl-click to select Acoustic Pressure (acpr), Sound Pressure Level (acpr), Acoustic Pressure, Isosurfaces (acpr), Exterior-Field Sound Pressure Level (acpr), Exterior-Field Pressure (acpr), and Exterior-Field Sound Pressure Level xy-plane (acpr).
|
|
2
|
Right-click and choose Group.
|
|
1
|
|
2
|
|
1
|
|
2
|
|
4
|
Click Add Expression in the upper-right corner of the Expressions section. From the menu, choose Component 1 (comp1)>Pressure Acoustics, Frequency Domain>Lumped Speaker Boundary 1>acpr.lsb1.P_front - Radiated power (front) - W.
|
|
5
|
|
1
|
|
2
|
|
1
|
|
2
|
|
3
|
|
4
|
|
5
|
|
6
|
|
7
|
|
8
|
|
9
|
|
1
|
|
2
|
|
3
|
|
4
|
|
1
|
|
2
|
|
3
|
|
4
|
|
5
|
|
1
|
|
2
|
|
3
|
|
4
|
|
1
|
|
2
|
|
3
|
|
4
|
Click Add Expression in the upper-right corner of the Objective Function section. From the menu, choose Component 1 (comp1)>Pressure Acoustics, Frequency Domain>Lumped Speaker Boundary 1>comp1.acpr.lsb1.P_front - Radiated power (front) - W.
|
|
5
|
|
6
|
|
7
|
|
8
|
Click Add Expression in the upper-right corner of the Constraints section. From the menu, choose Component 1 (comp1)>Pressure Acoustics, Frequency Domain>Lumped Speaker Boundary 1>comp1.acpr.lsb1.P_front - Radiated power (front) - W.
|
|
9
|
Locate the Constraints section. In the table, enter the following settings:
|
|
10
|
|
1
|
In the Model Builder window, under Results, Ctrl-click to select Acoustic Pressure (acpr) 1, Sound Pressure Level (acpr) 1, Acoustic Pressure, Isosurfaces (acpr) 1, Exterior-Field Sound Pressure Level (acpr) 1, Exterior-Field Pressure (acpr) 1, and Exterior-Field Sound Pressure Level xy-plane (acpr) 1.
|
|
2
|
Right-click and choose Group.
|
|
1
|
|
2
|
|
3
|
Select the Plot check box.
|
|
4
|
|
1
|
In the Model Builder window, expand the Shape Optimization - On Axis>Solver Configurations>Solution 2 (sol2) node, then click Optimization Solver 1.
|
|
2
|
|
3
|
Clear the Globally Convergent MMA check box to use the old (1987) MMA algorithm, because it often improves the objective faster - at the cost of convergence.
|
|
4
|
|
1
|
|
2
|
|
3
|
|
4
|
|
5
|
|
1
|
|
2
|
Browse to the model’s Application Libraries folder and double-click the file rectangular_horn_shape_optimization_geom_sequence.mph.
|
|
1
|
In the Model Builder window, under Component 2 (comp2)>Geometry 2, Ctrl-click to select Pyramid 1 (pyr1), Work Plane 2 (wp2), Speaker Boundary (boxsel1), Speaker Driver (cylsel1), and Moving Boundaries (boxsel2).
|
|
2
|
Right-click and choose Delete.
|
|
1
|
|
2
|
|
1
|
|
2
|
|
3
|
|
4
|
|
5
|
|
1
|
|
2
|
|
3
|
|
4
|
|
5
|
|
6
|
|
1
|
In the Model Builder window, under Component 1 (comp1), Ctrl-click to select Pressure Acoustics, Frequency Domain (acpr) and Electrical Circuit (cir).
|
|
2
|
Right-click and choose Copy.
|
|
1
|
In the Model Builder window, under Component 2 (comp2), Ctrl-click to select Pressure Acoustics, Frequency Domain (acpr2) and Electrical Circuit (cir2).
|
|
2
|
|
1
|
In the Model Builder window, expand the Component 2 (comp2)>Pressure Acoustics, Frequency Domain (acpr2) node, then click Exterior Field Calculation 1.
|
|
2
|
|
3
|
|
1
|
|
2
|
|
3
|
|
4
|
|
1
|
|
2
|
|
3
|
|
1
|
|
2
|
|
3
|
|
1
|
In the Model Builder window, under Component 2 (comp2)>Electrical Circuit (cir2) click External I vs. U 1 (IvsU1).
|
|
2
|
|
3
|
|
1
|
|
2
|
|
3
|
In the tree, select Built-in>Air.
|
|
4
|
|
5
|
|
1
|
|
2
|
|
3
|
|
1
|
|
2
|
|
3
|
|
4
|
|
5
|
|
1
|
|
2
|
|
3
|
|
4
|
|
5
|
Locate the Translation section. In the table, enter the following settings:
|
|
6
|
|
7
|
|
8
|
|
1
|
|
2
|
|
3
|
|
1
|
|
2
|
|
3
|
|
1
|
|
2
|
|
3
|
|
1
|
|
2
|
|
3
|
|
4
|
|
1
|
|
2
|
|
3
|
|
4
|
|
1
|
|
2
|
|
3
|
|
4
|
|
5
|
|
1
|
|
2
|
|
3
|
|
4
|
|
1
|
|
2
|
|
3
|
Find the Physics interfaces in study subsection. In the table, clear the Solve check boxes for Pressure Acoustics, Frequency Domain (acpr) and Electrical Circuit (cir).
|
|
4
|
|
5
|
|
6
|
|
7
|
|
1
|
|
2
|
|
1
|
|
2
|
|
4
|
|
1
|
|
3
|
|
4
|
Locate the Constraints section. In the table, enter the following settings:
|
|
5
|
|
6
|
|
7
|
|
8
|
|
1
|
In the Model Builder window, under Results, Ctrl-click to select Acoustic Pressure (acpr2), Sound Pressure Level (acpr2), Acoustic Pressure, Isosurfaces (acpr2), Exterior-Field Sound Pressure Level (acpr2), Exterior-Field Pressure (acpr2), Exterior-Field Sound Pressure Level xy-plane (acpr2), and Shape Optimization.
|
|
2
|
Right-click and choose Group.
|
|
1
|
|
2
|
|
1
|
|
2
|
|
1
|
|
2
|
|
3
|
|
1
|
In the Model Builder window, expand the Shape Optimization - Off Axis>Solver Configurations>Solution 3 (sol3) node, then click Optimization Solver 1.
|
|
2
|
|
3
|
|
4
|
In the Model Builder window, expand the Shape Optimization - Off Axis>Solver Configurations>Solution 3 (sol3)>Optimization Solver 1>Stationary 1>Segregated 1 node.
|
|
5
|
|
6
|
|
1
|
In the Model Builder window, under Results>Objective Function right-click Global Evaluation 1 and choose Duplicate, so the objectives can be compared.
|
|
2
|
|
3
|
|
1
|
|
2
|
|
3
|
|
4
|
Locate the Expressions section. In the table, enter the following settings:
|
|
5
|
|
1
|
|
2
|
|
3
|
|
4
|
|
1
|
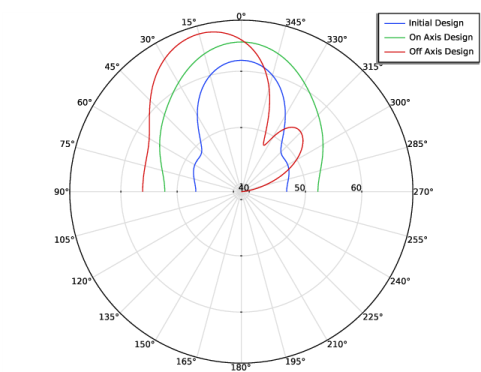
In the Model Builder window, expand the Results>Initial Design node, then click Results>Radiation Comparison>Radiation Pattern 1.
|
|
2
|
|
3
|
|
4
|
|
5
|
|
6
|
|
7
|
|
8
|
|
9
|
|
10
|
|
11
|
|
12
|
|
1
|
In the Model Builder window, expand the Results>Initial Design>Exterior-Field Sound Pressure Level xy-plane (acpr) node, then click Results>Radiation Comparison>Radiation Pattern 2.
|
|
2
|
|
3
|
|
4
|
Locate the Legends section. In the table, enter the following settings:
|
|
1
|
|
2
|
|
3
|
|
4
|
Click Replace Expression in the upper-right corner of the Expression section. From the menu, choose Component 2 (comp2)>Pressure Acoustics, Frequency Domain>Exterior field>acpr2.efc1.Lp_pext - Exterior-field sound pressure level - dB.
|
|
5
|
Locate the Legends section. In the table, enter the following settings:
|
|
6
|
|
7
|
|
1
|
|
2
|
|
3
|
|
4
|
|
1
|
|
2
|
|
3
|
|
1
|
|
2
|
|
3
|
|
1
|
|
2
|
|
3
|
|
4
|
|
5
|
|
1
|
|
2
|
|
3
|
|
4
|
|
5
|
|
6
|
|
7
|
|
8
|
|
1
|
|
2
|
|
3
|
In the Logical expression for inclusion text field, type mir1z<eps && abs(mir1x)<L0*1.01 && abs(mir1y)<w0*1.01.
|
|
1
|
|
2
|
|
3
|
|
4
|
|
5
|
|
6
|
|
7
|
Click OK.
|
|
8
|
|
9
|
|
1
|
|
2
|
|
3
|
|
1
|
|
2
|
|
3
|
|
4
|
|
5
|
|
1
|
|
2
|
|
3
|
In the Logical expression for inclusion text field, type mir1y*L0/w0<mir1x && mir1z < 0 && eps<abs(mir1y).
|
|
1
|
|
2
|
|
3
|
|
4
|
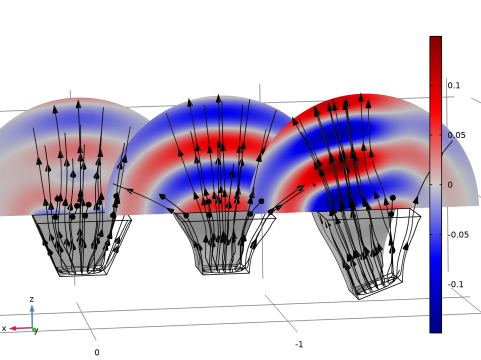
Click Replace Expression in the upper-right corner of the Expression section. From the menu, choose Component 1 (comp1)>Pressure Acoustics, Frequency Domain>Intensity>acpr.Ix,acpr.Iy,acpr.Iz - Intensity.
|
|
5
|
Locate the Streamline Positioning section. From the Positioning list, choose On selected boundaries.
|
|
6
|
|
7
|
Locate the Coloring and Style section. Find the Line style subsection. From the Type list, choose Tube.
|
|
8
|
|
9
|
|
10
|
|
11
|
|
1
|
In the Model Builder window, under Results>Design Comparison right-click Line 1 and choose Duplicate.
|
|
2
|
|
3
|
|
1
|
|
2
|
|
3
|
|
4
|
|
1
|
In the Model Builder window, under Results>Design Comparison right-click Slice 1 and choose Duplicate.
|
|
2
|
|
3
|
|
1
|
|
2
|
|
3
|
|
1
|
In the Model Builder window, under Results>Design Comparison right-click Surface 1 and choose Duplicate.
|
|
2
|
|
3
|
|
1
|
In the Model Builder window, under Results>Design Comparison right-click Streamline 1 and choose Duplicate.
|
|
2
|
|
3
|
|
1
|
In the Model Builder window, under Results>Design Comparison right-click Line 2 and choose Duplicate.
|
|
2
|
|
3
|
|
1
|
|
2
|
|
3
|
|
4
|
|
1
|
In the Model Builder window, under Results>Design Comparison right-click Slice 2 and choose Duplicate.
|
|
2
|
|
3
|
|
4
|
Click Replace Expression in the upper-right corner of the Expression section. From the menu, choose Component 2 (comp2)>Pressure Acoustics, Frequency Domain>Pressure and sound pressure level>acpr2.p_t - Total acoustic pressure - Pa.
|
|
1
|
|
2
|
|
3
|
|
4
|
|
1
|
In the Model Builder window, under Results>Design Comparison right-click Surface 2 and choose Duplicate.
|
|
2
|
|
3
|
|
4
|
|
1
|
|
2
|
|
3
|
|
4
|
|
1
|
In the Model Builder window, under Results>Design Comparison right-click Streamline 2 and choose Duplicate.
|
|
2
|
|
3
|
|
4
|
Click Replace Expression in the upper-right corner of the Expression section. From the menu, choose Component 2 (comp2)>Pressure Acoustics, Frequency Domain>Intensity>acpr2.Ix,...,acpr2.Iz - Intensity (spatial and material frames).
|
|
5
|
|
1
|
|
2
|
|
3
|
|
4
|
|
5
|
|
6
|
|
1
|
|
2
|
|
3
|
|
4
|
Browse to the model’s Application Libraries folder and double-click the file rectangular_horn_shape_optimization_parameters.txt.
|
|
1
|
|
2
|
|
3
|
|
4
|
Locate the Selections of Resulting Entities section. Select the Resulting objects selection check box.
|
|
1
|
|
2
|
|
3
|
|
4
|
|
1
|
|
2
|
|
3
|
|
4
|
|
5
|
On the object par1, select Domain 1 only.
|
|
1
|
|
2
|
|
3
|
|
4
|
|
5
|
|
6
|
|
7
|
|
8
|
Locate the Selections of Resulting Entities section. Select the Resulting objects selection check box.
|
|
1
|
|
2
|
|
3
|
|
4
|
|
5
|
|
6
|
Click OK.
|
|
1
|
|
2
|
|
3
|
|
1
|
|
2
|
|
3
|
|
4
|
|
1
|
|
2
|
|
3
|
|
4
|
|
5
|
|
6
|
|
7
|
|
8
|
|
9
|
Locate the Selections of Resulting Entities section. Select the Resulting objects selection check box.
|
|
1
|
|
2
|
|
3
|
|
4
|
|
1
|
|
2
|
|
1
|
|
2
|
|
3
|
|
4
|
|
5
|
|
6
|
|
1
|
|
2
|
|
3
|
|
4
|
|
5
|
|
1
|
|
2
|
|
3
|
|
4
|
|
5
|
|
1
|
|
2
|
|
3
|
|
4
|
|
5
|
|
1
|
|
2
|
|
3
|
|
4
|
|
5
|
|
6
|