PDF

Acoustic Microfluidic Pump
Introduction
Microfuidic devices are becoming increasingly popular in the field of biomedical research and diagnostics, especially for preparing and analyzing fluid samples. To create functional microfluidic systems, pumps, valves, mixers, and so on, are needed also in macrofluidic systems. This model investigates an acoustically driven microfluidic pump which can drive a flow in a closed microfluidic system. The model geometry is inspired by, but not identical to, the one investigated experimentally and numerically by Huang et al. in Ref. 1.
The acoustic microfluidic pump is driven by the nonlinear acoustic phenomenon known as acoustic streaming. Acoustic streaming is a steady fluid flow created by an acoustic field due to nonlinear terms in the Navier–Stokes equations. In a mathematical sense, where the acoustic field is the linearized first-order field of the Navier–Stokes equations, the acoustic streaming field is the time-averaged second-order field in the perturbation scheme.
In the acoustic microfluidic pump, the streaming is driven by nonlinear contributions arising close to sharp edge structures in the microfluidic channel.
Model Definition
The model is of a 2D acoustic microfluidic pump consisting of a water-filled microfluidic channel of width Wc = 0.6 mm and the channel is closed. One section of the channel includes an array of sharp edge structures on the boundary, as seen in Figure 1. It is assumed that the surrounding solid is acoustically hard and therefore only the fluid domain is modeled.
The acoustic streaming is induced by an acoustic body force that is induced due to nonlinearities in Navier-Stokes equation; see Ref. 2. The acoustic body force, faco, is given as
(1)
The angle brackets represent the time-average of the oscillating acoustic fields. To model the thin viscous and thermal boundary layers and the acoustic body force correctly, it is necessary to use a fine mesh around the sharp edge structures. The sharp edge structures has a thickness of 0.2 µm at the tip. In the region around the sharp edge structure, a full thermoviscous acoustic model is used, and in the large domain a pressure acoustic model is used to limit the computational requirements. It is necessary to use the Thermoviscous Acoustics, Frequency Domain interface around the sharp edge structures because the geometry features are of a length scale comparable to the viscous and thermal boundary layers in the fluid.
Figure 1: Geometry of the microfluidic pump.
The acoustic domain force is computed and applied to the Laminar Flow interface by the Acoustic Streaming Domain Coupling multiphysics feature that couples the Thermoviscous Acoustics, Frequency Domain interface with the Laminar Flow interface. The complementary Acoustic Streaming Boundary Coupling, available for both Pressure Acoustics, Frequency Domain and Thermoviscous Acoustics, Frequency Domain, is not used since its contributions are negligible in this setup (it can be included but will be dominated by the other feature). The boundary coupling from thermoviscous acoustics is only important if the boundary vibrates. Thus, if the vibrations of the thin flaps were modeled, the Acoustic Streaming Boundary Coupling should be included for modeling the resulting steady fluid flow.
Results and Discussion
The acoustic field is modeled as a Pressure Acoustics, Frequency Domain in the big domain with a thermoviscous fluid model (viscous bulk losses), and with a Thermoviscous Acoustics, Frequency Domain in the 13 small domains surrounding the sharp edge structures.
Figure 2: Acoustic pressure field in the microfluidic channel.
The acoustic field is actuated on the four vertical boundaries in the large pressure acoustic domain; see Figure 1. To get the correct pressure levels of the standing acoustic field, the dissipation in the thermal and viscous boundary layers in the pressure acoustics domain is included by using the boundary condition Thermoviscous Boundary Layer Impedance on the boundaries.
In Figure 2, the pressure field for an actuation at 2 MHz and actuation displacement of 1 nm is shown. The steady acoustic-streaming flow is solved in a stationary study step using the solved acoustic fields. The streaming is induced by an acoustic body force faco (see Equation 1) near the sharp edge structures (added by the Acoustic Streaming Domain Coupling feature). The acoustic body force around one of the sharp edge structures is shown in Figure 3. Note that the acoustic body force is located at the tip of the thin edge structure.
Figure 3: Acoustic body force generated at the tip of the sharp edge structure.
The acoustic body force at each thin edge structure creates a complicated fluid flow at the bottom half of the microfluidic channel. But because all the thin edge structures have the same direction, a nonzero flow field is created in the entire channel. The resulting fluid flow is shown on a logarithmic scale in Figure 4. The acoustic microfluidic pump creates a counterclockwise fluid flow. The logarithmic scale is chosen to capture both the complicated and fast flow around the thin edge structures and the fluid flow in the rest of the microfluidic channel.
The example demonstrates how an acoustic field can induce a steady fluid flow in closed microfluidic systems, also demonstrated experimentally by the research group of Tony J. Huang in Ref. 1.
Figure 4: Steady streaming flow in the microfludic channel driven by the acoustic source terms.
Notes About the COMSOL Implementation
The force and stresses implemented on the fluid domain depend on the derivatives of the acoustic fields. It is therefore recommended to increase the element order of the dependent variables of the Thermoviscous Acoustics, Frequency Domain interface to quadratic serendipity for the acoustic pressure and cubic serendipity for the acoustic velocity and temperature.
References
1. P.-H. Huang and others, “A reliable and programmable acoustofluidic pump powered by oscillating sharp edge structures,” Lab Chip, vol. 14, pp. 4319–4323, 2014.
2. P.B. Muller and H. Bruus, “Numerical study of thermoviscous effects in ultrasound-induced acoustic streaming in microchannels,” Phys. Rev. E, vol. 90, p. 043016, 2014.
Application Library path: Acoustics_Module/Nonlinear_Acoustics/acoustic_microfluidic_pump
Modeling Instructions
From the File menu, choose New.
New
In the New window, click  Model Wizard.
Model Wizard
1
In the Model Wizard window, click  2D.
2
In the Select Physics tree, select Acoustics>Pressure Acoustics>Pressure Acoustics, Frequency Domain (acpr).
3
Click Add.
4
In the Select Physics tree, select Acoustics>Thermoviscous Acoustics>Thermoviscous Acoustics, Frequency Domain (ta).
5
Click Add.
6
In the Select Physics tree, select Fluid Flow>Single-Phase Flow>Laminar Flow (spf).
7
Click Add.
8
Click  Study.
9
In the Select Study tree, select Preset Studies for Some Physics Interfaces>Frequency Domain.
10
Geometry 1
1
In the Geometry toolbar, click Insert Sequence and choose Insert Sequence.
2
3
In the Geometry toolbar, click  Build All.
Having imported the geometry, it can easily be modified as it is parameterized. Simply change the value of a dimension in the parameters list; this will update the geometry automatically.
Global Definitions
Parameters - Geometry
1
In the Model Builder window, under Global Definitions click Parameters 1.
2
In the Settings window for Parameters, type Parameters - Geometry in the Label text field.
Parameters - Model
1
In the Home toolbar, click  Parameters and choose Add>Parameters.
2
In the Settings window for Parameters, type Parameters - Model in the Label text field.
3
Locate the Parameters section. Click  Load from File.
4
Add Material
1
In the Home toolbar, click  Add Material to open the Add Material window.
2
Go to the Add Material window.
3
In the tree, select Built-in>Water, liquid.
4
Click Add to Component in the window toolbar.
5
In the Home toolbar, click  Add Material to close the Add Material window.
Pressure Acoustics, Frequency Domain (acpr)
1
In the Model Builder window, under Component 1 (comp1) click Pressure Acoustics, Frequency Domain (acpr).
2
In the Settings window for Pressure Acoustics, Frequency Domain, locate the Domain Selection section.
3
Click  Clear Selection.
4
Pressure Acoustics 1
1
In the Model Builder window, under Component 1 (comp1)>Pressure Acoustics, Frequency Domain (acpr) click Pressure Acoustics 1.
2
In the Settings window for Pressure Acoustics, locate the Pressure Acoustics Model section.
3
From the Fluid model list, choose Thermally conducting and viscous.
Thermoviscous Boundary Layer Impedance 1
1
In the Physics toolbar, click  Boundaries and choose Thermoviscous Boundary Layer Impedance.
2
In the Settings window for Thermoviscous Boundary Layer Impedance, locate the Boundary Selection section.
3
From the Selection list, choose All boundaries.
4
Locate the Fluid Properties section. From the Fluid material list, choose Water, liquid (mat1).
Thermoviscous Boundary Layer Impedance - Actuation
1
In the Physics toolbar, click  Boundaries and choose Thermoviscous Boundary Layer Impedance.
2
In the Settings window for Thermoviscous Boundary Layer Impedance, type Thermoviscous Boundary Layer Impedance - Actuation in the Label text field.
3
4
Locate the Fluid Properties section. From the Fluid material list, choose Water, liquid (mat1).
5
Locate the Mechanical Condition section. From the Mechanical condition list, choose Velocity.
6
Specify the v0 vector as
The boundary condition is used to actuate the system by using the velocity boundary condition.
Thermoviscous Acoustics, Frequency Domain (ta)
1
In the Model Builder window, under Component 1 (comp1) click Thermoviscous Acoustics, Frequency Domain (ta).
2
Thermoviscous acoustics is used in all the domains with sharp edges to capture the effect in the viscous boundary layers.
3
In the Model Builder window, click Thermoviscous Acoustics, Frequency Domain (ta).
4
In the Settings window for Thermoviscous Acoustics, Frequency Domain, click to expand the Discretization section.
5
From the Element order for pressure list, choose Quadratic serendipity.
6
From the Element order for velocity list, choose Cubic serendipity.
7
From the Element order for temperature list, choose Cubic serendipity.
To accurately model the acoustic body force in the Acoustic Streaming Domain Coupling, it is necessary to increase the element order of the acoustic fields.
Multiphysics
Acoustic-Thermoviscous Acoustic Boundary 1 (atb1)
1
In the Physics toolbar, click  Multiphysics Couplings and choose Boundary>Acoustic-Thermoviscous Acoustic Boundary.
2
In the Settings window for Acoustic-Thermoviscous Acoustic Boundary, locate the Boundary Selection section.
3
From the Selection list, choose All boundaries.
Acoustic Streaming Domain Coupling 1 (asdc1)
1
In the Physics toolbar, click  Multiphysics Couplings and choose Domain>Acoustic Streaming Domain Coupling.
2
In the Settings window for Acoustic Streaming Domain Coupling, locate the Coupled Interfaces section.
3
From the Source list, choose Thermoviscous Acoustics, Frequency Domain (ta).
4
Locate the Domain Selection section. From the Selection list, choose All domains.
Laminar Flow (spf)
In the Model Builder window, under Component 1 (comp1) click Laminar Flow (spf).
Pressure Point Constraint 1
1
In the Physics toolbar, click  Points and choose Pressure Point Constraint.
2
Mesh 1
Free Triangular 1
In the Mesh toolbar, click  Free Triangular.
Size 1
1
Right-click Free Triangular 1 and choose Size.
2
In the Settings window for Size, locate the Geometric Entity Selection section.
3
From the Geometric entity level list, choose Domain.
4
From the Selection list, choose All domains.
5
6
Locate the Element Size section. From the Predefined list, choose Extremely fine.
Size
1
In the Model Builder window, under Component 1 (comp1)>Mesh 1 click Size.
2
In the Settings window for Size, locate the Element Size section.
3
From the Calibrate for list, choose Fluid dynamics.
4
From the Predefined list, choose Extra fine.
Distribution 1
1
In the Model Builder window, right-click Free Triangular 1 and choose Distribution.
2
3
In the Settings window for Distribution, locate the Distribution section.
4
In the Number of elements text field, type 6.
The distribution node is added at the tip of the sharp edges to ensure that the edge on the tip is well resolved.
Boundary Layers 1
In the Mesh toolbar, click  Boundary Layers.
Boundary Layer Properties
1
In the Model Builder window, click Boundary Layer Properties.
2
In the Settings window for Boundary Layer Properties, locate the Boundary Selection section.
3
From the Selection list, choose All boundaries.
4
5
Locate the Layers section. In the Number of layers text field, type 6.
6
From the Thickness specification list, choose First layer.
7
In the Thickness text field, type 0.2E-6.
8
Click  Build All.
Study 1
1
In the Model Builder window, click Study 1.
2
In the Settings window for Study, locate the Study Settings section.
3
Clear the Generate default plots check box.
Stationary
1
In the Study toolbar, click  Study Steps and choose Stationary>Stationary.
The study consists of two steps: first a Frequency Domain study step to model the acoustic fields and, second, a Stationary study step to model the fluid flow.
Step 1: Frequency Domain
1
In the Model Builder window, click Step 1: Frequency Domain.
2
In the Settings window for Frequency Domain, locate the Study Settings section.
3
In the Frequencies text field, type f0.
Step 2: Stationary
1
In the Model Builder window, click Step 2: Stationary.
2
In the Settings window for Stationary, locate the Physics and Variables Selection section.
3
4
In the Study toolbar, click  Compute.
Results
From the Home menu, choose Add Predefined Plot.
Add Predefined Plot
1
Go to the Add Predefined Plot window.
2
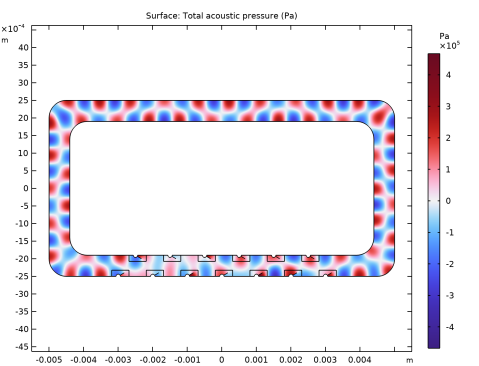
In the tree, select Study 1/Solution 1 (sol1)>Acoustic-Thermoviscous Acoustic Boundary 1>Acoustic Pressure (atb1).
3
Click Add Plot in the window toolbar.
4
From the Home menu, choose Add Predefined Plot.
Results
Acoustic Pressure (atb1)
1
In the Settings window for 2D Plot Group, click  Plot.
Acoustic Body Force
1
In the Model Builder window, expand the Results node.
2
Right-click Results and choose 2D Plot Group.
3
In the Settings window for 2D Plot Group, type Acoustic Body Force in the Label text field.
4
Click to expand the Selection section. From the Geometric entity level list, choose Domain.
5
6
Locate the Plot Settings section. Clear the Plot dataset edges check box.
7
Locate the Color Legend section. Select the Show units check box.
Surface 1
1
Right-click Acoustic Body Force and choose Surface.
2
In the Settings window for Surface, locate the Expression section.
3
In the Expression text field, type sqrt(spf.F_acox^2+spf.F_acoy^2).
4
In the Acoustic Body Force toolbar, click  Plot.
The acoustic body force that induces the fluid flow is located at the tip of the thin flaps.
5
In the Home toolbar, click  Add Predefined Plot.
Add Predefined Plot
1
Go to the Add Predefined Plot window.
2
In the tree, select Study 1/Solution 1 (sol1)>Laminar Flow>Velocity (spf).
3
Click Add Plot in the window toolbar.
4
In the Home toolbar, click  Add Predefined Plot.
Results
Velocity (spf)
1
In the Model Builder window, under Results click Velocity (spf).
2
In the Settings window for 2D Plot Group, locate the Color Legend section.
3
Select the Show units check box.
Surface
1
In the Model Builder window, expand the Velocity (spf) node, then click Surface.
2
In the Settings window for Surface, locate the Expression section.
3
From the Unit list, choose mm/s.
Streamline 1
1
In the Model Builder window, right-click Velocity (spf) and choose Streamline.
2
In the Settings window for Streamline, locate the Expression section.
3
In the x-component text field, type u2.
4
In the y-component text field, type v2.
5
Locate the Streamline Positioning section. From the Positioning list, choose Uniform density.
6
In the Separating distance text field, type 0.02.
7
Locate the Coloring and Style section. Find the Point style subsection. From the Type list, choose Arrow.
8
Locate the Streamline Positioning section. In the Separating distance text field, type 0.01.
9
In the Velocity (spf) toolbar, click  Plot.
Velocity (spf) - Logarithmic
1
Right-click Velocity (spf) and choose Duplicate.
2
In the Model Builder window, click Velocity (spf) 1.
3
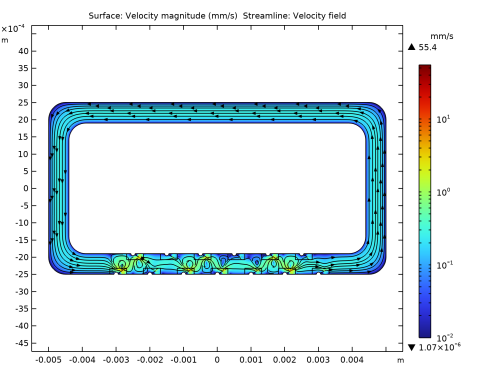
In the Settings window for 2D Plot Group, type Velocity (spf) - Logarithmic in the Label text field.
4
Locate the Color Legend section. Select the Show maximum and minimum values check box.
Surface
1
In the Model Builder window, click Surface.
2
In the Settings window for Surface, locate the Coloring and Style section.
3
From the Scale list, choose Logarithmic.
4
Click to expand the Range section. Select the Manual color range check box.
5
In the Minimum text field, type 1e-2.
6
In the Velocity (spf) - Logarithmic toolbar, click  Plot.
The fluid flow is represented on a logarithmic scale since the velocity amplitude varies by orders of magnitude.
Geometry Sequence Instructions
From the File menu, choose New.
New
In the New window, click  Model Wizard.
Model Wizard
1
In the Model Wizard window, click  2D.
2
Global Definitions
Parameters 1
1
In the Model Builder window, under Global Definitions click Parameters 1.
2
In the Settings window for Parameters, locate the Parameters section.
3
Click  Load from File.
4
Browse to the model’s Application Libraries folder and double-click the file acoustic_microfluidic_pump_geom_sequence_parameters.txt.
Geometry 1
Rectangle 1 (r1)
1
In the Model Builder window, expand the Component 1 (comp1)>Geometry 1 node.
2
Right-click Geometry 1 and choose Rectangle.
3
In the Settings window for Rectangle, locate the Size and Shape section.
4
In the Width text field, type L.
5
In the Height text field, type W.
Rectangle 2 (r2)
1
In the Geometry toolbar, click  Rectangle.
2
In the Settings window for Rectangle, locate the Size and Shape section.
3
In the Width text field, type L-channel_w*2.
4
In the Height text field, type W-channel_w*2.
Rectangle 1 (r1)
1
In the Model Builder window, click Rectangle 1 (r1).
2
In the Settings window for Rectangle, locate the Position section.
3
From the Base list, choose Center.
Rectangle 2 (r2)
1
In the Model Builder window, click Rectangle 2 (r2).
2
In the Settings window for Rectangle, locate the Position section.
3
From the Base list, choose Center.
Fillet 1 (fil1)
1
In the Geometry toolbar, click  Fillet.
2
Click the  Zoom Extents button in the Graphics toolbar.
3
On the object r1, select Points 1–4 only.
4
On the object r2, select Points 1–4 only.
5
In the Settings window for Fillet, locate the Radius section.
6
In the Radius text field, type corner.
Polygon 1 (pol1)
1
In the Geometry toolbar, click  Polygon.
2
In the Settings window for Polygon, locate the Coordinates section.
3
4
Click  Build Selected.
Circle 1 (c1)
1
In the Geometry toolbar, click  Circle.
2
In the Settings window for Circle, locate the Size and Shape section.
3
In the Radius text field, type flap_L/4.
4
In the Sector angle text field, type 180.
5
Locate the Position section. In the y text field, type -W/2.
Rectangle 3 (r3)
1
In the Geometry toolbar, click  Rectangle.
2
In the Settings window for Rectangle, locate the Size and Shape section.
3
In the Width text field, type 2*flap_L.
4
In the Height text field, type 0.7*flap_L.
5
Locate the Position section. In the x text field, type -0.75*flap_L.
6
In the y text field, type -W/2.
7
Click  Build Selected.
Copy 1 (copy1)
1
In the Geometry toolbar, click  Transforms and choose Copy.
2
Select the objects c1, pol1, and r3 only.
3
In the Settings window for Copy, locate the Displacement section.
4
In the x text field, type range(-3*flap_dist,(3*flap_dist-(-3*flap_dist))/6,3*flap_dist).
5
Click  Build Selected.
Polygon 2 (pol2)
1
In the Geometry toolbar, click  Polygon.
2
In the Settings window for Polygon, locate the Coordinates section.
3
Circle 2 (c2)
1
In the Geometry toolbar, click  Circle.
2
In the Settings window for Circle, locate the Size and Shape section.
3
In the Radius text field, type flap_L/4.
4
In the Sector angle text field, type 180.
5
Locate the Position section. In the x text field, type -0.5*flap_dist.
6
In the y text field, type -W/2+channel_w.
7
Locate the Rotation Angle section. In the Rotation text field, type 180.
Rectangle 4 (r4)
1
In the Geometry toolbar, click  Rectangle.
2
In the Settings window for Rectangle, locate the Size and Shape section.
3
In the Width text field, type 2*flap_L.
4
In the Height text field, type 0.7*flap_L.
5
Locate the Position section. In the x text field, type -0.75*flap_L-flap_dist/2.
6
In the y text field, type -W/2+channel_w-flap_L*0.7.
7
Click  Build Selected.
Copy 2 (copy2)
1
In the Geometry toolbar, click  Transforms and choose Copy.
2
Select the objects c2, pol2, and r4 only.
3
In the Settings window for Copy, locate the Displacement section.
4
In the x text field, type range(-2*flap_dist,(3*flap_dist-(-2*flap_dist))/5,3*flap_dist).
5
Click  Build Selected.
Union 1 (uni1)
1
In the Geometry toolbar, click  Booleans and Partitions and choose Union.
2
Select the object fil1(1) only.
3
Click the  Select All button in the Graphics toolbar.
4
In the Settings window for Union, click  Build Selected.
Fillet 2 (fil2)
1
In the Geometry toolbar, click  Fillet.
2
In the Settings window for Fillet, locate the Points section.
3
Find the Vertices to fillet subsection. Click to select the  Activate Selection toggle button.
4
On the object uni1, select Points 19, 32, 45, 58, 71, 84, 97, 110, 123, 136, 149, 162, and 175 only.
5
Locate the Radius section. In the Radius text field, type flap_w.
6
Click  Build Selected.
Delete Entities 1 (del1)
1
In the Model Builder window, right-click Geometry 1 and choose Delete Entities.
2
In the Settings window for Delete Entities, locate the Entities or Objects to Delete section.
3
From the Geometric entity level list, choose Domain.
4
On the object fil2, select Domains 2, 4–7, 9–12, 14–17, 19–22, 24–27, 29–32, 34–37, 39–42, 44–47, 49–52, 54–57, 59–62, and 64–67 only.
5
Click  Build All Objects.
Form Union (fin)
In the Geometry toolbar, click  Build All.