|
2
|
Add a 1D Plot Group (
|
|
1
|
Create a Cut Point 1D dataset.
|
|
2
|
Add a 1D Plot Group (
|
|
3
|
Add a Point Graph to this 1D plot group and select Cut Point 1D as the Dataset or From parent (the default) to use the same dataset as the plot group to which it belongs.
|
|
4
|
Continue to define the Point Graph as needed.
|
|
5
|
|
1
|
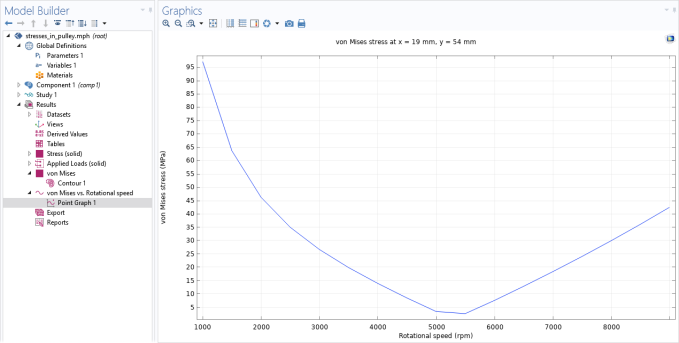
Create a Cut Point 2D dataset. Under Point Data, enter the x- and y-coordinate values for the plot. Enter the same number of space-separated values in the x and y fields. Alternatively, enter a vector of coordinates; for example, range(0,10,100).
|
|
2
|
|
3
|
Add a Point Graph and select Cut Point 2D as the Dataset or From parent to use the same dataset as the plot group to which it belongs.
|
|
-
|
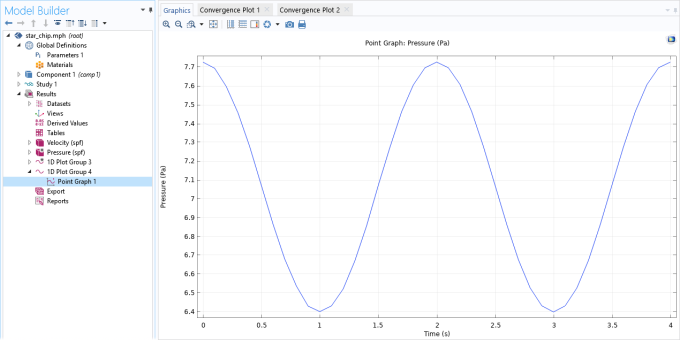
The x-axis corresponds to time, parameter values, or the eigenvalue number.
|
|
-
|
The settings in the y-axis data area determine the quantity on the y-axis. Select from predefined quantities or enter an expression that contains variables.
|
|
4
|
Continue to define the Point Graph as needed.
|
|
5
|
|
1
|
Create a Cut Point 3D dataset. Under Point Data, enter the x-, y-, and z-coordinate values for the plot. Enter the same number of space-separated values in the x, y, and z fields. Alternatively, enter a vector of coordinates; for example, range(0,10,100).
|
|
2
|
Add a 1D Plot Group (
|
|
3
|
Add a Point Graph and select Cut Point 3D as the Dataset or From parent to use the same dataset as the plot group to which it belongs. Click the Go to Source button (
|
|
-
|
The x-axis corresponds to time, parameter values, or the eigenvalue number.
|
|
-
|
The settings in the y-axis data area determine the quantity on the y-axis. Select from predefined quantities or enter an expression that contains variables.
|
|
4
|
Continue to define the Point Graph as needed.
|
|
5
|
|
|
|