Defining and Evaluating Load Cases
You define load cases in the Settings window for the Stationary study. Follow these steps to create load cases:
1
In the Model Builder under Study, in the Settings window for Stationary (), click to expand the Study Extensions section.
2
Select the Define load cases check box (see Figure 3-25).
3
In the Define load cases area, click the Add () button underneath the table to add a load case.
4
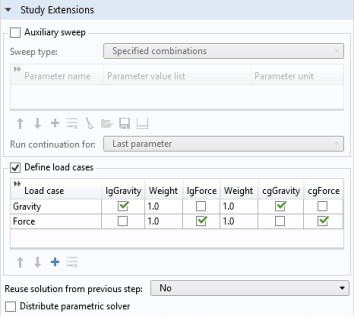
The added load case appears last in the table of load cases. Use the Move Up (), Move Down (), and Delete () buttons to rearrange the load cases in the table, and click the Add () button to add more load cases.
5
6
7
For load groups, optionally change the weight from its default value of 1.0 in the corresponding Weight column (the Weight column to the right of the load group that it affects). Use a positive value other than 1 to increase or decrease the magnitude of the load; a negative value also reverses the load’s direction.
Figure 3-25: An example of the Stationary node’s Study Extensions section. Click in the table of load cases to select or remove loads and constraints from the load case.
When you have defined all load cases, you can compute the solution. The COMSOL Multiphysics software then solves for all load cases directly. In the plot groups that are created, a Load case list in the Data section of the Settings window for Plot Group contains all load cases. To plot using the solution for a specific load case, select the load case of interest from the Load case list, and then click Plot ().
Stationary study step